
Intuit, the makers of QuickBooks, boasts of multiple features and tools that are instrumental for business owners in performing an assortment of tasks. One such tool is the GoPayment feature that can be used with QuickBooks Point of Sale (POS). This tool basically helps the users to take a debit card and get a credit card from the cell phone and other smart devices, including iPhone, Android, and iPad. With the help of this you can plug the credit card and it would make payment processing incredibly simple for the user. The latest Intuit GoPayment readers are also EMV compliant that puts the user into a position where one can charge with chip card, as well as non chip card.
If you want to know more about using GoPayment with QuickBooks Point of sale, then we suggest you to go through the article till the end. This article will cater users with detailed information on how to use GoPayment with QuickBooks Point of Sale. However, if you want to speak to QuickBooks professionals, then in that case you can make a call at our toll free number i.e. +1-888-510-9198.
You might also like: How to setup QuickBooks desktop?
What is GoPayment?
Before you unleash the procedure to use GoPayment with QuickBooks point of sale, it is sensible to first learn a little about GoPayment. Well, Intuit GoPayment lets you hold your credit cards from the mobile application using devices like iPad, Android, etc. It is by far one of the most affordable mobile payment solutions available to small and medium sized businesses. Moreover, this payment management system allow vendors to process credit card transactions via mobile app.
Make Payment from anywhere with QuickBooks point of sale
The combination of QB POS and GoPayment enables the users to keep a track of stocks and mobile income real-time. This feature isn’t a secret, but many professionals are yet to discover it and make the best out of it. And thus, it’s an opportunity to make the most of this tool, simply payment. The user can also sync the lists with GoPayment and along with QB Point of Sale, he/she can also edit and update the lists with much ease.
Facts to Know!
- QuickBooks Point of Sale Mobile Sync feature allow the user to record and update credit score card sales from office, home, or anywhere else.
- With GoPayment feature, the user can select all types of payment that also involve coins, test, experiment, key, or swipe card.
- Another fact related to this can be that QuickBooks payment consists of an unwanted GoPayment account.
- Also, Swipe charge fits well with the low QuickBooks Payment Fee.
- GoPayment works well on both iPhone and Android devices.
- QuickBooks Point of Sale syncs all sales and listing information.
- In this tool, new payments are recorded in the form of QB Point of sale sales invoices.
- Never miss out on a sale, even at the time of traveling, are at a conference, or work at a conference.
Steps to Set Up Mobile Sync at QuickBooks POS
- The very first step is to click Sign In for your Intuit Payments account in the QuickBooks POS.
- Now, hit File and setup interview options.
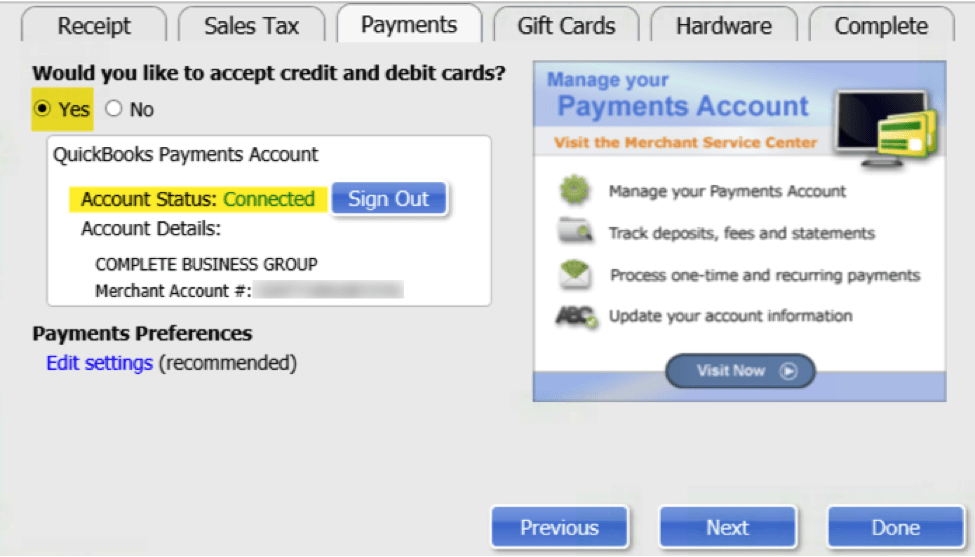
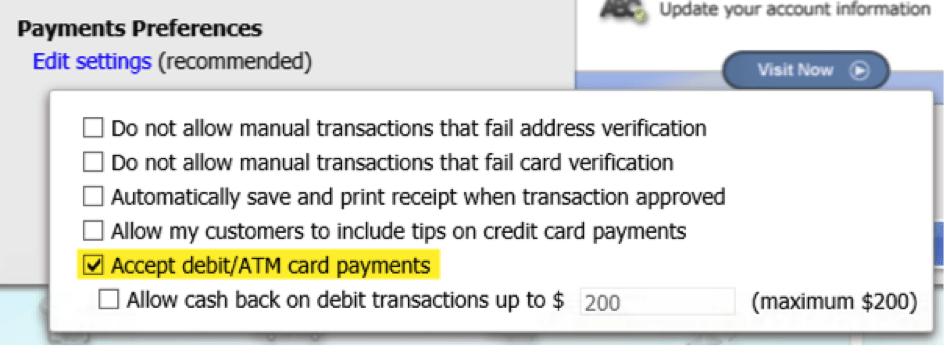
- The next step is to visit the Edit Settings tab and then select what is appropriate for the business. Suggestions will not require to be chosen manually as they are automatically decided, “we have un-selected and submitted for accepting debit cards.”
- Now, opt for QuickBooks File, Preferences, Company Preferences, and turn on mobile sync.
- Also, the mobile sync can be turned on or off, the user can increase or decrease the sync frequency.
- Select Mobile Sync:
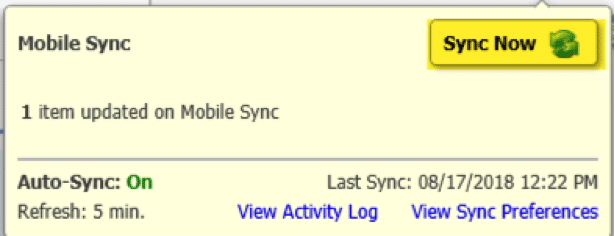
- You also have option to manually Mobile Sync by clicking the cloud icon on top right hand corner on your QuickBooks POS. It has the ability to transport multiple items/receipts at any time. The process, however, can’t be started from the mobile.
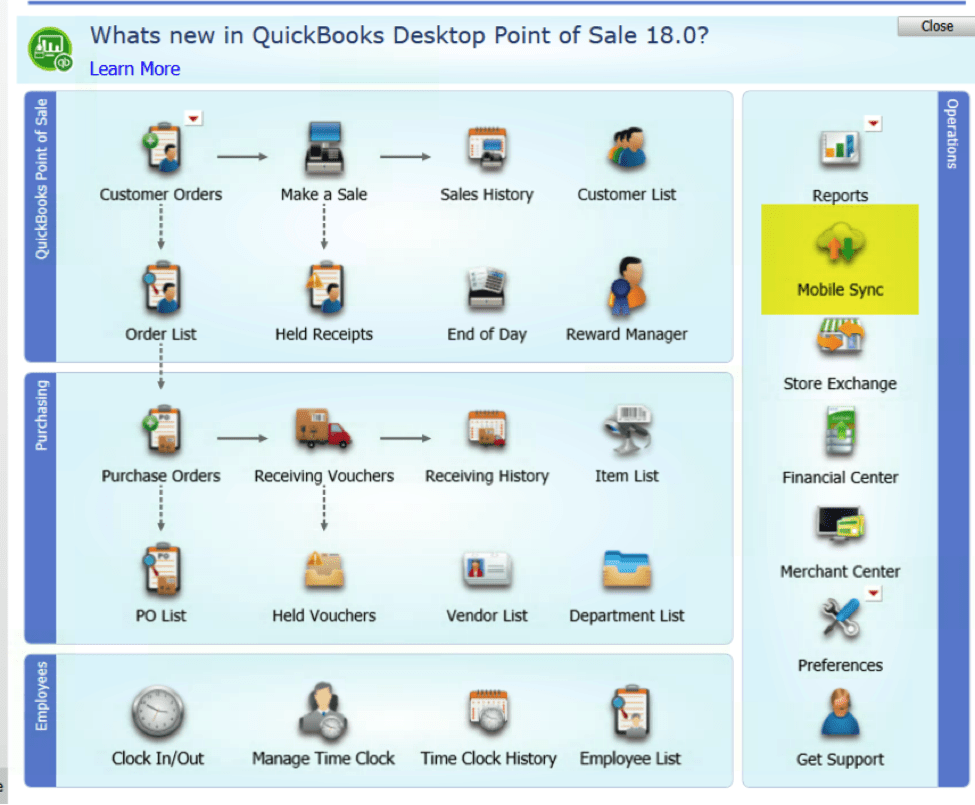
Important: You can also have the option to manually sync, which moves more items or invoices, by clicking the Cloud icon in the top right-hand edge of your Point of Sale software at any time. The sync process can not be initiated from the mobile devices.
Steps to Set Up Inventory to Sync to GoPayment
- First of all, Go to the item list and select the item you wish to sell in GoPayment.
- Click Edit in the more information widget, and then tap on Sync to Mobile checkbox.
- Click Save button.

See this also: How to Fix QuickBooks Error Code 6144 82?
Steps to Sync Departments to your Mobile Device
- Go to point of sale and click on the Inventory and then Department list.
- Click on the department tab in the Department Column and sort the name of the department.
- Edit or change the department name if needed.
- Complete the mobile sync.
Completing Mobile Sync in GoPayment
- Open the GoPayment app on Your mobile device.
- Launch the app and register for your QB Payments Account.
- Open the menu and go to Settings.
- Click sync Items under Sync settings.
Test the GoPayment Device
- Choose new payment.
- Tap on ITEMS and department to check your list.

The integration and rates in GoPayment is just fantastic.
You may also like: How to Fix QuickBooks Error Code 6177, 0?
Connect GoPayment to QuickBooks Desktop POS
The QuickBooks Desktop POS feature enables you to make income usage of your inventory in your mobile device. Currently, only QuickBooks Desktop Point of Sale 12.0 and 18.0 are equipped with this feature.
Reasons to connect your phone and tablet
QuickBooks POS Mobile Sync feature allows you to ring sales of credit cards everywhere the interior as well as your store.
- You can pay anywhere using the Intuit Payments Account and GoPayment app.
- You will be able to accept payment immediately. All you have to do is, activate your payment account and that’s it, no additional application needed.
- Your sales software is synchronized with all revenue and inventory information, so that your numbers are always correct and updated.
- This feature by default records new payments in the form of QuickBooks POS Sale receipts.
With this we come to the end of the article, and also hope that you find all the necessary details about the use of GoPayment with QuickBooks Point of Sale.
Read Also: How to Fix QuickBooks Error Code 6150?
Final Note!
In case you have any query or you need assistance in regards to any other QuickBooks related issue, you can contact our 24×7 QuickBooks point of sale support number .I.E. +1-888-510-9198. Our intuit certified experts will be more happy to help you out in every possible manner.
FAQs related to using GoPayment with QuickBooks Point of Sale
The GoPayment app usually syncs the payment with invoice in QuickBooks online on its own. The steps involved in using GoPayments are:
1. Open GoPayment app.
2. After that, click on Plus and choose invoice payment.
3. Once done with that, look for the customer or use the search field.
4. Opt for the existing invoice and tap on charge and go for a payment method.
You can easily integrate point of sale with QuickBooks account. It further minimizes the double entry and ascertains that the sales are accurately reflected in the books. Built-in integrations is something that we recommend.
Note that QuickBooks GoPayment is a free feature that can be downloaded, bu one might require QuickBooks payments to process the transaction. The QuickBooks payments service has a pricing structure depending upon the edition being used.
In order to connect your payments account with QuickBooks online, perform the steps below:
1. At first, sign in QuickBooks online using admin credentials
2. You now have to move to the settings ⚙ tab, and choose account and settings.
3. Opt for payments option.
4. Furthermore, select connect or link merchant service in the existing account section.
5. Now pick the payment account you would like to connect to and complete the onscreen instructions.
You may also like
What are the use and benefits of QuickBooks GoPayment?
How to Resolve QuickBooks Error 6176?
Step-by-step process to install and setup QuickBooks for first time

