Learn how to setup Email in QuickBooks Desktop Pro
Want to send transactions through webmail or outlook in QuickBooks? Well, QuickBooks lets you send invoices, reports, and much more by simply setting up emails. QuickBooks Desktop has many options like integrating your email with Outlook, Web-mail and QuickBooks mail. If you are currently using Google mail and you want to choose the webmail option but now cannot get it done with Google mail, this segment will help you with the process to setup Email in QuickBooks desktop.
To further explore setting up emails in QuickBooks, make sure to stick around till the end, or you can further connect with us at +1-888-510-9198, and we will assist you with the best support services related to QuickBooks. Having said that, let us further discover about setting up email in QuickBooks.
Also Read: Download QuickBooks File Doctor Tool – Install & Use
Brief into Email Services in QuickBooks
Often when you email directly from QuickBooks, it saves you time and is one of the best features so far. Setting up email service in QuickBooks is quite easy and can be done by performing certain set of steps. However, you might require the following information to set up email services successfully:
- Username and Password
- Outgoing and Incoming email addresses
- Incoming email server type
Why do You Need to Configure Email Services in QuickBooks?
Configuring email services is essential due to the following reasons:
- It sets payment reminders to all the clients via email.
- Another reason why email service is essential is that it helps in importing data from particular spreadsheets and adding attachments not more than 2MB.
- You can also send the estimates to the clients and direct email invoices with the QuickBooks email setup.
- This feature also gives details from the vendors and customers.
- And further, allow users to share reports within departments and offices conveniently
Benefits of QuickBooks email setup
- Setting up email in QuickBooks can be really beneficial. This feature boosts the overall productivity of the business and ensures making things easier.
- One can simply email invoices whenever the customer needs it using this feature
- Furthermore, it permits the user to send customers their payment reminders by emailing them invoices.
- It serves both as a storage and tracking device for client and vendor contact details.
- It further assists in importing data from spreadsheets.
- Form a list of the products that you deal with and send them to the vendors using this feature.
You may also read: How to set up, install QuickBooks desktop enterprise?
Configuration of your email service with QuickBooks desktop
You usually have various options for email integrations like Webmail, Outlook and QB Email when you work with QuickBooks Desktop products. There is a chance that some people cannot get it to work with Gmail.
QuickBooks Email Options:
There’s a chance that you will see all three options for Email in your QuickBooks Desktop preferences. Several versions of QB do not provide all three and even if you have a version which supports all three versions you might not see all the options on some particular computer installations.
- WebMail- It was introduced by QuickBooks in the year 2011 and it allows you to connect via Gmail, Yahoo email or your own web-based email service.
- Outlook- Outlook support is only there if you have already installed Microsoft Outlook on your computer. It is preferred email integration as it provides the greatest degree of control.
- QuickBooks Email- It is the least favorable. It is dependent on Intuit mail servers plus they don’t own web-based email services.
See Also: How to Fix QuickBooks Error 404?
Steps to Setup Email in QuickBooks Desktop
You can configure your QuickBooks via webmail, outlook and email to Email invoices, reports and other transactions. Make sure that your QuickBooks is compatible with your version by checking QuickBooks Desktop system requirements.
Webmail
In the updated version of QuickBooks you can work out with Secure Webmail for an easier connection to your Email service provider and reliable on your QB Desktop version and it’s only vacant for some providers.
QuickBooks 2019 and 2020: Left for Gmail, Yahoo Email, Hotmail and AOL like Mozilla Thunderbird Email Client.
Note: Supports simple text version in Mozilla.
QuickBooks 2018: Available for Gmail and Hotmail/Live clients in the US, Canada and UK.
Newer and QuickBooks 2017 R5- It is available for Gmail users in the United States.
QuickBooks 2017 R4 and older- Secure Webmail not vacant for its version.
To setup a Secure Webmail:
- Initially, select ‘Preferences‘ and then click on ‘Send Forms‘ from the QuickBooks ‘Edit‘ tab.
- Choose the ‘Webmail option‘ and then select the ‘Add button‘.
- Now, choose your provider from the drop-down list and then input your ‘email address‘.
- Make sure that ‘Enhanced Security‘ checkbox is marked.
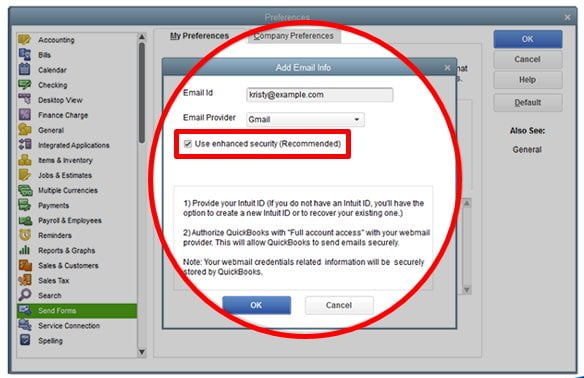
- Click on ‘OK‘ button.
- When asked, sign in to ‘Intuit Account‘.
- On the screen, you’ll see webmail provider login page.
- Sign in and then select ‘Grant Intuit Access‘.
Outlook
- Firstly, you have to ‘create a new Outlook email profile‘
- If you have Outlook accounts then move to the Next Step.
- Select the information to configure Outlook as your Email client.
- Username
- Password
- Incoming email server address
- Incoming email server type
- Outgoing email server address
Quick tip: You can contact your Internet Service Providers for the above given information.
- Set up Outlook in QuickBooks.
Quick Tip: Want to see Outlook is missing in QB Desktop Send Form preferences if Outlook is unavailable in your QuickBooks.
- Select Preference and then select Send Forms from the QuickBooks Edit menu.
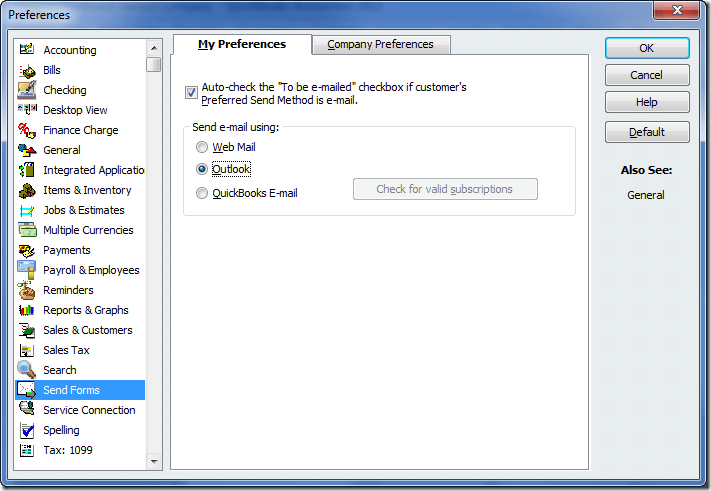
- Choose Outlook and click Ok button.
See Also: Integration of QuickBooks PayPal with QuickBooks online (QBO)
Connect with Regular Webmail:
If you are working on QuickBooks Desktop in the US:
| ISP (Internet Service Provider) | SMTP Server | SMTP Port |
| 1AND1.com | smtp.1and1.com | 587 (SSL enabled, with password) |
| ADELPHIA | mail.adelphia.net | 110 |
| AOL | smtp.aol.com | 465 or 587* (SSL enabled for incoming and outgoing mail server) |
| BELL SOUTH | mail.bellsouth.net | 110 |
| COMCAST | smtp.comcast.net | 587 |
| COMPUSERV | smtp.compuserve.com smtp.aol.com | 110 or 587 |
| COX Business | smarthost.coxmail.com | 25 |
| COX CENTRAL | smtp.central.cox.net | 25 |
| COX EAST | smtp.east.cox.net | 25 |
| COX WEST | smtp.west.cox.net | 25 |
| EARTHLINK | smtpauth.earthlink.net | 25 (with password) |
| GODADDY | smtpout.secureserver.net | 80 |
| LYCOS | smtp.mail.lycos.com | 25 |
| MICROSOFT OUTLOOK 365 | outlook.office365.com | 587 (SSL enabled) |
| NETSCAPE | smtp.isp.netscape.com | 25 (SSL enabled) |
| PRODIGY | smtp.prodigy.net | 25 (SSL enabled) |
| ROADRUNNER | smtp-server.sc.rr.com | 587 |
| SPRINT PCS | smtp.sprintpcs.com | 25 |
| VERIZON | outgoing.verizon.net | 465 |
| VERIZON YAHOO | outgoing.yahoo.verizon.net | 465 |
You may also like: How to Fix QuickBooks Error 6000 77?
If you are working on QuickBooks Desktop in Canada:
| ISP (Internet Service Provider) | SMTP Server | SMTP Port |
| MICROSOFT OUTLOOK 365 | outlook.office365.com | 587 (SSL enabled) |
| BELL MAIL | smtphm.sympatico.ca | 25 (or 587 if port 25 does not work) |
| BELLNET | smtpa.bellnet.ca | 25 |
| CLUB INTERNET | smtp.club-internet.fr | 25 |
| COGECO | smtp.cogeco.ca | 465 |
| COMCAST | smtp.comcast.net | 465 |
| EARTHLINK | smtpauth.earthlink.net | 587 |
| GMAIL | smtp.gmail.com | 587 |
| HOTMAIL | smtp.live.com | 587 |
| LAPOSTE | smtp.lineone.net | 25 |
| smtp.aol.com | 587 | |
| MSN | smtp.live.com | 25 |
| MTS | smtp.mts.net | 25 |
| NETSCAPE | smtp.isp.netscape.com | 25 |
| NETZERO | smtp.netzero.com | 25 |
| NEUF | smtp.neuf.fr | 25 |
| ROGERS | smtp.broadband.rogers.com | 25 |
| SASKTEL | mail.sasktel.net | 25 |
| SHAW | shawmail.cg.shawcable.net | 25 |
| SKYNET | smtp.skynet.be | 25 |
| SYMPATICO | smtphm.sympatico.ca | 25 |
| TELUS | smtp.telus.net | 25 |
| VIDEOTRON | relais.videotron.ca | 25 |
| YAHOO | smtp.mail.yahoo.com | 465 |
You may also like: Troubleshoot Most Common Errors of QuickBooks Pro
Setup a regular Webmail:
ISP obeys the Webmail servers. QuickBooks automatically select out the information for the many common service providers, like Gmail, Yahoo and Hotmail etc.
- Select Preferences and then select Send Forms from the Edit menu in QuickBooks.
- Select Webmail and then choose Add button.
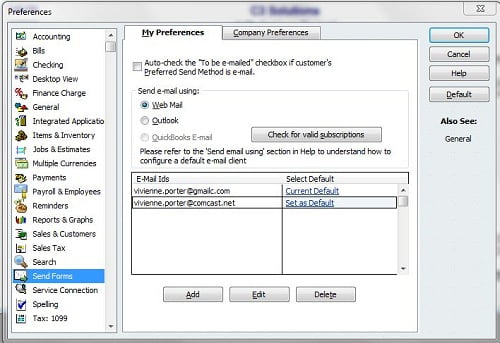
- Choose your provider from the drop-down list and then input your email address.
- Click on OK button.
Read Also: How to Fix QuickBooks Error 6129, 0?
Important things to Remember:
- QuickBooks Desktop will ask you to enter your webmail password the first time you send an email using regular webmail unlike with Secure Webmail.
- If you have issues in open account by password in QuickBooks Desktop and note that webmail providers require the user to confirm configuration for two-step verification.
- Fox Cox user: When we send email, the standard SMTP setting of Cox then uses SSL or login information. QuickBooks needs login credentials and prefers SSL connections and hence, use port 25. Use SSL with such alternatives port 587 or 465.
- For CableOne users: Make use of these credentials as CableOne uses Google servers.
- Email Address: Your Email
- Email Provider: Gmail
- Port: 587 or 465
- SSL: Yes
You may also like: How to Fix QuickBooks Error 6000 304?
Conclusion
We hope that with the help of these above-mentioned steps you have now successfully setup Email in QuickBooks Pro version. However, these steps are a bit confusing and consume a lot of time to follow.
In case you are facing any kind of difficulties or unable to do the specific task or you have any other QuickBooks related issues then no need to worry. Please feel free to get in contact with our QuickBooks customer support team at +1-888-510-9198, to share your concerns with one of our Intuit certified ProAdvisor to get 24/7 help.
Frequently Asked Questions (FAQs)
The information required to set up the service includes email address, username, and password, details of the server along with incoming and outgoing email settings, and a few other things mentioned in our blog in detail.
The user can set up office 365 in QuickBooks using the steps below:
1. Head to QuickBooks and then select Preferences
2. Choose the icon of email
3. Send emails using by selecting Custom
4. A list of Email Accounts will appear on the screen
5. This list will only be full if you have entered any email accounts and in case you haven’t then the list will be empty
6. In order to add a new account choose the + icon
7. Also, add an account name, then from your email provider add the settings
8. To add any other account repeat the same steps for any other accounts too.
The feature named Scheduled Reports is available in QuickBooks which helps in emailing reports on a daily and recurring scheduled time.
This can be done by performing the steps which include:
1. At first, press Windows + R keys simultaneously
2. Now, the run command will open on your screen.
3. The user should now enter control panel there
4. When the control panel will open, head to Programs and Features
5. Select QuickBooks and click on Uninstall/Change
6. Also, click on continue and then on Next
7. The next step is to choose Repair and then click Next
8. Hit ok once done
Read Also:
How to Fix QuickBooks Desktop Update Errors?

