QuickBooks is the world’s most used and sought-after accounting software. This software is mostly used by the small and medium sized business. To start using it, one needs to set it up on the system for which some steps need to be followed. In this post we will discuss about setup quickbooks desktop first time.
Steps to Setup QuickBooks desktop first time
Steps to setup quickbooks desktop first time are given below:
Step 1: Register for QuickBooks desktop
You can register for the QuickBooks desktop is just one minute or even less than that. You can choose any of the QuickBooks package after taking a free trial.
The QuickBooks packages or subscription are:
- Simple Start Plan- $5/month: With this, you can create invoices, get estimates and download your bank transactions.
- Essentials Plan- $10/month: It gives you access that are offered in Simple Start plan along with the access to manage and pay bills and offers multi-user support.
- Plus Plan- $21/month: This plan comes with all essential features, and the access to track inventory, prepare and print 1099’s.
All these features are available on free access for duration of 30 days. You just need to enter your personal details, and you will be able to take benefit of the free online trial.
To use QuickBooks Online, you would need to use a compatible browser which includes. (Chrome, Safari 6.1, Firefox, and Internet Explorer 10 or higher). Once you sign up for the trail, you can login to the QuickBooks and get access to QuickBooks Dashboard.
You may also see: How to Upgrade QuickBooks Software?
Step 2: Customize your Company Preferences and the Account Settings
- You can display a to do List on the QuickBooks Dashboard. After logging in for the very first time, you will find a number of tutorials that help you setup different parts of your new account. After this, you should set your company preferences that will help you move forward with the QuickBooks.
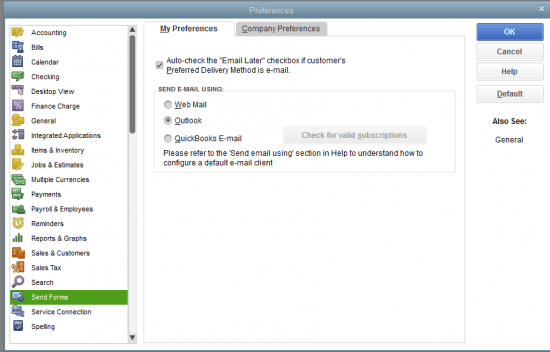
- On the top menu, click on the ‘Company tab‘ and select “Preferences“. Fill or ‘Edit your company’s contact details‘ and changes the account settings in the way you like. These settings may include invoice automation, credit card payments, and time tracking and payroll.
However, if you do not want to change these settings, the version will not pressurize or force you to do so.
Step 3: Import Business Data to QuickBooks desktop first time Setup
This new QuickBooks version allows you to import the data without any hassle. You would not be required to do manual transfers or setups. This software will helps you import data, do transactions from bank accounts, customer data from Excel, and your Excel chart of accounts.
To do all these things, you would be required to click on the ‘Company tab‘ and select ‘More‘ and ‘Import Data‘ from the drop-down menu.
- You will get various options to upload the file and you can choose the one as per your preference. Moreover, uploading your customer or vendor list is quite easy with this new software. Just match each field with your QuickBooks field ensuring no error in the list, you can go ahead.
- Some of the business data you can import to QuickBooks include customer or vendor data, products & services from excel, chart of accounts from Excel, transactions from your bank, and QuickBooks desktop company data. You may also experience few types of errors while importing but that can be easily troubleshooted.
- During this process, you may sense that QuickBooks makes you over-categorize some of the businesses but that is going to help you in keeping your business more organized.
You may also like: How to Fix QuickBooks Error 6129, 0?
Step 4: Sync QuickBooks with your Bank Accounts
- First of all, click on the ‘Banking tab‘ on the top of the screen and it will automatically connect QuickBooks with your bank account. Then, click on ‘Download Transactions’.
- After that, a pop-up window will appear where you need to fill your ‘Bank details‘ that you want to sync with the software.
- Next, a pop-up window will appear where you need to ‘Fill your bank details‘ that you want to sync with the software. You can use your online banking ‘username and password‘. After few minutes, your account will be synced with the software and all your bank transactions will be imported to the software.
- Finally you can attach your ‘Customer and vendor names‘ to each of the transactions. This attachment or organized data will help you keep track of the credit and debit info.
Step 5: Sync your Business credit cards
- After bank account, it’s time to ‘sync your credit card accounts‘ as well. Once you ‘Sync your credit card accounts‘, ensure that your credit card information is shown in QuickBooks. This will ensure that you do not record your data manually.
- If you wish to sync your credit cards, click on the ‘Banking tab‘ on the top menu bar, select ‘More‘ and then ‘Register’ from the drop down menu. Type your bank account details and choose the ‘Credit Card Option‘ in the pop-up that appears. As you click, QuickBooks will launch a credit card setup wizard that will help you sync your cards in just few steps.
Read Also: How to Fix QuickBooks Error 6190 and 816?
Step 6: Customize your Invoices with Company Banking
- Not to mention, a good business has always good looking and well-maintained invoices by which the customers get impressed easily. This can be done only by ‘Customizing QuickBooks invoice‘ with the company logo and branding.
- As a user, you would be glad to know that QuickBooks supports ‘customizable invoices‘ and is also quite happy to do so. You can change ‘style, color, font, layout, and size‘. But this need to be kept in mind that complete invoice customization is only available to the users who are the ‘QuickBooks Plus subscribers‘.
- Click on the ‘Customers tab‘ to access the customization menu, select ‘Create Invoices‘. Choose your desired invoice template from the drop-down list and make your own. You can also do further changes to the invoice by click on the ‘Formatting tab‘ and then click on ‘Customize Date Layout‘.
- Customize the design and the layout. Look for the ‘Use Logo Checkbox‘ and see if your logo looks nice and does not get cropped while you use it in the invoice.
Step 7: Import your contacts to QuickBooks
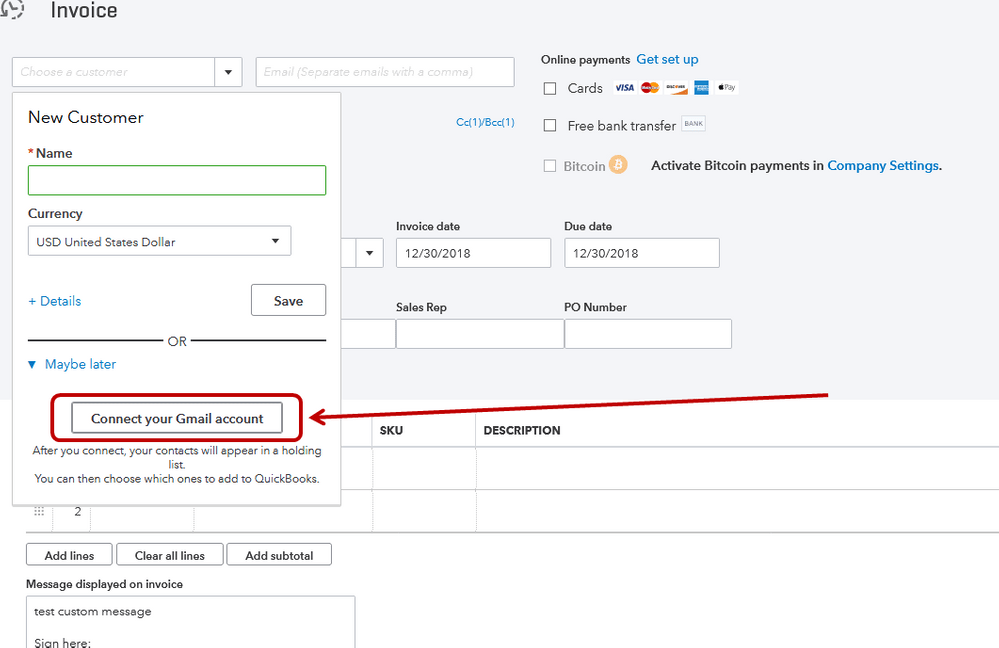
- Making it easy to import the contacts, QuickBooks ensures that you are ready-to-do for everything.
- Click on ‘Company > More> Import Data‘ and then select ‘Customers or Vendors‘ (It depends on whose data you want to import).
- The data of ‘Customer and vendor‘ can be uploaded in the form of an ‘Excel or CSV file‘. Once the file is imported, QuickBooks will automatically extract data.
- But while copying the data, QuickBooks do some errors. Once you have filled all the data correctly, you can ‘Continue and review‘ the data.
Tips for the First time QuickBooks Desktop users
If you are setup quickbooks desktop first time, then you should make sure that while using certain tools, you need to follow some tips:
Avoid using invoices and estimates:
As a first time user, you should avoid using invoices and estimates on QuickBooks until and unless you are completely familiar with the software. All the accounting activities are posted automatically when you use these functions. Once you know how the amounts are generated on QuickBooks, you can start using in-built invoices and estimates that will help you make your business QuickBooks account highly accurate.
Separate Business
However, it is a great thing that QuickBooks allows a user to sync the accounts with software but it is recommended to keep your business bank account separate and it should not include any personal transactions.
Let Host Docket to help you
On the basis of your ‘ZIP code‘ or ‘postal code‘, QuickBooks helps you find out the nearby QuickBooks professionals who are certified who can help you with problems related to the software.
Connect QuickBooks with Payroll Software
Calculating payroll manually is now a difficult task and QuickBooks is the most popular software that can help you do payroll quickly and accurately. You can sync payroll software programs with QuickBooks. This will also help you stay updated with the latest tax laws and other changes.
Final Note!
By following all the above mentioned steps and tips, you can become a QuickBooks master in no time and easily able to setup QuickBooks desktop first time. If you have any questions or queries please ask it directly to our experts at +1-888-510-9198. Our QuickBooks Support executives will help you to install, update or troubleshooting of your QuickBooks software in no time.
You may also like these topics
Steps to Register or Activate QuickBooks Desktop
How to Set Up a New Company File in QuickBooks desktop?
Resolve QuickBooks Online Not Working with Chrome
Some FAQs Related to QuickBooks Desktop first time Setup
To set up QuickBooks Desktop for the first time, follow these steps:
Install QuickBooks Desktop on your computer
Create a company file and select the type of company you want to set up
Enter your company information, including your company name, address, and tax ID number
Set up your chart of accounts and add any additional accounts as necessary
Enter your opening balances for each account
Set up your products and services list
Set up sales tax and track expenses
Before setting up QuickBooks Desktop, you’ll need the following:
A computer with a supported operating system
A valid QuickBooks Desktop license
Your company information, including your company name, address, tax ID number, and chart of accounts
Your bank account information to set up online banking
Information about your products and services, sales tax, and expenses
If you need help with the setup process, you can call our toll-free number +1-888-510-9198 for assistance.
To create a company file in QuickBooks Desktop, follow these steps:
Open QuickBooks Desktop and click on “File” and then “New Company”
Select the type of company you want to set up
Enter your company information, including your company name, address, and tax ID number
Set up your chart of accounts and add any additional accounts as necessary
Enter your opening balances for each account
To set up your chart of accounts in QuickBooks Desktop, follow these steps:
Go to “Lists” and then “Chart of Accounts”
Click on “New Account” to add a new account to your chart of accounts
Select the type of account you want to add, such as a bank account, credit card account, or expense account
Enter the account information and click “Save & Close”
To enter your opening balances in QuickBooks Desktop, follow these steps:
Go to “Lists” and then “Chart of Accounts”
Double-click on the account you want to enter an opening balance for
Enter the opening balance in the “Opening Balance” field
Save your changes by clicking “Save & Close”
If you encounter any issues while setting up QuickBooks Desktop, you can call our toll-free number +1-888-510-9198 for assistance.

