
Experiencing QuickBooks error code 12002 and can’t find the right way to rectify it? Well, to help you out in tackling such an error in QuickBooks, here we are with a comprehensive guide sharing the complete details. Talking about QuickBooks error code 12002, it is an error that usually occurs due to network timeout, slow internet connection, or any other internet connectivity issue preventing QuickBooks from connecting to the internet. To learn what fixes this error in QuickBooks, make sure to stick around this piece of writing till the end. Or you can further dial our technical support number i.e., +1-888-510-9198, and our certified QuickBooks ProAdvisors will answer your queries immediately.
Have you checked the latest QB update: QuickBooks Desktop 2024 Download, Pricing, and Features- Click to know more!!
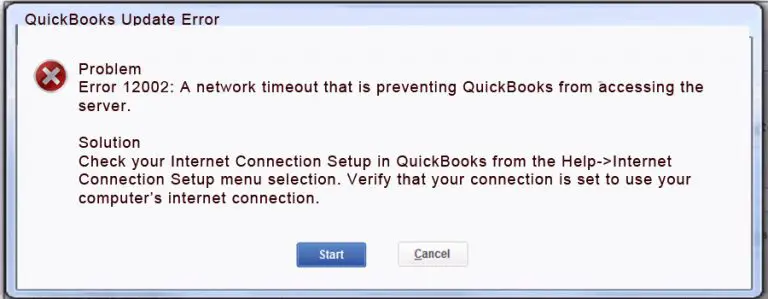
What is QuickBooks error code 12002?
QuickBooks error code 12002 occurs when the QuickBooks software is unable to access the internet connection. At times due to some basic reasons, QuickBooks is unable to connect to the internet, which can further cause issues while updating the software. This can be due to incorrect browser and security settings, or an application like an antivirus or firewall program interfering with the update. There are a few other reasons behind the occurrence of such errors, we have tried to elaborate on them later. Here is what error message you see when error 12002 in QuickBooks occurs.
“A network timeout that is preventing QuickBooks from accessing the server”
What triggers the QuickBooks error code 12002?
Certain factors might trigger such an error, of which the common ones are stated below:
- In case the QuickBooks software is unable to access the server as there is a network timeout
- Moreover, if the internet connection is poor
- The user can also experience a similar issue if the SSL setting is incorrect
- Or if the internet security or firewall is leading to some or the other issue
- Moreover, if the internet explorer isn’t set as default, then experiencing such an error is probable
Important steps before troubleshooting 12002
Before you proceed with the steps to eliminate the QuickBooks error code 12002, it is essential to perform the steps listed below:
Step 1: Create a Company File Backup
It is important to back up the company file before performing any necessary set of steps to get rid of the issue.
- The very first step is to open QuickBooks on the system.
- After that, head to the file menu and select the backup company file option.
- The user will then have to make a local backup of the data.
- And then, perform the onscreen instructions to create a company file backup.
Step 2: Update your QuickBooks Desktop
- The user is also suggested to update the software by heading to the help menu.
- After that select update QuickBooks option.
- Now, select Update Now tab.
- And then, click on get updates and wait for the process to conclude.
- It may take a while to Sync with the server and show all the available updates.
- After that, click on Update Now to update all the updates.
See Also: QuickBooks Error Code 80029c4a? (Error Loading Type Library/DLL)
Methods to fix QuickBooks error 12002
Here are a few quick methods that can be performed to eliminate QuickBooks error code 12002 successfully.
Method 1: Verify the Internet Explorer Settings
- The user needs to first close QuickBooks and open Internet Explorer.
- And then choose the Tools and then select the Internet Option.
- After that, select the Security Setting and ensure that the security setting is set to Medium High.
- The next step is to click on the Globe icon and then choose the Content tab.
- After that ensure that the content advisor tab is enabled
- Moreover, click on the connection tab and perform the steps ahead:
- The user needs to choose Never a Dial connection.
- Also, ascertain that you choose the right ISP and hit ok tab
- Select the LAN setting tab
- Also, verify if the automatically detected settings checkbox is enabled
- Now, check if the use of a proxy server is disabled
- In case, you come across port 80 uncheck the box.
- Now, hit ok tab
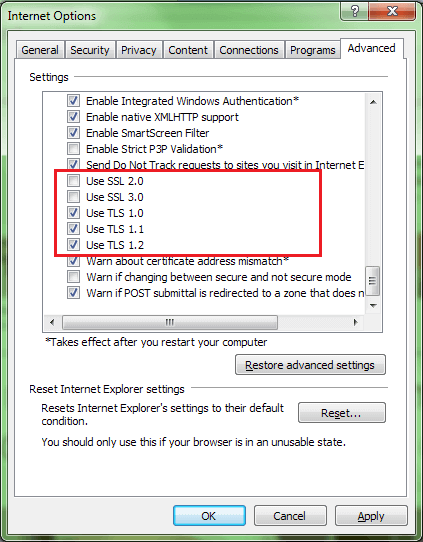
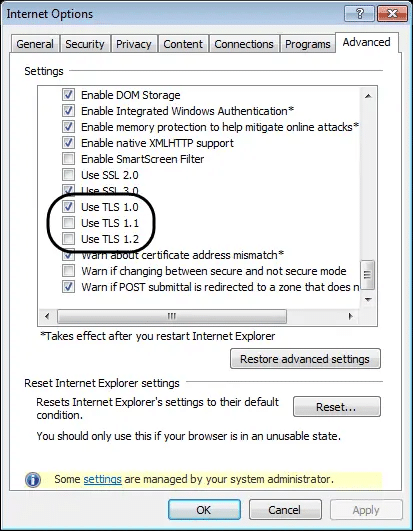
- Go for the Advanced Tab:
- Click on the Restore Advanced Setting option.
- Look for Use TLS 1.0, Use TLS 1.1, and Use TLS 1.2 options.
- Ensure that the Use TLS 1.0 is checked and the other two are unchecked.
- Close the Internet Option and then click on OK button.
- Shut down the Internet Explorer and restart the system.
- The next step is to open QuickBooks and update it again.
Method 2: Install/Uninstall QuickBooks in Selective Startup Mode
Hopefully have already created a backup of the data. Keep your QuickBooks desktop license and product details before you continue with the steps below:
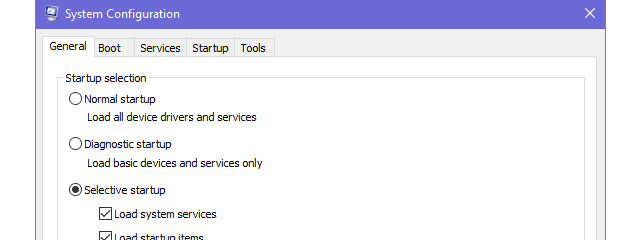
Step 1: Start the System in Selective startup mode
You can stop all the applications from restricting your repair process. It is suggested to switch to selective startup mode.
- The user needs to first press the Windows and R tab to open the run command box on the bottom left of the system screen
- Then type msconfig and choose the ok tab
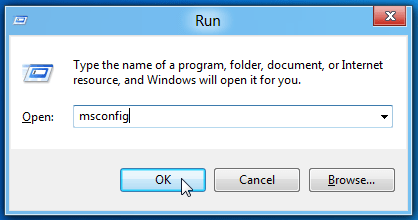
- Once done with that hit Windows + R and open the run command
- Enter in msconfig and hit the ok tab
- Also, head to the general tab and choose selective startup and load system services
- Click on the services tab and choose Hide all Microsoft services
- Choose disable all option
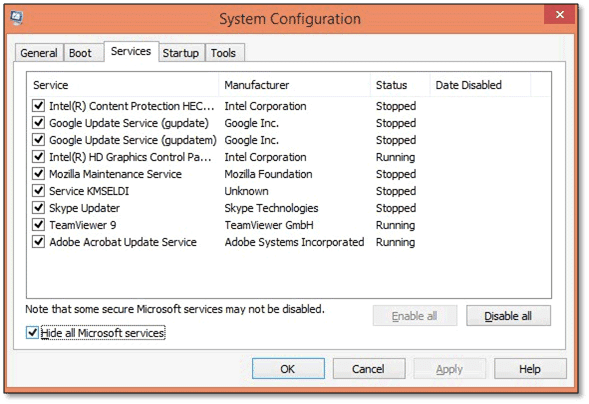
- Uncheck the checkbox for Hide all Microsoft services.
- The user should check and ensure that the Windows Installer checkbox is selected from the list of services
- Hit ok tab
- And then choose the reboot option on the system configuration window
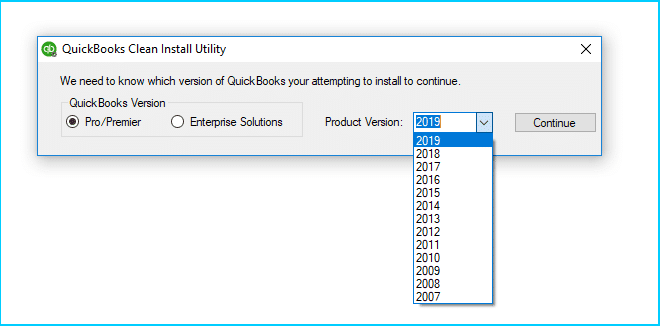
Step 2: Uninstall or Install QuickBooks Desktop
The user should then choose clean install QuickBooks Desktop.
Step 3: Switch back to Normal startup mode
- Once the user has uninstalled and installed QuickBooks, restoring your system to its normal configuration is recommended.
- After that press windows + R to open the run command
- And also enter in msconfig and ok tabs
- You need to choose the general tab and click Normal Startup.
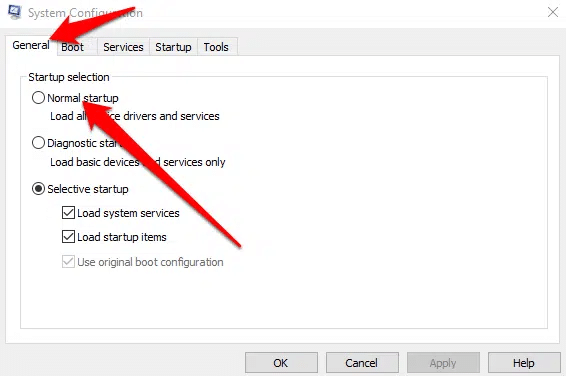
- Now, select ok tab
- Also, go for the restart tab on the system configuration window
You may also read: Fix QuickBooks Error Code 6189 and 816
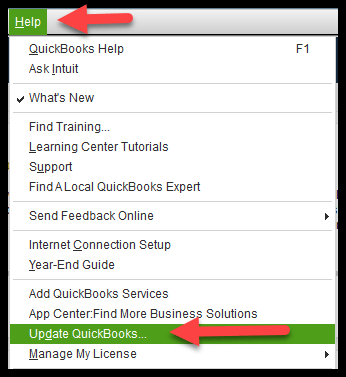
Method 3: Set Up an Internet Connection
- The user should first go to QuickBooks and then go to Help and check the Internet Connection Set up.
- Now, click on the internet connection setup
- Click on the next and done tabs respectively

- The last step is to update the application and check if the issue resolved
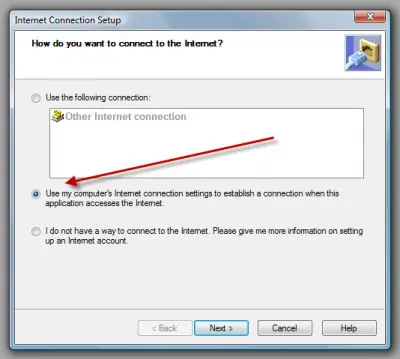
Method 4: Verify the Internet Connection
- Under this method, the user should choose the Help option and then click on the Internet Connection Setup.
- After that select Use my computer’s internet connection settings to establish a connection when this application accesses the internet
- After that update it again
- For QuickBooks 2008 and more recent versions: select the Help option click on Update QuickBooks and then on Update the Now tab.
- For QuickBooks 2006 and older versions: Go for File and Click on Update QuickBooks and then on the Update Now tab.
Method 5: Update QuickBooks desktop
- At first, the user needs to head to the help option and choose an internet connection setup.
- After that, make use of the internet connection settings of my system to establish a connection when this application accesses the internet.
- Go for the next tab
- After that update the QuickBooks again with the steps below:
- The user should select the file tab and then the update tab.
- Go for the Update Now tab for QuickBooks 2006 and earlier versions.
- Now, choose the file and update tab.
- Go for the Update Now tab for QuickBooks 2008 and the later versions.
Read this also: How to Fix QuickBooks Error Code 6150
Method 6: Reset Update settings in Internet options
- The user should first click on the Update Now tab.
- The next step is to select the Reset Update Checkbox.
- Now, hit the get updates tab and if the updates fail, then the user can continue with the steps below:
- At first, one has to click on the advanced settings tab.
- After that look for the Use TLS 1.0, USE TLS 1.1, and Use TLS 1.2 options.
- Also, ascertain that the Use TLS 1.0 is checked and the other two are unchecked.
- This would reset the update settings in the internet options fixing the issue up to a certain extent
Method 7: Update your Chrome browser
Installing the latest version of Chrome can help in fixing the issue up to a certain extent, as often an outdated Chrome browser can trigger issues in QuickBooks. The steps involved in fixing such errors are as follows:
- The very first step is to open the Chrome browser on the system.
- After that, click on the More tab.
- The user is required to select the updated Google Chrome.
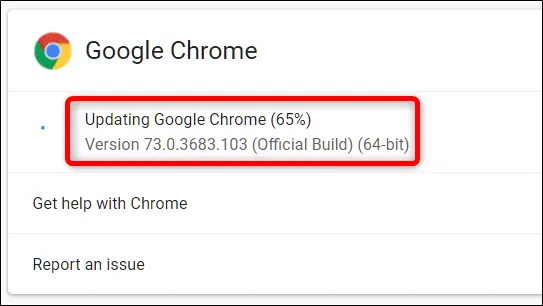
- Once done with that wait for a while to update the browser.
- After the process is over, click on relaunch. If the user is unable to find the update option, then it indicates that he/she is using the latest version of Chrome.
Do check this out: QuickBooks Direct Deposit Form
Conclusion!
Now that you know what it takes to get rid of the QuickBooks error code 12002, it is time to implement these steps carefully and check if the error gets resolved or not. However, if for some reason the user continues to end up in a similar issue again and again, then in that scenario, talking to our QuickBooks Support professional at +1-888-510-9198 is suggested. We are a team of technically sound experts who work round the clock to provide you with immediate tech assistance.
FAQs
Here is the list of 12000 series error codes that users experience:
· QuickBooks Error 12007
· QuickBooks Error 12031
· QuickBooks Error 12152
· Error 12002
· Error Code 12009
· Error 12029
· Error Code 12057
· Error 12157
To repair the company file using the rebuild data tool, the below set of steps will help:
1. The first step is to open the file menu.
2. Click on the utilities and choose the rebuilt data.
3. Go for the OK tab on the QuickBooks information window.
4. Search for the tool to repair your file.
5. Choose the OK tab.
6. Head to the file menu from the top of the screen.
7. Go for the tool in order to check your file for data issues.
Carry out the below steps to reset QuickBooks.
· The very first step is to head to the help menu in QuickBooks.
· After that, select the search tab and click on contact us option.
· Sign in to your QuickBooks online account with your admin log in ID and Password.
· Now, confirm the action by clicking on the yes button.
· Choose the wipe data option from the next page.
See More Helpful topics Here

