Comprehensive Guide to merge Vendors in QuickBooks
QuickBooks accounting software is packed with features and functionalities loved by entrepreneurs all across the globe. This software comes with manifold constructive features, and one such feature is allowing the users to merge vendors. As per the latest feature of QuickBooks, the user can merge up to four vendors at a time with much ease.
We have come up with this blog with an aim to answer some of the most commonly asked questions such as: Can I merge Vendors in QuickBooks? How many vendors can be merged in QuickBooks? How to merge vendors in QuickBooks Online? What do you mean by merging vendors in QuickBooks? If you are also having any such query, then stay tuned with the article and clear all your clouds of confusion. However, for expert assistance, you can also reach out to our QuickBooks support team by dialing our toll-free number .i.e. +1-888-510-9198.
Read also: Use Undeposited funds account to receive payments in QBO
Merging Vendors in QuickBooks
Many QuickBooks users doubt whether it is possible to merge vendors or not. Well, it is very much possible to merge vendors in QuickBooks. The process of merging vendors permits the users to consolidate all the transactions. The best part is that the users are not required to enter the transactions over and over again, one after the other. The merging process basically deletes one vendor and at the same time, reassigns the entire relevant data to the other vendor. You cannot make any changes after performing the above steps. This means that everything is permanent, from deletion of one vendor to transfer of the data to another.
Points to remember before beginning with the merging procedure
Well, before you begin with the merging procedure, it is better to update yourself with certain pointers that you should definitely keep in mind. To make it easier for you, we have jotted down a few of them:
- The very first thing that you can’t afford to miss is taking a secure backup of QuickBooks company file. Avoiding this might end up in data loss at large.
- Always ensure that you are in single-user mode, and if by any chance you are using the multi-user mode, then don’t think much simply switch to the single-user mode.
- The next point that requires your attention is to turn off the Multi-currency feature.
- Ensure that he/she is not merging paid through online banking vendors, tax authorities vendors, and also the direct deposit vendors.
- Another matter to be considered is that the merging process can’t be reversed once performed. Thus, double-check before merging the vendors and ensure that you are merging the accounts that really need to be merged.
See Also: How to Check QuickBooks Product Version and Release?
Why do you need to merge vendors in QuickBooks Desktop?
Merging vendors in QuickBooks gives an extra edge to business, as it resolves the issue of duplicacy. When you merge vendors in QuickBooks, it simply lets you combine transactions. The users need not to add the transactions, again and again, one after one. Merging vendors means that you delete a vendor and at the same time, assign the entire data that is relevant to other vendors. After all the steps are done, the process cannot be reversed. This indicates that the merger process is permanent same as the deletion of one vendor’s data.
Merge Vendors in QuickBooks Desktop
You can avail of QuickBooks merge vendors feature using the steps below.
- Initially, in your QuickBooks account, head to the Vendor Center and choose vendors.
- After that note the vendor that you want to merge.
- The next step is to find the vendor that needs merging and also right-click on it.
- The user will then have to choose the edit tab and add the name of the vendor with whom you wish to merge it.
- The last step is to choose the ok tab and then after the confirmation screen shows up, choose the Yes tab.
Merging Vendors in QuickBooks Desktop 2019
The process of merging vendors in QuickBooks varies from version to version of QuickBooks. The below-enumerated steps are for the merging vendors in QuickBooks Desktop 2019:
- To begin with, access the merge vendors window
- There can be two alternatives, one for the QuickBooks Desktop Accountant Edition: In this, the user has to visit the Accountant menu and then select the Client Data Review, followed by visiting the Merge Vendors option
- For QuickBooks Desktop Enterprise, the user has to visit the company menu and then select the Accounting tools, followed by visiting the merge vendors option.
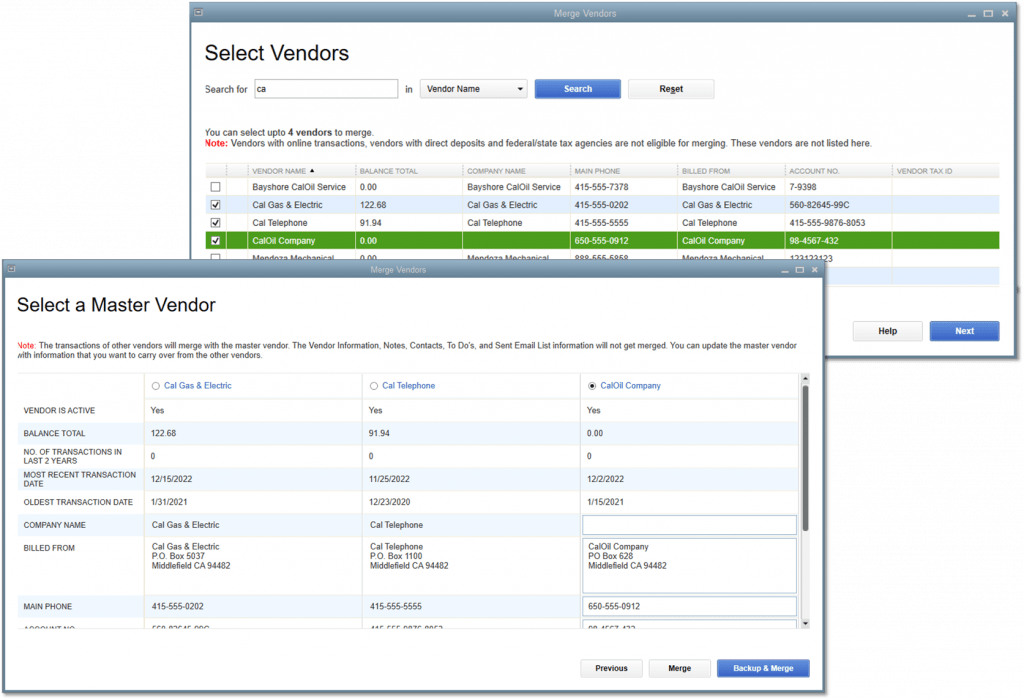
- Moving ahead, in the merge vendors window, select the vendors to be merged, and then tap on the Next option.
- Now, select the Master Vendor option and then click on the Merge option
- The last step is, on the confirmation prompt Yes, on the Merge Complete Window, the user is required to select the OK option.
Read also: Integration of PayPal with QuickBooks Online
Merging vendors in QuickBooks Desktop 2018 and below
- The very first step is to select the Vendors menu and then opt for the Vendor Center.
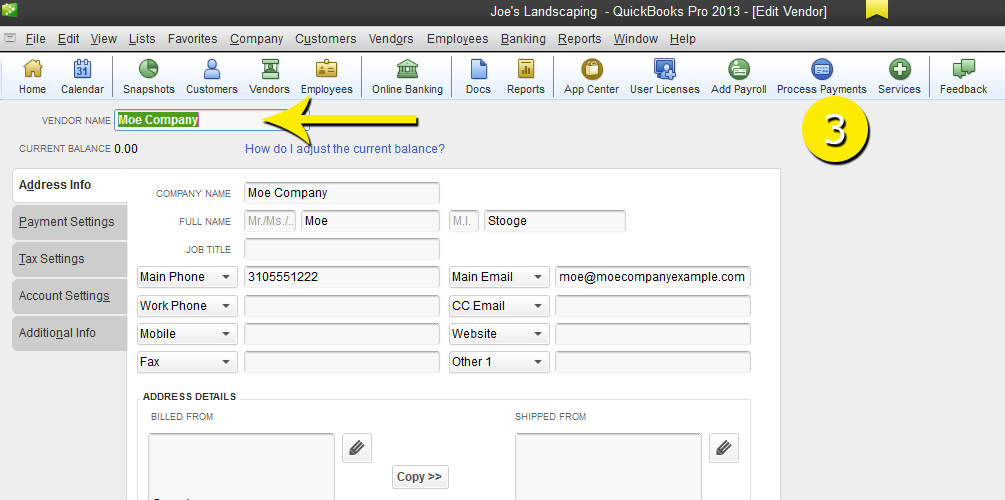
- Moving ahead, right-click on the Vendor’s name to keep, followed by selecting Edit Vendor.
- Now, the next step is to copy the vendor’s name.
- After that, tap on the Cancel option to return to the vendor center.
- After following the above steps, right-click on the vendor’s name to merge. And further, choose the Edit Vendor.
- In the next step, the user needs to replace the vendor name with one copied.
- After that choose the OK option.
- The last step is to tap on the Yes option, at the time when a prompt is displayed to proceed to merge.
With this, we come to the end of this article, with the hope that this article might be helpful to you in any manner. By following the above-scribbled steps, the user can easily merge vendors in QuickBooks.
Use the Merge Vendors tool in Accountant and Enterprise Editions
- In the QuickBooks desktop accountant edition, you need to first go to the accountant menu.
- After that, choose client data review, and further click on merge vendors.
- For QuickBooks desktop enterprise, move to the company menu, choose accounting tools, and then merge vendors.
- Once done with that, choose the vendors you want to merge and choose the next tab.
- The next step is to choose a primary vendor and click on merge.
- The last step is to choose yes to merge the vendors and further hit the ok tab.
You may also like: How to Fix QuickBooks Error 6000, 301?
Winding Up!
However, if you are finding difficulty in merging vendors, even after following the above steps, then all you need to do is dial our toll-free number .i.e. +1-888-510-9198. And our QuickBooks accounting and bookkeeping experts and highly qualified professionals will be there to assist you in a single call. Do not hesitate to call our technicians anytime, as they remain active round the clock to provide the best possible services to our clients.
FAQs Related to Merge Vendors in QuickBooks
In order to merge duplicate clients, you need to sign in to QuickBooks online accountant as an admin. You further needs to choose the gear icon and merge duplicate clients. And choose get started.
Yes, you can merge two accounts in QuickBooks online by simply selecting the accounts that you want to merge. And further specify which account you want to keep and which account you wish to delete.
QuickBooks makes use of some accounts as the default for certain features. These, like accounts connected to online banking, cannot be merged or deleted. In case you are merging accounts that have reconciliation reports, then save those reports first. The account being merged may not keep the reconciliation history.
Just in case you have duplicate accounts, customers, or vendors, you can simply merge them. This further moves all the data into the one you want to keep and also makes the duplicate one inactive.
Some other helpful articles:
How to Record vendor refunds in QuickBooks desktop?

