Making changes to any transaction in QuickBooks even when it is recorded, is possible by creating a journal entry. In order to correct transactions and post entries, you can create journal entry in QuickBooks. Making journal entries in QuickBooks involves a couple of steps, which we will be discussing later in this article. You can only make a journal entry for one customer or vendor at a time. In case you wish to correct multiple customer or vendor balances, then it is essential to post separate entries. Let us further explore the process of creating a journal entry in QuickBooks, along with other important information related to the same.
In addition to that, if you need any sort of technical guidance related to creating journal entries in QuickBooks or for any other QuickBooks-related queries, feel free to consult our technical support team at +1-888-510-9198 and they will provide you with immediate assistance.
You can also read: How to Record an Opening Balance in QuickBooks Desktop?
What is a Journal entry in QuickBooks?
Journal entries are the records of accounting transactions that are kept in a general ledger. They let you move money between accounts and force your books to balance in specific ways. In simple words, it is a record of transactions that shows the credit and debit balance of the company. Journal entries are considered to be a very important and essential part of business accounting as all of your business’s financial reports rely on them. All the journal entries are the basis of many of your Balance sheets, income statements, and cash flow statements, etc. So, use them only if you understand accounting or by following the advice of your accountant. Besides this, you should have a good understanding of debits and credits. So, follow the post ahead and explore further!
Important Points when creating journal entry in QuickBooks
- Note that QuickBooks online doesn’t support multi-currency in a single journal entry. This indicates that each and every currency has its own journal entry.
- Another important point to consider is that if you create an entry and wish to fix the transaction, then it can be done by deleting and reversing the journal entry.
- You will have to view the additional column for the location and class in case you are using QuickBooks Online Plus.
- To view the sales or expenses tab, ensure that the entry has a line for either A/R or A/P and also the vendor or customer name.
Other important rules to make journal entries in QB
- We suggest you not to make journal entries to inventory or payroll accounts.
- Note that the entry to the accounts payable type or the accounts receivable will need a customer or vendor.
- It is essential to use the accounts receivable or accounts payable account on the second line of the journal entry.
- Along with that, include one account receivable or accounts payable type account in every entry.
When to use journal entry in QuickBooks?
Here is when you should use journal entry in QuickBooks online.
- When sending the money between income and expense accounts.
- Or when transferring money from an asset, liability, or equity account to the income or expense account.
- Also, if you enter the debits and credits in the general journal or the ledger.
Also Read: How to Enter and Delete Transactions by Batch in QuickBooks Desktop?
Procedure to create a Journal entry in QuickBooks Desktop
Journal entries created in QuickBooks is of great help to managers and accountants to record transactions or transfers of amounts between accounts. By following these step-by-step instructions, you can easily make the most general journal entries in QuickBooks Desktop. They are as follows:
Step 1: Go to the Journal Entry Feature
- At first, you have to look for the journal entry feature from the ‘Company’ option.
- Click on the ‘+’ icon at the top right of the file for a drop-down menu.
- Now Create option appears where you will see the Journal Entry option, Click on it.
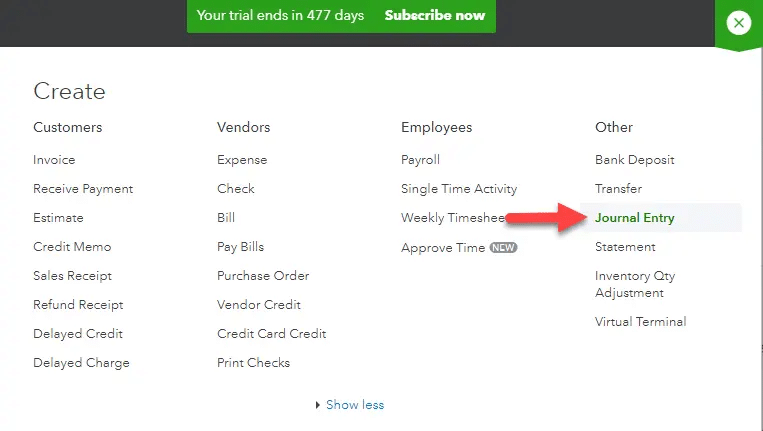
- This will divert you to the Make Journal Entries window which has the necessary blank for the information to add on.
You may also read: How to Install QuickBooks desktop on two computers
Step 2: Enter the Date and Journal Entry number
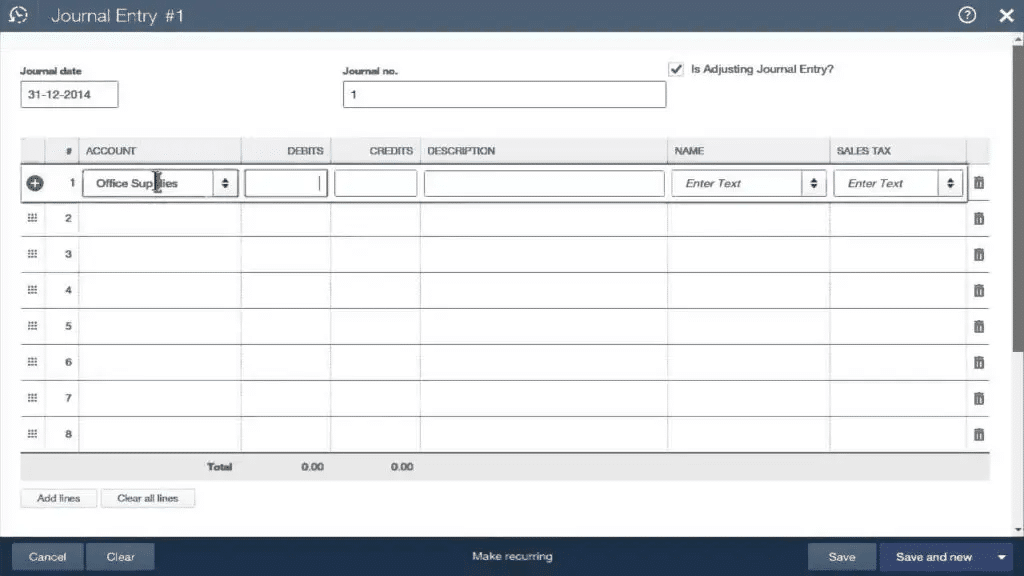
- After the form opens up, edit the journal date, whereas the current date will be entered by QuickBooks on its own.
- Now, if you are recording any entry from any other date, then ensure to correct the date before moving ahead.
- After the date is corrected, you need to fill in the journal number.
- Or else, QuickBooks will automatically enter the sequential number.
Read Also: Download and Install Trial Version of QuickBooks Desktop
Step 3: Enter the other Necessary information
After entering the date and journal entry number, fill up the other required information.
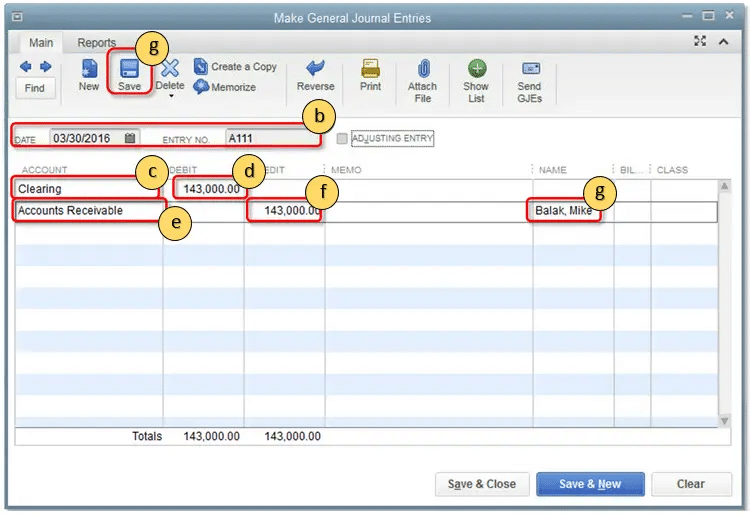
- Account column – In this account column enter the journal ledger account number in the account column.
- Journal Code – Another important thing is that you should enter a new code for your journal. Be certain to use the same code which is also used by transactions for the debit and credit accounts.
- Debit and Credit Column – Now in the Journal entry list the Debit accounts first and then credit accounts from the drop-down menu. Enter the amount which is debited in the debit column. Whereas QuickBooks automatically enters the credited amount under the Credit Column. To make the entry balanced sum of both the debit and credit entries should match otherwise repeat the steps. Repeat until the entries completely match with each other and the transaction reaches a zero balance then only the journal entries will be properly balanced.
- Memo Column – Once done, you should now enter a descriptive memo in the Memo Column so that you can check the transaction details on the report. This step is optional but it will help you later on to remember later why the entry was made.
- Name – Lastly you can also add the name of the customer, employee, or vendor and mark both the amounts as billable.
In case the total of the debit column doesn’t tally with that of credit column, then fill in the distribution lined until the total of both tallies.
See this Also: How to Transfer Data Files from QuickBooks Online to QuickBooks Desktop?
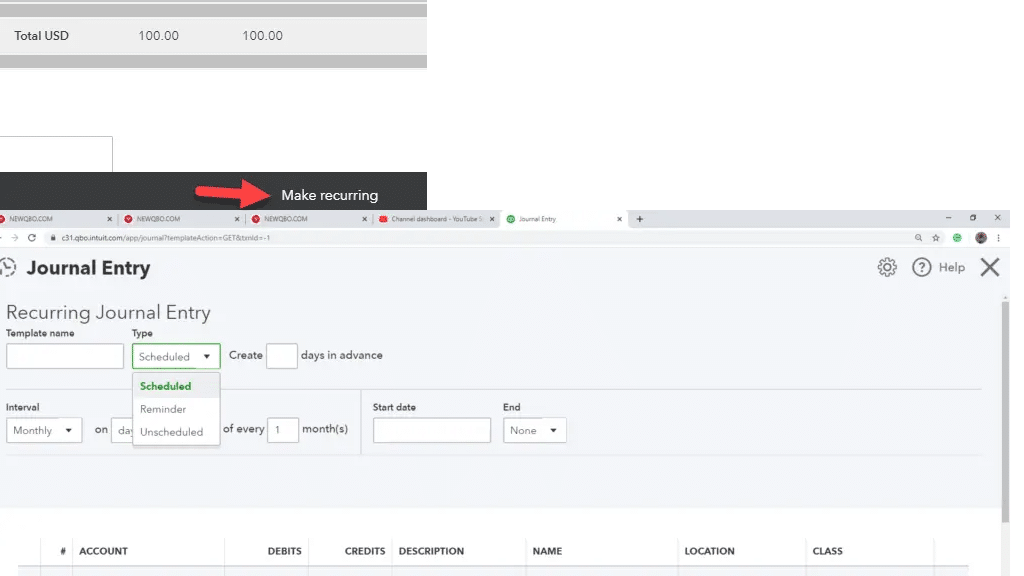
Step 4: Choose to make recurring journal entry schedule
After cross checking all the information and debits and credits total, select the recurring journal entry schedule. Then finish the process by clicking on “Save & Close” to save the journal entry and close the window. Or you can also click “Save & New” where you can save the journal entry and open a new window.
Steps to edit a journal entry in QuickBooks
Now that you have learnt the procedure to create a journal entry, here are some quick steps that can be performed to edit a journal entry in QuickBooks. Let us have a look:
- At first, you need to navigate to the company menu and further choose make general journal entries option.
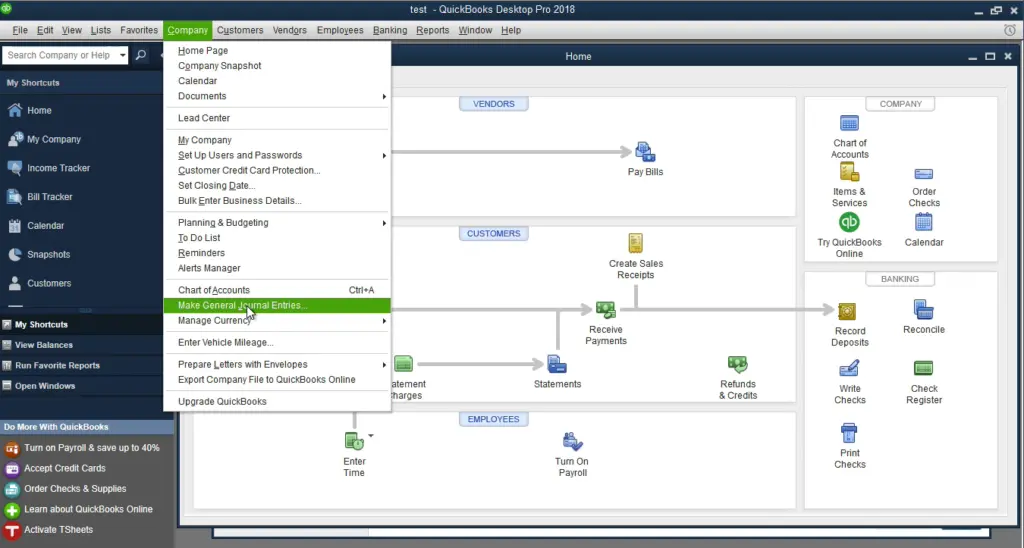
- You now have to choose the find option and further enter the name, date, entry no, or amount and also click on find tab.
- Once done with that double click the journal entry and make the updates.
- After that, select save and close tabs.
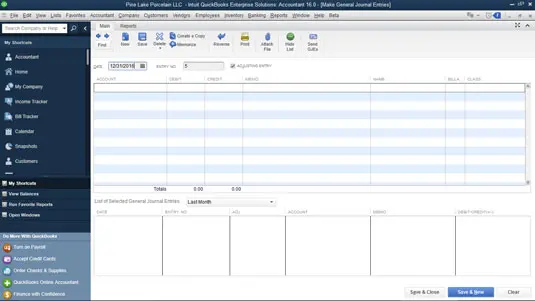
- The last step is to click on yes tab to record changes.
Steps to delete a journal entry in QuickBooks
At times, you might need to delete or void a journal entry in QuickBooks. The steps involved in such situation are as follows:
- Start with navigating to the company menu and further choose make general journal entries.
- Once done with that, choose find option and enter the name, date, entry no, and other info.
- You now have to double click the journal entry and choose delete or void option. Also click on ok tab.
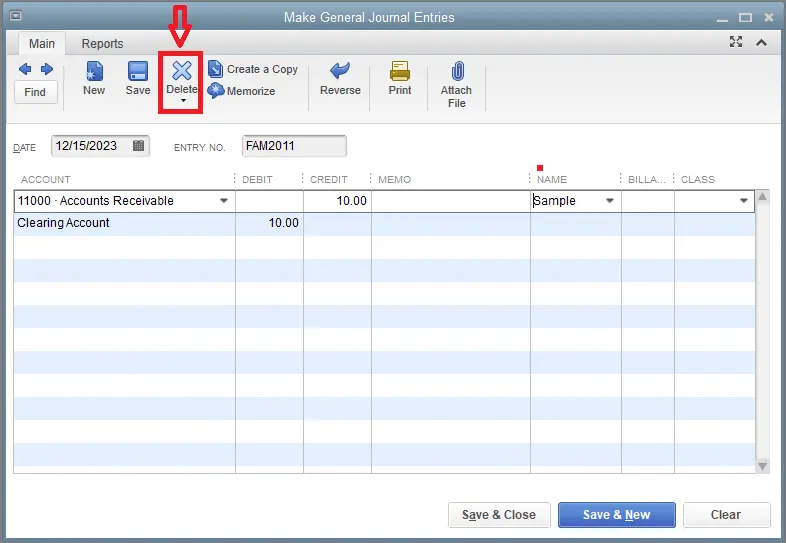
- To end process, select save and close tabs.
Related Search: How to Locate Missing Transactions in QuickBooks Desktop?
Steps to reverse a journal entry in QB
The process to reverse a journal entry in QuickBooks desktop involves the following steps:
- At first, move to the company menu and further choose make general journal entries.
- Once done with that, search for journal entry that is to be reversed.
- In case you use QuickBooks for windows, choose find tab and enter the name, date, entry no, or amount. Also, choose find tab.
- If you are a QuickBooks for Mac user, then look for and select the journal entry that is to be reversed on the left side of the make general journal entries window.
- After that, opt for reverse option.
- And also, choose the save and close tab.
It should be noted that the reversed journal has an R next to the entry number and any debit and credit amounts that are reversed. The new entry will be dated the first day of the next month, following the original transaction date.
Steps to create journal entries in QuickBooks online
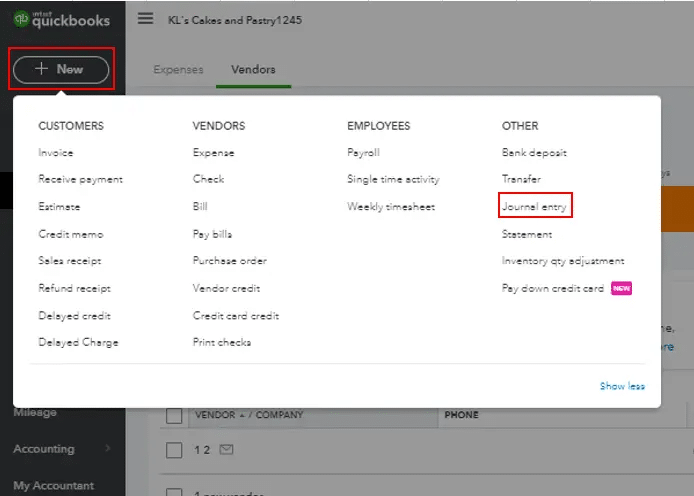
- To create a journal entry in QuickBooks online, choose + new.
- After that, opt for journal entry.
- On the first line, pick the account from the account field.
- According to your requirements, if you need to debit or credit the account, enter the amount in the correct column.
- On the next line, choose the other account you are moving money to or from.
- Depending upon if you entered a debit or credit on the first line, enter the same amount in the opposite column.
- You now have to check the amounts. Note that you should have the same amount in the credit column on one line and the debit column on the other.
- This indicates that the accounts are in balance.
- Once done with that, you need to enter the information in the memo section, so you know why you made the first entry.
- The last step is to choose save now or save and close tabs.
Also check this out: How to Download Bank Feed transactions in QuickBooks Desktop?
Reverse or delete journal entry in QuickBooks Online
You can reverse journal entry to swap the debits and credits, or delete it entirely. Note that, you should only create journal entries as a last resort or with the help of the accountant. In case you need to, you can reverse a journal entry to update and correct it. The steps involved in reversing and deleteing a journal entry in QuickBooks online are enumerated below. Let us explore further:
Reverse a journal entry in QuickBooks Online
In case you need to allocate a transaction between two accounting periods or fix a debit and credit error, then you need to follow the steps below. This doesn’t delete the original entry.
- Begin with selecting Settings tab and then go for chart of accounts.
- You now have to find the account you created the journal entry for and then choose view register.
- Now, find the journal entry in the account register. The word journal should be in the Ref No. or Type column.
- The next step is to choose the journal entry to expand the view.
- Now, select edit tab.
- And also, go for reverse and save tabs respectively.
When you reverse a journal entry in QuickBooks online, the software creates a new journal entry to balance it. This is a record that you made in regards of the change. It has different information that usual:
- The new journal entry usually keeps the original journal no. and adds the letter R. This indicates reconciled.
- Moreover, the new journal entry is dated the first day of the moth following the original journal entry date.
- Another important point is that the new journal entry keeps the same info like the account, name, and description, as the original one.
Delete a journal entry in QuickBooks Online
In case you created a journal entry misakenly, you need to follow the steps to permanently remove it. This can unbalance the accounts, if not done correctly. Moreover, it should be noted that, if you invited your accountant to review the books, they can also make an adjusting journal entry, rather than deleting it. The steps you need to carry out to delete a journal entry in QuickBooks Online are:
- Choose settings tab and go for chart of accounts
- Furthermore, find the account you created the entry for and then choose view register
- Once done with that, find the journal entry in the account register.
- The word Journal should be in the Ref no. or type column.
- The next step is to choose a journal entry to expand the view.
- The user will then have to click on the delete and yes tabs respectively.
You might find this helpful: How to Create, Edit, or Delete QuickBooks Memorized Transaction?
Steps to make adjusting journal entries in QuickBooks Online
Talking about an adjusting entry, it is basically a type of journal entry that usually adjusts an account’s total balance. This is used to fix minor issues or record uncategorized transactions. You can create adjusting journal entries and review them on an Adjusted trial balance report in QuickBooks Online Accountant.
It should be noted that, this feature is online available in QuickBooks online accountant. In case you are not an accountant, you can enter a regular journal entry. Adjusting entries can be created for a bunch of reasons:
- In case of depreciation or amortization
- For reallocation of accruals and reversing accruals or prepaid income or expenses.
- In order to adjust tax payable for interest, discounts, or penalties.
- Also, for entering bank or credit card fees.
It is possible to mark journal entries as adjusting entries, in order to identify and get reports for adjusting journal entries.
Enter an adjusting journal entry
You will be able to make adjusting entries from client’s QuickBooks online company file using the steps below:
- Begin with signing in to QuickBooks online accountant.
- Once done with that, choose go to QuickBooks dropdown and opt for client’s company.
- The next step is to choose + New
- And then, choose journal entry
- After that, go for Is adjusting journal entry? checkbox
- Now, perform the steps to record an entry.
- And lastly, click on save and close.
Review Adjusting Journal entries
You can run an adjusted trial balance report, in order to review the adjusting journal entries. This report lists all the account balances in the general ledger before and after you make adjusting journal entries. It further lists the total adjusting entries. The steps to be carried out here are:
- In QuickBooks online accountant, you need to enter the adjusted trial balance in the search bar.
- Head to the reports menu and choose adjusted trial balance report.
- After that, go for customize to adjust the report as required.
- Further, ensure that the total debit balances equal the total credit balances.
Also Read: How to Delete Duplicate Transactions in QuickBooks?
Final words!
Using these steps, you can easily create a journal entry in QuickBooks Desktop. But if there is a mistake during the process QuickBooks will still give you the option to edit, reverse, or delete journal entries. Moreover, if in case you can’t get the proper resolution, you can also call the QuickBooks helpline number +1-888-510-9198 to troubleshoot it instantly. Our QuickBooks techie team experts will be there to help you round the clock. Also, you will get the most relevant answers to all your journal entry in QuickBooks related queries, so get in touch with us today.
FAQs related to Creating Journal Entry in QuickBooks
My “Is Adjusting Journal Entry? button is missing. How do I make it available?
Well, you might be creating a regular journal entry using QuickBooks online version. This is the reason why your checkbox for Is Adjusting Journal Entry is not visible. If you are using QBO version, then you can sign up for QBO accountant to make the said tool available. Add image
How to undo a deleted journal entry?
You can undo the deleted journal entry using the steps below:
1. Click on the gear icon first.
2.Select Audit log
3. After that, choose filter tab and select all users in the users field.
4. Now, choose all dates and date field.
5. Under events, you need to mark the transactions box.
6. Choose deleted/voided transactions in show field.
7. Click on apply tab and search for the deleted entry and click on view.
Can I delete an incorrectly entered Journal Entry? Using QuickBooks Online
Yes, you can delete the journal entries made incorrectly in QuickBooks using the steps below:
1. Move to settings
2. Select chart of accounts
3. Find the account you created the journal entry for.
4. Click on view register
5. Find journal entry in the account register.
6. Select the journal entry to expand the view and click on delete and yes tabs respectively.
You may also like:
How to Fix QuickBooks Crash Com Error?
Install Multiple QuickBooks Desktop Versions on One Computer?


