
Learn how to resolve data damage on your QuickBooks company file
Company file in QuickBooks is one of the core elements. It stores your crucial and sensitive data. However, at times, this crucial data file can get damaged or corrupted due to some reasons, which not just puts your data at risk, but also hinders the smooth working of the software. You can experience data damage in QuickBooks due to performance failures, disk failures, power surges, and much more. To help you out in dealing with such annoying errors, we have designed this piece of writing, sharing the complete details about data damage and data corruption issues.
Thus, stick around this piece of writing for further information or you can further connect with our QuickBooks enterprise support team at +1-844-499-6700, and get answers to all your queries from the professionals.
Also Check This Out: QuickBooks Desktop 2024 Download, Pricing, and Features
What is data damage error in QuickBooks Desktop?
Data damage errors in QuickBooks company file often occur when the software is unable to read the company files properly. It can further be experienced due to various external and internal reasons. You might get an error message or see an unusual behavior in case any sort of data damage occurs. Data corruption or data damage can be a common yet annoying error experience for QuickBooks users. Thus, it is suggested to make regular backups of QuickBooks company files, to avoid any sort of data loss.
Identifying signs for data damage in QuickBooks company file
The signs and symptoms of data damage in QuickBooks company file. Let us have a look:
- Issues like a data problem prevents QuickBooks from continuing, in the verify data utility or verify target: values in minor do not match the major on the screen.
- Moreover, if there is a negative balance in the transaction history.
- Another reason can be if any of the transaction and entry is missing from the lists.
- One can also experience a similar issue if the bills paid or invoices are shown unpaid.
- Also, if the software runs sluggishly.
- In case there are any errors in the balance sheet.
- If the user opens the send feedback online and while moving to the bug report window.
Also Read: How to Fix Error: This is a Corrupt or Damaged QuickBooks Database?
What instigates the data damage in QuickBooks?
The user can end up in such an error due to the following reasons:
- One of the basic reasons can be if there is any virus attack to the hard drive on which the database is stored.
- Another trigger can be if the data file size has expanded beyond the prescribed limit.
- Moreover, if there is a sudden power surge or drop, then it might trash the entire hard drive.
- Also, if the system lacks certain resources, this also includes RAM, virtual memory, network interface cards, routers, network cables, etc.
- Incorrect shut down of the system
Preventive Actions
The following actions are a must to do, before you perform the steps to eliminate the issue:
- Selecting a hard-wired network over wireless
- Creating a backup within QuickBooks
- Checking the file size
- Update patches
- Monitoring list size
- Keep a check on the database file fragments monthly
Things to remember before proceeding
- First of all, you need to ensure to run the rebuild and Verify Data Utilities on the same computer system.
- After this, the Rebuild utility will make a backup of that file
- Now you can save the file anywhere you want
Fix data damage on your QuickBooks Desktop company file
Mainly there are two steps to resolve this problem. You can take help from your IT professional or contact our error support team in case you get stuck somewhere by following given steps.
Step 1: Run the Rebuild Data Utility
- Go to File menu, choose ‘Utilities > Rebuild Data‘
- Select ‘OK‘ button in the backup of the data of QuickBooks company file.
- (There are chances that your computer will show that QuickBooks is not responding.) But if the cursor is moving, it means that Rebuild is going on. Let it complete.
- When Rebuild is complete, Select ‘OK‘ button.
You may also like: How to Fix QuickBooks Error 6000?
Step 2: Run the Verify Data Utility
- Go to ‘File menu‘ and choose ‘Utilities > Verify Data‘
- Select ‘OK‘ if you get the message ‘QuickBooks detected no problem with your data‘.
- If there is an issue with the data, you will get the prompt ‘Rebuild Now‘ or ‘View Errors‘.
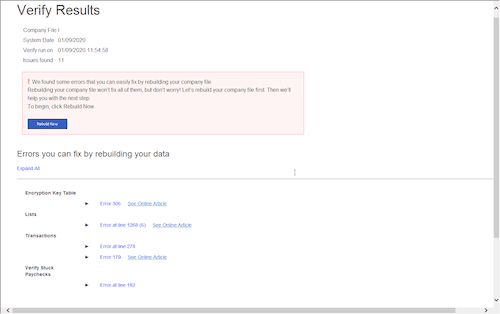
- Now, choose ‘Close‘ and perform the steps below:
Important Note: You can follow the steps below if you find yourself comfortable in reviewing the QBWin.log or QuickBooks.log file.
- Find QBWin.log or QuickBooks.log files
- Go to the ‘Tech Help‘ window if you are working with a support agent. Go to ‘Open File‘ tab, highlight the log file and select ‘Send log files‘ to Intuit Support. This will send the file as well as enable the agent to view the log files.
- Now, check the log file
- For Mac: Scroll down to the most recent verify information
- For Windows: Search for start verify and locate the most recent file
- In the opened file, you need to search by pressing ‘Ctrl+F keys’ for the start ‘Verify‘
- Now, find the line which is LVL_ERROR, and look for it in check QuickBooks Learn & Support Site. Also you can see that there is a data damage top LVL errors library
Why should you use Verify and Rebuild features?
- Encountering fatal errors while using QuickBooks Desktop
- Discrepancies on invoices, bills and other reports that post negative values
- Already deposited payment showing in the payment to deposit window
- Some accounts are missing from the balance sheet
- Some names are missing from lists
- Few transactions are missing from the record
- Checking if your company file is free from errors
You may also read: Steps to troubleshoot installation errors of QuickBooks desktop
Step 3: Use QuickBooks file doctor from Tool Hub Program
If you are unable to fix the issue using the above rebuild and verify data utility related steps, then try performing the steps associated with file doctor tool to get rid of the issue successfully:
- If the users haven’t downloaded it already, then download the QuickBooks tool hub.
- After that, open the company file issues tab from there.
- You now have to opt for run QuickBooks file doctor.
- This might take a minute or so.
- Now choose the company file from the drop-down menu and if the file is not identified, go to the browse and search tabs to find the file.
- Once done with that, choose check the file option and click on continue tab.
- You will then have to enter the admin password for QuickBooks and also click on next.
The scanning process might take some time, depending upon the file size. And once the scan ends, open QuickBooks and the company file.
Step 4: Deletion of Customer Reports and memorized transactions
Another method you can try out for QuickBooks Desktop data damage is deleting customer reports and memorized transactions.
- To delete memorized transactions:
- Move to the lists, where the user should move to memorized transaction.
- After that, click on the edit tab and select deleting the memorized transactions option.
- You now have to click on ok tab.
- Delete customer reports
- You need to click on the reports menu and further select the reports center.
- Once done with that, select X.
- Also click on ok tab.
Data damage troubleshooting for QuickBooks desktop Mac
If you are a QuickBooks Mac user then the below given steps will help you to resolve the data damage issues of QuickBooks:
Step 1: Re-Sort Files
Re-sorting the lists will help you put your records back in order. In case you have changed the order of a list, resorting will do the needful.
Step 2: Identify Problem
Run the Balance Sheet in Cash and Accrual Basis
- Go to ‘Reports menu‘, and select ‘Company & Financial‘ > ‘Balance Sheet Detail‘
- Now, select ‘Options‘, choose ‘Accrual or Cash‘.
- If you find that the total assets do not get equal with the liability and equity in all the reports, then you better determine the transaction which is causing the problem.
- Take a backup of the company file, ‘Delete and re-enter‘ the transaction
After this, compare the Account report totals to the balances on Chart of Accounts:
- Compare the open invoices to accounts receivable balance on the ‘Chart of Accounts‘.
- Compare the total in ‘Unpaid Bills report‘ to the ‘Accounts Payable balance‘ on the ‘Chart of Accounts‘
- Now, backup your company file, delete and re-enter the transactions or you can also modify the transaction.
Step 3: Check Specific Accounts
There are two specific accounts which include:
- Uncategorized Expenses:
- To balance the transaction, rebuild will put out-of-balance transactions in this account. You may also see voided checks in this account
- Other than voided checks, you will also find the transactions. Now, again delete and re-enter the transactions.
- Undeposited Funds:
- Go to ‘Activities‘, select ‘Make Deposits‘ and then, select all. Make sure that the total amount is equal to the balance shown for ‘Undeposited Funds‘ on ‘Chart of Accounts‘. Also, ensure that there are no deposits showing on the deposit.
Step 4: Merge the Damaged Accounts/Items/Names
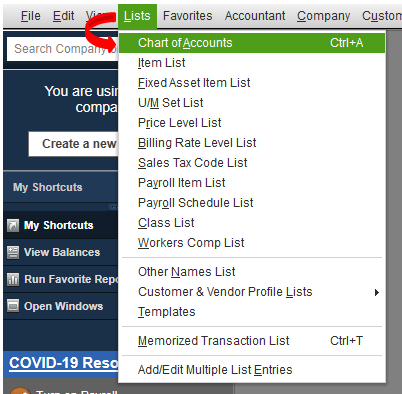
- Go to ‘Lists‘ and select ‘Chart of Accounts‘.
- In the control key, select the account that has been damaged. Click on ‘Edit Account‘
- Make sure you put an asterisk (*) on the name of account
- Then, click on ‘Cancel‘
- While holding the ‘Control Key‘, select any account and click on ‘New Account‘
- Choose the type and enter the original name of the account having problem
- Click ‘OK‘
- Hold the ‘Control key’ and select original account. Choose ‘Edit Account‘
- Now remove the asterisk and select ‘OK‘ button
- Click on ‘YES‘ as this will confirm that you desire to merge the accounts
- To merge items and names, the same steps will be followed as the ones followed for merging accounts
You may also like: How to Check QuickBooks Product Version and Release?
Step 5: Delete Customer Reports
- Go to ‘Reports menu‘ and click on ‘Report Center‘
- Select ‘Reports‘ you want to delete and click on name once.
- Select ‘Red X‘ and click on ‘OK‘ button.
Step 6: Delete Memorized Transactions
- Go to ‘Lists‘ and choose ‘Memorized transactions‘
- Go to ‘Edit menu‘ and choose ‘Delete memorized transactions‘
- Click on ‘OK‘ and the transactions will be deleted.
See Also: How to fix QuickBooks error code 15218?
Final Words..!
We hope that the above-prescribed information is helpful for you to resolve data damage on your QuickBooks company file. In case, you are unable to perform the systematic steps of the solution or you seek expert assistance – dial our QuickBooks data recovery number i.e. +1-844-499-6700.
FAQs Related to Data Damage in QuickBooks Company file
You can try fixing the data file in QuickBooks using the steps related to repair company file with rebuild data tool.
1. The first step is to move to the file menu.
2. Move to the utilities tab and choose rebuild data.
3. The next step is to let the tool repair the file.
4. Click on the ok tab and head to the file menu.
5. Also, let the tool check your file for data issues.
Data damage usually indicates that the company file can’t be read correctly by QuickBooks. This can be caused by factors within QuickBooks or some external factors, especially the ones where the file is located. The majority of data damage issues include LVL errors in the QBWin.
You can fix your file from the tool hub and choose the company file issues and also go for the quick fix my file option. Once done with that click on ok tab when it completes and launch your QuickBooks.
Read Also:
How to Troubleshoot QuickBooks Error 1335?