

All You Need to know about Enter and Delete Transactions by batch in QuickBooks Desktop
Manually entering dozens or hundreds of transactions one by one in QuickBooks isn’t just tedious, it’s a waste of time you probably don’t have. That’s exactly what the Batch Enter Transactions feature is built to solve. It lets you add or delete multiple transactions at once, whether that’s deposits, checks, invoices, credit card charges, bills, or credit memos. This feature isn’t available in every QuickBooks edition though it’s limited to QuickBooks Desktop Accountant 2018, Enterprise, and Enterprise Accountant 18.0 and later versions, and you’ll need to be signed in as an Admin or External Accountant user to access it. One limitation worth noting upfront: the batch delete/void transaction tool doesn’t support multi-currency.
This article covers everything how to enter transactions by batch, add split lines, use classes, delete transactions, and even create batch invoices. If you run into any trouble along the way, our technical support team is available at +1-888-510-9198, just give us a call.
Related Search: How to Create, Edit, or Delete QuickBooks Memorized Transaction?
Important points to remember
Before you dig in deep and explore the steps to successfully enter or delete transactions by batch, make sure to go through the below pointers.
- Do not forget to create a backup of the company file before performing the steps discussed later.
- Copy multiple transactions from one company file to another, to export transactions from another company file.
- In case you have QuickBooks desktop accountant 14.0 and the later versions, then make batch entries of checks, invoices, credit memos, bills, credit card charges, and bill credit.
Features of entering and deleting transactions by batch
Here are the features and benefits of entering and deleting transactions by batch:
- Batch Enter Transactions Feature
- Select the order in which you want to display the data of columns and from the multiple data fields.
- Enter the transactions into a personalized data entry grid.
- Paste more than 1000+ transactions from excel and save them at one place.
- Batch Delete Transactions Feature
- Hide or show transactions having other linked transactions.
- In all other storing systems, it is unattainable to see whether an invoice has a payment attached to it.
- Filter by date range, based on last modified date or entered date.
- A cleared column is something we suggest, as it helps you to decide whether you can actually delete it or not.
List of entering and delete transactions by batch in QuickBooks Desktop
The batch feature supports a wide range of transaction types here’s the full list of what you can enter or delete in bulk:
- Checks
- Payees including Customers, Jobs, Vendors, Employees and other names
- Sales Tax Payments
- Paychecks
- Deposits
- Credit Card Charges/ Credits
- Transactions in a closed period
- Inventory Adjustments
- General Journal Entries
- Bank Transfers
- Bills and Bill Credits
- Invoices and Credit Memos
- Payroll Liability Payments
- Down Payments
Read Also: How to Fix QuickBooks Desktop Installation Errors?
Steps to Entering and Deleting Transactions by batch in QuickBooks
Time to walk through the actual process. As always, make sure you’ve backed up your company file before proceeding it’s a simple precaution that can save you a lot of trouble if anything goes sideways during a bulk entry or deletion.
Enter transaction by batch in QB:
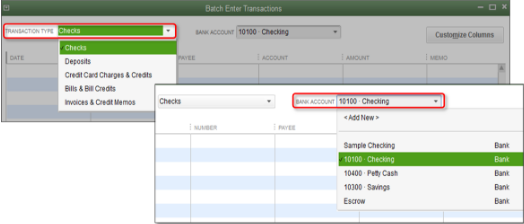
- First, go to the Accountant menu and then tap on batch enter transactions.
- Now choose the Transaction Type and Account.
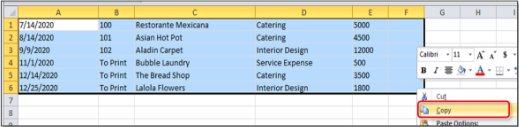
- Open the spreadsheet which contains that transaction that you need to record in QuickBooks column.
- Now categorize the columns in your spreadsheet to check the arrangements of the column in the Batch Transaction Screen.
- After this click on Ctrl +A the information you want and rich click and then choose copy.
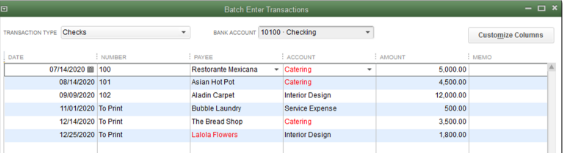
- Finally in the Batch Enter Transaction screen, right-click the first date field and now choose Paste.
Important Note: Kindly note that if the name and account is not listed in the company file they will be displayed in red. So, click on the name or account and then choose Quick Add or Set UP.
Add Multiple Split Lines in the Transaction
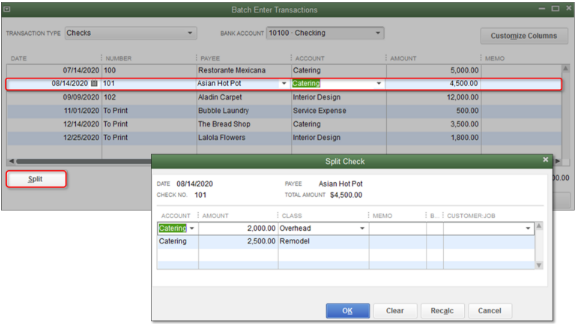
The split transactions actually permit to add a single or more secondary split line to a transaction.
- First thing to do is select the transaction which you want to add split line.
- Now click on the Split tab
- After this you have to type the needed details for each of the splits on a separate line.
- Click on OK so as to return to the main batch Enter Transaction screen.
- Finally, keep on doing this step for every transaction with multiple split lines.
You may also like: How to Troubleshoot the QuickBooks Error Code 6069?
In order to Use Class in QuickBooks Desktop
- In case, you can change your columns to add ‘Class’ by entering Batch Transaction screen.
- To keep the ‘class’ remain associated with an item in transaction in the organization, the item must be selected before you choose class.
- This is applicable for all form and transaction entries.
- In case, a class has been chosen earlier to an item, then the Class will be replaced when the item is chosen.
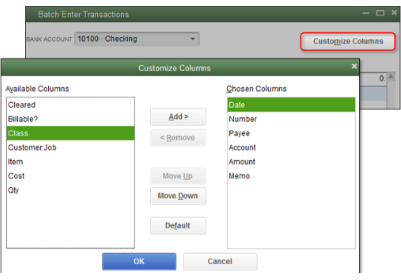
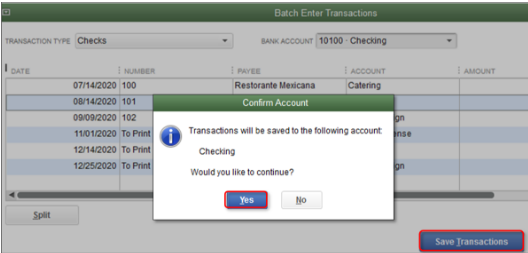
- After this press on the save Transaction tab and the yes and on Confirm Account Screen.
You may also read: How To Locate Missing Transactions In QuickBooks Desktop?
Delete Transaction by batch
This feature is presently available only in QuickBooks Premier Accountant, QuickBooks Enterprise Solutions 16.0, and QuickBooks Enterprise Accountant 2016 and the latest versions.
- QuickBooks Enterprise Solution, QuickBooks Premier Accountant, QuickBooks Enterprise Accountant 2016 and newer.
- QuickBooks Desktop Pro or Premier 2015, QuickBooks Enterprise Solution 15.0 and earlier.
- Click on CTRL + D to delete faster.
Important Note: Untick the alert when removing a transaction or unused detail item to remove the warning pop up when you press CTRL + D.
- This can also be done from the account register.
- If you are trying to replace all your transactions, then visit the Intuit Marketplace for a third-party application that can help you remove all unwanted transactions at once.
Steps to delete the transaction by batch
- Find out whether the single user mode is applied or not. If you find yourself in multi-user mode, then head to the file menu and also switch to single user mode.
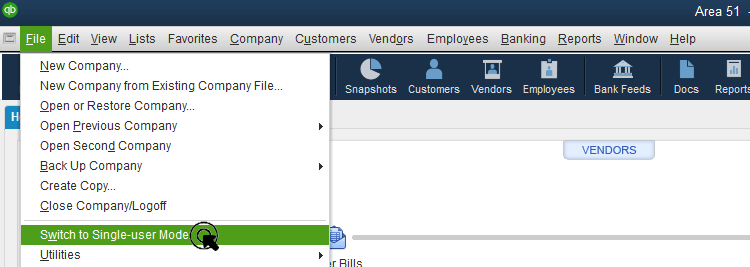
- After that, head to the accountant menu and also select the batch delete/void transactions.
- Select the transactions you want to delete or void from the available transaction list
- The next step is to choose review or delete
- After that, on the review batch, delete transactions screen, click on backup and delete option.
- Hit the yes tab on the confirmation window
- The last step is to select the option view deleted/voided transaction report.
Steps to file a batch invoice
- The first step is to move to the customers tab and then go for create batch invoice.
- After that, ensure the terms, sales tax rate, and dispatch method are up to date for all customers you send batch invoices to select each customer.
- Double click the customer and open the additional info tab and change the information needed.
- Search for the customers by selecting billing group
- The user is then required to click on next tab
- Once done with that, select the desired line item and template
- After that enter custom message and click on next tab
- Review the list of invoices and create invoice
- The last step is to print or email as appropriate and click on close tab
Might Help: How to Download Bank Feed transactions in QuickBooks Desktop?
Winding Up!
Once you get comfortable with the Batch Enter Transactions tool, it genuinely changes how you handle bulk data entry in QuickBooks what used to take hours of manual clicking can often be done in minutes by pasting directly from a spreadsheet. The split lines and class features add even more flexibility for businesses that need detailed transaction tracking. If you hit a snag anywhere in the process whether it’s a transaction not pasting correctly, a feature that seems unavailable in your version, or anything else our QuickBooks Enterprise Support team is ready to help. Reach out at +1-888-510-9198 and we’ll walk you through it.
FAQs Related to Batch Transactions in QuickBooks
In order to enter transactions by batch in QuickBooks, you can perform the below steps:
1. From the accountant menu, enter batch transactions.
2. Now, choose the appropriate transaction type and account.
3. Once done with that, open the spreadsheet containing the transactions you need to record in QuickBooks.
4. After that arrange the columns in your spreadsheet to match the order of the columns in the batch enter transactions window.
In case you want to copy multiple transactions from one company file to another, then simply use the enter batch transaction feature in QuickBooks. This feature can help in saving and managing your time efficiently.
Yes, if you void a transaction, the record of it remains in QuickBooks, but it won’t actually affect the books. However, when you delete a transaction, it is entirely removed from your books and won’t appear in the reports or accounts.
If you catch the mistake before clicking “Save Transactions,” you can simply edit the affected rows directly in the Batch Enter Transactions grid before finalizing. However, once transactions are saved, there isn’t a single “undo batch” option you’d need to locate and correct or delete each affected transaction individually, or use the Batch Delete/Void feature if you need to remove several entries at once. This is exactly why backing up your company file before starting a batch entry is so important.
This happens when the name or account you’re trying to use in your spreadsheet doesn’t already exist in your QuickBooks company file. QuickBooks flags these entries in red so you can quickly identify them. From there, you simply click on the red name or account and choose either “Quick Add” (to add it with minimal details) or “Set Up” (to enter full details) before continuing with your batch entry.
No, the Batch Delete/Void Transactions feature described in this guide is specific to QuickBooks Desktop versions specifically QuickBooks Premier Accountant, Enterprise Solutions 16.0, and Enterprise Accountant 2016 and later. QuickBooks Online has a different interface and handles bulk transaction management through its own set of tools, which work differently from the Desktop batch feature covered here.
Get More Helpful Topics
How to Install and Configure the QuickBooks Enterprise ODBC Driver?
Add an EIN to existing QuickBooks Desktop Payroll Basic, Standard or Enhanced subscription