Did you see QuickBooks error 6131, 0 and can’t find the right set of steps to eliminate it? Well, if that is the case, this segment will surely be of great help to you. At times, when opening a QuickBooks company file, you might come across such an error in QuickBooks. This error usually stops the authorization required to access the company file. The QuickBooks error 6131, 0 can appear on both local and network setups, especially when you open the file locally. This error falls under the QuickBooks 6000 error series and is usually related to the company file itself.
To help you eliminate this particular issue in QuickBooks, we have come up with this segment discussing the causes as well as the fixes of this error. For more details, scroll through this segment carefully, or you can discuss your queries with our QuickBooks support team at +1-888-510-9198, and let our certified QuickBooks ProAdvisors help you with your queries.
A couple of factors can cause QuickBooks error 6131. Let us understand those factors one by one:
A basic trigger for this particular error can be if there are insufficient admin permissions.
You can further come across a similar issue if the previous QuickBooks installation wasn’t complete.
Another possible trigger can be the .ND and .TLG files are damaged.
Solutions to QuickBooks error 6131, 0
Fixing QuickBooks error code 6131 doesn’t involve any rocket science. A few simple steps can help you get rid of this error permanently. Here are the solutions that can be implemented to eliminate this issue successfully.
Solution 1: End QuickBooks-related tasks in Task Manager
At times, background tasks can create hindrances in the smooth working of the software. Thus, it is suggested to close all the background tasks in the task manager, especially the ones related to QuickBooks. This can be done using the following set of steps:
Initially, you need to press ctrl + shift + Esc to open the task manager.
Once done with that, click on the processes tab.
You will then have to select all QuickBooks processes including QBW32.exe, qbupdate.exe, and QBDBMgr.exe, and close all the tasks by clicking on the end task.
The next step is to open QuickBooks and try to open the company file.
You will now have to check if the issue still shows up or not.
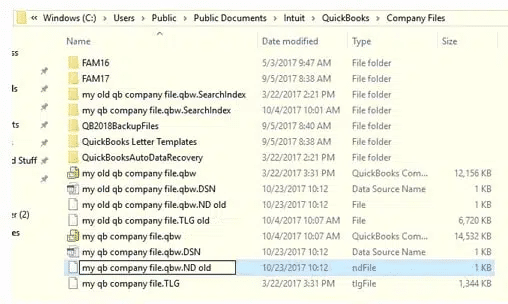
Solution 2: Rename .ND and .TLG files to fix QuickBooks error 6131
This process requires you to head to the company file folder.
After that, you need to search for the files with the extensions set as .nd and .tlg.
You are now recommended to right-click and select rename
Followed by adding old at the end of the file name.
And lastly, open QuickBooks and open the company file.
Solution 3: Changing the company file location
Another effective solution is to relocate the company file, as it can be creating an issue in certain cases. This can be done by carrying out the steps enumerated below:
At first, you need to visit the folder having the company files.
Heading forward, right-click the QuickBooks.exe icon and click on the properties tab.
You now have to click on the open file location.
Once done with that, click on the company file and press ctrl + C to copy the file.
The next step is to create a new folder on the desktop and open it.
Press Ctrl + V and paste the files here.
You are then required to open QuickBooks and click on the option to open the company file.
The last step is to click on browse and select the file that you copied to the new folder.
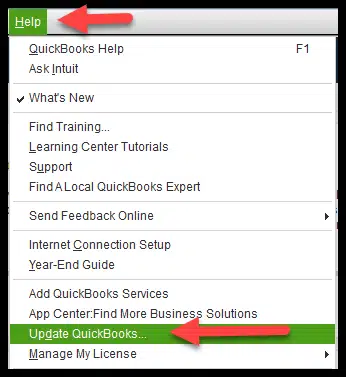
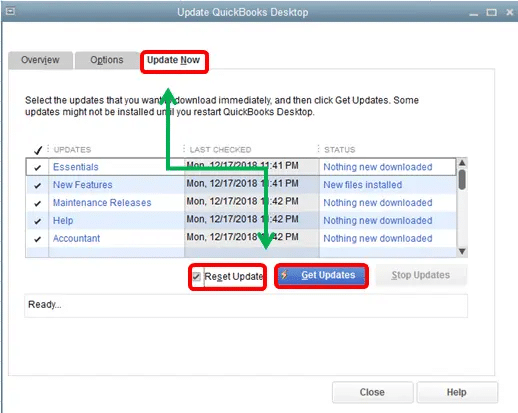
Solution 4: Update QuickBooks
Using an outdated software version can also trigger a lot of errors. Therefore, it is highly recommended to update QuickBooks to the latest release. You can try performing the below steps to update QuickBooks Desktop successfully.
Open QuickBooks at first.
Furthermore, head to the help menu and select the update QuickBooks desktop option.
You are then required to click on the Update Now tab.
Followed by clicking on reset update.
Also, click on get updates.
The last step is to quit QuickBooks after the update ends.
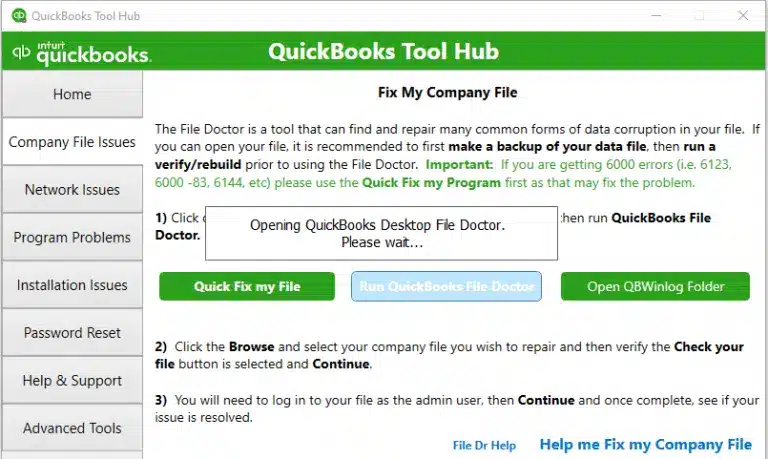
Solution 5: Run QuickBooks File Doctor Tool
If none of the above methods worked, try running the QuickBooks file doctor tool using the steps below:
As discussed above, QuickBooks error 6131, 0 falls under the 6000 error series, and eliminating this issue becomes easy, once you implement the right set of steps. Now that you know what steps can be implemented to fix this error successfully, we hope that you will be able to eliminate QB error 6131 from its root cause. On the contrary, if you are unable to rectify this issue, or if you need any sort of technical guidance, then do not think much in connecting with our technical team at +1-888-510-9198, and our certified QuickBooks experts will answer all your queries immediately.
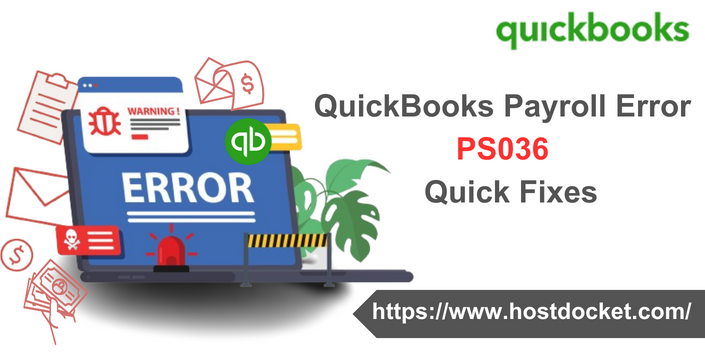
Payroll errors in QuickBooks are pretty common, especially errors like PS036. You can come across QuickBooks error PS036 when updating QuickBooks payroll or when working on it. It usually shows up with a warning message on the screen that states: PS036: There is a problem verifying your payroll subscription or QuickBooks Unable to Verify Payroll Subscription. It can also be accompanied by a warning message that shows: QuickBooks error PS036– Trouble verifying payroll subscription and can’t install new payroll updated.
A few factors can trigger this payroll error in QuickBooks, which we have tried to highlight in this particular segment along with the necessary steps that can be performed to eliminate the issue permanently. To learn further about this issue, stick around this segment carefully, or you can further get in touch with QuickBooks support professionals by dialing our support number i.e., +1-888-510-9198, and we will help you with all your queries immediately.
A handful of factors can drag you into QuickBooks payroll error PS036. Let us evaluate:
Just in case the payroll subscription is expired or invalid or a damaged file is present in the CPS folder.
You can also come across this issue in case multiple payroll agreements are stuck due to inactive direct deposit settlements.
Another possible reason can be if the QuickBooks Utility document paysub.ini is corrupted or broken.
You can further see a similar issue if the status of the payroll subscription in the QuickBooks desktop service keys screen shows as invalid EIN number.
Also, if the version of QuickBooks you are using is not compatible with the version of Windows you use.
You can further see this issue if the service key is not right or the product is not updated.
If the company file PSID is no longer right, then such an error can be experienced.
Or if the QuickBooks company file is damaged, then such an error can be seen.
In case the data damage occurs.
Effective Methods to Fix QuickBooks Error PS036
Getting rid of such an error becomes easy by using the correct fixation methods. Here are some quick steps and procedures that can be performed to get rid of the QuickBooks error PS036. Let us have a look:
Method 1: Check for QuickBooks payroll subscription
You need to check if the QuickBooks payroll subscription is active or not. An expired subscription can lead to QuickBooks error PS036. The user can carry out the below steps to fix the QuickBooks error PS036. Let us have a look:
Begin with downloading and installing the latest QuickBooks version i.e., QuickBooks Desktop 2024.
And also update the tax table.
Now, open QuickBooks and log in to the payroll service account.
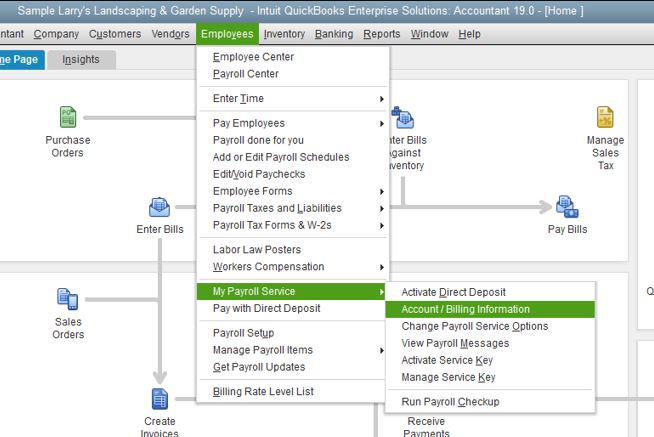
You now have to open the QuickBooks software and log in to the payroll service account.
The next step is to move to employee and my payroll services tabs respectively. Also, click on account or billing information.
You will then have to enter the login credentials and choose sign in.
The next step is to reboot the system and download the updates.
The last step is to open QuickBooks and verify whether issue is resolved or not.
In case you are trying to deposit direct paychecks for the company, then move with the procedures ahead to fix QuickBooks payroll error ps036.
You will have to change the file name of the Paysub.ini file using the below steps, in order to fix the QuickBooks error PS036.
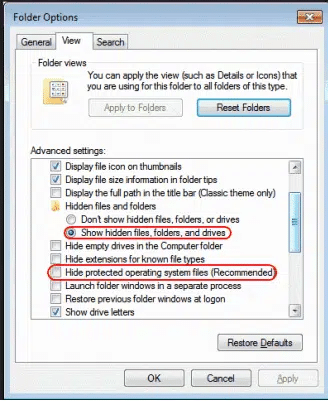
The very first step is to note that the INI is a hidden file in Windows. You will have to change the settings of the Windows folder options.
Later on, select my computer and also click on organize.
You will later have to click on folder and search option and then click on view tab.
The next step is to click on hidden files and folders and choose the show hidden files, folders, and drivers tab.
Now, select the apply and ok tabs.
Followed by heading back to My computer and in search bar look for Paystub.
Once you are able to spot the paystub.ini file, right-click the same and choose the rename tab.
The user will then have to rename the file extension as .old from .ini file.
Towards the end, repeat the steps for all the paystub files found.
Method 3: Run Quick fix my program from QuickBooks Tool hub to fix the PS036 QuickBooks error
QuickBooks tool hub lets you access multiple QuickBooks related tools to fix a bunch of errors. One can use Quick fix my program using the below steps to fix QuickBooks PS036 error.
Method 4: Delete EntitlementClient File to fix PS036 QuickBooks error
Here you will have to head to Microsoft’s Start menu.
Now, type run in the search box and launch run.
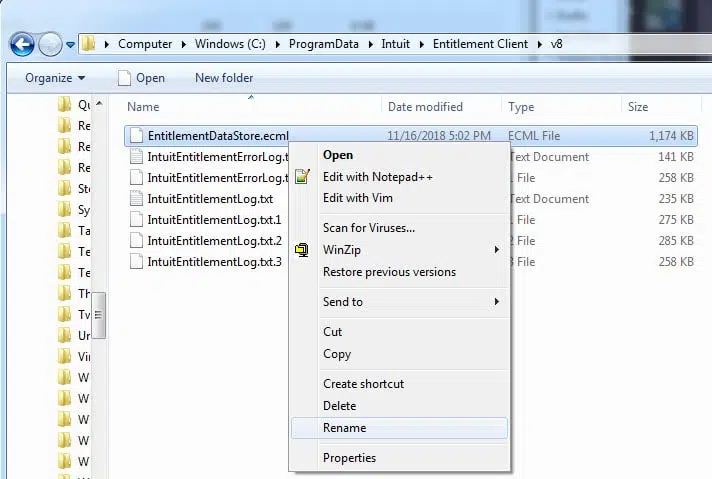
The next step is to head to C:\ProgramDate\Intuit\EntitlementClient\V8 and press enter tab.
In case it doesn’t show up, enter C:\ProgramDate\Intuit\EntitlementClient\V6.
Now, find the entitlementdatastore.ecml and right click the file, and select the delete tab.
You now have to click on the yes tab to confirm.
The last step is to launch your QuickBooks and perform the onscreen steps to register it again.
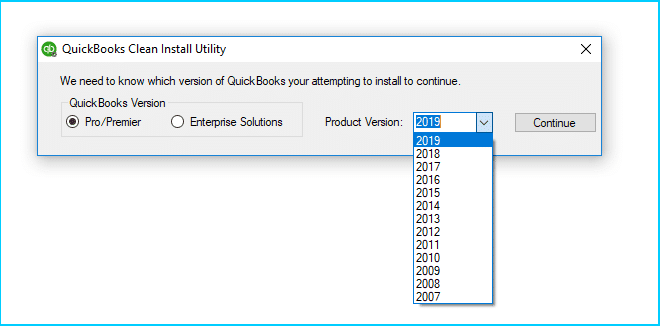
Method 5: Clean install QuickBooks to fix QuickBooks error PS036
If none of the steps discussed above were of any help, you can try using QuickBooks clean install tool to fix payroll error PS036. The steps involved in this are:
Begin the process by opening the start menu and then open control panel.
You now have to move to programs and features tab.
The next step is to choose QuickBooks and press uninstall/change tab to get the accounting program uninstalled.
After the uninstall is complete, you need to restart the system and follow it up by reinstalling the QuickBooks program on the system.
Enter in the correct license and product keys at the time of QuickBooks registration and activation.
Experiencing payroll errors like QuickBooks PS036 can be extremely devastating. However, the best part about QuickBooks is that getting rid of such errors is possible by implementing the right set of steps. Carrying out the steps discussed in this segment carefully can surely help you get rid of QuickBooks payroll error PS036. However, if you are still getting interrupted by any such error, then simply ring us up at +1-888-510-9198, and our team will ensure to answer your queries instantly.
Tried to create a custom email template, but emails aren’t using it? Well, need not to worry. Sometimes it happens that a user creates a new email template and sends emails, but the software continues to use the old template creating custom email template issues in the QuickBooks desktop. Two simple ways can be applied to change email template in QuickBooks. To help you in changing the QuickBooks templates, here we are with this quick segment sharing the complete set of steps you can implement.
Thus, to find out the right ways to use the right email template and add or change to a new one, make sure to stick around this segment carefully. You can further get in touch with our technical team, in case you have any queries, by simply getting in touch with our technical support team at +1-888-510-9198, and we will provide you with immediate support services.
Here is what can be done to change the QuickBooks email templates. Let us check out the steps to learn how to change email template in QuickBooks:
Solution 1: Copy and paste the right message before sending the email
It is important to copy and paste the right message before sending the email, for successfully carrying out QuickBooks change email template process. The steps involved in here are:
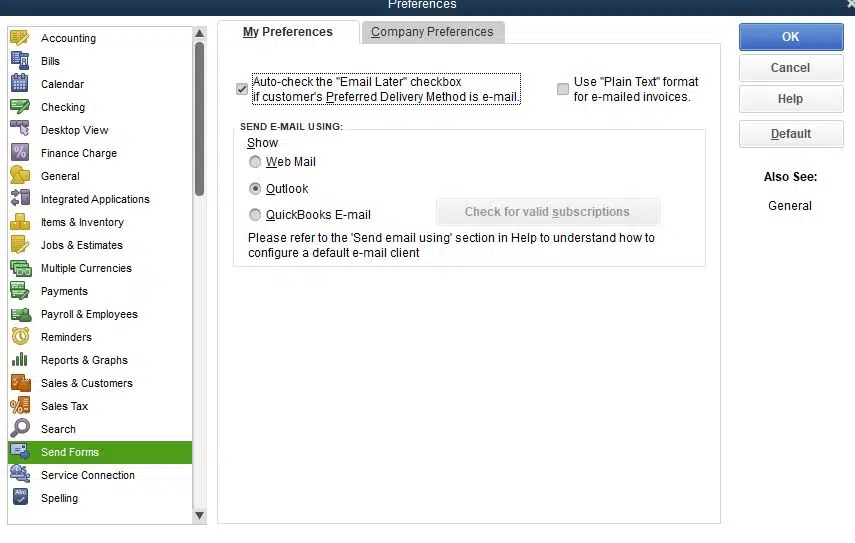
This process requires you to head to the edit menu, and further choose preferences.
Once done with that, select the send forms menu and also opt for the company preferences tab.
The next step is to highlight the QuickBooks templates you wish to use and choose edit.
The user will then have to copy the message body text.
Now, head to the file menu and choose Send Forms.
After that, choose the email you wish to send.
And further, paste the copied text into the body section.
It should be noted that if you are using QuickBooks Desktop Enterprise, then you simply need to choose edit email first.
Solution 2: Resetting the email later settingsfor QuickBooks Templates
Here you simply need to identify and open the transaction you want to send.
Followed by unchecking email later box.
You now have to choose the save and close tab.
And also reopen the transaction.
Choose to check the email later box.
And click on save and close tabs.
This will put the transaction back into the email queue. And your email should now be using your new default template. Moreover, you can edit QuickBooks email template to ensure that your email uses the template you wish to.
Changing the email template in QuickBooks Desktop isn’t that tough. You simply need to implement the set of steps enumerated above and this would successfully use a new template. Just in case your email still uses an old template, then in that scenario, you can get in touch with our QuickBooks support professionals at +1-888-510-9198, and let our certified ProAdvisors help you successfully change the email template or address related queries.
FAQs Related to QuickBooks Templates
How do I fix a template in QuickBooks?
You can fix a template by simply using the below steps:
Choose the type of form you would like to customize.
Opt for formatting tab.
Select manage QuickBooks templates.
Choose a template to preview.
Go for copy to create a new template or choose ok to edit the template
How do I customize my email in QuickBooks desktop?
Simply head to the edit menu and select preferences.
Once done with that, choose the send forms menu and then select the company preferences tab.
Now, from the delivery method default drop-down menu and choose email.
From the QuickBooks templates, select a transaction type.
The last step is to choose the add template and perform the onscreen steps.
Why can’t I send an email from QuickBooks desktop?
There can be a couple of reasons behind this, which include outdated QuickBooks, incorrect email setup, issues from the email provider, etc. You can perform some basic steps to fix the issue successfully.
How do I edit a custom template in QuickBooks?
To successfully edit a custom template in QuickBooks, you need to perform the steps below:
Choose settings and then select custom form styles.
After that, find your custom or standard template.
Trying to merge customers in QuickBooks and don’t know what the right procedure to do it is? Well, this segment solves all your queries and confusions. Note that if you enter the same item twice with different names, you can merge them and keep the lists accurate. QuickBooks lets users successfully combine customers in QuickBooks by performing some basic set of steps. To learn further about how to merge customers in QuickBooks, stick around this piece of writing. However, if you do not want to perform these steps on your own and need any sort of technical guidance, then in that case, give us a call at +1-888-510-9198, and our QuickBooks support team will ensure to answer all your queries immediately.
Steps for deleting payment or deposit against customer before merging
You need to initially open QuickBooks and further click on the list at the top menu bar and click on Chart of Accounts in QuickBooks.
You are then required to double-click the account and double-click the deposit to delete the specific payment.
The next step is to click on edit and further click on delete line.
Once done with that you need to delete the deposit and payments against the customer, you can carry out the below steps to merge the customers.
Steps to merge two customers in QuickBooks
Begin with opening QuickBooks and enter the credentials. You now have to right-click on the name of the customer that you want to merge with the other customer.
Before merging, you need to make the job a parent customer. This can be done by placing the cursor on the top of the small diamond symbol left to the name of the job and then dragging it to the left side.
You now have to right-click on the name of the customer and click on edit customer.
Replace the name of the customer with the new name. And then click on ok tab.
Click on the ok tab and click on yes once a prompt appears for proceeding for merging.
After you are done with merging two customers, you will have to re-process the payment that you deleted earlier.
Click on the customer menu and click on receive payment.
The next step is to choose the customer by clicking on received from the drop-down menu.
Put a checkmark next to the invoice you want to apply the payment to.
And the last step is to select a payment method and click on the save and close tab.
Merging list entries in QuickBooks isn’t a tough nut to crack, especially when you unleash the right steps. Hopefully, reading this segment might help you in some way to successfully merge lists in QuickBooks. Just in case, you have any queries left unanswered, then in that case connecting with our QuickBooks technical support team at +1-888-510-9198 is recommended. We are a team of certified QuickBooks professionals who work around the clock to provide immediate support and guidance.
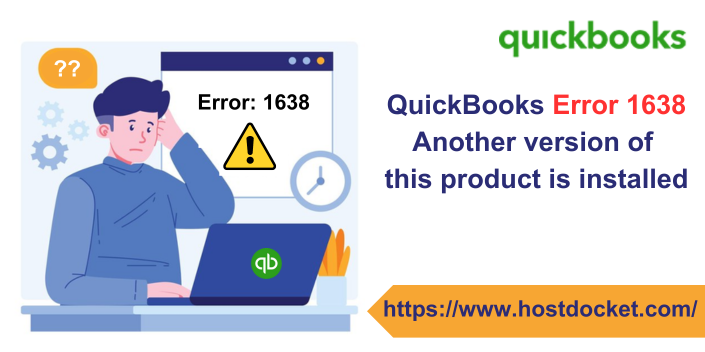
Trying to fix QuickBooks error 1638, but unable to do so? Well, we can help you with that. QuickBooks error 1638 is basically an installation error that shows up with a warning message that states: Another version of this product is already installed. If you get this particular error in QuickBooks, then it simply indicates that you might already have QuickBooks installed. You will have to find your QuickBooks version and open it. To help you in dealing with QuickBooks error code 1638, here we are with this segment sharing the complete details about the error, its causes, and the quick fixes that can be implemented. To learn further about this issue, stick around to this segment or you can also get in touch with our technical team at +1-888-510-9198, and let our experts help you with your queries immediately.
A bunch of factors can trigger QuickBooks error 1638. Let us evaluate each of the factors one by one:
In case there is any sort of virus or malware infection.
Another probable reason can be if the software installation guidelines aren’t followed appropriately.
You can further come across a similar issue if the software is already installed on the system and you are trying to install it again.
Such an error is also triggered when the installation source is damaged.
Or if the Windows firewall settings are blocking QuickBooks installation.
Methods to eliminate QuickBooks install error 1638
To get rid of such an error in QuickBooks, you can try performing the below methods one by one:
Method 1: Spot QuickBooks version
As this error indicates that QuickBooks is already installed, you need to locate the QuickBooks version present on your system. This can be done as follows:
You need to first press the Windows + R tab and this will open the Run command.
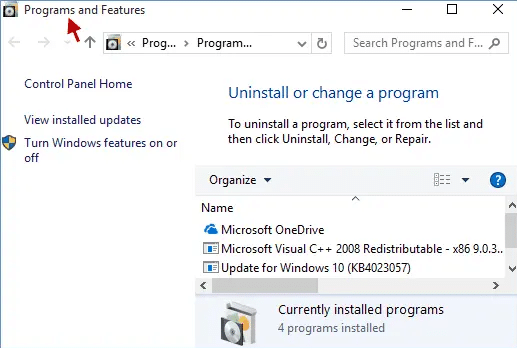
Once done with that, type the control panel in the search box and hit the ok tab.
Click on the programs tab and further go for programs and features.
Later on, if you see QuickBooks in the list, double-click on the same.
If none of the above methods helped you in eliminating the error code 1638 in QuickBooks, you can try this last method that includes clean installation of the software.
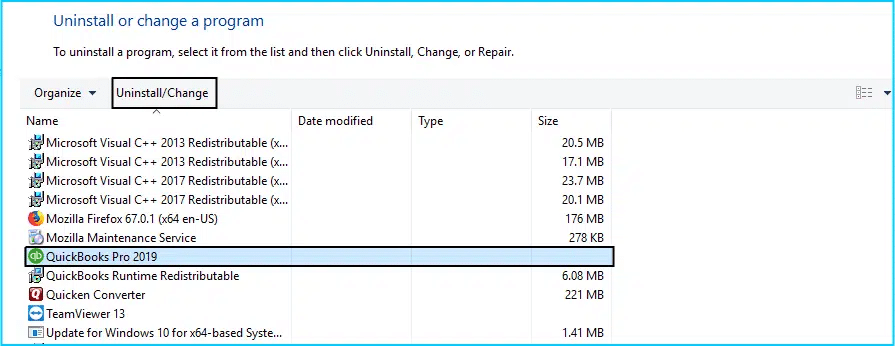
Uninstall QuickBooks
Here you will first have to log in system with admin rights
Further, press the Windows start tab.
Also, enter the control panel in the search box and hit the enter tab.
Once done with that, choose programs and features or uninstall a program under the control panel window.
You will later have to choose your version of QuickBooks from the list of programs.
Toward the end, choose uninstall and click on the next tab.
Find and open the QuickBooks.exe file and perform the onscreen steps to complete the installation.
Do not forget to accept the software license agreement and click on the next tab.
At the end, enter product and license numbers and hit the next tab.
Conclusion!
Getting rid of error code 1638 in QuickBooks becomes easy, once you perform the set of steps enumerated above. However, if you still have any queries that are to be addressed, then simply reach out to our technical support team at +1-888-510-9198, and our certified QuickBooks professionals will answer all your queries instantly.