Do you see a warning message stating QuickBooks requires that you reboot loop when installing an update for QuickBooks? Well, in some cases, the update might not be finished and the message QuickBooks requires that you reboot your computer to complete the installation keeps showing on a loop even after the system has rebooted. As this error isn’t pretty much common, tackling through it can be a bit daunting for QuickBooks users. When you are trying to install the latest update, you might end up in the same error message like a broken record. It is like being stuck in a loop, where you keep doing the same thing over and over again, but nothing works or changes. This repetitive cycle is not just annoying but also prevents you from getting QuickBooks up and running.
However, to help you in dealing with this particular glitch, here we are with this segment sharing the essential information regarding the error, along with the possible ways that can be implemented to get rid of it from its root cause. However, if you are seeking any sort of technical guidance, then feel free to reach out to our technical support team at +1-888-510-9198, and let them help you with your queries related to QuickBooks immediately.
What is QuickBooks requires that you reboot loop error?
To understand QuickBooks requires that you reboot loop error or QuickBooks 2022 installer keeps forcing reboot or won’t install, here is the scenario in which you might experience this error.
Initially, you might run the installation after downloading it from QuickBooks and run it as admin.
After that, you will start installing the VC9 vc_redist x86/x64 without issue.
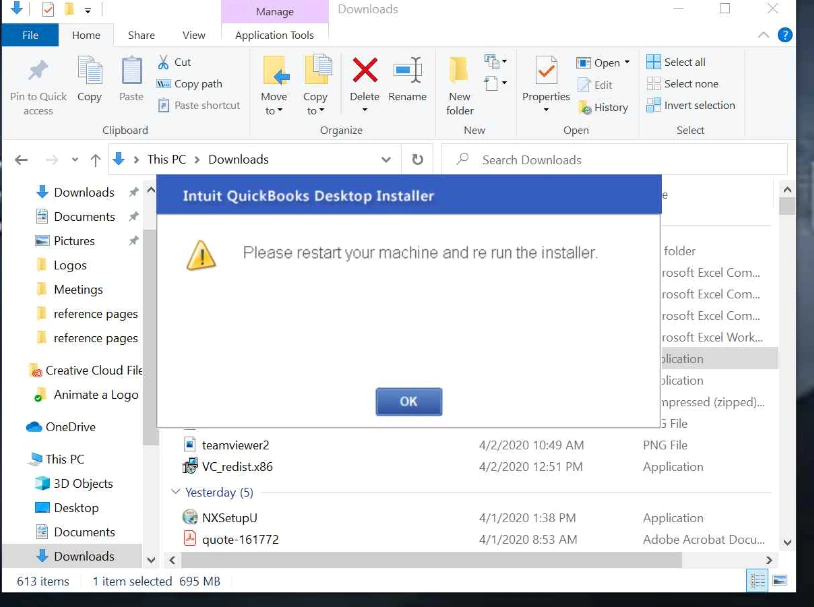
This is when you might see an error message appearing almost instantly when the request to reboot the system appears.
You will then press the Yes tab. However, it will show the same error message on the window. Following the error, the system will then reboot as usual.
The installer will now start on its own and the process then repeats again and again.
If you try to go for No when the prompt shows up on the screen to reboot, then the system will show that the installation was suddenly interrupted and hence you will have to begin from the initial step.
Factors causing QuickBooks requires reboot to complete installation error
A few factors can drag you into QuickBooks update reboot loop error. These factors include:
In case of a corrupted or damaged hard disk, you can experience this issue.
Or if the QBWUSER.ini file is either missing or damaged.
Be ready for such an error if you select a lengthy company file name.
Another probable reason can be an improper installation of QuickBooks.
Or if you are using an outdated operating system.
Important tips to consider
Before you begin with the steps to fix QuickBooks requires that you reboot loop error, it is important to keep a few things in mind.
Also, change the name of the .ND and .TLG files, in case they are too long.
Another essential point is to fix QuickBooks software, in case there are any issues with it already.
Quick Steps to Fix Quickbooks 2023 requires that you reboot loop
Try performing these steps before you implement the full-fledge methods to fix QuickBooks reboot loop issue. Note that you must have access to an admin account to fix this issue. In case you access the admin account, then perform the following steps:
Simply login to Windows using admin account
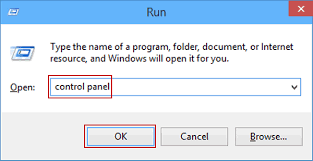
Further, head to start menu and choose the control panel.
Now, there click on programs.
Select turn Windows features on or off
There, you need to turn on .NET Framework 3.5
And furthermore, reboot the system.
The .NET framework is now required for QuickBooks installer to install any new updates. Note that, the installation process will fail, if it is disabled. The installed will complete the installation, in case it isn’t already done when you logged in.
Solutions to fix QuickBooks Requires that you reboot loop error
You can implement a bunch of steps to fix QuickBooks keeps asking to reboot issue. Let us understand each of the solutions one by one:
Solution 1: Use company file from a different location
In case you are repeatedly experiencing the same issue, then try using the company file from a different location. You need to perform the following steps to use a company file from a different location:
Initially, you need to click on Windows + E tabs.
This will lead you to Windows Explorer.
You need to look for the file with .QBW file extension.
When you search for a file location on a given network server, make sure to do it where the data file is present.
Now, right-click on the file and select copy.
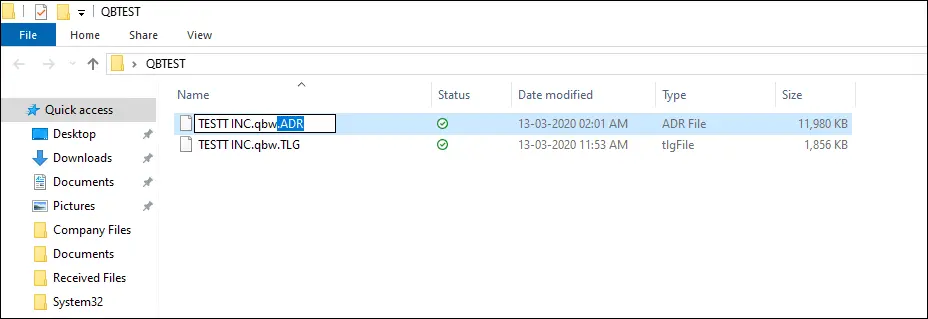
The next step is to find C: drive and create a new folder.
Assign the name to the folder as QBTEST.
Open the particular folder and paste the company file in it.
Open the QuickBooks holding ctrl tab.
Now, open the company file you copied and check if you still face the same issue.
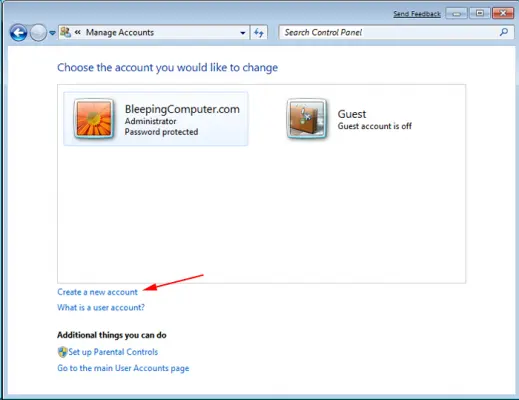
Solution 2: Create a new Windows admin user
If the first solution didn’t work, try creating a new Windows admin user. This involves the use of the following steps:
To begin with, open the Control panel.
Now, double-click on the user account and click on manage user.
The next step is to click on the add tab.
After it is complete, enter the name along with the admin domain and hit the ok tab.
If you are using Windows 10, then choose admin.
Also, press the finish tab and it will lead you to the user accounts dialog box.
Your QuickBooks desktop installation can be something causing the error. If your QuickBooks installation is damaged or corrupted. If that is the case, then try repairing the installation using the below steps:
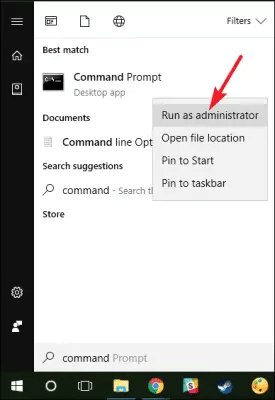
Start the process by pressing ctrl + alt + del
Once done with that, select task manager.
And then, press the process tab.
You now have to right-click on any of QuickBooks processes.
Later on, click on end processes.
You will now receive a confirmation notification to ask if you really want to end the process. Click on yes and try to perform the same task again. Check if the issue still exists or not and proceed further.
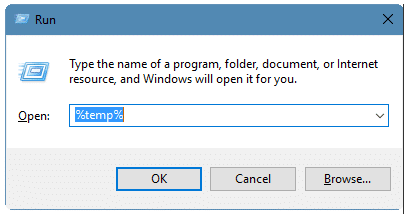
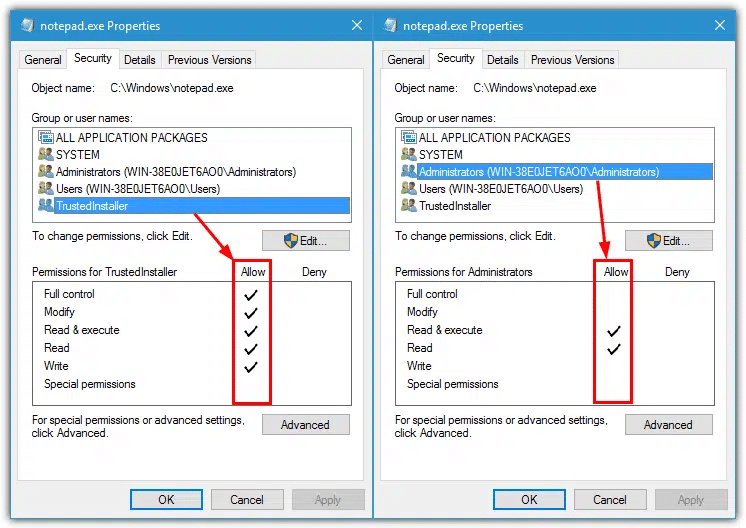
Solution 4: Edit permissions related to temporary folders
Here, you need to press the Windows key
After that, add %temp% in the search box.
Right-click the Windows temp folder after it has been opened and choose properties.
Furthermore, press the security tab on the properties screen and also click on the edit tab.
Go for the Windows username.
You now need to choose the checkbox for full control in the Allow column.
Click on ok tab.
And furthermore, install QuickBooks again to check if the issue continues.
Solution 5: Run QuickBooks in selective startup mode
To ascertain that no other software is causing an issue and hindering the process, you need to use selective startup mode. The steps involved in here are:
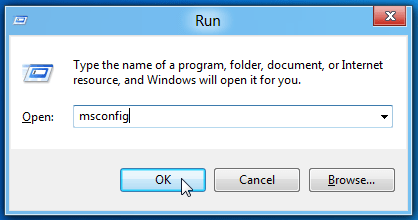
Initially, you need to press Windows + R to open the run command.
Once done with that, enter MSConfig when the window opens up on the screen.
You now have to enter the ok tab to show the system configuration screen.
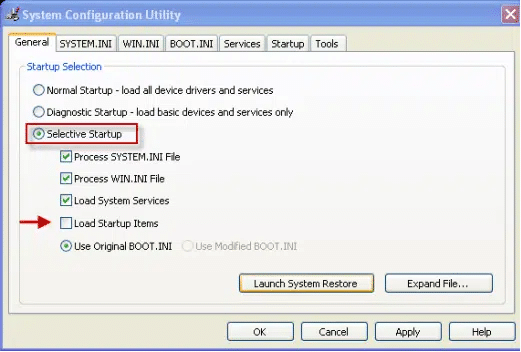
Followed by pressing the selective startup mode in the provided General tab.
The next step is to choose load system services.
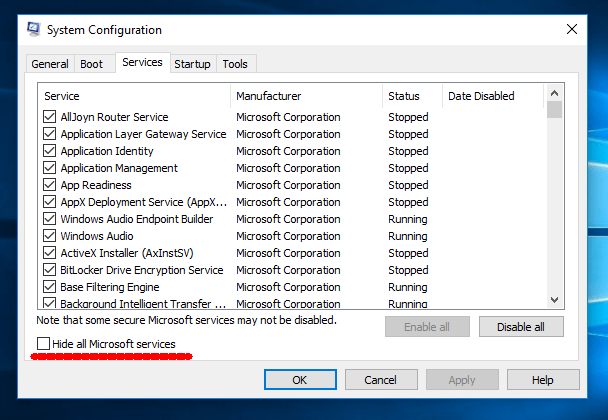
And then, move to the services tab and click on Hide all Microsoft services.
You now have to choose disable all option.
And further uncheck the particular hide all Microsoft services checkbox.
Ascertain that the Windows installer checkbox option is marked from the provided list of services.
If it is not marked, make sure to put a checkmark in the particular checkbox.
You are then required to click on the ok tab.
Once done with that press the restart tab on the system configuration screen.
Now try to install QuickBooks again. After installing QuickBooks successfully, make sure you head back to the normal startup to avoid any sort of issues further.
The process of shifting to normal mode is easy and can be performed using the steps below:
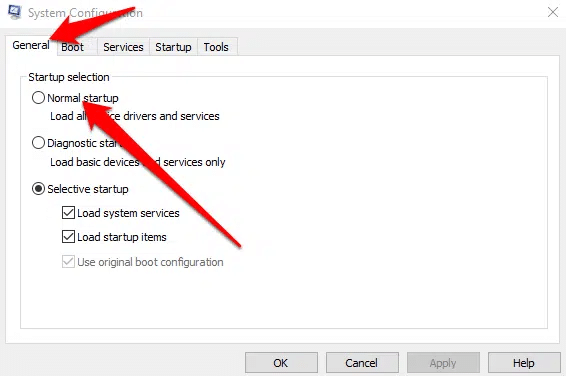
At first, press the Windows + R tab to use the run command
After that, add MSConfig and click on the ok tab.
You now have to select normal startup in the general tab
Also, click on the ok tab.
The last step is to choose the restart option in the system configuration screen.
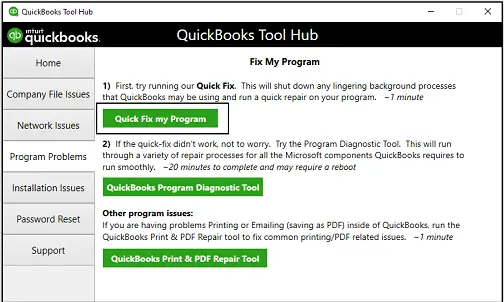
Solution 6: Use Quick Fix My Program feature in QuickBooks tool hub to fix force reboot issue
And also run the tool and let it perform the scan.
After spotting the issue, the tool will perform the necessary steps to fix it.
This might take some time.
Thus, you need to reboot the system to save changes.
The last step is to check if the issue continues to trouble you or not.
Solution 8: Turn on .NET framework
To perform these steps, you need to access an admin account. Here is what you need to do:
Begin with logging in to Windows using an admin account.
After that, head to the start menu.
You now have to choose the control panel.
Click on programs.
The next step is to turn Windows features on or off
And in the next step, turn on .NET framework 3.5
At the end of the process, you need to reboot the system.
QuickBooks installer usually needs .NET framework to install any new updates. If that is disabled, then the process of installation is bound to fail. The installer will now successfully install the software, which was previously showing an error.
Now that you know what the QuickBooks Reboot loop error is and what measures can be taken to permanently eliminate it, it is time to implement these steps to fix the issue successfully. However, if you fail to do so, even after performing the set of steps discussed above, then in that scenario, give us a call at +1-888-510-9198, and we will provide you with immediate support and guidance.
QuickBooks lets you customize your email templates and use them to send messages from the software directly. You can personalize your emails to customers and vendors by simply carrying out some basic set of steps. It is possible to create these email templates with subject lines and email bodies. Once you have designed a custom QuickBooks desktop email template, all you would need is to simply select the template when you send an invoice, sales receipt, transaction, or estimate and you are good to go. Not just that, as of QuickBooks Desktop 2022, you can simply add the option to customize and email bill payment stubs.
To help you with creating a custom email template successfully in QuickBooks, here we are with this segment sharing the complete set of steps that can be performed. However, if you need any assistance, then in that scenario, connect with our technical support professionals at +1-888-510-9198, and let them help you with your queries.
Steps to Create a Custom QuickBooks Desktop Email Template
Now that you know much about QuickBooks custom email templates, here are the steps that you need to follow to successfully create a custom email template. Let us have a look:
Step 1: Create and Customize a Template
Here, you simply need to sign in to QuickBooks as admin.
You can also sign in as a user with the required permissions to edit the company preferences.
Once done with that, navigate to the file menu and choose switch to single-user mode.
Perform the onscreen instructions for each template you wish to create. You can now create multiple templates for every transaction type.
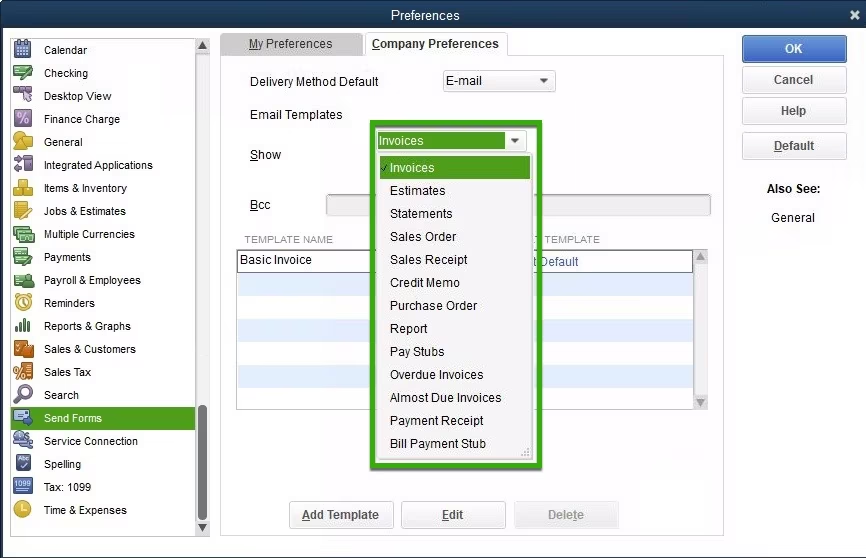
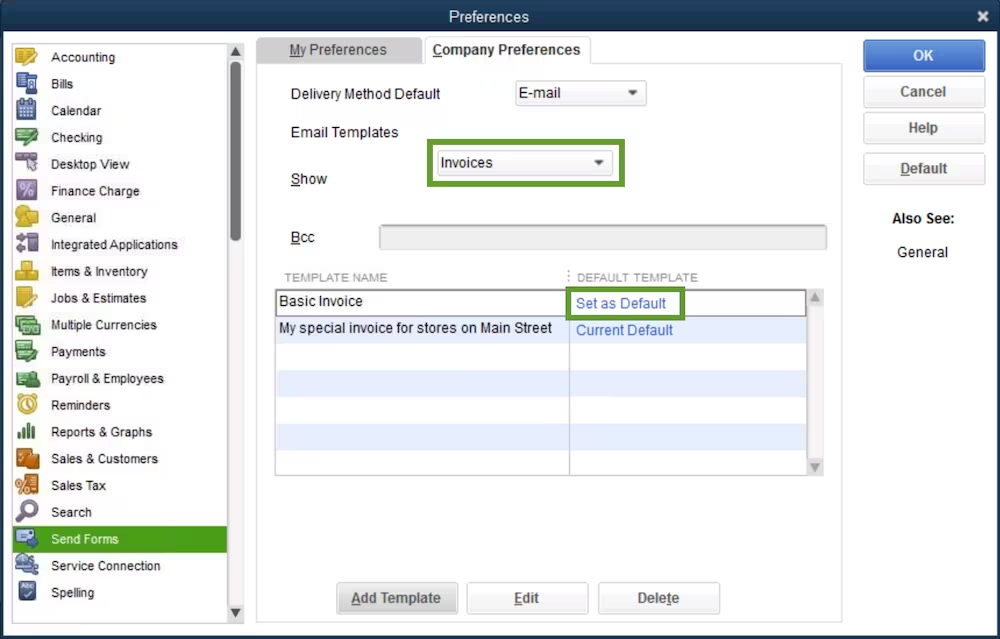
Initially, you need to head to the edit menu and choose preferences.
Once done with that, choose the send forms menu and also select the company preferences tab.
Now, from the delivery method default drop-down menu, you will have to choose the email tab.
The next step is to choose a transaction type from the email templates drop-down menu.
And further, create multiple templates for every transaction type transaction listed.
You now have to choose add template.
After that assign a name to the template.
Once done with that, customize the subject line and the body of the template.
Later on, choose the insert field to put a dynamic data field, which uses real data from the form including the customer name, due date, etc. Note that, you can type these fields into the message body, as long as they tally the prefilled options.
After you are done with the customization, you are supposed to click on save. Once you close the template, you need to click on ok in the company preferences tab to save the changes.
Under the company preferences tab in the Send forms menu, you will find all of the templates. In order to set one as the default, you need to choose a transaction type and choose set default next to the template you wish to use.
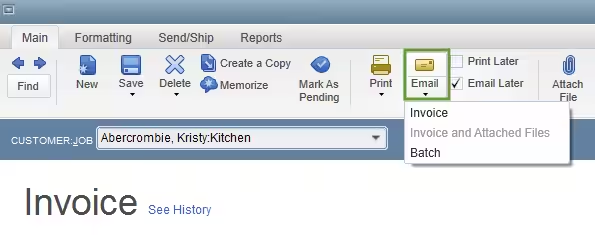
You can make use of your templates for emails sent alongside single transactions, batch emails, and even when you send pay stubs.
Email Sales/Payroll transactions
After you create an invoice, for instance, choose an email from the toolbar and then click on the invoice. QuickBooks will use the default template for the transaction type.
Whereas, if you go for an email later, you can choose one of the templates that you want to send a batch of emails. Head to the file menu and choose Send Forms. Once done with that, select the template you wish to use from the template drop-down,
In case you see your emails aren’t using any new template, then you can fix this issue or change your email template.
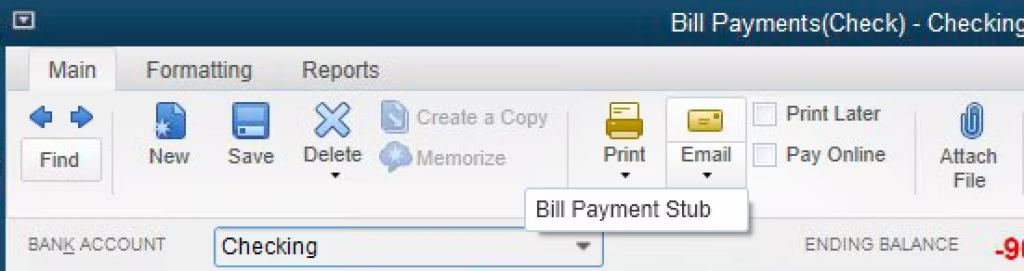
Email Bill Payment Stubs
When creating bill payments, you can send them using email with a custom template. You simply have to open bill payment, then choose email and bill payment stub and QuickBooks will use the default template for the transaction type.
Conclusion!
Creating a custom QuickBooks desktop email template isn’t that difficult, all you need is to implement the above-enumerated steps. However, if you still have any doubts or queries, or if you are unable to create custom email templates due to some reason, then in that case, do not think much in connecting with our technical support team at +1-888-510-9198, and they will surely provide you with the right information.
Having duplicate accounts might require you to merge them. This process of merging accounts in QuickBooks usually moves all the data into the one you wish to keep and makes the duplicates inactive. Not only that but keeping the lists clean usually speeds up the bookkeeping and makes it much easier. Note that, it is suggested only to merge the duplicates that were created mistakenly and be very careful when carrying out this process. In case you are an accountant, you need to follow the steps to consolidate multiple client lists at the firm. As this process is irreversible, it is essential for you to merge QuickBooks accounts carefully. To help you with this process, here we are with this segment sharing the complete set of steps to merge accounts in QuickBooks.
For more details, you can get on a call with our technical support team at +1-888-510-9198, and let our certified QuickBooks professionals help you with your queries.
Before you proceed with the steps, we would like to remind you again that merging accounts in QuickBooks is a permanent process. You can’t undo Intuit merge accounts once you have performed the steps. QuickBooks makes use of some accounts as the default for certain features. These accounts like the one connected to online banking, can’t be merged or deleted. Having said that, let us continue with the steps below to merge duplicate accounts. Note that, you should be in Accountant’s view before performing the steps. Here is how to combine accounts in QuickBooks:
In case you are merging accounts in QuickBooks online that have reconciliation reports, you need to save those reports first.
The account that you are trying to merge might not keep the reconciliation history. Moreover, the transactions remain on the merged account and stay reconciled.
Note that if both account registers have an opening balance equity transaction, then you will have to delete the transaction with the most recent date prior to merging. The older transaction is the opening balance in QuickBooks of the newly merged account.
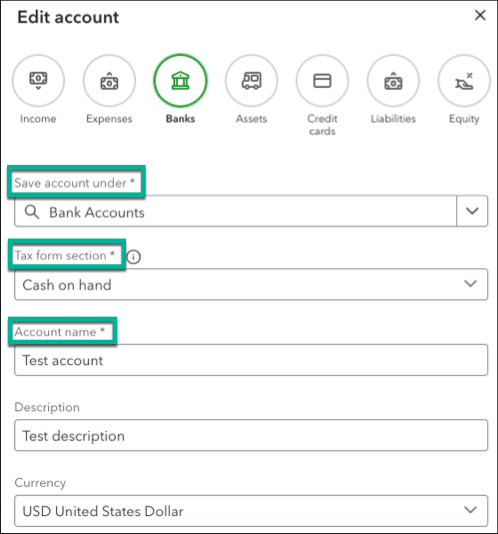
Also, find the account you want to keep, choose the dropdown in the action column, and click on the edit tab.
Also, note save account under (account type), tax form section (detail type), and account name (name) of the account, all of these should match in both the accounts you want to merge.
Check if an account is a subaccount or a parent account. You can see the names of the subaccounts in the name column of the chart of accounts list. In case it is, then note down the parent account it is associated with.
You now have all the information that is required for the account you wish to keep. The steps below are associated with the duplicate account.
Head to the chart of accounts.
You will now find the duplicate account (the one you won’t keep).
Choose the dropdown ▼ in the action column and also click on the edit tab.
Once done with that, change the account name. Along with the tax form section (detail type), so the duplicate account’s information tallies to the account you wish to keep.
In case you want to make this as a subaccount, then keep the following things in mind:
In case you are merging two parent accounts, then it is essential to ensure that they do not have any subaccounts.
Or if you are merging two subaccounts, then they both must have the same parent account.
Also, if only one is a subaccount, then you need to change the save account under (account type). This is to match the other parent account so it becomes a parent account.
Once done, you need to choose the save tab and click on Yes, merge accounts.
This will successfully merge two accounts so that you end up with one. QuickBooks moves past transactions from duplicate to the new merged account.
Merging accounts in QuickBooks Online isn’t that difficult. All you need is to perform the right set of steps carefully. However, if you are unable to merge accounts in QuickBooks online even after carrying out the set of steps enumerated above, then in that case, feel free to reach out to us at +1-888-510-9198, and we will provide you with immediate support services. Our technically sound QuickBooks ProAdvisors will provide you with immediate support services.
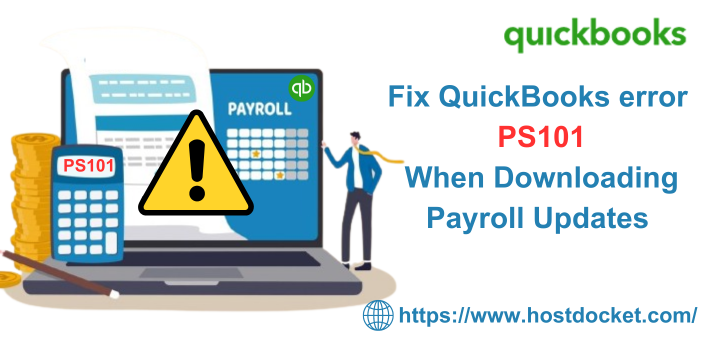
Did you see a warning message with an error code PS101 when downloading the latest update for QuickBooks payroll tax tables? Suddenly bumping into a random error PS101 isn’t very common in QuickBooks. The error code usually shows up with a warning message that states: QuickBooks payroll update did not complete successfully. Please try again before the deadline reaches the payroll submission. As a result of this issue, the payroll update might not succeed. Moreover, the same error can be seen when there are any sort of firewall restrictions or other background applications that are obstructive. To help you in dealing with such an error, here we are with this segment sharing the complete set of steps to get rid of QuickBooks error PS101. Thus, make sure that you stick around this segment carefully, or you can also connect with our technical support team at +1-888-510-9198, and let our certified QuickBooks professionals help you in fixing all sorts of QuickBooks-related errors.
There can be a handful of factors triggering QuickBooks error PS101. Let us evaluate each of the reasons one by one:
In case the antivirus program or the system firewall is blocking the communication.
Another possible trigger can be if the Internet Explorer settings are not configured properly.
You can further come across similar issues in case numerous QuickBooks versions are stored on the device.
Or if the application is facing any sort of connectivity issues disrupting the smooth running of the program.
Another reason can be the installation of QuickBooks updates is partially done.
Methods to fix QuickBooks error PS101
In order to get rid of QuickBooks error PS101, one can try to implement a few solutions. Let us evaluate each of the methods one by one:
Method 1: Clean install QuickBooks using selective startup mode
Before you begin with the clean installation of QuickBooks, make sure to create a company file backup, to avoid any sort of data loss. The steps involved in here are:
To start with press and hold Windows + R and this will open up the Run prompt.
Once done with that enter MSCONFIG in the search panel and click on the next tab.
The next step is to head to the general section and choose the below tabs:
Selective startup
Load system services
You now have to click on the services tab and press Hide all Microsoft services.
After that click on disable all option.
Now, uncheck the lock screen.
Also, click on ok tab and select restart.
The user will then have to reinstall QuickBooks desktop.
Method 2: Configure Windows Firewall that excludes QB
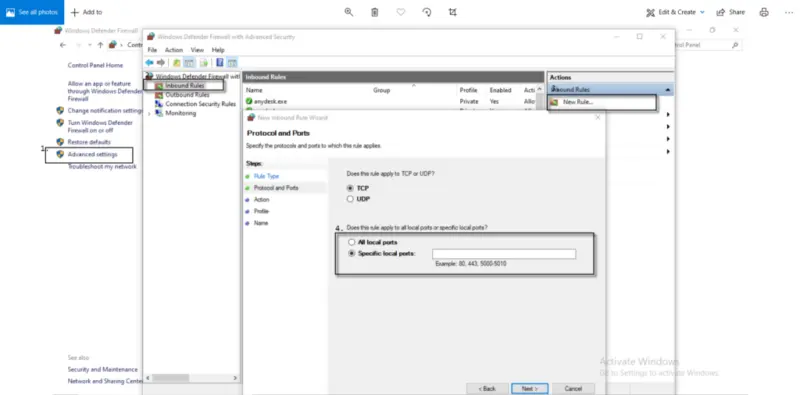
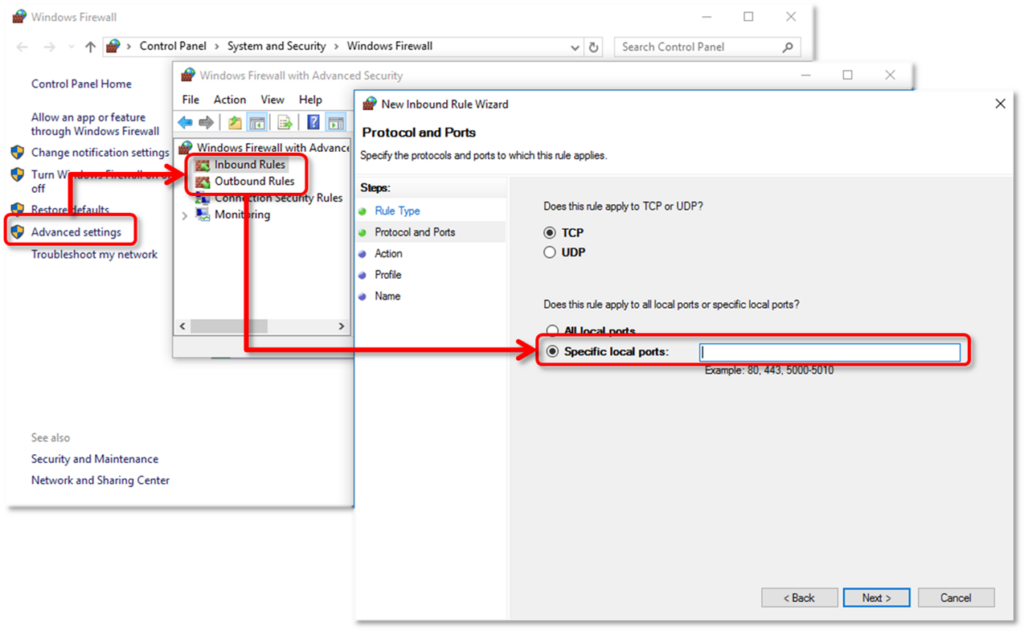
Windows firewall is often set up to block certain websites and applications. Therefore, it is important to Configure Firewall Ports and Security Settings for QuickBooks for pages and apps that you want to access regularly. You can do this using the steps below:
Here you simply need to click on the Start tab
Once done with that, enter Windows Firewall in the search bar and choose the Windows Firewall tab.
Now, head to the advanced settings section.
Followed by, you need to see inbound rules and right-click on it.
After that select Create a new rule.
You now have to press the port tab and click on next.
Make sure that TCP option is marked
Move to the specific local ports field and enter the relevant ports according to the version of QuickBooks:
If the above steps didn’t help, try downloading and using the QuickBooks tool hub. You can carry out the steps below to fix the issue using the QuickBooks tool hub.
Simply try to close all background processes.
Now head to the official Intuit website and download the latest available version of the QuickBooks tool hub.
Once done with that, save the download file to an easy-to-access location.
The next step is to double-click the file downloaded above i.e., the QuickBooksToolHub.exe file.
And perform the onscreen prompts to complete the installation process.
Now double-click the QuickBooks tool hub icon and open it.
The next step is to click on the program problems tab and also click on Quick Fix My Program.
After the program diagnoses and fixes the issue on the system, you need to reboot it.
The last step is to download the payroll tax table update.
Conclusion!
Payroll errors in QuickBooks can be extremely annoying, especially errors like PS101. Hopefully, reading this segment might be of some help in getting rid of the QuickBooks error PS101. Just in case you have any queries, or if you come across the same issue again due to some reason, then in that case, feel free to reach out to our technical support team at +1-888-510-9198, and our certified QuickBooks professionals will ensure that all your QuickBooks-related queries are addressed immediately.
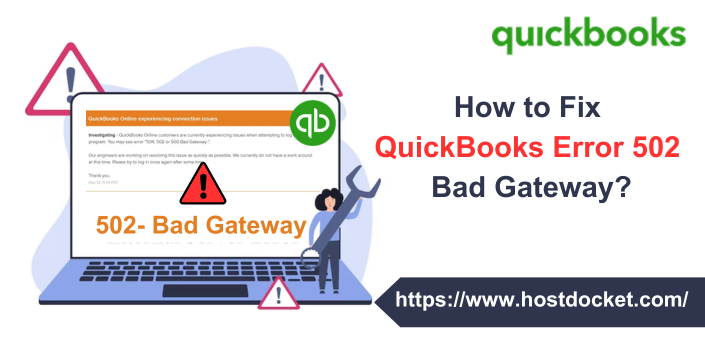
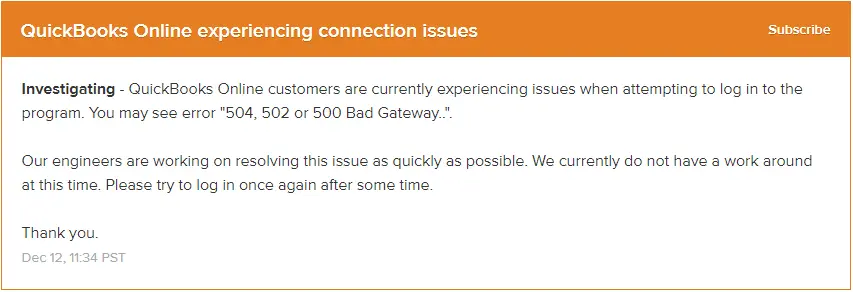
Did you see QuickBooks error 502 bad gateway? Well, this particular issue can be seen due to invalid responses from the server or when the cache memory of the browser gets full. QuickBooks error 502 bad gateway usually indicates that the HTTP status code server is getting an invalid response from another server on the internet. When a user saves a web page, the browser saves some data from the page in the cache memory, to simply load it quickly the next time you visit the page. However, when the cache memory gets full, the browser fails to store data further and this ultimately leads to error code 502 bad gateway. It can further be seen when you try to update QuickBooks to the latest release.
This error might seem to be a bit confusing, yet can be easily eliminated by clearing up the cache file of the web browser. There are a handful of factors that can trigger such an error in QuickBooks, which we have tried to cover in this segment along with some quick fixes for the same. To discover what those factors and quick fixes are, stick around this segment carefully, or you can further get in touch with our technical support professionals at +1-888-510-9198, and we will provide you with instant support services.
As mentioned earlier, a handful of factors can trigger such an error. Let us evaluate each of the factors causing bad gateway errors one by one:
In case you haven’t cleared the browsing history for a long period of time, then it can trigger this bad gateway error.
Another reason can be if there is any sort of malware or virus attack.
You can further come across a similar issue if the user hasn’t added Intuit as a trusted site in the browser.
Moreover, if the cache memory of the browser gets full, then it can trigger this particular issue.
Or if the cache memory of the QuickBooks application is full.
You can also face this issue if the active scripting is turned off in the browser’s settings.
Methods to fix QuickBooks error 502 bad gateway
Getting rid of the bad gateway error in QuickBooks becomes easy, once you have a grip onto the methods discussed below. Let us explore what measures can be taken to eliminate QuickBooks error 502 bad gateway successfully.
Method 1: Access QuickBooks using a Web browser
Navigate to the official site of Intuit.
Enter the credentials and click on the help tab.
The next step is to click on Contact Us.
Once done with that end 502 bad gateway in what we can help you with section.
Method 2: Download the latest transactions manually
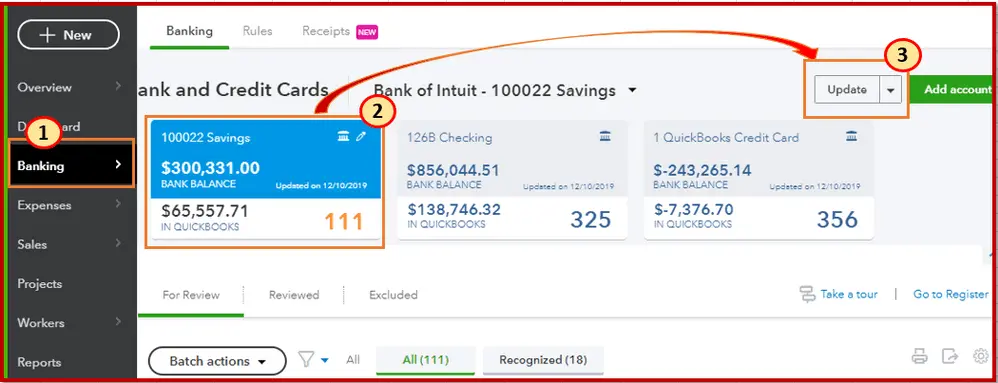
Under this process, you will have to initially head to the banking menu.
Furthermore, you will have to choose the account that is to be updated.
Now, click on the update tab.
In case you face any duplicate entries, then there is a probability that your bank sent them twice. This often happens after a maintenance update is carried out. The transactions can be excluded from the download transactions page twice.
Head to the banking page.
Now, click on the review tab and mark the duplicate entry.
Furthermore, click on the batch actions tab and select exclude selected.
If you see any missing transactions, then they might not be posted yet.
Method 3: Verify settings of active scripting in the internet explorer
You need to check the settings of active scripting in Internet Explorer. This can be done using the below-scribbled steps:
Begin with rebooting the browser.
And then, clear the browser’s cache.
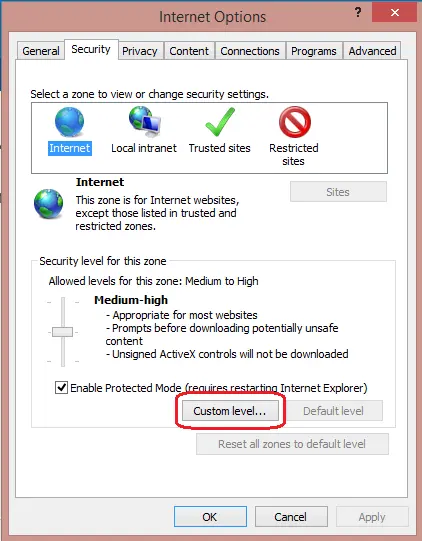
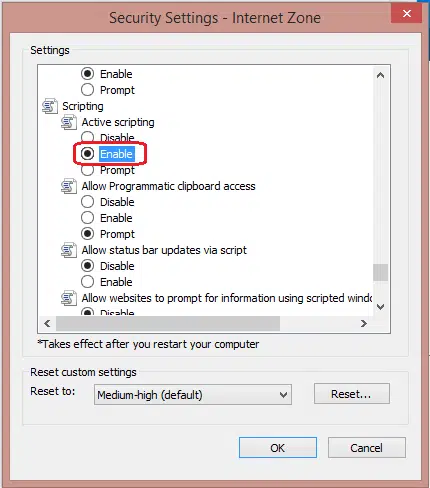
Furthermore, launch Internet Explorer and choose the Internet option from the tools menu.
The next step is to open the security tab and head to the internet icon.
After that, select the custom level and click on the enable active scripting option.
Toward the end, you need to click on the ok tab.
You will be required to reset the browser to its default settings. Note that this will change any customized settings that users have on the browser.
Browser cache can be one of the basic reasons causing such an error. Thus, it is suggested to clear the cookies and cache of the browser. The steps for Firefox, Internet Explorer, chrome, etc, might vary.
For Firefox:
At first, you will have to choose 3 bars present at the top.
Later on, head to the options tab and select the privacy and security tab.
You will then have to mark the cookies and site data, as well as the cached web content.
The last step is to choose the clear option.
On Internet Explorer:
Under this process, you need to launch Internet Explorer and then head to the tools tab.
Followed by, clicking on the internet options.
You now have to choose the delete tab in the general tab.
And head to the box having the temporary internet files.
End the process by clicking on the delete tab.
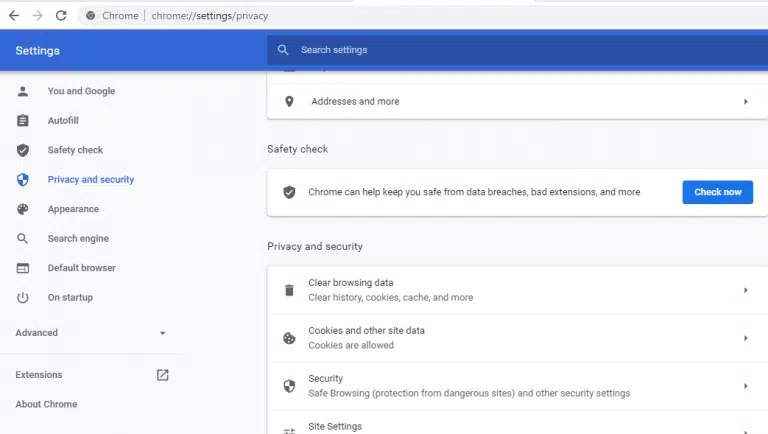
For Google Chrome:
In this process, you need to launch Chrome and choose the three dots.
The next step is to head to more tool options and also choose clear browsing data.
After that, make sure that all time has been selected in the time range list.
Also, mark cookies, other site data, cached images and files, and browsing boxes.
The last step here is to choose a clear data option.
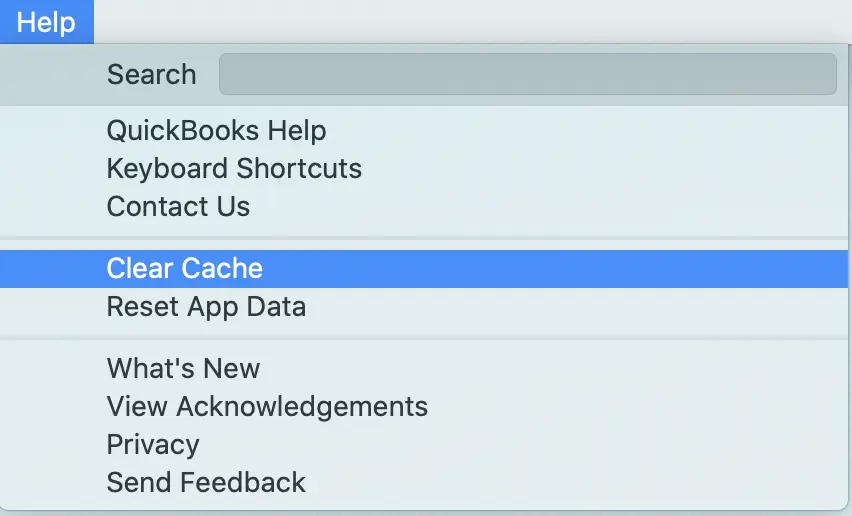
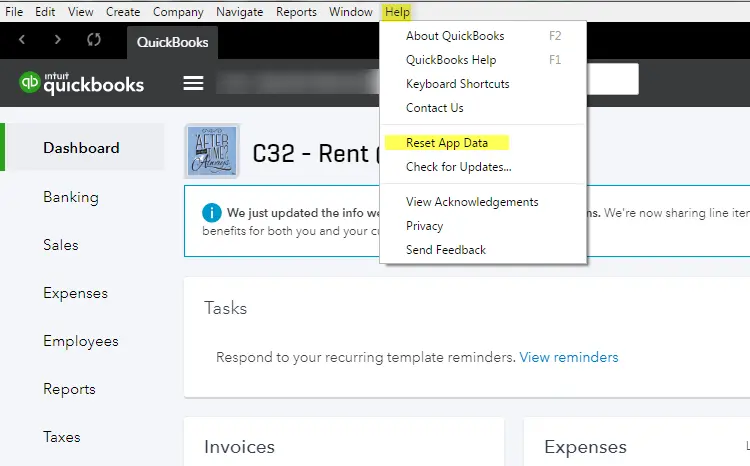
Method 5: Clear cache of QuickBooks
Previously you cleared the cache of web browser. However, at times the cache of the software itself can trigger the error. Thus, try to clear the cache files of QuickBooks using the below steps.
Begin the process by launching QuickBooks.
Choose the reset app data in the help tab.
You now have to start the application.
At the end, verify whether the error is still active or not.
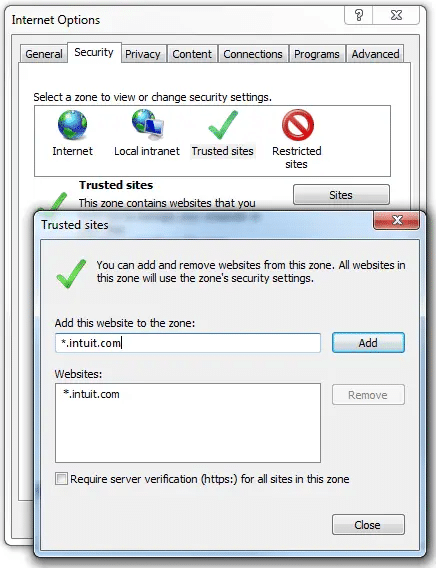
Method 6: Add the Intuit website as a trusted website in the browser
For Safari on Mac
Here you need to launch Safari and then write com in the address field.
After that click on enter tab.
Choose bookmarks and add the bookmarks tab.
You now have to choose top sites from the add this page drop-down list.
Followed by heading to add tab. How to Fix Script Error When Accessing QuickBooks Desktop?
The last step here is to check whether the issue is fixed or not.
For internet explorer
As Internet Explorer, you need to choose Internet options on the tools menu.
And then, choose trusted sites from the security tab.
Now, write intuit.com and unmark the server.
You also need to click on add option and hit the close and ok tabs respectively.
Now that you know what actually can fix QuickBooks error 502 bad gateway, it is time to implement these measures and fix the issue permanently. However, if you still have any queries related to the issue, or if you need our assistance at any point in time, then in that scenario, ring us up at +1-888-510-9198, and our certified QuickBooks support professionals will provide you with instant support and guidance.