If you run a small business, then a QuickBooks checking account is something that you need to know. QuickBooks checking is a monthly fee-free checking account where all customer payments are deposited. You can use your QuickBooks checking account to save money or make use of features like envelopes to save proactively. It is a business account with no monthly fees, minimum balances, or instant deposit fees. With a QuickBooks checking account, your business gets complete financial management, cash flow forecasting, and interest-earning potential. To give you a better insight into QuickBooks checking account, here we are with this segment sharing the details related to QuickBooks checking account, along with the procedure to use it.
Thus, make sure to read this segment carefully, or you can also connect with our technical support team at +1-888-510-9198, and we will provide you with instant support services.
QuickBooks checking is a business account designed for small businesses to let them have financial freedom. QB users can open a bank account that lets them get fast payments with no monthly minimum requirements. Just like other checking accounts, you will get a debit card. The significant difference is that you can immediately start spending your funds with an instant deposit instead of waiting for incoming funds to clear. You further get access to a virtual debit card till you get your physical card.
In order to open a checking account, you just need basic information, such as business name, employer identification number, address, and phone number. QuickBooks checking is free, but you need a QuickBooks online account to access QuickBooks checking account.
Features of QuickBooks Checking Account
Free to Access
Qualified balance requirements or monthly fees.
Cash flow forecasts and analysis
ACH transfers are free of charge
Save money for expenses in envelopes to earn 1.25% APY.
QuickBooks Debit Card: A debit card makes it possible to make purchases using the cash balance in QuickBooks. It further links to QuickBooks cash business bank account and reconciles with QuickBooks without many issues.
QuickBooks Checking Account: A business bank account gives complete financial management, cash flow access, and interest-earning potential.
Access to Instant Deposit: With instant deposit, one can process incoming cash using QuickBooks payments without having to wait for them to clear. Instant deposit offers free, instant access to funds from QuickBooks payment in QuickBooks cash account for approved transactions.
Google Pay and Apple Pay: You can connect your QuickBooks debit card to Google Pay and Apple Pay to skip lengthy online checkout forms and quickly pay in person within one touch.
Seamless QuickBooks Integrations: You can use your money in the checking account to run payroll, accept payments, and create invoices in QuickBooks online and then send them directly via checking account because QuickBooks checking seamlessly integrates across the QuickBooks online platform. All these activities are reconciled and accounted automatically for in their QuickBooks file for a complete money-in and money-out view.
Envelopes: Business owners can use envelopes to set money away for specific planned or unexpected expenses, preventing unintentional use of their future spending.
Bill pay: Small businesses can plan vendor payments and manage all their money-out transactions in one location. They have QuickBooks set up to record the transactions, so their books are automatically reconciled.
Cash flow planner: This feature offers a complete view of the company finances via a dashboard that shows how much money is inflowing and outflowing. This end-to-end analysis gives an overview of the financial inputs to predict the business’s cash flow over the following 90 days.
Mobile check deposit: Businesses can collect checks from customers or vendors and deposit the money directly into their accounts. In the coming days, QuickBooks checking customers will be able to receive mobile check deposits.
Now that you know the basic information related to QuickBooks checking account, it is time to perform the necessary steps to use QuickBooks checking.
Step 1: Set up your QuickBooks Checking Account
You need to register QuickBooks payments and QuickBooks checking, in case you haven’t already. If you are accepted, then you will be given a QuickBooks checking account within 7 to 10 business days, and your QuickBooks debit card will arrive in the mail.
Step 2: To QuickBooks checking connect a bank Account
To begin with, you simply need to head to business overview and then select cash flow, and then click on QuickBooks checking.
Now, in order to transfer money between your accounts, first, choose transfer. To send money, you will have to start the connection.
After that, add a bank.
Once you have entered the bank’s name, you need to choose the type of the account.
Enter the account number and routing number
After that, choose the next tab when you are ready to connect.
After this, within the next three days, QuickBooks will make two small deposits to the account. You need to recheck the transactions in QuickBooks when you see the deposits in the account.
Step 3: Transfer Money in and out of the QuickBooks Checking Account
You can simply view the balance of the QuickBooks checking account at the top of the cash flow menu. The accountants having read-only access to QBOA can view the QuickBooks checking account for their clients. They can further access other documents, download statements, and verify transaction information. You need to access the client view to access the read-only QuickBooks checking section.
Fill up your QuickBooks checking account with money
You need to first select QuickBooks checking from cash flow under business overview.
After that, select transfer and then right option to transfer money between accounts.
You now have to enter your desired transfer amount.
Pick + in the from field, and then select your connected bank account.
Once done with that, you need to select QB checking account in the to field.
You need to then enter the desired transfer amount.
Withdraw money from your QuickBooks Checking Account
Withdrawing funds from QuickBooks checking account is possible in a few ways. You need to choose cash flow from the business overview and then go for QuickBooks checking. Here are the steps that you can perform to transfer money out of the checking account.
The very first step is to choose move money between your accounts after selecting transfer money.
After that, the amount to be moved from the checking account should be entered.
The next step is to select your QuickBooks checking account in the form field.
Also, click on the plus + icon and select a bank account.
The last step is to select finalize transfer when you are ready.
Using QuickBooks checking account to pay bills
You need to first start by selecting Pay a bill
After that, follow the steps that show up on the screen to schedule and pay by paper check or ACH.
In order to withdraw money from ATMs and make purchases, you can use your debit card.
Step 4: Categorize your transactions
QuickBooks can categorize as many QuickBooks checking transactions as possible on its own. However, it can’t classify everything. In order to categorize your QuickBooks checking transactions, you must access the bookkeeping menu and choose transactions.
Well, QuickBooks checking is basically a no-cost, no minimum balance, no required daily balance business checking account with a debit card. It further has no monthly service charges and for eligible users, the quick deposit is available at no additional cost. Moreover, small business owners can now access all in one business bank account that is effortlessly integrated with the books. This further lets small businesses manage their finances, see their full financial picture, pay their employees and invoices, accept payments, and also access financing.
QuickBooks cash business checking
The QuickBooks business checking account was added to the product line of QuickBooks online in the year 2020. It provides standard business checking functions like ACH transfers, a debit card, and access to AllPoint ATM network, along with offering 1% interest on all balances. What makes it even better is that there are no fees or minimum balance requirements when opening an account. The users can have an unlimited number of transactions, but the volume of those transactions is set up to a certain limit. With a debit card, one can make purchases around $10,000 per day and ATM withdrawals up to $1,000 per day and $5,000 per month.
The remaining QuickBooks and QuickBooks cash are meant to work together without any sort of issue. To understand it better, here is an example: the money might be in the checking account within minutes if users receive payment using QuickBooks payments. One can anticipate gaps using a dashboard that shows the most recent transactions and uses machine learning to forecast cash flow for the following few months. The users can also create envelopes inside the bank account to keep money away for particular uses like payroll or debt payments. It should be noted that a check deposit is not yet an option. Thus, customers who regularly deal with checks may wish to search elsewhere for a business banking service. You must enter the recipient’s details online before the bank sends the check on your behalf. Also, you do not have an option for wire transfers.
Why QuickBooks cash is ideal for small businesses?
Firstly, small businesses don’t use checks.
They prefer to manage most of their finances digitally and value the insights that their digital solutions can provide, such as cash flow forecasts.
They get interest on the checking account balance.
Towards the end of this segment, it is believed that the reader might be able to make the most of a QuickBooks checking account. Just in case there are any sort of queries, then in that case, consulting our technical support team at +1-888-510-9198 is suggested. Our certified QuickBooks ProAdvisors will definitely answer all your queries immediately.
When you use online banking, the transactions are recorded. And to download these transactions, a CSV file is required. A CSV file is basically used to import online banking transactions into QuickBooks. You can import CSV files that include bank transactions, general journal entries, accountant’s changes, and batch transactions in QuickBooks. In order to import CSV files, you need to start installing QuickBooks Import Excel and CSV toolkit. To make the import process easier for you, here we are with this segment sharing the complete details as to how to install QuickBooks import Excel and CSV toolkit and how to import CSV files.
Thus, to learn further, stick around till segment till the end. You can also connect with our technical support team at +1-888-510-9198, and we will provide you with immediate support and assistance.
CSV files are basically simple text files that contain tabular data. A comma separates each field in the file from the next in a CSV file. The majority of spreadsheets support this format including Microsoft Excel and Google Spreadsheets. Also, you can create and edit CSV files with any text editor like Notepad. You can also import files related to some of your vendors and customers. CSV files are also termed as Comma Separated Values.
Why import CSV into QuickBooks?
In order to track finances, it is essential to maintain records of all the data. The CSV file is already in a tabular format and is further supported by spreadsheets. In the case of online banking, there are so many QuickBooks transactions and manually Creating transactions in QuickBooks desktop involves a lot of effort and takes time. Moreover, recording manually can lead to inaccuracy. The concept of importing CSV files eliminates the chances of errors due to inaccuracy and saves a lot of time.
Import CSV files
In order to import a list in the CSV format, you simply have to install QuickBooks import Excel and CSV toolkit. This toolkit includes:
Import from Excel and CSV manual – A PDF document with instructions, best practices, and notes.
CSV Example Folder – 4 Sample CSV files, one for each type of list
XLS Example Folder – A sample Excel file that contains 4 worksheets, one for each type of list.
Allowed fields – A reference guide explaining what fields are available for Excel and CSV import.
Steps to install QuickBooks Import Excel and CSV ToolKit
You can try to install QuickBooks Import Excel and CSV toolkit using the set of steps enumerated below.
Initially, open the file download window for the toolkit and then choose the save tab.
The next step is to head to the Windows desktop and choose Save.
Double-click the QuickBooks_Import_Excel_and_CSV.exe on the Windows desktop. This will open the WinZip Self-Extractor window.
After that, choose browse and select the folder where you want to install the toolkit.
Also click on the ok tab.
The next step is to choose Unzip to extract the contents and choose Close to close the WinZip self-extractor window.
You now have to open QuickBooks Import Excel and CSV folder from the location you opted for.
One can try to export a list as a CSV file, in case you do not have MS Excel installed on the system or if you want to view and edit the data using a different format.
Customer and Vendors
The very first step is to open a Customer/vendor Center
After that, choose the Excel drop-down and select
Export customer/vendor list, in case you want to export customer/vendor data such as name, balances, and contact information.
Export transactions, if you wish to export transactions (either by name or transaction type)
Now, in the export window, you are supposed to create a comma separated values file i.e., .csv file.
Furthermore, choose export.
After that, assign a file name, and select the location where you wish to save the file.
The process of setting up QuickBooks Import Excel and CSV toolkit is easy and involves a few basic steps. Hopefully, performing the above steps carefully might be of some help to you in successfully importing QuickBooks Excel and CSV toolkit. However, if you have any queries even after performing the steps above, or if you need any sort of technical assistance, then, in that case, feel free to consult our technical support team at +1-888-510-9198, and our certified QuickBooks ProAdvisors will answer all your queries immediately.
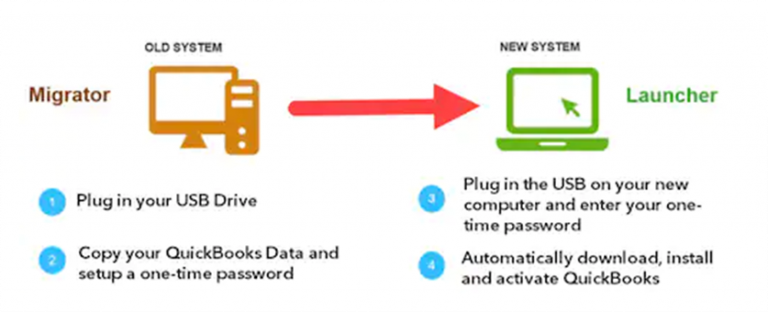
Moving QuickBooks from one system to another, well you will need QuickBooks Migration Tool for this. This tool is designed in a way to make transferring data from one system to another super easy and swift. You can use this tool to transfer data safely from one system to another without much human intervention. It can get the work done in half the time and thus, it saves a lot of time. To help you understand the QuickBooks migration tool better, here we are with this segment sharing the complete set of steps to download and use the QuickBooks Migration tool.
Thus, read this segment carefully. Or you can further get in touch with our technical support team at +1-888-510-9198, and let our certified QuickBooks ProAdvisors help you with your queries.
As the name suggests, the QuickBooks migration tool is an essential tool when you migrate or move QuickBooks from one system to another. This tool eases the process and eliminates the risk of data loss when transferring the data. The migration tool is accessible via your browser, which cuts down the need for a copy of QuickBooks Desktop Pro, premier, enterprise, or Mac on your system to migrate the data files.
Requirements for QuickBooks Migration Tool
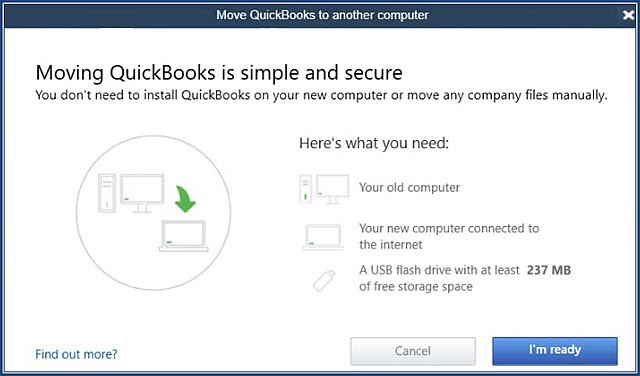
There are a few things that you might require when transferring your data using the QuickBooks Migration tool. Let us have a look:
To store your QuickBooks data, you must have a USB flash drive with optimum space.
Another essential thing is that your new computer should be connected to the Internet.
The available space should be at least 150MB to 250MB.
Steps to set up QuickBooks Migration Tool
You will initially have to download and install QB Migration Tool on your system. Let us check out the steps that you need to perform to download, install, and set up the tool successfully.
Begin with logging in to QuickBooks using your admin ID and password.
Once done with that, allow access so that you can easily copy the data into the system.
The next step is to head to the migration tool and click on it.
The migration tool will now ask for a password. Thus, enter the admin password in it.
After accessing the tool, you need to click on the Start or Run tab.
The migration tool will begin the process.
When the tool initiates its process, the flash drive also starts copying and transferring some files.
Note that, after the completion of transferring the data, the tool never formats or erases your data, the data remains as it is in the past. However, if you want to erase it, then you can by clicking on the delete tab.
What data can be transferred using QuickBooks Migration Tool?
Here is a list of data that can be easily transferred using the QuickBooks Migration Tool. Let us evaluate:
QuickBooks Desktop details, including the version and other details needed to install QuickBooks Desktop on your new computer.
Up to the last three company files that you opened on the old computer, including sample files.
Related files, custom templates & forms
QuickBooks letters and templates
Scheduled and memorized reports
Local attachments
Printer Setting (PrintEng.ini, wpr.ini, and QBPrint.qbp)
What data can’t be transferred using the QB migration tool?
Certain data can’t be transferred even after using the migration tool. This includes:
In case you are using QuickBooks in a multi-user setup, then the configuration won’t be copied to the new system.
Also, if you have payroll or payment services set up, then you might have to sign in again on the new computer, as this is something to protect the data.
The user will have to uninstall Intuit Data Protect on the old computer, sign in again on the new computer and go through the setup process. All previous backups will still be available.
Any company files that aren’t used by you recently, won’t be copied. As mentioned earlier, QuickBooks only copies three of the most recently opened company files. Other files will have to be moved manually or you can also restore them from the Intuit Data Protect.
You should also note that any manual backups you created earlier won’t be copied by the Migration tool.
Steps to move data using QuickBooks Desktop Migration Tool
Here are the steps that you need to carry out on your old system.
You need to first connect USB flash drive in your old computer
Later on, launch QuickBooks desktop.
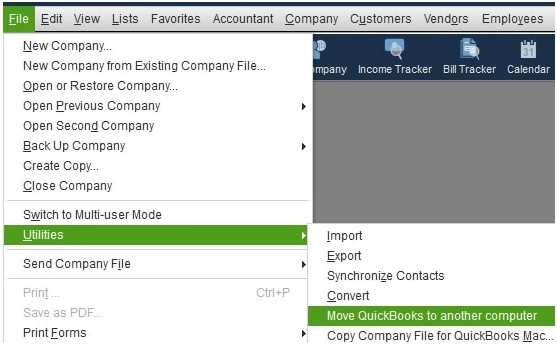
Once done, head to the file menu and click on it.
From the drop-down menu of the file, choose utilities tab.
Then, choose Move QuickBooks to another computer option.
Now, go for I am ready and create a unique password.
Follow online instructions and choose your USB flash drive.
The last step is to sit aside and wait for all the files to be copied.
Steps to be followed on the New computer
After you are done copying the files, you now have to launch your new system.
Here, you need to plug in your flash drive in the new system.
The tool will not launch on its own. Thus, you will have to open the flash drive in the new system.
Also, double-click the Move_QuickBooks.bat file.
Furthermore, enter the password that you created in the old system.
After you are done with all the steps above, wait for the migration tool to complete its task.
Other steps to complete QuickBooks setup
Note that, not all the data can be copied using the migration tool. Thus, you need to perform some additional steps to complete the task easily and migrate the entire data successfully.
You need to log in to the payment and payroll services.
Furthermore, log in to Intuit data protect.
Also, configure the entire backup schedule
Take the backup of the company files so that you can skip unexpected issues or problems that might show up in the future.
Steps to manually transfer the data
Transferring the data might seem to be a tough nut to crack, however, a few basic steps can help you in transferring the data manually. Here are the steps that you need to follow to manually transfer the data to the new system.
First of all, create a QuickBooks backup on the old system.
You now have to uninstall QuickBooks from the old system.
Then, move to your new computer and install QuickBooks in your new system.
Using QuickBooks Migration Tool you can migrate the required data from your old computer to the new one without much hassle. The steps enumerated above might be of great assistance in successfully completing the migration process. However, if you aren’t able to do so, or if you have any queries, then in that case, feel free to connect with our technical support team at +1-888-510-9198, and we will provide you with immediate support and assistance.
FAQs Related to QB Migration Tool
Where can I find the Migration Tool?
In order to find the Migration tool, you can perform the below steps:
1. At first, you need to sign in to QuickBooks online using QuickBooks supported web browser 2. After that, enter https://app.qbo.intuit.com/app/exportqbodatatoqbdt 3. Now, head to the export overview screen and click on the tab to start. 4. Download the tool by clicking on the download tab in QuickBooks. 5. After the installer is downloaded, launch and run it. 6. Wait for the installation process to complete, and after that perform the onscreen steps to run it.
What to do after migration of QuickBooks Desktop?
After you are done with the migration, you need to perform the following steps:
1. Sign in to your payroll and payment services. 2. Furthermore, sign in to Intuit data protect and set up the backup schedule 3. Transfer the additional company files that were left when using the tool, from the old system to the new system. 4. Ensure that you always take a backup of the company file.
What if I don’t have my CD?
In case you have your license and product number and not the CD and you need the installation files, then simply download your version of QuickBooks from Intuit directly.
What if I don’t have my license and product numbers?
Will I need to register QuickBooks after I reinstall or move it?
In case you need to move your installation to another system, you will have to register again. This can be done as follows: 1. Head to the help menu and choose Register QuickBooks 2. You now have to enter the info, Intuit detects the registration status of the copy of QuickBooks and records the info for the new computer.
Making an incorrect journal entry mistakenly is pretty common. In such a scenario, you might have to delete or reverse an entry by performing some basic steps. You can simply create journal entries in QuickBooks on your own, and if some issue arises, you can edit or correct a journal entry by reversing it if needed. Any entry made mistakenly can be removed permanently. A journal entry can be created and deleted in both QuickBooks desktop and QuickBooks online. However, the process might differ in both cases. To help you further, here we are with this segment sharing how to delete a journal entry in QuickBooks successfully.
In case you have any queries or if you need any sort of technical guidance at any point in time, then in that case, feel free to connect with our technical support professionals at +1-888-510-9198, and let them help you with your queries.
Before you directly jump on to the steps to reverse or delete journal entries, it is essential to understand the difference between the two.
Reverse a journal entry: This can be done when you need to allocate a transaction between two accounting periods or fix a debit/credit error. Note that, reversing simply reverses the debits and credits and doesn’t delete the original entry.
Delete a journal entry: In case you create it by mistake and need to get rid of the entry permanently.
How to delete a journal entry in QuickBooks Desktop?
The procedure to delete a journal entry in QuickBooks Desktop is different from QuickBooks Online. Let us understand the steps in detail:
Initially, you need to head to the company menu.
Now, choose make general journal entries.
Once done with that, find and choose the journal entry that you want to delete:
In QuickBooks for Windows, choose find and enter the name, date, entry no, or amount, and then choose find.
In QuickBooks for Mac, choose the journal entry you wish to reverse from the list on Make general journal entries window.
In order to delete the journal entry:
You need to double-click the journal entry in QuickBooks for Windows and then choose delete, or void and click on the ok tab.
In QuickBooks for Mac, you need to choose Delete General Journal from the edit menu.
Steps to reverse a journal entry in QuickBooks Desktop
In order to reverse a journal entry in QuickBooks desktop, you need to carry out the following steps:
At first, navigate to the company menu and choose Make general journal entries.
After that, find and choose a journal entry that you want to reverse.
In QuickBooks for Windows: You will have to choose find and enter the name, date, entry no, or amount and choose find.
Whereas in QuickBooks for Mac, you simply have to find and select the journal entry you wish to reverse on the left side of the Make general journal entries window.
Now, go for the reverse option.
And lastly, choose save and close.
How to Delete a journal entry in QuickBooks Online?
Note that, deleting a wrong journal entry can unbalance the accounts immediately. Thus, you must be absolutely sure to delete the journal entry. In case you invited your accountant to review your books, then instead of deleting the entry, it is possible to make an adjusting journal entry. Having said that, let us check out the steps to delete a journal entry in QuickBooks Online.
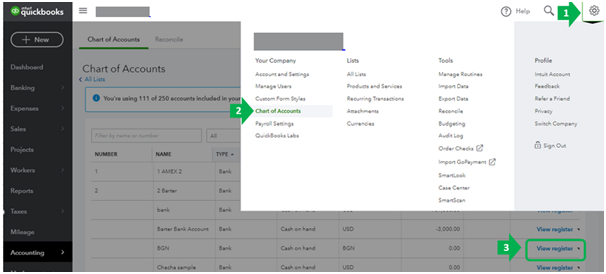
To begin with, you simply need to choose the settings tab and then go for the chart of accounts.
Once done with that, find the account you create the journal entry for.
Now, choose the account history tab.
And find the journal entry in the account register.
The word journal should be present in the Ref no. or type column.
The next step is to choose a journal entry to expand the view.
Then, simply click on delete and yes to confirm.
This would delete the entry successfully.
Steps to reverse a journal entry in QuickBooks Online
Reversing a journal entry usually reverses the debits and credits and doesn’t delete the original entry. The steps involved in reversing a journal entry in QuickBooks online are as follows:
Deleting or reversing a journal entry in QuickBooks desktop and online involves a handful of steps only. However, it is important to ensure that you actually need to delete or reverse the entry or not, as this might trigger balance issues. Hopefully, reading this segment might have helped you in successfully deleting or reversing journal entry in QuickBooks. However, if you have any queries at any point in time, then in that case, feel free to connect with our technical support team at +1-888-510-9198, and we will provide you with immediate support and assistance.
When it comes to taxation applications, TurboTax has always been a preferred choice. It is believed that TurboTax eases the process of filing federal and state taxes, which isn’t easy otherwise. This software is advanced and consists of various ways to file taxes that are convenient and reliable. Furthermore, it provides maximum returns to all of its customers. It is a more trustworthy and practical technique for filing taxes than the conventional ones. However, in order to use TurboTax, you are supposed to complete all necessary financial information forms. If you need to know how to delete TurboTax Account, this segment will help you. We have tried to summarize the entire steps to delete a TurboTax Account successfully.
To learn further about the process, make sure to read this article carefully, or you can also connect with our technical support team at +1-888-510-9198, and we will provide you with immediate support and assistance.
Deleting a TurboTax Account involves a bunch of steps. You can implement any of the below methods to delete or deactivate a TurboTax Account. Let us evaluate each of the methods one by one:
Method 1: Manually Delete a TurboTax Account
The very first procedure is to delete the account manually. The steps involved in this process are as follows:
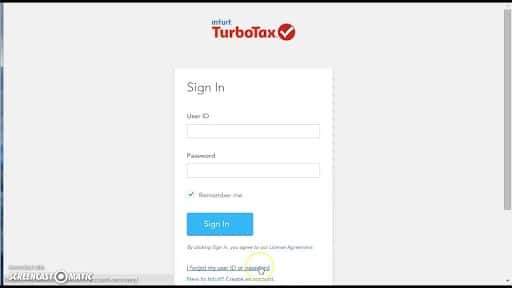
At first, access the TurboTax account using the login credentials.
After that, click on Take me to return option in the login window.
Select the option “My available account located at the top”
And then, click on start over.
You are now required to click on the yes tab.
This will delete your TurboTax account and the whole information will be deleted.
Method 2: Send an email to delete the TurboTax Account (Customer Support)
Another method that you can opt for is seeking assistance from the Customer Support team. This is by far the easiest method but can take longer as the support team might take longer to respond. In case you need to cancel your account, then head to the steps below:
Begin the process by signing into the email account.
Once done with that, confirm that you have registered that mail at the time of registration. Make sure to check it before starting the process.
Now type in Request to delete my account in the subject tab.
The user now needs to type a complete email describing a valid reason why you want to delete your current TurboTax Account.
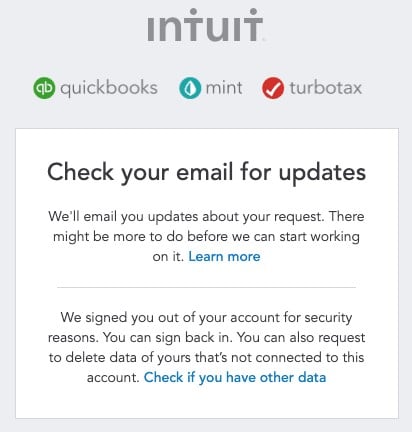
Wait for the reply.
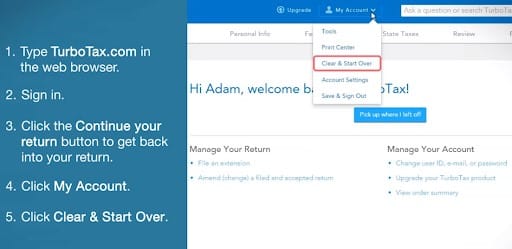
Using the steps above might help you delete the TurboTax Account. You can also follow the process to know how to delete a TurboTax account. This is what can be done:
First, sign in to the TurboTax Account.
Ensure that you enter the right login details.
Once done with that, click on the take me to my return option.
The next step is to move to my account option which is located at the top-right corner of the windows.
You now have to click on the clear and start over option.
Now click on the yes tab.
And clear and start over immediately online.
In certain cases, you might face issues when starting over a TurboTax account. If you have to execute the steps to delete the account, then you might see a list of all the products on the screen.
CD/Download Mac
Mobile app
CD/Download Windows
Online
I don’t know
Once done with that, click on I need to delete my account permanently.
Then, head to the right corner of the screen and click on the Continue tab.
You now have to scroll down to the bottom of the page and enter the information asked. Also, add some basic details like email address, phone number, etc.
Now, click on the option to get the phone number to call on that number.
Towards the end, proceed with the account deletion process.
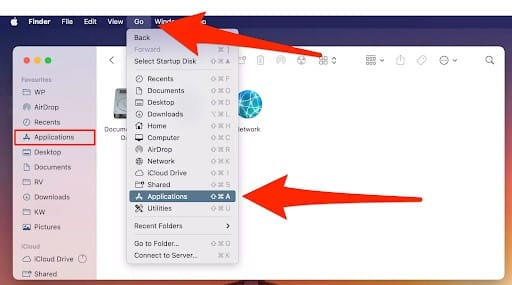
Mac users simply need to begin by opening the Finder from the dock to remove the TurboTax account from their Mac. The steps to be performed here are:
Click on the applications tab present in the left-hand menu. In case this option is not available, you need to click on the hard drive and double-click the blue folder that shows applications.
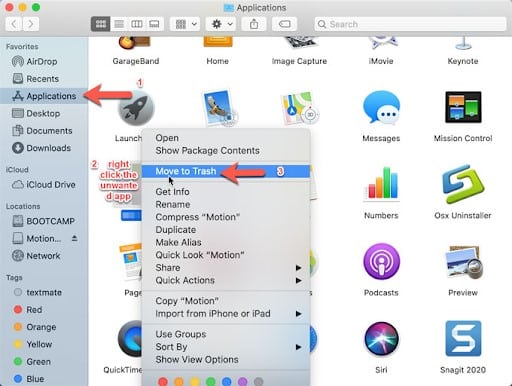
Search for TurboTax Deluxe icon
After that, click on the TurboTax application name to expand the full name. And also highlight and copy the file name.
You now have to paste the name into the search bar of the Finder window and click on the enter tab.
This will show only a few TurboTax deluxe files. In the next step, you need to set up an appropriate way to display all the files.
Under the finder search bar or next to the save tab, click on the plus icon tab.
Now, choose others in the leftmost dropdown.
Also, enter the system in the search bar of the pop-up window and click on the enter tab.
Make sure to select the box under the in menu for system files and hit the ok tab.
You now have to return to the drop-down where you choose Others and further go for System files in its place.
Multiple files will show up in the search results.
You need to click on the files to ensure that they are relevant to TurboTax by seeing the file path at the bottom of the Finder window.
The main TurboTax will be somewhere in the path.
Therefore, click on all relevant files, and then right-click to select move to trash.
The last step is to right-click the trash icon on the dock and choose Empty Trash to delete the TurboTax deluxe account from your Mac.
How to Delete TurboTax account online?
In case you need to stop using TurboTax Deluxe online, then simply delete all the confidential information from the TurboTax database. However, if you are unable to delete the account, then remove the personal information linked with the account. In order to remove the personal information, you need to continue with the steps below:
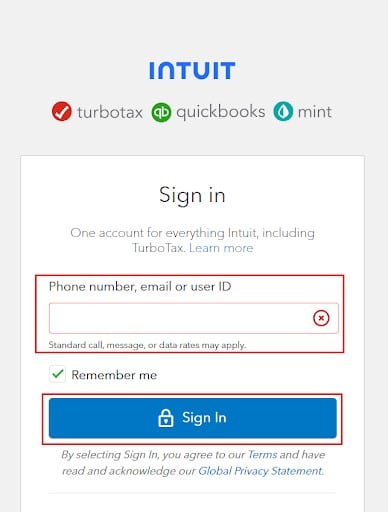
Begin with logging in to the online TurboTax program
After that click on Intuit Account and click on Account settings
You now have to remove or modify the data under both the profile and security options
In case the fields cannot be left blank, enter in a series of A’s or zeroes to save the changes.
Now that you know the measures that can be taken to successfully delete a TurboTax account, it is time to implement these steps one by one. However, if you are unable to delete the account using the set of steps discussed above, or if you need any sort of technical guidance in deleting the TurboTax account, then in that case, do not hesitate to connect with our technical support team at +1-888-510-9198 and we will provide you with instant support and assistance.
FAQs Related to How to delete TurboTax account
How to remove or deactivate a TurboTax Account?
In case you need to find ways to deactivate the TurboTax Account, then you can do it with the help of Control Panel. The steps involved here are:
First, close TurboTax programs.
Furthermore, click on Control Panel.
After that, close the TurboTax program on the system.
And then, choose the TurboTax program you have to delete.
Click on uninstall located on the top.
And towards the end, click on uninstall TurboTax and wait for the process to end.
How to delete and start over in TurboTax mobile app?
Unless you have not submitted payment, deducted the TurboTax fee from the refund, and registered your product, you can simply delete the return and start afresh in the mobile app. However, if you have done any of these things, edit the return manually.
Begin the procedure by signing in to the mobile app and selecting more from the bottom menu.
Now, choose clear and start over.
The last step is to choose clear and start over again to confirm.
Can you Delete your TurboTax Account Permanently?
One can’t delete the TurboTax account until you have paid your TurboTax online fee. You can only clear the data using the clear and start over feature. You can further deactivate a TurboTax account. Intuit will store copies of the return when you have paid or registered. These same requirements are forced on accountants, CPAs, and other professional tax preparers.