When you deposit multiple payments in a bank, it combines different payments into one. Thus, until you know what payments are combined and what payments you need to record, an undeposited funds account comes in handy. The undeposited funds account in QuickBooks keeps a record of payments in QuickBooks till you physically deposit the same payments at the bank. Until you have your deposit slip and know what payments your bank has combined, you can deposit payments into undeposited funds in quickbooks. After you have the complete info, you can combine them as needed. After you get the slip, you can combine payments from undeposited funds into a single record. This ensures that your QuickBooks matches your bank records.
This process is different for QuickBooks online and desktop, so here we are with this segment containing information on depositing payments into the undeposited funds account in QuickBooks online and desktop. To learn further, you simply need to read this segment carefully. You can also connect with our technical support team at +1-888-510-9198, and our experts will help you with your queries.
Deposit Payments into Undeposited Funds in QuickBooks Desktop
For QuickBooks Desktop, you need to consider the following steps to put payments into the undeposited funds account before you combine them.
Step 1: Put payments into the undeposited funds account
Payments processed with QuickBooks payments:
In case you process invoice payments using QuickBooks payments for desktop, then QuickBooks will take care of everything. You will not have to combine payments or move them to an account.
Invoice payments you process outside of QuickBooks:
However, if you follow the workflow to receive payment for an invoice, then QuickBooks will put them into undeposited funds. Head to the next step and deposit the payments in such a scenario.
Sales receipts for payments you process outside of QuickBooks
By default, QuickBooks will put sales receipt payments into the undeposited funds account. You will only have to create a sales receipt and QuickBooks will take care of the rest.
If you would rather opt for an account you put payments into:
Head to the edit menu and choose preferences.
Now, opt for payments from the list. Move to the company preferences tab.
Go for and uncheck the use undeposited funds as a default deposit to account checkbox.
The last step is to go for the ok tab.
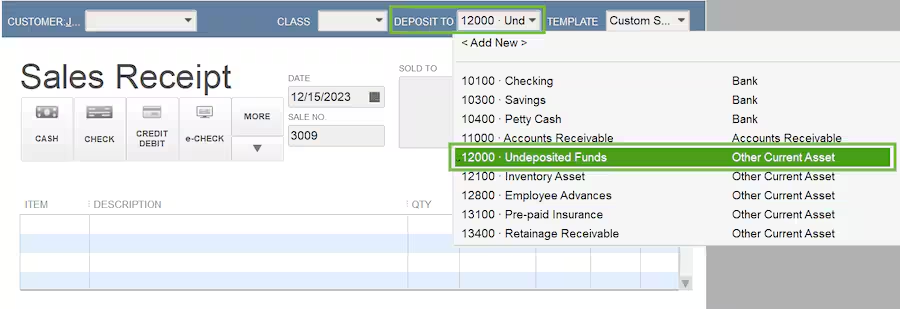
Select an undeposited fund or another account each time you create a sales receipt.
On the homepage, choose Create Sales Receipt
After that, choose a customer from the customer dropdown menu
The next step is to select undeposited funds from the deposit to drop down.
Then, enter the rest of the information and fill out the form.
Choose save and close or save and new.
It is recommended to always review the deposit to field, so you know where your payments are going.
In case your bank records a single payment as its own, then the need to combine it with others is eliminated. You can further put the payment directly into an account and skip undeposited funds.
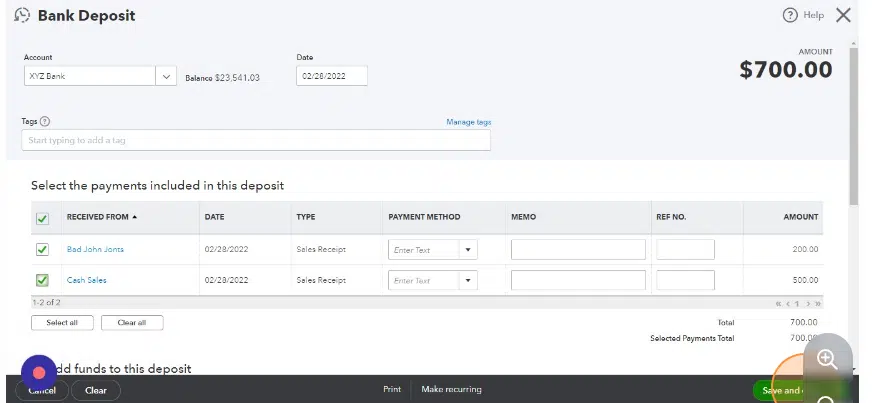
When you have your deposit slip in your hand, you can record a bank deposit and combine payments successfully in QuickBooks. All the payments in the undeposited account will show up in the bank deposit window.
Other Steps: Review your undeposited funds account
It is good to check the undeposited funds account and further clear out any payments waiting to be moved.
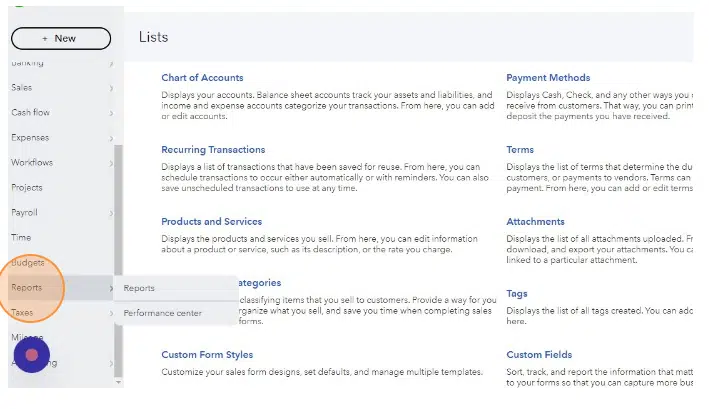
Here, you need to choose a chart of accounts from the lists menu
Now, right-click the undeposited fund and choose Quickreport: undeposited funds
The next step is to select all from the date dropdown menu
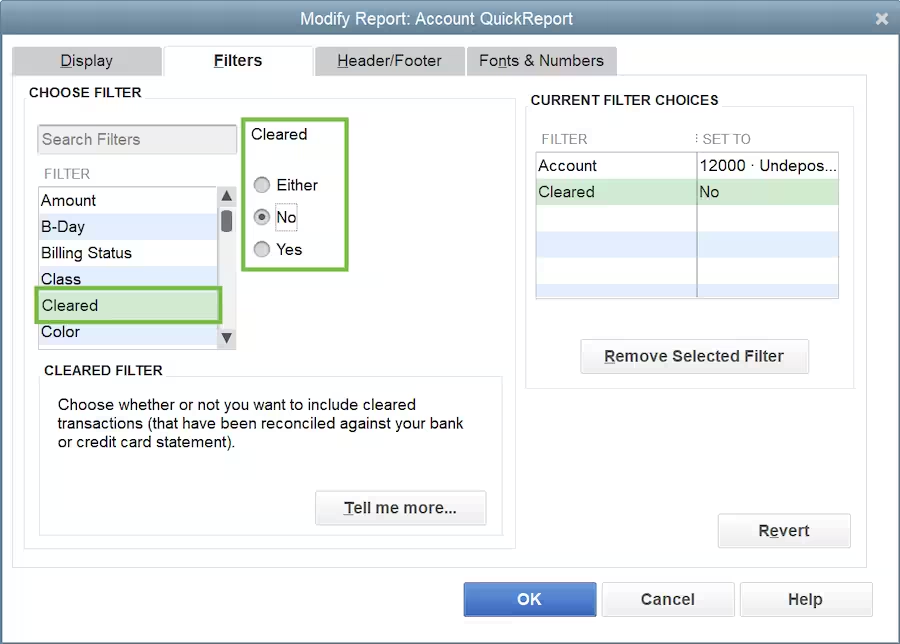
After that, choose Customize report
Go for the filters tab and then scroll down the filter list and choose cleared.
In the cleared section, choose no. Also, choose the ok tab.
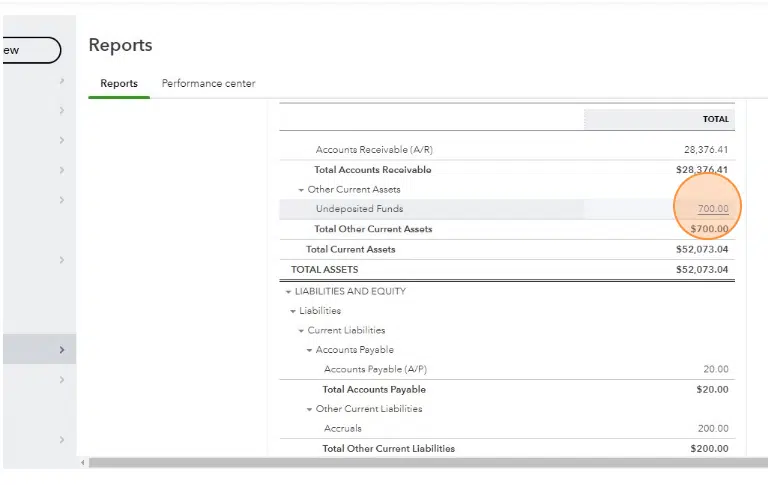
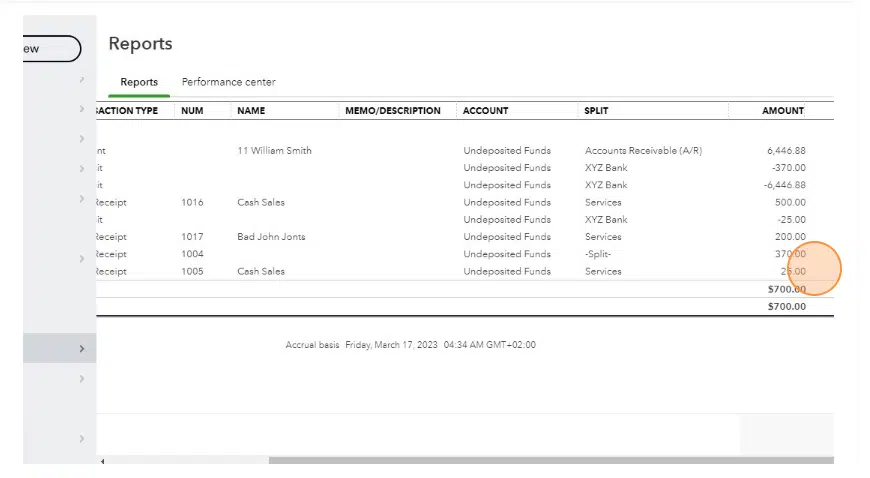
The report lists any transactions that are remaining in the undeposited funds account. In order to add these payments to the deposit, you can make a bank deposit.
Steps to Deposit Payments into Undeposited Funds in QuickBooks Online
If you are a QuickBooks Online user, here is what you need to do, in order to put payments into undeposited funds account in QuickBooks Online:
Step 1: Put payments into the undeposited funds account
You simply have one undeposited fund account. This can be used to hold all payments you need to combine and group together. You will be able to decide which account in QuickBooks to put the deposit into when you combine.
You can carry out the below guidelines to process payments and enter transactions in QuickBooks:
Transactions you download from your banks and credit cards
In case you connect your bank and credit card accounts, then QuickBooks will download all the transactions. You simply have to combine downloaded transactions or use undeposited funds since QuickBooks already has the info from the bank. Simply categorize your downloaded transactions.
Transactions processed with QuickBooks payments
QuickBooks manages the invoice payments processed with QuickBooks payments for you. You don’t have to put these in undeposited funds. In case you need to combine payments processed outside of QuickBooks payments, then perform the steps in the next sections.
You need to opt for + New tab
Furthermore, choose receive payment
And then, choose a customer from the customer dropdown
After that, go for the checkbox for the invoice you are receiving payments for
Now, from the deposit to dropdown, choose undeposited funds
The next step is to enter the rest of the form.
The last step is to choose save and send, save and new, or save and close
Sales receipts for payments you process outside of QuickBooks
Go for + New
Then, choose the sales receipt
After that, go for the customer from the customer dropdown
The next step is to choose undeposited funds from the deposit to drop down
Now, enter the rest of the sales receipt
The last step is to choose save and send, save and new, or save and close
Note that, you should always review the deposit to field so that you know where your payments are going. In case your bank keeps a record of a single payment as its own, then you need not combine it.
With a deposit slip in hand, you need to simply record a bank deposit and combine payments in QuickBooks. All the payments in the undeposited funds’ account will appear in the bank deposit window automatically.
Other steps: Review the undeposited funds account
We recommend checking your undeposited funds account to clear out any payments waiting to be deposited. This can be done as follows:
Head to the settings tab and choose Chart of accounts
The next step is to find an undeposited funds account on the list
Now that we have reached the end of this segment, we believe that the information shared above might be of some help in depositing funds in an undeposited account in QuickBooks online and on desktop. However, if there is any query remaining, then in that case, you can try reaching out our technical support team at +1-888-510-9198, and they will answer all your queries immediately.
Do you know what an undeposited funds account is and how to combine multiple payments together in QuickBooks? Well, if not, then this segment is something you need to go through. When you put money in the bank, you might deposit several payments at once. Let’s say that you deposit five $100 checks from different customers into a real-life checking account. The bank records all five checks as one US $500 deposit. Thus, you need to combine your five separate US $100 records in QuickBooks, in order to tally what the bank shows as one deposit. However, if you are downloading transactions directly from the bank, then the need to do this is eliminated.
To help you understand Undeposited funds in QuickBooks, here we are with this segment sharing the complete info. For more details, read this segment carefully. You can also contact our technical support team at +1-888-510-9198, and we will provide you with answers to all your queries immediately.
One can use the undeposited funds account to hold invoice payments and sales receipts that are to be combined. It is similar to a lockbox or drawer where you keep your payments before taking them to the bank. When you have your deposit slip, you need to make a bank deposit in QuickBooks, to combine payments in undeposited funds to tally. This process, ascertains that QuickBooks always matches the bank records. Furthermore, it ensures that your reconciliation process becomes much easier.
Steps for Clearing or Deleting the Undeposited Funds in QuickBooks Desktop
You can successfully clear undeposited funds in Quickbooks using the set of steps enumerated below. Let us have a look:
You need to simply login QuickBooks and then click on Banking
Once done with that, select the option to make deposits from the list present.
After that, locate the payment that you want to deposit within the undeposited account
Followed by, selecting the payment by heading from the payments tab and selecting make deposits tab.
Now, click on ok tab.
Also, you might now be able to see the deposit window showing up on the screen, where you need to click on the deposit tab and select the preferred bank from the list of the drop down options.
Now, select the date of deposit and any other relevant information, that you would want to record.
Moreover, if you want to print a deposit slip for maintaining a physical record of all the deposits, then you would simply have to click on print command and then the slip will be printed.
The last step is to click on the OK tab and then your funds will get cleared from the undeposited account.
Steps to clear undeposited funds in QuickBooks Online
Clearing or deleting undeposited funds in QuickBooks online can help you in keeping the records better and further ascertains that your financial records are more accurate.
Coming to the end of this segment, we believe that the reader might be able to understand Undeposited Funds in QuickBooks in a better way. However, if there is any query that is still unanswered, then in that case, contact our technical support team at +1-888-510-9198, and we will provide you with all sorts of technical guidance.
FAQs Related to Undeposited funds Account in QuickBooks
What type of account is undeposited funds?
Undeposited funds is simply a holding account that usually tracks payments received from customers that have not been deposited to the bank account. Add image
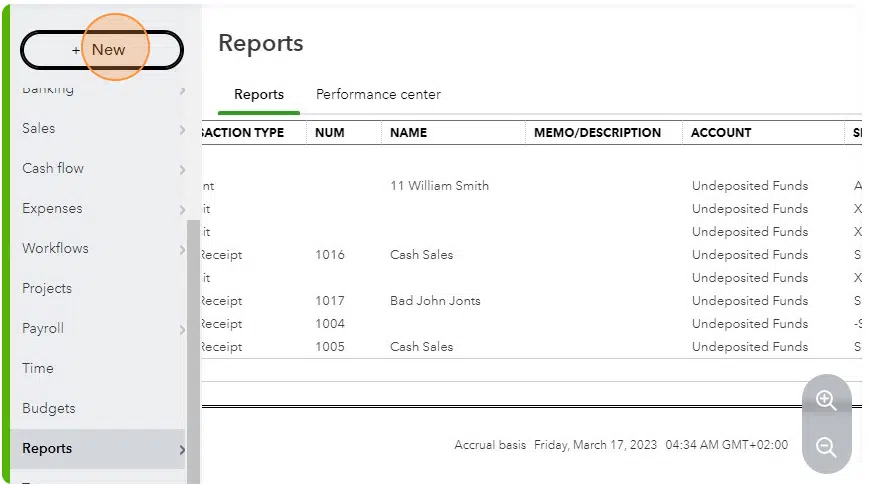
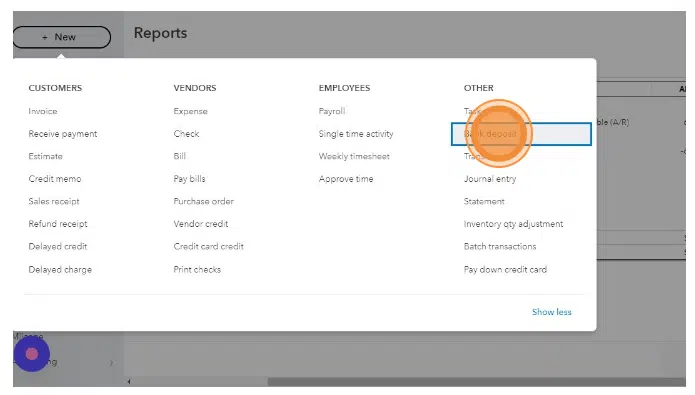
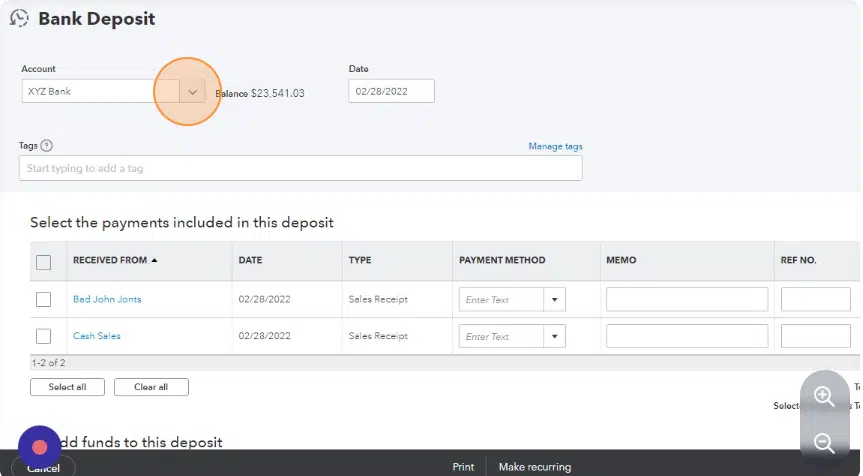
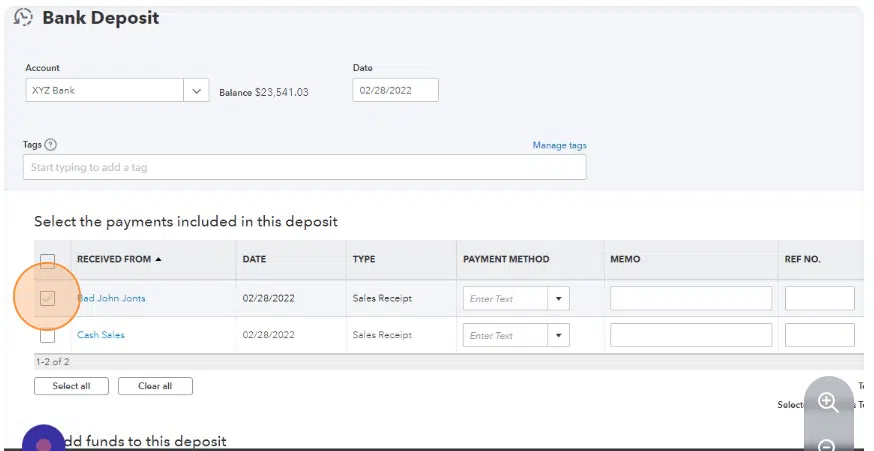
How do I resolve undeposited funds in QuickBooks?
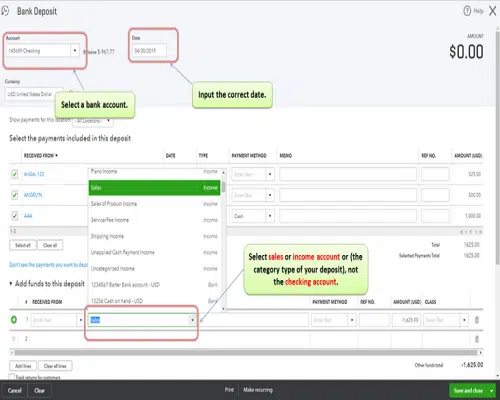
You can correct the undeposited funds in QuickBooks using the steps below: 1. Click on the +New tab 2. After that, choose Bank deposit 3. From account ▼dropdown, select the account you wish to put the money into. 4. Enter a checkmark on the boxes for each transaction. 5. Further click on save and close.
Is undeposited funds debit or credit?
Well, it can have both debit as well as credit balance. When you get the payment, the balance will be debited to the undeposited fund account, and when you make the deposit entry, the account will be credited with the amount of the deposit in the QuickBooks
With QuickBooks Enterprise managing business has become a lot easier and accurate. One such feature that adds value to a business is the landed cost. The landed cost basically helps to factor in freight, duties, insurance, and other expenses, simply to understand and evaluate the true product cost easily. After you set up landed cost in QuickBooks Enterprise, it is possible to see it for any bill you add inventory and shipping items to.
Landed cost can be a bit confusing for you, if you are new to QuickBooks. So, here we are with this segment sharing the complete information about landed cost, along with the ways in which you can set up landed cost in QuickBooks Enterprise. To learn further, stick around, or you can also connect with our technical support team at +1-888-510-9198, and let our experts help you with your queries immediately.
Before you set up and calculate landed cost, it is crucial that you first understand what landed cost is all about. Landed cost basically helps in keeping track of the product costs in a more precise manner. You can use landed cost to factor in things like shipping, customs duties, insurance, and other items. This is basically the total price of a product by the time it makes it to the buyer. When you calculate this number manually, it can turn out to be tiring, inaccurate, and confusing. Thus, landed cost in QuickBooks desktop enterprise can help you in cutting down the efforts. After setting it up, you will be able to see it for any bill that is adding inventory and shipping items. QuickBooks involves landed cost calculation in the bills as part of shipping and handling bills.
Reasons why landed cost is not calculated in the bill
There are a few reasons why landed cost is not calculated in the bill. This includes the following:
In case the bill is missing inventory and assembly items
Or if the inventory and assembly item bill are open, or another user is making use of it.
Another reason can be if the currency of the cost is different.
To ascertain that the landed cost is calculated properly, we suggest using an enhanced inventory-receiving workflow.
Quick Steps to Set up Landed Cost in QuickBooks Enterprise
You can perform the following steps to set up landed cost in QuickBooks Enterprise. Let us evaluate:
Step 1: Set up landed cost account
In order to set up landed cost, you will have to first turn on advanced inventory for QuickBooks desktop enterprise. You can further create a new account or make use of an existing account to map shipping and handling items. The steps involved in here are as follows:
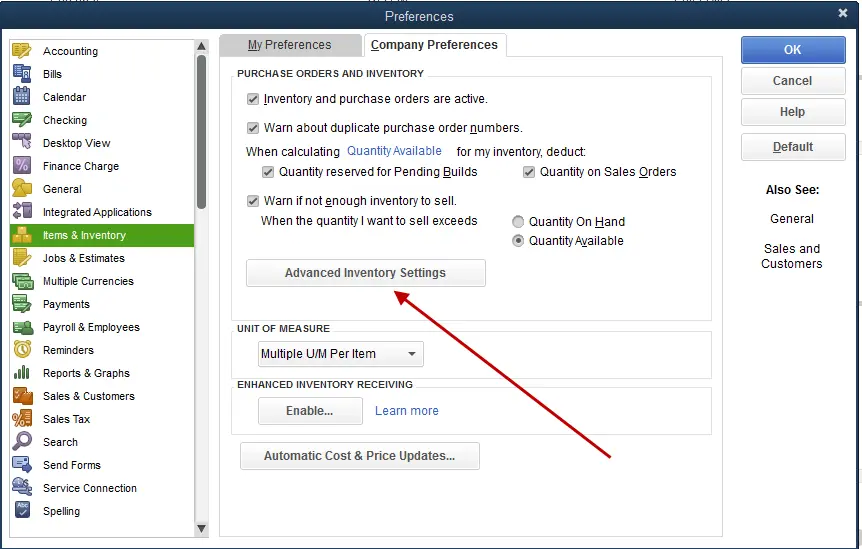
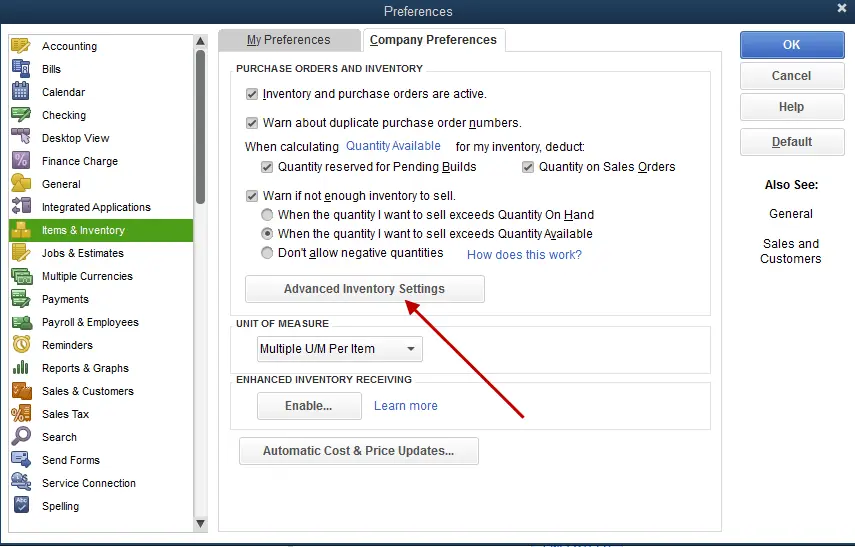
The very first step is to choose preferences from the edit menu.
Now, go for items and inventory and then choose company preferences.
Once done with that, choose advanced inventory settings
Followed by selecting the landed costs tab and also choose set up landed cost account.
The next step is to create either a new account or use an existing account and choose save and continue.
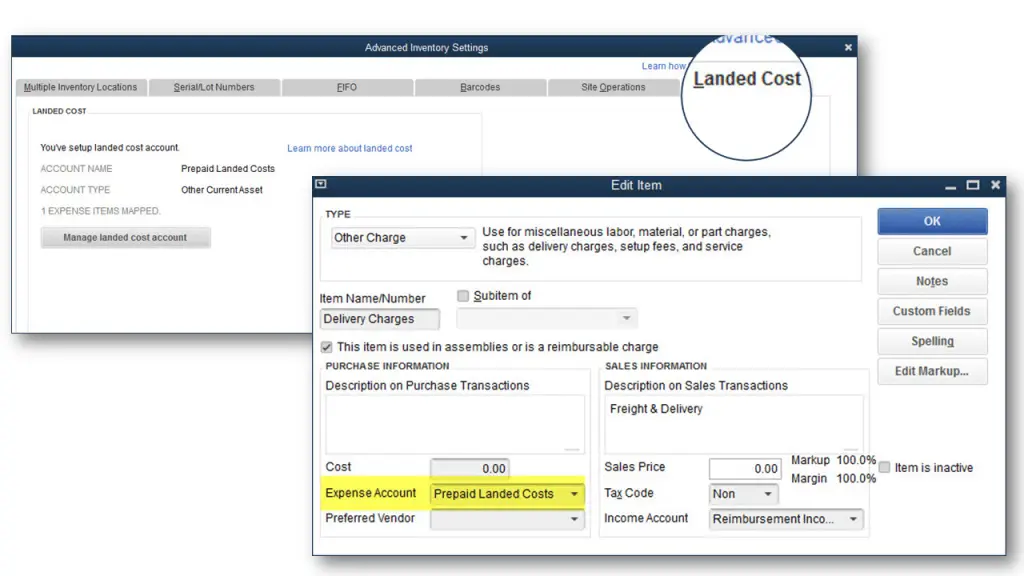
Step 2: Map shipping and handling items to the landed cost account
You need to choose shipping and handling items or add new items like shipping, customs, labor, etc.
Here you need to go for Shipping and Handling Items dropdown
After that, go for the shipping and handling items that you want to map.
To simply create new items for landed cost, you need to create an item type of other charge and then add it to the landed cost account.
The very first step is to choose item list
Go for item and click on new
You will have to add it to the landed cost account, which can be done as follows:
Choose preferences from the edit menu
Go for items and inventory and then go for company preferences
The next step is to choose advanced inventory settings
Now, go for the landed costs tab and then go for managing landed cost account
The user needs to then choose save and continue
Also, go for add item and select an item to add.
The last step is to choose save and close.
After you have mapped shipping and handling items, you can simply calculate landed cost in QuickBooks enterprise services.
How to calculate landed cost in QuickBooks Enterprise Services?
After setting up the landed cost, you can simply calculate the same by performing the steps below.
Step 1: Add inventory and assembly items from a bill
Go for the inventory
And then, head to calculate the landed cost item
Now, go for add bill from inventory and assembly items
The next step is to select a bill having the inventory items
Lastly, select the add bill option.
Step 2: Add shipping and handling items to the bill
Choose add bills option from the shipping and handling costs section
Now, choose shipping and handling bills for the inventory you would like to calculate.
After that, choose Add bill
Step 3: Calculate the landed cost of the bill
Go for the spill bill dropdown menu. Note that, you can split shipping and handling costs between the inventory and assembly items by quantity, amount, and percentage. You can do it manually.
The next step is to choose post to bill option to add the landed costs to the bill.
Step 4: Update selling price based on landed cost
This step isn’t a mandate. As the landed cost gives you a more accurate cost of the goods, you wish to update some of the selling prices. The steps involved here are:
Select the items that you would like to update the price for.
Now, add a new selling process, and go for the update and proceed tab.
Then click on skip and proceed, in case you do not need to update the price.
The last step here is to update the bill and select save.
Now that you know what is landed cost and you can set up landed cost in QuickBooks Enterprise services, it is time to perform the steps manually. In case you are unable to do so, or if you do not want to perform these steps on your own, then simply get in touch with our technical support team at +1-888-510-9198, and we will provide you with immediate support and assistance. Our technical support team will ensure that all your QuickBooks-related queries are addressed as soon as possible.
Error code: – subsui-error-10004 shows up when trying to re-subscribe to your QuickBooks online account. When such an error occurs, one might be unable to add eCommerce to the QuickBooks Online account. To help you out with this, we have curated this article sharing the quick steps that can be performed to fix Error code: – subsui-error-10004. However, if there is any query, or if you need any sort of technical guidance, then in that case, feel free to contact our technical support team at +1-888-510-9198, and we will ensure that you get instant support and guidance.
Such an error in QuickBooks is caused by incorrect or invalid company address on file. One needs to ensure that the credit or debit card used to pay the QuickBooks online subscription has a US-based billing address.
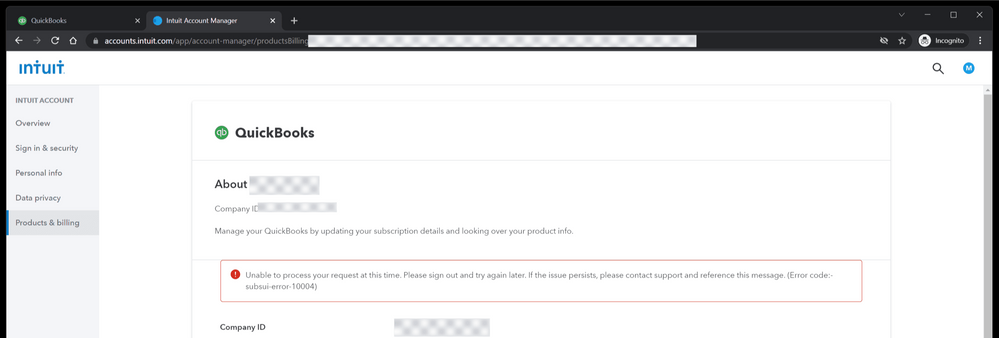
This error shows up with a warning message: Unable to process your request at this time. Please sign out and try again later. If the issue persists, please contact support and reference this message. (Error code: – subsui-error-10004). As a result of this issue, one cannot log in to QuickBooks Commerce/tradegecko as I do not have an active subscription to QuickBooks Commerce.
Quick Steps to fix Error code: – subsui-error-10004
One might face this issue when credit cards on file expire. It can also be seen as (-subscrib-error-10004) when you try to re-subscribe to the QuickBooks online account. Though there is no definite fix to this issue, you can try performing the below steps:
Add eCommerce to QuickBooks Online Account
To Add eCommerce to your QuickBooks online account, you need a connector. There is a third-party connector that is already integrated with QuickBooks. You can browse the link: Ecommerce Connector. This will route you to the QuickBooks app store to help you get the app. In case you need any sort of assistance, then make sure to contact the app provider.
Other Solution
As we mentioned earlier, to avoid this issue, you will have to ensure that the credit or debit card used to pay your QuickBooks online for a US version subscription has a US-based billing address.
Though there are not too many solutions to this error, performing the above-discussed ones might help. As this error is very much unique, you might find it a bit difficult to deal with this issue. In case you need any sort of technical guidance, then in that case, feel free to contact our team at +1-888-510-9198, and we will ensure that all your queries are addressed immediately.
When working on QuickBooks, there can be a scenario when you might require your accountant to review your books, make corrections, and collaborate on any issues. When it comes to accountant users, they have additional privileges that let them undo the entire reconciliations, reclassify transactions, and further write off invoices. Accountant users can also use accountant-specific tools in order to help in preparing for taxes. Not just that, QuickBooks users can give their accountant access to QuickBooks self-employed company files and accounting info. Giving them access lets them review the books and perform necessary corrections. When you add accountant to QuickBooks online, it becomes easier for the user to collaborate with the accountant, especially when it comes to tax season.
Quick Note: Regular accountant users do not count toward the usage limit. They will consider when you make them your company’s primary admin. In case you want to manage regular users, then you can simply add and manage users in QuickBooks Online. To help you out in adding accountants to QuickBooks online, here we are with this segment sharing the complete set of steps and procedures that can be performed to add users successfully. However, if you have any queries, then dial +1-888-510-9198, and our experts will be there to provide immediate technical guidance.
In order to invite your Accountant to QuickBooks online, you need to carry out the steps below:
Begin with signing in to Quickbooks online as a primary admin.
Once done with that, go for the settings tab ⚙ and further choose manage users
The next step is to choose accountants or accounting firms tab
Now, enter your accountant’s email address and then choose Invite.
What happens when you invite your accountant?
When you invite your accountant, he/she will receive an email regarding the invitation. When the status on the manage users page changes from Invited to Active, it indicates that the accountant has accepted your invitation.
Note that, the accountant will get a link to access QuickBooks online company in case they are already using QuickBooks Online Accountant. In case they do not, then simply they would have to sign up. It should be noted that the process to sign up is free and lets the accountant users to access all of the features that are available in your QuickBooks online version that too at no cost to you.
Steps to Remove An Accountant from QuickBooks Online
The Accountants do not have the authority to remove other accountants or themselves from Manage users page. Just in case you no longer wish an accountant to access your books, then you can remove them using the below steps:
To begin with, simply sign in QuickBooks online as primary admin
Once done with that, navigate to the settings tab ⚙
And choose manage users
You now have to opt for the accountants or accounting firms tab
Now, find the accountant you wish to remove
Furthermore, from the action column, go for the delete tab.
The last step is to choose delete and you are done with the process.
Steps to Invite an Accountant in QuickBooks Self-Employed
You can let your accountant review your books in QuickBooks self-employed using the steps below:
Begin with signing in to QuickBooks Self Employed
After that, choose settings ⚙ and go for Accountant.
You now have to enter your accountant’s email address in the accountant email field.
Followed by selecting Send Invitation.
The next step is to choose text a code to verify your identity.
This will send a verification code to your registered mobile number.
You will then have to enter the verification code and click on the Continue tab.
It should be noted that:
Doing this will email an invite to the accountant.
Also, you will get an email notification after the accountant accepts the invite.
Once they accept it, they can access the accounts using QuickBooks Online Accountant.
You might need to resend invitation if they do not receive the invite.
Steps to Remove an Accountant in QuickBooks Online
Now that you have done the necessary task and you do not want your accountant to have access anymore, you can simply carry out the steps to remove them. The steps involved in here are:
At first, choose the settings tab ⚙ and go for accountant.
Once done with that, look for the accountant you wish to remove.
Now, click on remove accountant next to their name.
The accountant will now have no more access to the company file.
Steps to Send Copies of Reports to Accountant
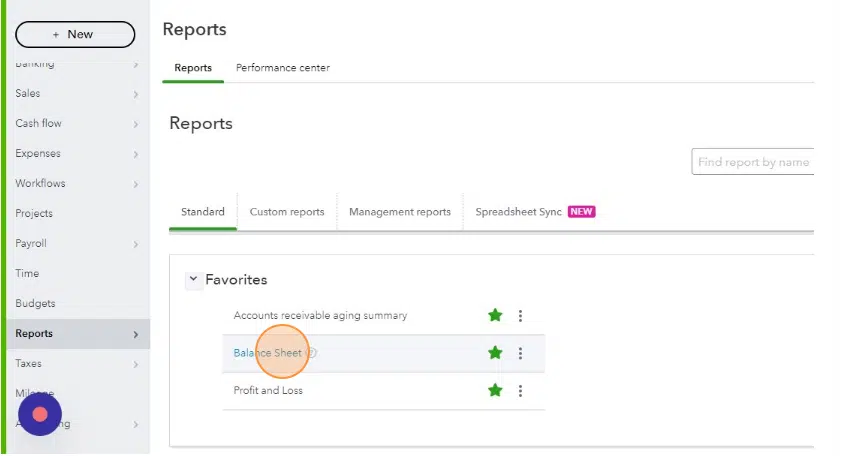
You can simply head to the reports menu.
There, find the report that you like to send to your accountant.
After that, choose the time period or tax from the dropdown menu.
And then, click on view or download.
The last step is to select print or download from the dropdown.
You might now be able to send the report to your accountant via email or mail.
Now that you know how to add an accountant to QuickBooks Online and self-employed, it is time to implement these steps. However, if you are not sure about implementing the steps or if you need any sort of technical guidance in adding accountant to QuickBooks online or self employed, then in that scenario, do not hesitate in contacting our QuickBooks technical support team at +1-888-510-9198, and our certified QuickBooks ProAdvisors will help you in successfully adding the accountant user without stumbling upon any sort of error.