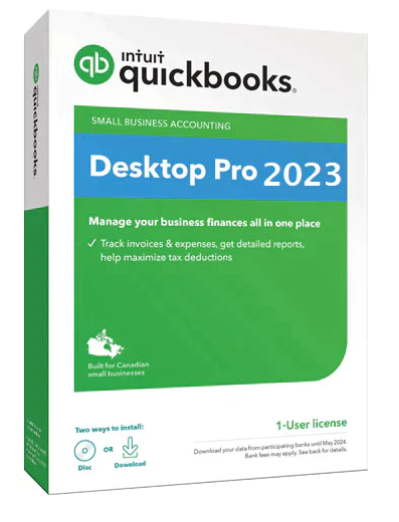
QuickBooks Pro is basically an entry-level version of QuickBooks desktop that can be installed locally. The QuickBooks Pro software can be often used for making payments and deposits, sending and tracking invoices, running payroll within a single platform, and much more. It is more like a comprehensive business management solution that provides small businesses with more than 15 integrated business solutions. From accounting and online payroll to online banking, to TurboTax for business integration, you get a lot with QuickBooks Pro. To help you understand QB Desktop better before purchasing, here is a quick guide highlighting the necessary details related to QB Pro.
In case you have any queries, then feel free to ring our QuickBooks technical support team at +1-888-510-9198, and they will answer all your queries.
QuickBooks Pro helps automate the billing and invoicing process and work order management from a single reconciliation window. Moreover, the bank reconciliation feature helps users link their bank accounts and further define workflows for accounting activities. QuickBooks Desktop Pro further lets the users make automated payments and deposits from their linked bank account and manage the employee payroll within a few clicks. You can expect this comprehensive accounting solution to offer robust functionalities.
QuickBooks Desktop Pro Features and Functionalities
As we mentioned earlier, QuickBooks Pro is loaded with various features and functionalities. Here is a detailed list of newly added as well as existing helpful features. Let us explore further:
Get Paid Faster- QuickBooks Pro 2024 lets the users get paid faster by automatically reminding the customers when payments are due.
Create a consistent, professional look: This software is designed in a way to lets you present your business more professionally by simply leveraging style and design templates for your customer communications.
Faster and Smoother: The latest version of the pro software comes with 64-bit processing power that will let you run reports, create invoices, and further reconcile accounts at a faster speed saving a lot of time and effort.
Automatic backup of data and recovery: In QB desktop Pro, Intuit data protect takes local backup of the company file on its own regularly. It further diminishes computer crashes, corruption of data, and power failures. Not only that, but you can also revert to a previous file from the past 45 days from daily backup if needed. In order to restore the file you can get assistance from the helpdesk team.
Inventory tracking: Depending upon the business type, you might need to keep track of your inventory. And QuickBooks Pro can help you with that. You can avoid overbuying and backorders with this accounting software and it will further let you set up reorder points that will automatically alert you as to when you should schedule a reorder.
Payroll: You can now manage your staff with QB Pro and further process payroll with appropriate tax deductions. You make payments through direct deposits to employees. Moreover, the software can automatically create and print 1099s for independent contractors.
Time Tracking: The time tracking feature lets you track your employees’ time to avoid under-billing your customers. It further alerts you when creating an invoice, if there are any outstanding time or expenses for that customer. The software further lets you track time by employee, service, and customer using timesheets. In case you are creating an invoice, then QB will alert you about any unbilled time and expenses.
Create purchase order: In the QuickBooks Pro version, you can create a purchase order by selecting the appropriate vendor from the list and picking the inventory item to order. Once the inventory is received, QuickBooks will identify the products and tally them to the appropriate PO. This simply means that when you enter the inventory items, the correct corresponding PO is reconciled on its own.
General Ledger: The general ledger feature lets you stay ahead in your business and further provides you with a consolidated view of who owes you money, and who will owe money to, important reminders, and income/expense performance. Moreover, QuickBooks Pro makes use of the transactional history established in the general ledger to provide you with pre-designed reports.
Get access to a large network of independent QuickBooks ProAdvisors.
Doesn’t let you manage fixed assets
Track employee time and bill customers easily with QB Desktop Pro
Limited to three users only.
Easily compare budgeted costs to actual costs
No industry-specific editions like premier and enterprise.
When to use QuickBooks Desktop Pro?
Still not sure whether you should use QuickBooks Desktop Pro or not? Well, here is when to opt for QuickBooks Pro. In case you fall in any of the below categories, get QuickBooks Pro for your business right away!
Managing Multiple Companies: Note that a single subscription lets you manage the books of an unlimited number of companies, which makes QuickBooks Desktop the best multi-company accounting software.
Businesses that prefer desktop software: With QB pro, you do not need an internet connection to run. Thus, it is a great choice for businesses that have issues with internet connectivity and speed.
Companies having in-house bookkeepers: When you have an in-house accountant working on a single computer, you can physically work with them to check the books right from their computer, this software works as an ideal solution.
If you have minimal inventory: Businesses requiring only basic tracking of stock on hand and inventory costs without dealing with inventory in multiple locations, then QuickBooks Desktop Pro tends to be more than enough.
QuickBooks Pro is affordable software available at different prices, according to the number of users and a few other aspects. Let us evaluate the pricing for QB Desktop Pro in detail:
Create professional invoices Track sales and expenses Manage accounts payable Single click sales and tax reports
QuickBooks Desktop Pro + Payroll 2024
1 User
$87/month
Create professional invoices Track sales and expenses Manage accounts payable Single click sales and tax reports Quickly make payments to employees Easily remit payroll taxes Automatically stay updated and worry-free.
QuickBooks Desktop Pro + Payroll 2024
3 Users
$130/month
Create professional invoices Track sales and expenses Manage accounts payable Single click sales and tax reportsQuickly make payments to employees Easily remit payroll taxes Automatically stay updated and worry-free.
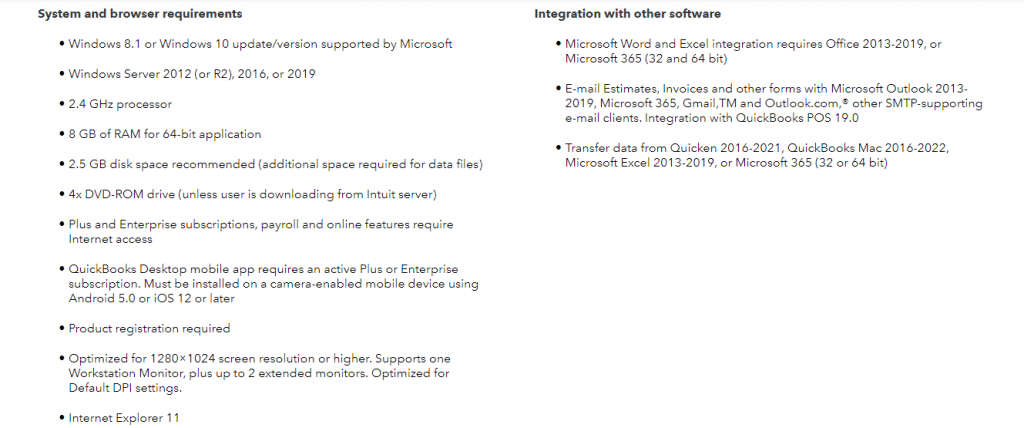
Before you get QuickBooks Pro for your business, it is crucial to check if your system is ready to work with the software or not. Here is a list of system requirements for the latest version of QB Desktop Pro i.e., QB 2024.
Windows 8.1 or Windows 10 update/version supported by Microsoft.
Windows Server 2012 (or R2), 2016 or 2019.
2.4 GHz processor
4 GB of RAM (8 GB suggested)
2.5 GB disk space suggested (additional space needed for data files)
4x DVD-ROM drive
Other Requirements:
Payroll and online features need internet access (1 Mbps suggested speed)
Product registration needed
Optimized for 1280x 1024 screen resolution or greater
Supports one workstation monitor, and in addition to that 2 extended monitors can work.
You will be asked a question: Will you be using QuickBooks Desktop on multiple computers at once (multi-user mode)?
Choose one of the available options for this.
No matter whether you choose yes or unsure, you will have to follow the entire process. However, if you opt for no, this will direct you to express setup.
Also, instead of responding to the question, you can click on the standard setup link under the question box. Here, you must follow the steps to download and install the process.
The next three choices that you would see are
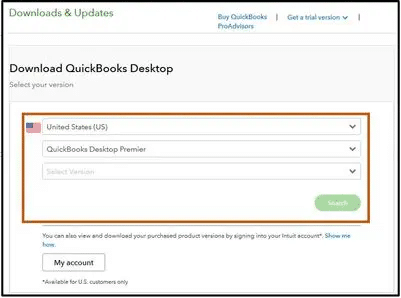
Choose the country in which you are using the QuickBooks desktop application.
Choose the QuickBooks desktop version you wish to install on your desktop.
Choose the year for the version of QuickBooks you wish to download and use for your company.
After clicking on the above tabs, you will be able to see the search tab.
Further, you need to click on the search tab.
This might take you to the software page from where you can download the software to the version and also the version you opted for.
Click on the download tab.
This will initiate the download process, where you will be asked the location to save the downloaded file or if it won’t ask, then it will save the file in the default location set.
Move to the folder where you have saved the file and proceed with the installation steps.
Now that you have made the payment and downloaded QuickBooks, it is time to perform the installation steps for different QuickBooks desktop 2023 or other versions. Let us check that out:
Head to the Quickbooks.exe file downloaded using the steps above.
After that, click on yes, only for permission.
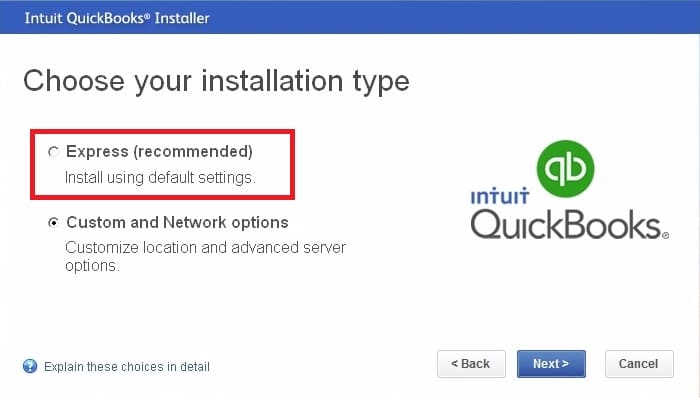
Choose the installation type.
Express Install – This is ideal if you have never used QuickBooks before. Or if you are again reinstalling QuickBooks. You can also opt for express installation if QuickBooks is used on a single computer and not on a network of computers.
Custom and network install – If you have opted for multi-user mode, then you have to go for this install type. Moreover, if you want to install QuickBooks somewhere other than the default location, then opt for this installation type. If you use a server to store files, then this install type is ideal.
Moving ahead, perform the onscreen instructions.
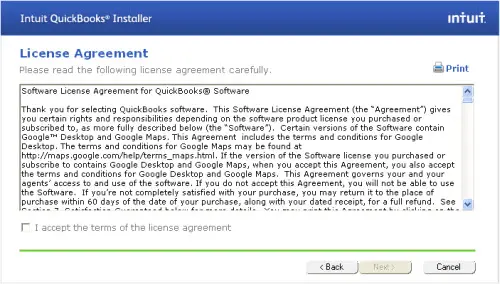
Also, agree to the license agreement and hit next.
QB Desktop Pro is an ideal software can be an ideal software for your business. We hope that, towards the end of this segment, you might be able to decide whether QuickBooks Pro is worth investing in or not and further successfully download and install it. However, if any of your queries remain unaddressed, do not think much about connecting with our technical support team at our toll-free customer support number i.e., +1-888-510-9198, and our certified QB experts will ensure to answer all your queries immediately.
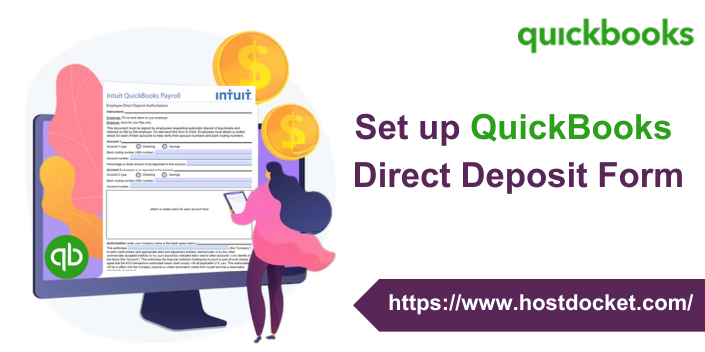
Struggling with making payments to employees and contractors? Well, the QuickBooks direct deposit form is one of the most convenient ways to pay your employees and contractors. This eliminates the hassle of handwriting or printing paychecks each payday. It further helps employers collect relevant employee information to manage payroll. Moreover, the employer can collect employee bank details and essential authorization to pay salary with a standard direct deposit form. In case the employer wants the employees to enter their own personal, tax, and banking info, ensure employee self-setup is on. QuickBooks will automatically email them an invite through QuickBooks workforce.
To brief you with the entire procedure to fill direct deposit forms, here we are with this piece writing sharing the complete set of steps and information. For more details, make sure to scroll through this piece of writing, or you can connect with our technical support team at +1-888-510-9198, and we will provide you with the right guidance instantly.
The direct deposit form gives authority to a third party i.e., often the employer for payroll to send money to a bank account by simply making use of the account details. An employer might require a canceled check to verify the accounting information. After the form is completed by the account holder, it must be signed and returned to the employer.
Note that, in order to make payments to your employees and contractors through direct deposit, you will be required to have a U.S. bank account that’s set up for ACH transactions. Also, there are fees to use direct deposit. You can check your payroll subscription for further related information.
Steps to set up direct deposit for employees
You can try performing the below set of steps to set up direct deposit for employees. Let us explore the steps one by one:
Step 1: Setting up company payroll for direct deposit
Identify and get access to your business, bank, and principal officer info
Connect your bank account
Verify your bank account
Set up your employee’s direct deposit
Step 2: Get a direct deposit authorization form
If your employees have filled out, signed, and dated a Direct Deposit Authorization Formand attached a voided check from the employee’s bank account, then choose your payroll for the next steps.
QuickBooks Online Payroll
You need to first head to taxes and further choose payroll tax.
Once done with that, choose filings and further opt for employee setup.
Heading forward, you need to choose bank verification next to authorization for direct deposit.
The last step is to choose the view option.
QuickBooks Desktop Payroll
You need to obtain a completed direct deposit authorization form and a voided check from the employee’s bank account. It should be noted that there is no need to submit the authorization form and void check to QuickBooks, as they are just for recording purposes.
In case the employee’s bank shows that the account should be tagged as money market, then inform the employee that QuickBooks desktop only accepts checking or savings accounts, so they should choose the checking option.
Here, you need to first choose employees and then opt for the employee center to open your employee list.
Once done with that, choose the employee’s name.
And further, opt for the payroll info tab.
You now need to choose the direct deposit tab.
In the direct deposit window, choose use direct deposit for the employee’s name.
Moving ahead, choose whether to deposit a paycheck into one or two accounts.
Followed by entering the employee’s financial institution information such as bank name, routing no., account no., and account type.
Now, if you are opting to deposit to two accounts, then you need to simply enter the amount or percentage that the employee wants to deposit to the first account in the amount to deposit field.
The remaining goes to the second account.
Further, you need to choose the OK tab to save the information.
And lastly, enter the direct deposit PIN when asked to.
Steps to get employee direct deposit authorization form
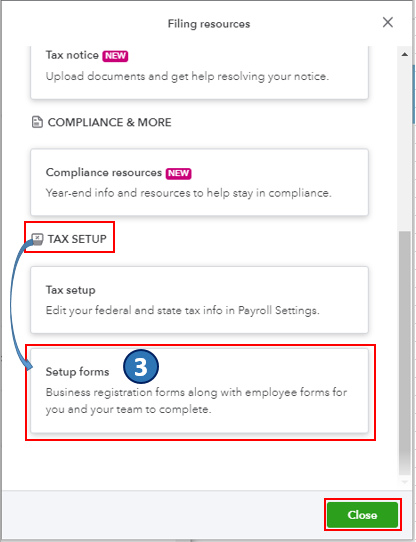
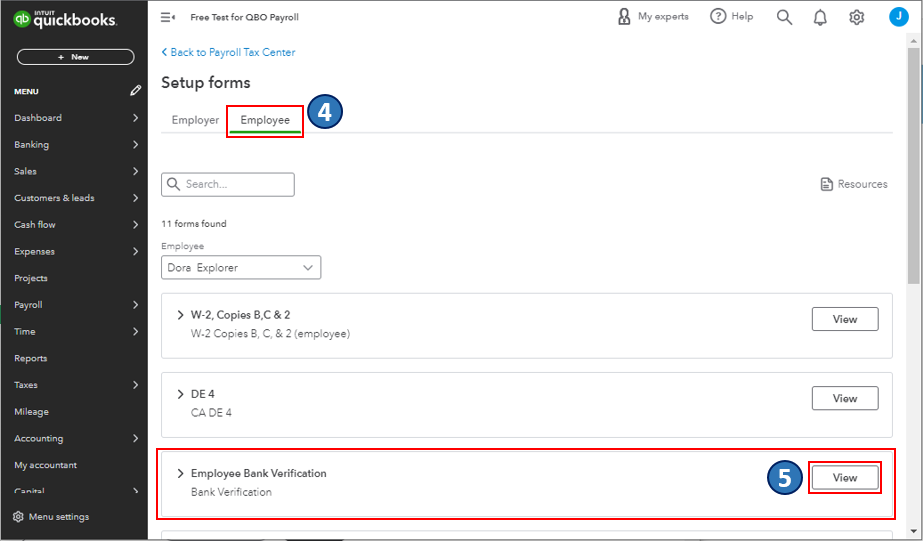
In order to get to the employee direct deposit authorization form in QuickBooks online, you need to first navigate to the filing resources window and further set up employees’ direct deposits in payroll. Note that the employees or contractors who will be paid by direct deposit should complete the employee direct deposit authorization form. To get this, you need to continue with the steps below:
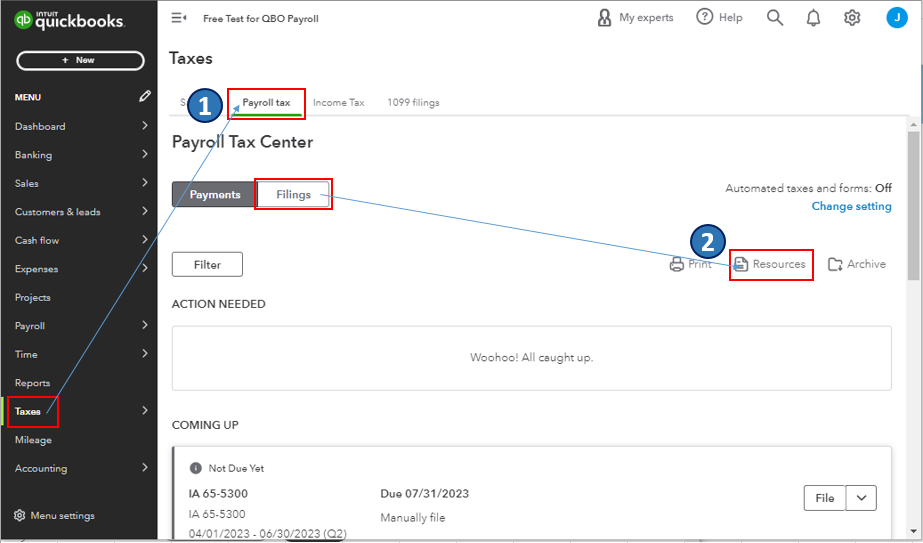
Initially, head to the taxes menu.
Further, opt for payroll tax.
You now have to choose the filings tab, and also click on resources
Heading forward, in the filing resources window, you need to scroll down to the tax setup section.
And later on, choose setup forms.
Now, navigate to the employees tab.
Also, find the employee bank verification section and hit the view tab.
Now, you will be routed to the form’s PDF file.
From there, download and print the employee direct deposit authorization form.
After you are done with this, carry out the necessary steps to set up and manage employee direct deposit in the payroll listed above. Moreover, there are a variety of payroll reports that you can make use of to view information about the business finances and employees.
QuickBooks Online payroll gives you increased flexibility with employee self-onboarding by letting you enter some of their info. Moreover, you can further invite them to add the rest. Not just that, you can still print a direct deposit authorization form in case you want.
With this segment, we have tried to summarize the complete procedure to set up the QuickBooks direct deposit form. However, if you are doubtful regarding any step, or if you are stuck at any point in time, do not hesitate to connect with our technical support team at +1-888-510-9198, and let them help you with the procedure.
FAQs Related to QuickBooks direct deposit form
Does QuickBooks have a direct deposit form?
Yes, QuickBooks offers a direct deposit form that helps employers collect relevant information related to the employee and further manage payroll.
Where is the direct deposit form in QuickBooks?
You can find the direct deposit form in QuickBooks using the steps below: 1. Navigate to the payroll tab. 2. Further, choose employees. 3. Now, from the payment method, select Start or Edit. 4. Heading forward, from the payment method dropdown ▼, choose direct deposit.
How do I verify direct deposit in QuickBooks?
You can verify direct deposit in QuickBooks using the set of steps below: 1. Sign in using your Intuit Account login. 2. Now, move to the payroll info section under the direct deposit bank account. 3. After that choose verify. 4. Enter the payroll PIN and confirm. 5. Lastly hit submit to complete the procedure.
What is a direct deposit form?
A direct deposit authorization form is a form that employees fill out, in order to authorize the employer to deposit money straight into the bank account. Many businesses pay their employees using the direct deposit option.
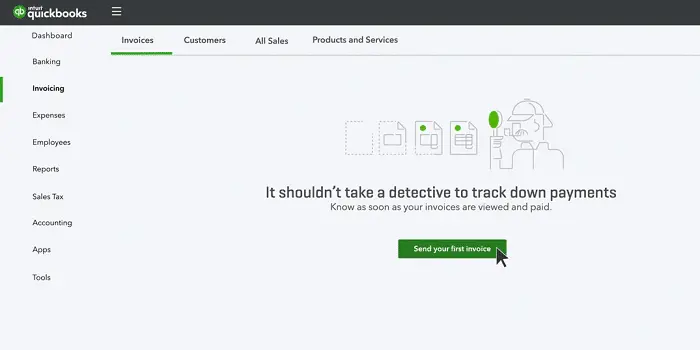
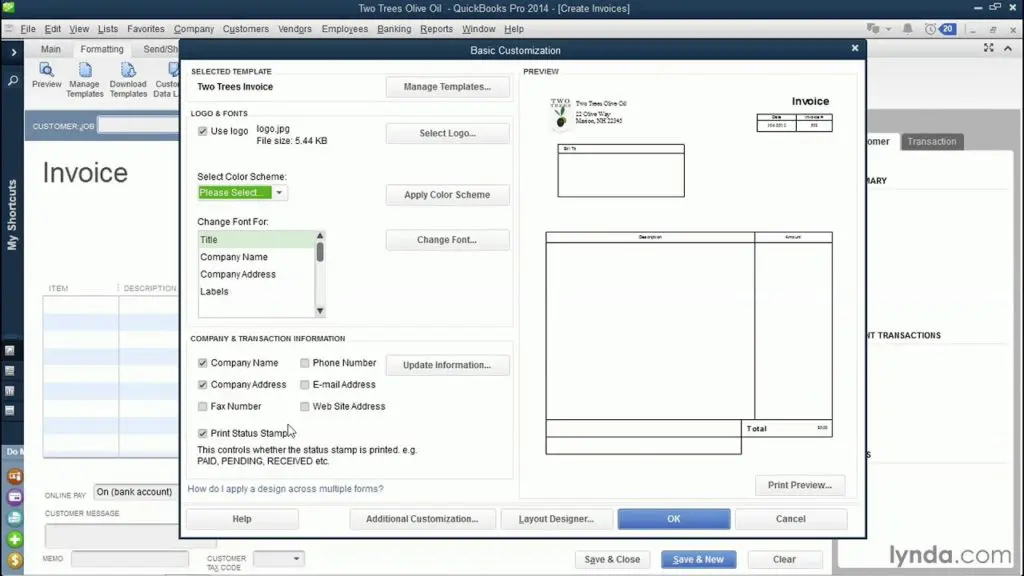
Creating invoices in a few clicks is one of the best features offered by QuickBooks. In case you plan to get paid in the future for products and services you sell, you can send your customers an invoice. Not just that, you can add the product or service you are selling to an invoice and email it to your customers. Creating and sending invoices in QuickBooks online is now easier with the set of steps scribbled in this piece of writing. We have tried to cover the steps to create an invoice in QuickBooks Online and also how to review unpaid invoices. Thus, scroll down to unleash the complete information.
You can also speak to our technical support team in case you need our assistance in creating invoices in QBO or for any sort of QuickBooks-related queries. Ring us at +1-888-510-9198, and we will surely answer all your queries immediately.
Creating invoices involves a few simple steps. Your customers can pay their invoices online if you have QuickBooks payments. You can also handle the invoice and payment activities when you use an external payment processing platform. Note that your estimates or invoices will look different depending on whether you have the old or new estimate and invoice experience. Let us now explore the steps involved in creating an invoice in QuickBooks online.
Step 1: Create and send an invoice
Note that the steps for the new layout and the old layout differ. Let us explore the steps in both scenarios:
Condition 1: In case you are using the new layout
Well, there are multiple ways to create an invoice in QuickBooks. When you send an estimate to your customer, there are chances that the customer might approve it, in such case, you can convert your estimate to an invoice. Also, there is an option to create a new invoice from scratch.
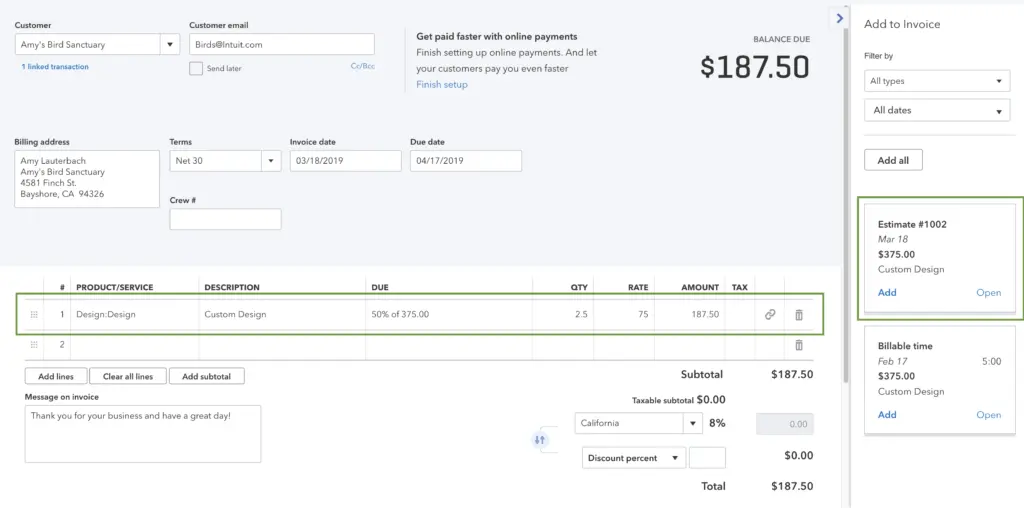
The very first step is to choose + New
Now, opt for an invoice
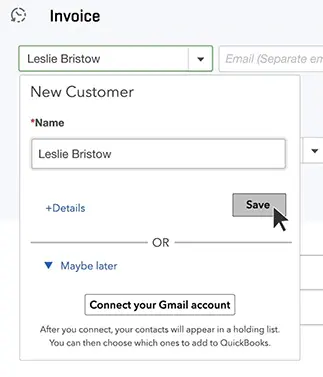
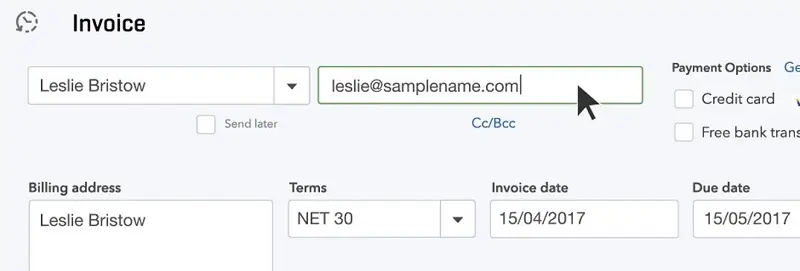
The next step is to choose add customer and pick a customer from the ▼dropdown menu.
Ensure that all of the info entered is correct, especially the email address.
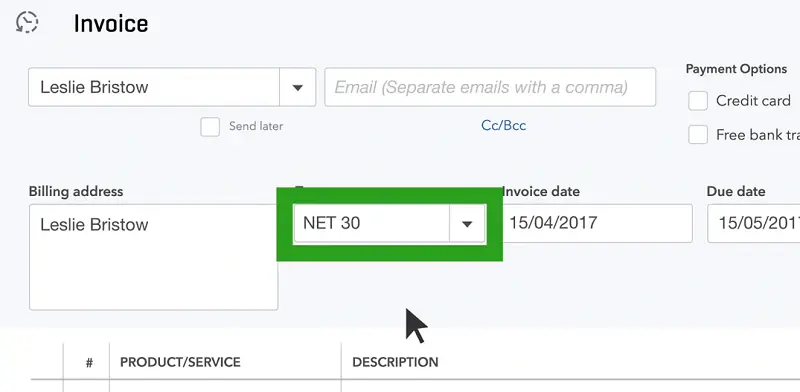
Now, review the invoice date, due date, and terms.
Enter the new dates or terms, if you need to.
The terms field contains the word net, which refers to the number of days until the payment is due.
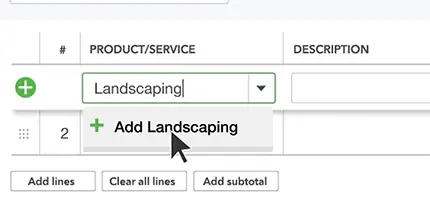
You will then have to choose to add a product or service and go for a product or service from the ▼ dropdown.
Once done with that, choose how you want to calculate the charge amount- flat rate, by hour, or by item.
You will then be required to enter a quantity and rate if asked to.
To customize the info or design of the invoices, choose ⚙ manage tab.
Also, go for the options from the side panel.
QuickBooks keeps a check on your choices and further applies them to all existing and future invoices.
After you are done, there are various options for saving or sharing the invoice.
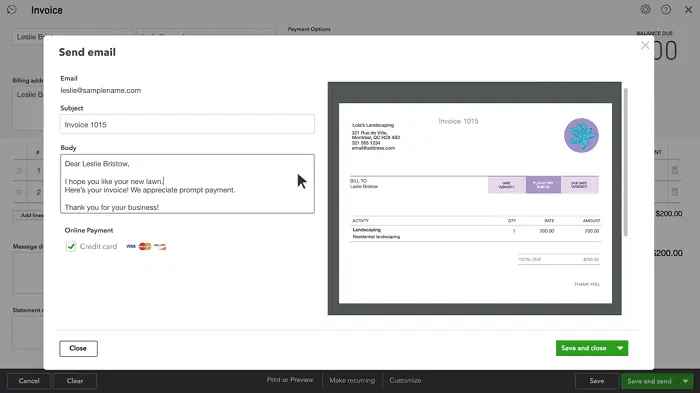
In case you are ready to send the invoice, choose review and send, to email the invoice to your customer.
Further, adjust the email if required.
Once done with that, choose send invoice.
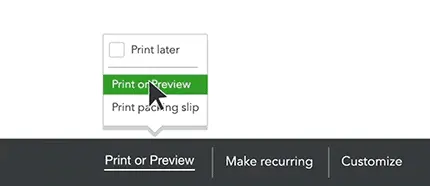
To send the invoice later, choose save and close tabs.
In order to print a paper invoice, choose print and download.
Or if you have received a payment from the customer, then choose receive payment.
Now, in order to send your customer a link to the invoice through text message, choose the share link.
QuickBooks usually marks unpaid invoices in the accounts receivable account, which is visible on the balance sheet and other financial reports.
To review the invoices, you need to head to sales and choose invoices. Now, check the status column to see the status of the invoices in the sales process. There are a bunch of statuses that can show up. Let us evaluate each of the scenarios one by one:
Due in [days]: This means that you haven’t emailed the invoice yet.
Due in [days] sent: This indicates that you have emailed the invoice to the customer
Due in [days] viewed: This message shows up when your customer opens the invoice.
Deposited: It simply means that the customer has paid the invoice
Overdue [days]: This status indicates that the invoice is past due and unpaid.
Overdue [days] viewed: This appears when the customer has opened but didn’t pay the past due invoice.
Delivery issue: In such a case the invoice would be undelivered. You will have to check the email address and resend.
Voided: The invoice was voided in QuickBooks.
You can notify your customers about the upcoming invoice due dates. You can send them a reminder message.
Step 3: Receive payments for invoices
In case you use QuickBooks payments, then your customers can pay the invoices directly by credit card, PayPal, Venmo, or ACH transfer. Intuit processes and handles everything for the user. Once the payment is made, QuickBooks will put the transaction into the correct accounts.
However, just in case you make use of an external platform to process payments, then you can simply keep track of those payments in QuickBooks.
The set of steps enumerated above is enough to create an invoice in QuickBooks online successfully. However, if you have any queries at any point in time, or if you need our technical assistance in creating invoices in QBO, then feel free to ring us up at +1-888-510-9198,, and our technically sound certified QuickBooks ProAdvisors will ensure that all your queries are addressed immediately.
FAQs Related to Creating Invoices in QuickBooks Online
How do I create an invoice in QuickBooks Online?
You need to perform a handful of steps: 1. Choose + New 2. Select the invoice and add customer 3. Review the invoice date, terms, etc. 4. Choose add product or service 5. Select the process to calculate the charge amount 6. Customer the info or design of your invoices. 7. Choose Manage. 8. Select the options from the side panel. 9. Save and share the invoice
Does QuickBooks Online have invoicing?
Yes, using QuickBooks online you can minimize missed payments, and reduce administrative hassle by sending recurring invoices on a schedule. Even let your customers set up autopay.
How do QuickBooks invoices work?
In QuickBooks Online, users can simply create invoices when they sell products and services but expect customers to pay for them in the future. These forms key details about the sale and further lets you track the open and completed sales.
Are QuickBooks invoices free?
Yes, you can use the invoice generator for free in QuickBooks.
Can I make changes to an invoice once I have created it?
Well, you can make necessary changes to an invoice after you have created it. However, it might show some exceptions and errors when reconciling, especially if the invoice has been filed already.
Can you batch change VAT codes, classes, or locations on invoices?
No, only an accountant can batch change VAT codes on invoices.
Trying to create invoice in QuickBooks Desktop, but can’t find the right way? Well, your search ends right here. Invoices are used to record sales transactions from customers who make no or partial payment at the time of sale. Not just that, but the invoices further let you keep track of the accounts receivable. QuickBooks lets the users create invoices and also the documents given to the buyer to collect the payment. Creating an invoice in QuickBooks desktop in different ways depends upon the transaction with a customer.
Note: Creating an invoice is part of your usual A/R workflow in QuickBooks.
To learn the steps involved in creating invoices in QuickBooks desktop, make sure to stick around this piece of writing till the end. Or you can further speak to our technical support team at +1-888-510-9198, and let them help you with the procedure.
Steps to create an invoice in QuickBooks Desktop from scratch
An important point to note here is that if your business doesn’t need creating sales orders or estimates, then the A/R workflow starts with creating the invoice. The steps involved in this procedure are as follows:
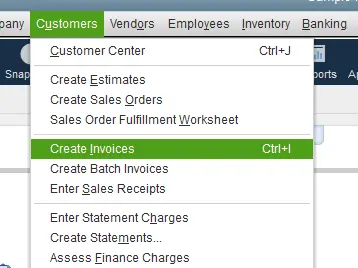
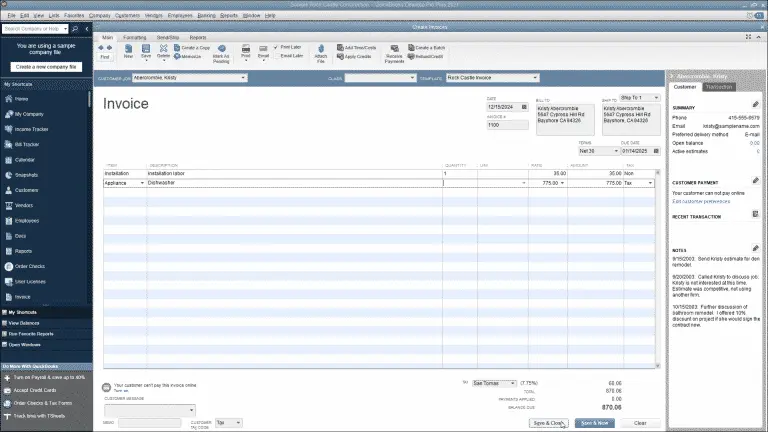
Initially, you need to head to the home screen or the customers menu and choose the create invoices option.
Further, from the customer: Job drop-down, you need to pick a customer or customer job.
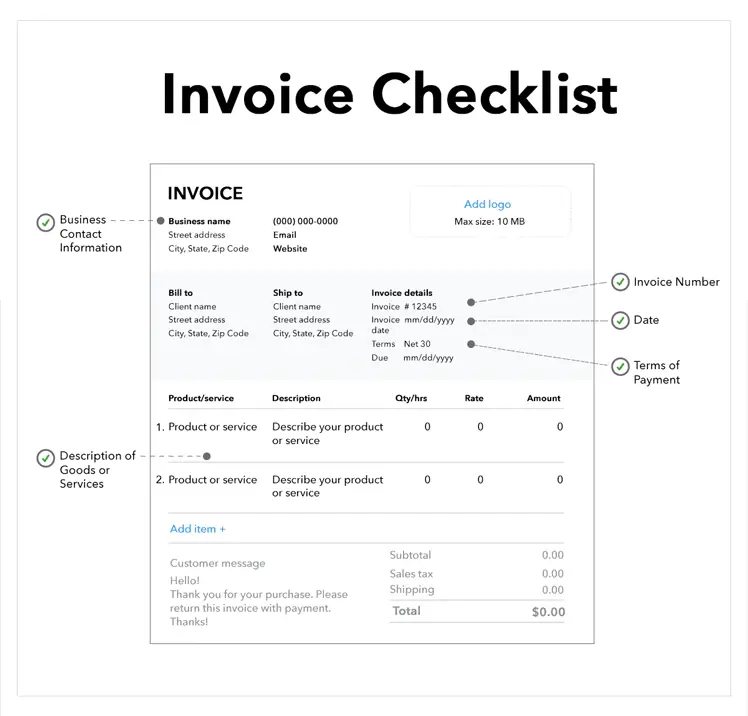
Heading forward, fill in the relevant information at the top of the form like the date invoice #, bill to/sold to, and terms.
Now, in the detail area, choose the item/s. Further, when you choose or add an item, the description and the amount are populated automatically depending upon the description and unit cost entered when it was set up.
Moreover, you can delete or modify this when creating invoices.
In case you wish to apply for a discount, you need to create a discount item. (This step is not mandatory).
For this, you need to scroll the lists menu from the home screen.
Further choose item list.
Also, right click anywhere and choose new.
You now have to choose the type drop down and select discount.
Once done with that, enter an item name/number and a brief description.
In the amount or % field, you need to enter the discount amount or percentage.
Just in case the discount amounts vary, then you might want to leave the amount or % field blank and further enter the amount directly on the sales forms.
From the account drop down, you need to choose the income account you want to use to track discounts you give to customers.
Further, choose the right tax code for the item.
Hit ok tab.
End the procedure by selecting save and close tabs respectively.
Just in case you have created a sales order and filled it, then you might have to create an invoice. This can be done in two ways. Let us evaluate each of the ways one by one:
From the sales orders window
The very first step is to choose create invoice tab on the sales orders main tab.
Now, select any of the two options from the prompt that shows up on the screen:
Choose create invoice for all of the sales order(s) to add all the items from the sales order to the invoice.
Go for Create invoice selected item, in case you want to put only some of the items on the invoice.
Perform necessary changes to the invoice.
Also, note that in the list of items, you need to enter a quantity in the To invoice (or invoiced) column for each item. In case you don’t want to invoice any of the listed item, enter the quantity as Zero
The last step is to choose save and close.
From the invoice window
Here you need to head to the QuickBooks home screen or the customer menu and choose create invoices.
Furthermore, on the customer: job drop-down, choose a customer or customer job.
The available sales order window will show up on the screen.
You now have to choose one or more sales orders having items that you are planning to include in the invoice.
Perform necessary changes. Also, in the items list, enter the quantity in the To invoice (or invoiced) column for each item.
Just in case you don’t wish to invoice any of the listed items, add quantity as zero.
In situations where the customer accepts the estimate and agrees to pay a fixed amount (instead of the actual time and costs), then you can simply turn that entire estimate into an actual invoice. This can be done in any of the two ways enumerated below. Let us explore the steps in both the cases one by one:
From the estimate window
Start by opening the correct estimate.
After that, choose create invoice at the top of the estimate form.
In case you have progress invoicing turned on, then there are chances that you get a prompt that would ask for the items and quantities to put on the invoices.
You will have to specify the required information.
And after the invoice appears, edit the information as required.
At the end, choose save and close, and you are good to go.
From the invoice window
Under this procedure, you need to navigate to the QuickBooks home screen or the customer menu and further opt for create invoices.
Once done with that, on the customer: job dropdown, you need to choose a customer or customer job. The available estimates window show up.
Now, pick the estimate you wish to include in the invoice.
Further note that QuickBooks only allow you to choose one estimate to invoice.
Also, if you have progress invoicing turned on, then you might get a prompt asking what you want to have on the invoice.
Specify whatever asked to.
And after the invoice appears, edit the information required.
Creating an invoice doesn’t involve any rocket science. Performing the set of steps enumerated above is enough to successfully create an invoice in QuickBooks. However, in case you are unable to create an invoice using the steps above, or if you need professional assistance from certified QuickBooks ProAdvisors at any point in time, feel free to ring us up at +1-888-510-9198, and we will provide you with immediate support and assistance. Our team will clear all your queries related to creating invoices in QuickBooks.
FAQs Related to Create invoice in QuickBooks Desktop
Can you create your own invoice in QuickBooks?
For this, you need to perform the steps below: 1. Move to the sales tab. 2. After that, choose invoices or estimates. 3. Once done with that choose create invoice or estimate to create a new form. 4. Or to edit the existing form, choose an invoice or estimate from the list and choose view/edit.
How do I send an invoice from QuickBooks desktop?
You can send an invoice from QuickBooks desktop using the set of steps below: 1. Move to the sales tab. 2. After that, choose invoices. 3. You now have to find the invoice you wish to email in the action column. 4. Now, select the drop-down arrow and hit send.
How do I Create a bill in QuickBooks?
To create a new bill in QuickBooks, you need to: 1. Choose + new 2. Select bill 3. From the vendor ▼ dropdown, choose a vendor 4. After that, from the terms ▼ dropdown, choose bill’s terms. 5. Furthermore, enter the bill details in the category details section. 6. And also enter the amount and tax.
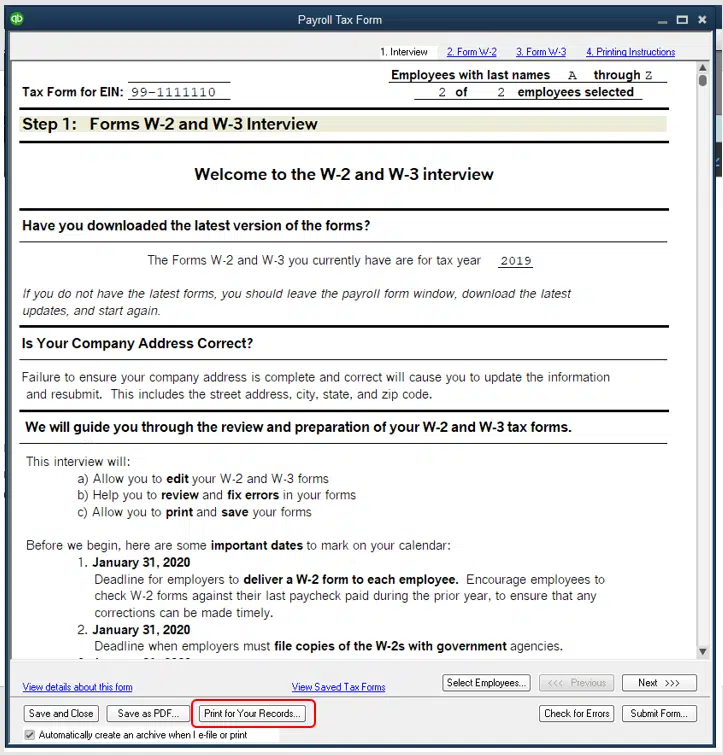
Form W-3 stands for Transmittal of Wage and Tax Statements. It summarizes W-2 employee information about the total W-2 earnings, FICA wages and tax amount withheld. It further consists of the federal income wages and tax amount withheld. In certain cases, you don’t need to file a W-3 form. Filing form W-3 is based on how your W-2s are filed with the social security administration. But if you are required to file for W-3, then this segment will help you in learning the complete procedure to print w3 form in QuickBooks. Let us explore the complete set of steps in detail.
On the other hand, if you are seeking professional guidance to carry out the procedure to file and print W-3 in QBO or for any related to intuit forms, then do not hesitate in connecting with our technical support team at +1-888-510-9198, and they will provide you with immediate solutions.
What is w3 form?
W3 form is a tax form that is used by the employers to report an employee’s total income to the Social Security Administration and to the Internal Revenue Services (IRS). Employees who get more than one W-2 Form from their employers need to be addressed to the IRS and Social Security Administration about their total salary payments and withholding amounts. This is done by filling W3 form by the employers and sending it to the respective authority.
As a business, you might need to print various forms in QuickBooks. Below we have stated the steps to print W-3 form in QuickBooks online payroll. Note that in QuickBooks online, printing W-3 forms depends upon how you pay and file the form.
Condition 1: When Intuit pay and file w-3 form for you.
In such a scenario, the form will be emailed to your employees starting January 16-31. In case you need to, you can reprint them on plain paper on January 13. The current year’s or any previous year’s form can be printed from when you started using QBO payroll.
Also, opt for print both employer and employee copies of your w-3 form.
The next step is to choose view on the transmittal wage and tax statements (W-3)
In case you are printing employee copies, then you will see those who want a paper copy and those who want to opt for paperless.
A printed copy won’t be provided to the ones chosen paperless.
You will now have to click on the view tab.
In case you come across a question asking if you or your employees contributed to a retirement plan outside of QuickBooks online, you will have to select yes or no, and carry out the steps above to get back to the W-3 form.
The last step is to click on the print tab on the Adobe Reader toolbar.
For this, you need to first head to the taxes menu.
Further click on payroll tax.
And also choose filings and opt for resources.
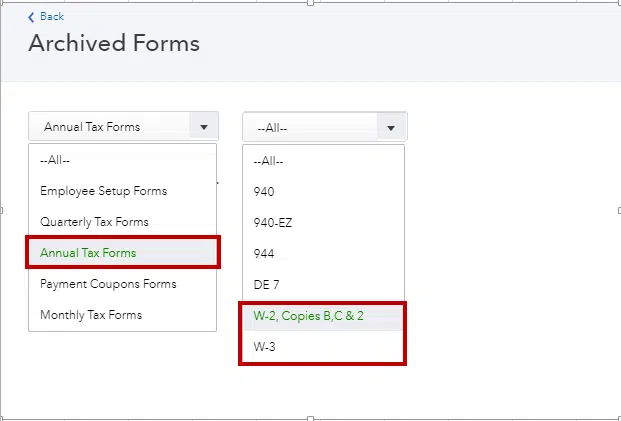
Once done with that, click on Archived forms and filings and also set the date range you need, or search the QuickBooks forms you need.
The next step is to choose the view on the w-3 form that you want to print.
Also, click on the print icon on the reader toolbar.
After that, choose print again.
Condition 2: In case you pay and file electronically or manually
In case you pay and file your W-3 form electronically or manually. You can print the W-3 form starting January 1. And can print the current year or any previous form from when you started using QBO payroll.
Printing the current year or a year prior
For printing the current year or a year prior W-3 form, you need to perform the set of steps below:
Navigate to the taxes menu.
Followed by clicking on the payroll tax.
And further choose filings.
From there, you can further choose to print both employer and employee copies of W-3.
Once done with that, choose archive or view on transmittal of wage and tax statement.
In case you are printing employee copies, you will see the following:
For W-2 Print setting: 4-part or 3-party perforated paper. Opt for the change setting, in case you need to change your paper type.
Employees who need a printed W-2 and those who want a paperless W-2. Note that, the employees who need paperless won’t be selected and won’t get a printed copy. You will then have to click on view.
A question might appear asking if you or your employees contributed to a retirement plan outside of QBO. Choose yes or no accordingly and further perform the steps above to get back to your W-3 form.
The last step is to choose the print icon on the Adobe Reader toolbar. Also, click on print again.
Now that you know the steps stating how to print W3 in QuickBooks online and desktop, it is time to implement those steps. However, in case you have any queries or if you get stuck at any step, feel free to ring our QuickBooks support team up at +1-888-510-9198, and they will help you with the procedure smoothly. Our technical team consists of professionals having sound QuickBooks knowledge. Thus, reach out to us in case of any queries related to QuickBooks.
FAQs Related to W-3 forms in QuickBooks
What is w3 form?
W-3 in QuickBooks payroll is Transmittal wage and tax statements that summarize W-2 employee information about: Total w-2 earnings, etc.
How do I print tax forms in QuickBooks desktop?
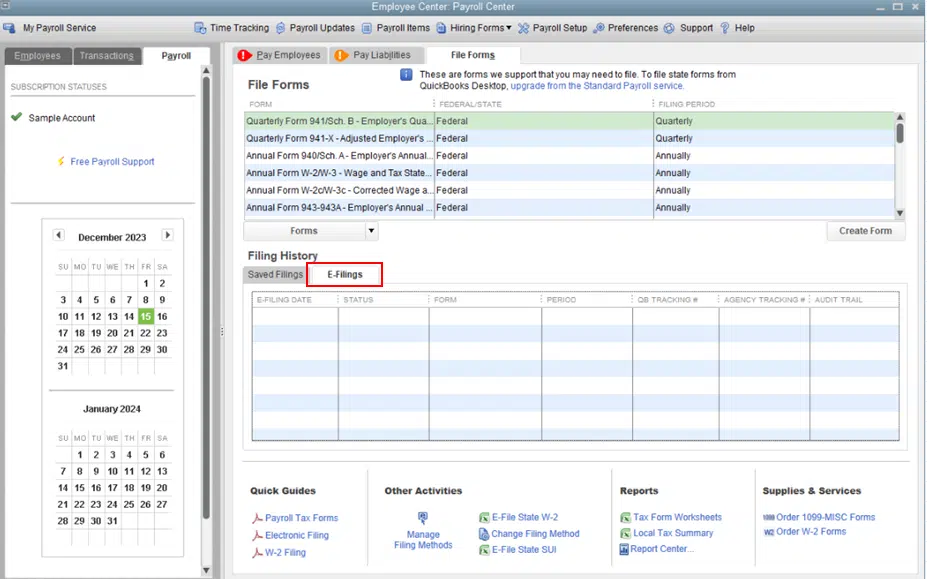
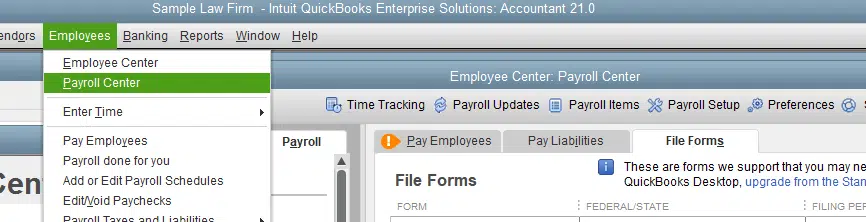
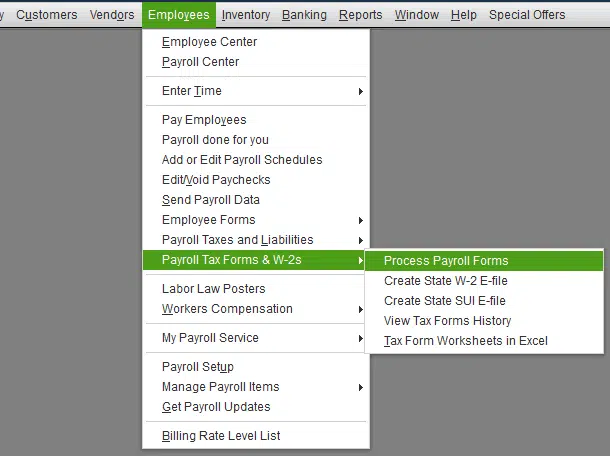
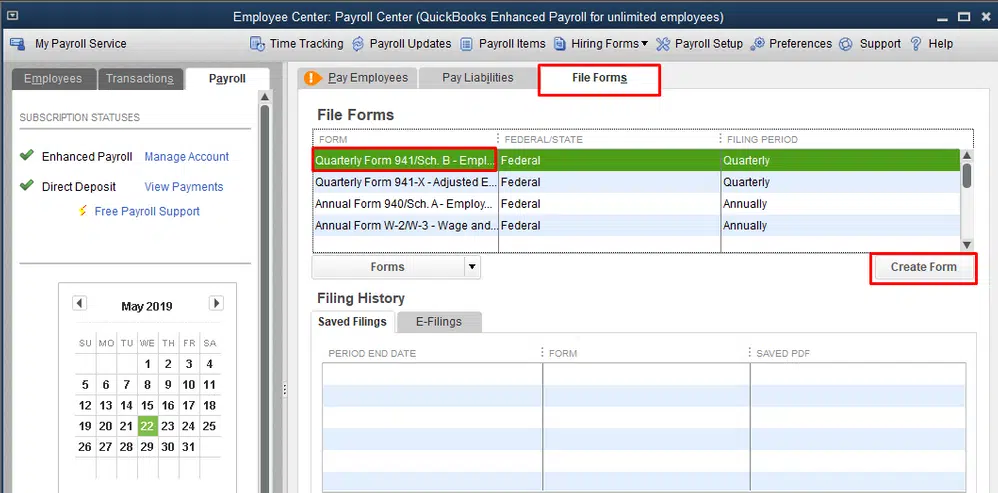
In order to print tax forms in QuickBooks, you can perform the steps below: 1. Move to the employees menu. 2. Choose the payroll center. 3. After that, select the file forms tab. 4. Now, select view/print forms and W-2s
Can I print w2 from QuickBooks desktop on plain paper?
You can print W2 on plain paper by clicking on W-2 printing settings. Under how do you want to print form W-2? you need to click on employee W-2 forms on plain paper. After that click on ok tab and this will print it for you successfully.
Where is W3 in QuickBooks Desktop?
You can find W-3 and print it using the steps below: 1. The very first step is to choose taxes. 2. After that, opt for payroll tax. 3. Now, choose filings. 4. You will see your W-2s and W-3 listed, but you can only file them from here. 5. Choose resources, and further click on W-2s or W-3s. 6. Once done with that, perform the steps to print it successfully.