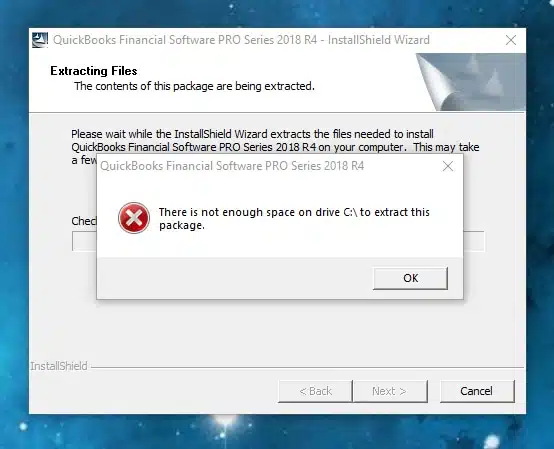
Trying to work on QuickBooks desktop and came across an error QuickBooks not enough space on drive C? Well, this isn’t a huge bug, you can easily rectify this issue by performing some basic steps. Often such errors occur indicating space issues, which require you to clear up disk space for QuickBooks. You might see the following warning message displayed on your screen when such an error occurs:
There is not enough space on drive C:\ to extract this package
To help you out in dealing with such an error, here we are with this segment right here, spilling the beans on how you can clear up disk space for QuickBooks desktop easily using some basic set of steps. For more details, you can stick around this piece of writing, or get on a call with our technical support team, at +1-888-510-9198, and we will ensure that all your queries are addressed properly.
Getting rid of unwanted data can create space for QuickBooks. Here are the steps involved in clearing up disk space for QuickBooks. Let us evaluate these steps one by one in order to fix error QuickBooks not enough space on drive C:
Step 1: Check the hard drive
Before you proceed further, you need to check the free space available at the current moment. Note that QuickBooks requires at least 1 GB of space, so as to run the install process and 2.5 GB of space to work properly. You can carry out the steps below to check the hard drive space available:
You need to first choose the Windows start menu.
Once done with that, enter File Explorer into the search and also open File Explorer.
You now have to select my computer from the navigation bar.
Heading forward, right-click the icon for the hard drive.
Moving ahead, you will see C: drive
Here, you need to go for the properties tab
Followed by, a window showing the available space.
Step 2: Create space on the hard drive to fix QuickBooks not enough space on drive C:
You can clear up disk space using the procedures below. You need at least 2.5 GB of free space to run QuickBooks optimally.
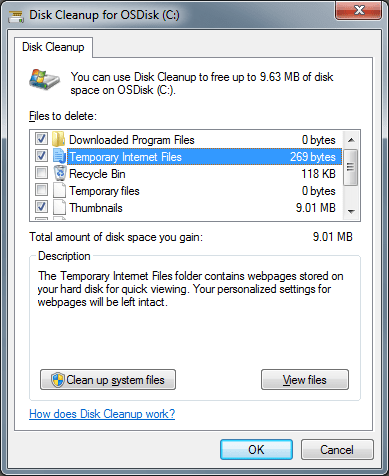
Clean up your disk
Running disk clean-up makes sense when you have lots of files in the downloads folder or recycle bin.
Removing temp folder
You can delete the files in the temp folder to free up some hard drive space. Make sure to sign in to the windows as admin.
Before eliminating the files, check if you can uninstall any of the programs that are no longer in use. This would create more space for you.
Clean up photos and documents
If you have already removed the temporary files and unused programs, and the space requirement isn’t satisfied, then you can move photos and documents to an external hard drive. Note that the photo and media files can make up a lot of space. However, avoid moving any QuickBooks files. They are required to be kept on the local hard drive. Moreover, QuickBooks can’t access files on external hard drives.
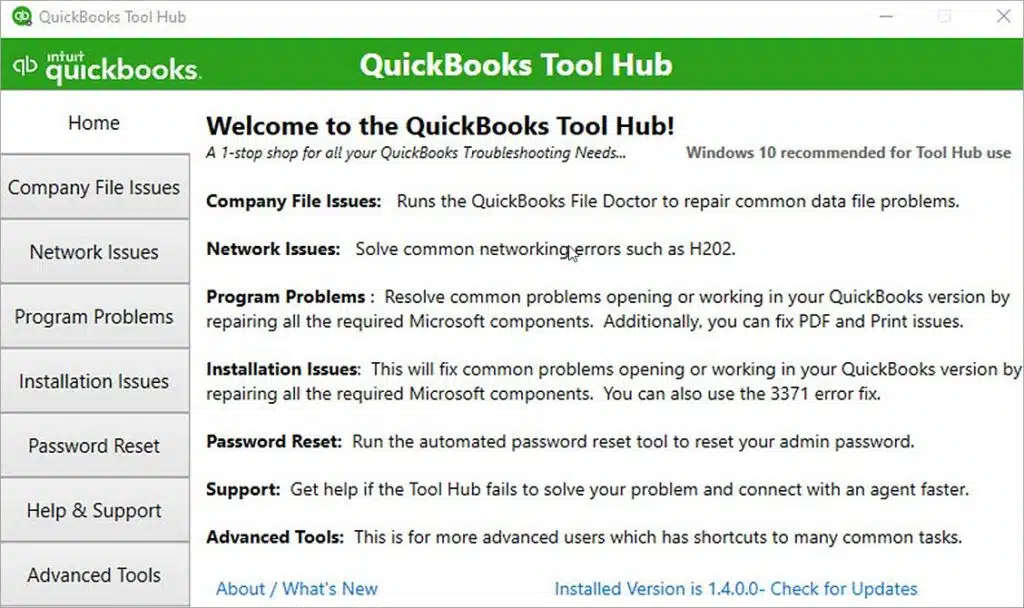
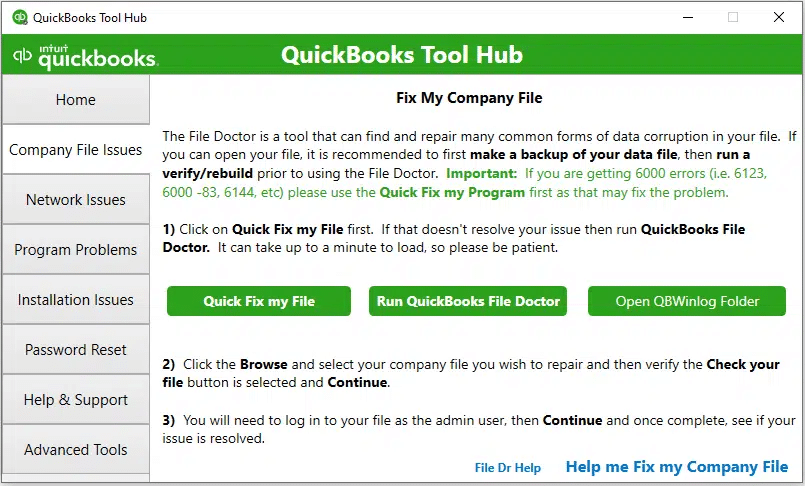
Refreshing Install file
If you are trying to install QuickBooks desktop, and still require space, then use QuickBooks tool hub. Or navigate to the installation issues section, and there you will find a few steps that can be performed. Start the installation process again.
Steps for upgrading
In case you have tried all the measures, and are still unable to make space for QuickBooks, then carry out the steps below:
Implementing the set of steps mentioned above might help you clear up disk space for QuickBooks and make optimum use of the software. On the contrary, if you are still unable to do so, then our team of certified QuickBooks ProAdvisors is here to help you. All you need is to ring up to us at +1-888-510-9198, and we will address all your queries immediately.
QuickBooks lets you have multiple companies under the same QuickBooks online account. However, each of the company files is its own paid subscription but can be accessed easily with the same sign-in info. This simply lets you manage and switch between the companies more efficiently and without any hassle. However, merging two companies in QuickBooks online is not possible. But it lets you consolidate and compare QuickBooks companies easily. This article will help you create or add another company file to QuickBooks online. Let us check out the steps involved in the procedure later in this segment. However, for any queries related to QuickBooks online or QuickBooks desktop, you can give us a call at +1-888-510-9198, and connect with our technical support professionals.
In case you have various companies under separate accounts in QuickBooks online, you can move them all into one account by performing a simple set of steps.
Send an invite
You can send an invite to the email address, you wish to access all your companies with. Note that only the company admin can send invites and also ensure that you already have the Intuit account with this email.
Sign in to one of your QuickBooks online companies that can be accessed with the email you do not use now.
Further, Invite the new email to the company file. In case you see a user limit message, then you will have to add a license.
Now, select a user type and if you want the new email to manage other users and the company info, then you will have to choose Company Admin.
Navigate to the inbox for the new email and choose the link you might have got for the invite.
You will now be able to sign in to the company file using the new email.
For this, you need to visit the QuickBooks pricing page and choose the subscription option you want. This further opens one of two experiences. Let us evaluate:
In case you are signed in to QuickBooks, you will be asked to confirm the account you wish to sign in with. However, if the account displayed is one you want to use for the new company file, then simply choose Yes, that’s correct.
If you haven’t signed in recently, then you will be asked to create an Intuit account. Don’t fill this out unless you want to connect your new company file to a new account. Or else, look for adding a company to an existing account section and choose the sign-in link. You can sign in with the user ID password you use for QuickBooks.
Later on, carry out the onscreen prompts to create a new company file.
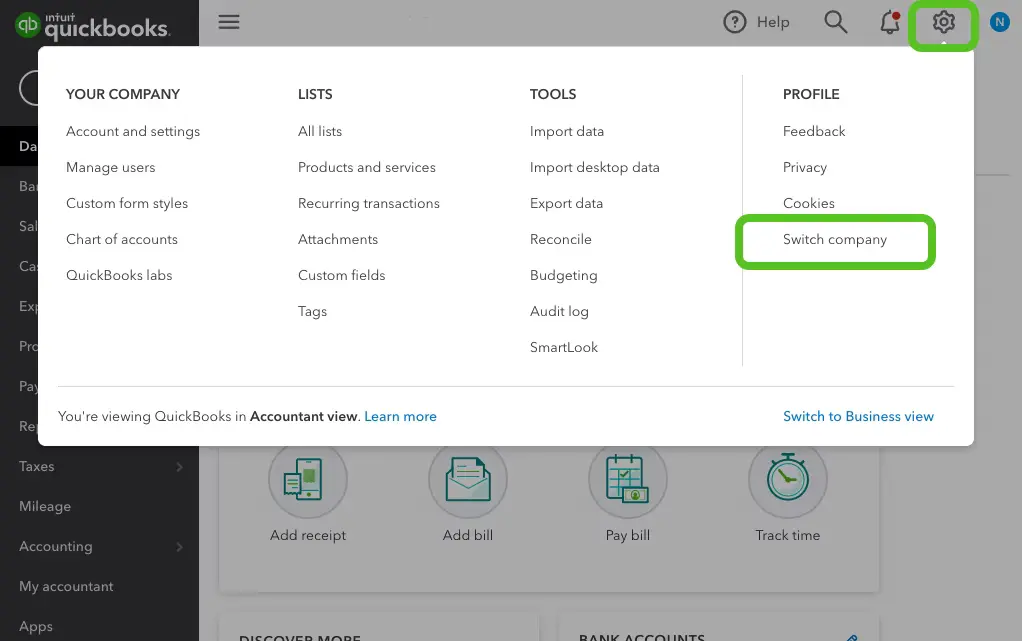
When you sign in, QuickBooks asks which company file you want to open. In order to switch between companies, you can choose the settings tab and further select switch company.
Manage Multiple companies in QuickBooks Online
When you quickly switch between multiple companies you have set up, they are still separate. Here are a couple of things that can be done to manage all data in your company files.
Users
Note that, users you set up for one company aren’t automatically granted access to the other. In case you want to give them access, then you can simply invite them.
Online Banking
In case you connect a bank or credit card account to one company, then it isn’t added or visible from the second one. This requires you to connect it separately for each company.
Lists
You can simply move your lists (vendors, customers, inventory, or chart of accounts) to the new company, so you do not have to start from scratch. Note that, your companies are kept separate for a reason and any changes you make in the future in one company won’t be updated in the other’s list.
Hopefully, the set of steps above might help you create or add a company file to QuickBooks online. However, if you aren’t sure about performing the process manually, you can simply reach out to our technical support team at +1-888-510-9198, and they will provide you with instant support and guidance related to all sorts of QuickBooks queries.
FAQs Related to Create Another QuickBooks Company in QBO?
How do I add another company file in QuickBooks Online?
You can add another company file in QuickBooks online using the steps below: 1. Select Buy Now or Free 30-day trial. 2. Select again from the same buttons under the subscription you want to avail. 3. On the Sign-up page, click the Add another company hyperlink. 4. Enter the login credentials you always use and select Add new company.
How do I import a company file into QuickBooks Online?
Log in as an admin to the company file you need to import. Go to the Company menu, then select Export Company File to QuickBooks Online. Select Get Started. Click Select Destination, then sign in to your QuickBooks Online account.
Can you have 2 company files in QuickBooks?
It is possible to have multiple companies under the same QuickBooks online account. Every company file is its own paid subscription, but you can access them with the same credentials.
How do I open two companies in QuickBooks Online?
On the login page, select the Subscribe here link next to Already have an Intuit account? With the same credentials you have for your current company. If you want to have two separate sets of credentials, enter a new user ID. Follow the on-screen instructions to create a new company file.
After you purchase and start using QuickBooks, if you need more users to access a QuickBooks desktop company file at the same time, then you simply need to buy additional user licenses. However, there is a limit set for the number of users to access the same company file. One can add a user license to QuickBooks using some basic steps. Talking about the number of user licenses: QuickBooks Desktop Premier lets 5 users work in the same company file. Whereas, QuickBooks Desktop Pro lets 3 users work in the same company file. And if you need more than that, the QuickBooks desktop enterprise is ideal for you, as it lets up to 30 users work on the same company file at the same time.
If you are planning to add a user license to your QuickBooks, here is how you can do it. This segment is going to highlight the complete set of steps for buying an additional user license, along with the other necessary information. Thus, stick around to this piece of writing till the end, or you can further connect with us at +1-888-510-9198, and we will provide you with quick support and assistance related to QuickBooks.
To sync online, you need to navigate to the help menu and further choose Manage my license. Later on, go for the sync license data online option to update new license info.
You can carry out the steps to sync your license data manually if you install QuickBooks on a computer that doesn’t have internet access. The steps that would work here are:
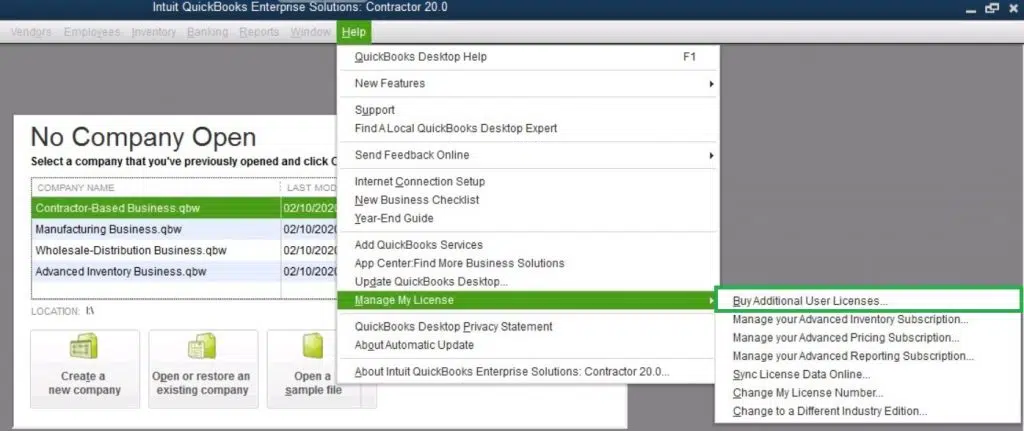
Initially, head to QuickBooks, and further navigate to the help tab.
You now have to opt for manage my license.
And go for buy additional user licenses.
Now, choose the phone option.
And also enter the same validation code you got when you purchased the additional license.
To Add a User License to QuickBooks isn’t a tough nut to crack. Once you are well versed with the steps above, it becomes easy to get your hands on extra user licenses. However, if you are stuck at any point, or if you want professional guidance in purchasing and adding users to a QuickBooks license, then in that case, give us a call at +1-888-510-9198, and let our technically sound QuickBooks support team help you with your queries.
FAQs Related to Add User to QuickBooks
How do I add an authorized user to QuickBooks Online?
You can add an authorized user using the steps below:
Sign in to my account
After that, on the manage your QuickBooks page, choose the product or service you would like to manage.
The next step is to check if you have the correct account.
Once done with that, you need to scroll to the authorized users section
Choose to invite a user
Followed by entering the contact info needed.
You now have to select Send invite
Can I add another account to my QuickBooks Online?
In order to add a new account, you simply need to head to the settings tab and choose the chart of accounts. Once done with that, choose a new tab. According to your account view, you will either see a panel labeled new account or new category.
How much is a QuickBooks license per user?
The prices for QuickBooks online and QuickBooks desktop differ. The license price further differs according to the edition of QuickBooks being used.
Is your QuickBooks payroll not taking out taxes? Well, a few QuickBooks users have reported this issue quite recently. It isn’t a commonly encountered error and can be experienced due to a handful of reasons. Usually, QuickBooks payroll automatically calculates taxes and if the employee isn’t required to contribute to a specific tax, then you can create an exemption for the same. However, at times due to a few reasons, QuickBooks payroll might not take out taxes.
Thus, to help you in such a scenario, here we are with this piece of writing sharing the complete info related to QuickBooks payroll not taking out taxes issue. Just in case you are seeking any sort of technical assistance, give us a call at +1-888-510-9198, and our certified QuickBooks ProAdvisors will answer all your queries.
Quick Fixes to QuickBooks payroll isn’t calculating payroll tax issue
You can try fixing the issue with QuickBooks payroll using the effective steps below. Note, that the solutions differ according to the condition. Thus, make sure to perform the steps accordingly.
Condition 1: If the year-to-date and quarter-to-date wage or tax information of the employee is incorrect
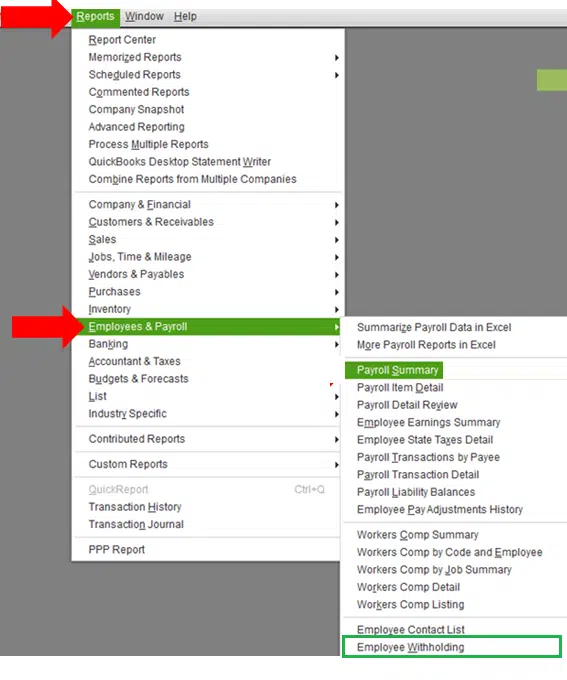
It is possible to view the taxes of all the active employees in an employee withholding report. This can be done using the set of steps below:
At first, select reports
After that, move to employees and payroll
You now have to click on employee withholding
Further, click on Customise Report tab
Also, go for columns as per the requirements
Now, click on the items you want to display on the report in the display list section.
Once done with that, select ok tab to save changes
Also, check if your employees are set up accurately for state, local, and federal taxes.
Now, for editing the employee info window, you need to ensure that you double-click the employee’s name.
Further, the employee information window will show up.
Now, click the payroll info.
Also, tap on the taxes tab.
The next step is to click on the federal, state, and other tabs.
Lastly, ensure that the employee is marked properly for taxes.
Condition 2: In case you bought a QuickBooks payroll subscription
You can save the paycheck of the employee depending upon the calculations that were made earlier.
Now, change the check details of the employee to ensure accurate calculations.
Further, manually enter both the withholding and employer matches in QuickBooks payroll.
If in case you have already subscribed to the assisted version of payroll, then you might face issues due to the payroll taxes being filled by Intuit.
You will further have to update QuickBooks to the latest release.
This will sync the software with the latest payroll forms and tax tables.
Before you run the payroll, check if the employees and payroll items have been set up properly.
If the data within QuickBooks is not set up, then you might come across this issue for sure.
Condition 3: Check if the annual limit has been set or reached
The annual limit box and default limit may be check marked, which might lead to an issue where the payroll item is not calculating correctly and it stops calculating on a paycheck. In such a scenario, you can verify the setup of the item by:
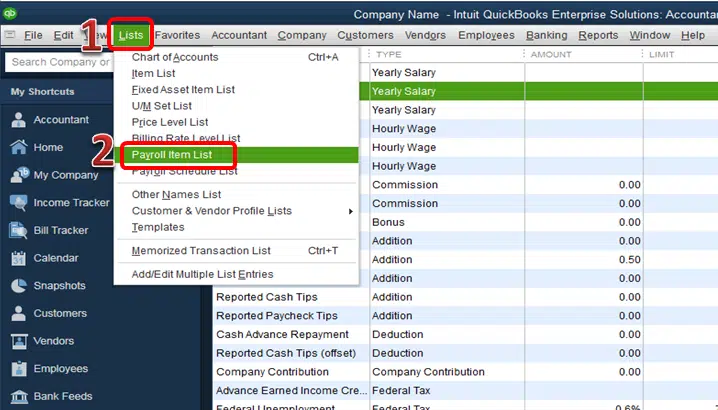
At first, select lists and payroll item lists from the top menu bar.
Further, right-click the payroll item that you want to modify and further choose edit payroll items.
You now have to scroll down to the next screen till you reach the limit type screen.
Once done with that, verify that the box at the bottom is correct.
Just in case the limit is correct, the employee’s payroll should stop calculating at that limit.
Or else you can update the amount.
Now, under the limit type, verify that you have opted for the right option.
Annual – Restart every year
Monthly – Restart every month
One-time limit
You can also change the default limit or limit type selection according to the requirements.
Now, conclude the process by clicking on the finish tab.
Other Effective steps to correct payroll taxes in QuickBooks
If none of the methods discussed above helped you in fixing the QuickBooks payroll is not taking out taxes, then in that case, try performing the below steps.
Method 1:
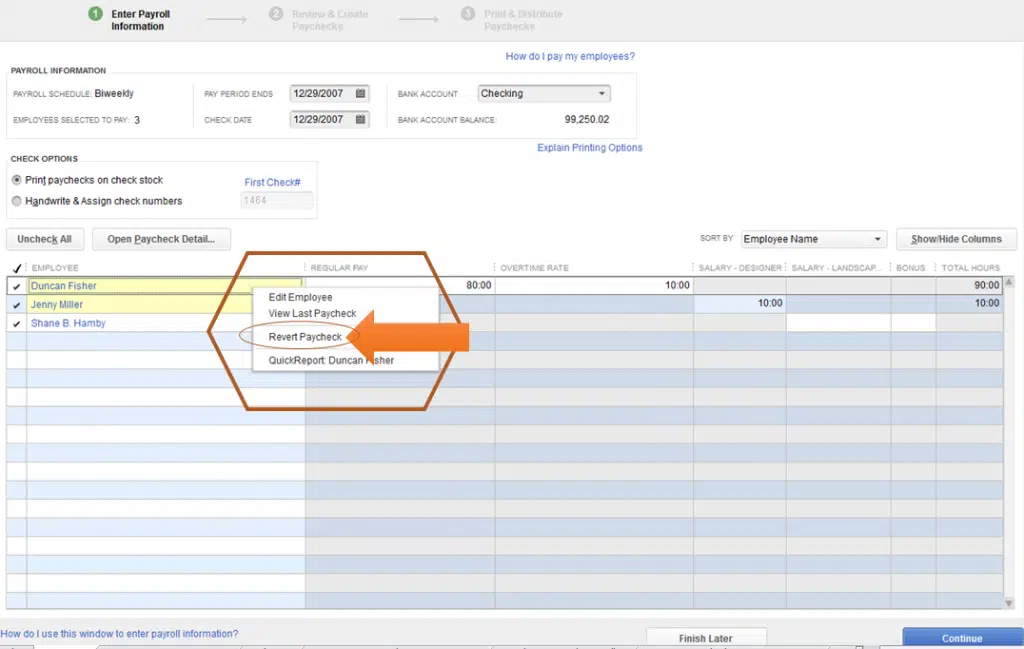
Make sure that the software is in the latest version. Further review the employee’s tax setup, as it affects the process of QuickBooks calculating taxes. After that, revert the employee’s paycheck. This would refresh the payroll info for calculating the taxes on the transaction. For this, you need to carry out the steps below:
Open the employee’s payroll information.
Further, right-click the name of the employee which is highlighted in the yellow circle.
You now have to choose Revert paycheck.
And this would rectify the issue up to a certain extent.
Method 2:
Under this process, you need to open QuickBooks.
Now, click on employees.
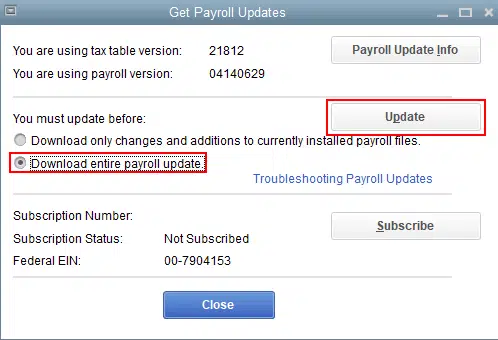
And further, choose the get payroll updates option.
The next step is to choose the download entire payroll update radio-tab.
And then, select update.
Wait for the process to complete.
Conclusion!
QuickBooks payroll not taking out taxes is an uncommon error making it even more complicated to tackle. However, once you implement the steps enumerated above, it is believed that you might be able to rectify the issue up to a certain extent. In case you still need any sort of technical guidance at any point in time, or if you are still facing the same issue, then do not think much in connecting with our technical support team at +1-888-510-9198, and we will provide you with immediate solutions to all your QuickBooks related issues.
Sending emails directly from QuickBooks saves a lot of time and effort. However, at times, users might find an error that states: QuickBooks is unable to send emails due to network connection failure. Such an error in QuickBooks can usually occur due to misconfigured settings. This error can be a bit annoying, so here we are to help you eliminate such an error in QuickBooks.
In this piece of writing, we are going to share the complete information related to errors in sending emails, especially in the case of a network connection failure. Thus, make sure to stick around this segment till the end, or you can further connect with our technically sound QuickBooks support team for any sort of further technical assistance. Give us a call at +1-888-510-9198, and we will answer all your queries immediately.
You have entered an incorrect email address or password: For this, you log in to the email account using the web browser. Further, check whether the email address and password that you have entered are working or not.
You are not connected to the internet or the firewall is blocking the connection: You need to first open the Internet Explorer browser and further open the website to look for the internet connection.
Your email server settings are incorrect: For such error, you need to check and certify that the settings of webmail preferences are done properly.
What causes QuickBooks unable to send emails error?
As we mentioned earlier, there are a bunch of factors that might trigger this issue in QuickBooks. Let us explore what causes this error:
In case the Windows firewall is hindering QuickBooks from functioning, then such an error can be experienced.
Another trigger for the same can be incorrect internet settings.
You can also experience a similar issue if the .nd and.tlg files are corrupted.
Also, if the server is having some backend issues.
Effective methods to eliminate errors QuickBooks unable to send emails
Now that you know what factors can cause QuickBooks unable to send email errors, it is time to implement the right steps to get rid of this issue. Let us evaluate each of the methods one by one:
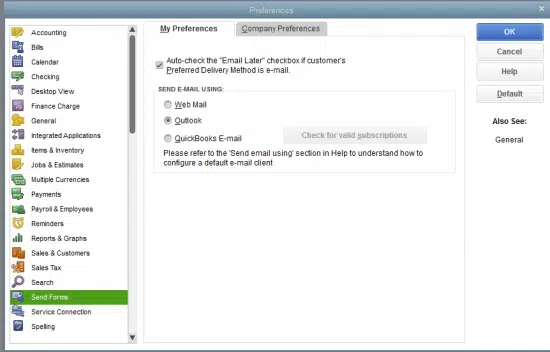
It is essential to identify if the email preference is correctly configured or not. You can perform the below steps in such scenario:
You need to first run QuickBooks as an admin
Further, click on the edit tab.
Once done with that, click on preferences.
The next step is to pick the send forms option.
Now, click on my preferences tab.
You now have to toggle the options in the send e-mail option.
Heading forward, click on ok tab.
Also, close QuickBooks.
After that, restart Windows and run QuickBooks as admin.
Lastly, try to send a test email.
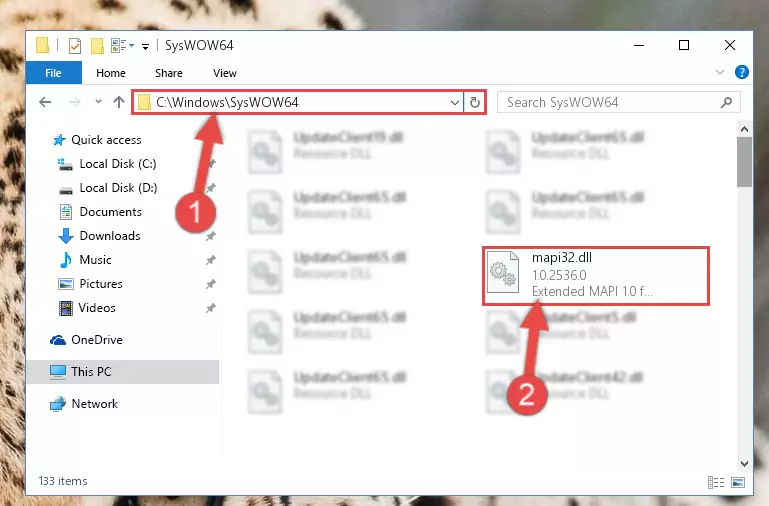
Method 3: Repair MAPI32.dll
The MAPI32.dll file is usually responsible for handling email messages and other functions in Microsoft Outlook. In order to repair this file, you can perform the steps below:
In this method, you need to open the control panel and click on programs and features or add/remove programs.
After that, find Microsoft Office or Outlook in the list of installed programs and opt for it.
When there is a network connection failure, you can try to use a different email client to send emails. The steps involved in using a different email client are as follows:
You need to open an email client other than the one you were using previously like M.S. outlook, gmail, etc.
Now, navigate to the compose option.
Enter the email of the person to send and also the subject.
The last step is to type in a message and send an email.
Method 5: Clean Install QuickBooks
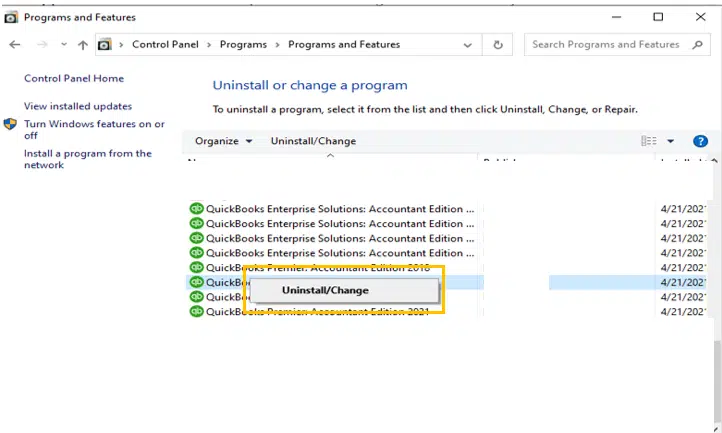
Another method you can try to implement is to clean install QuickBooks. The steps involved in this procedure are as follows:
Initially, you need to open the control panel.
Once done with that, move to programs and features.
Now, click on QuickBooks.
After that, right-click on it and then click on the uninstall option.
After the program is uninstalled, move to the QuickBooks folder and rename it.
Now, get the QuickBooks program reinstalled on the system
Also, register and activate QuickBooks.
After all the steps above, you can run QuickBooks as admin.
Try sending a test email and check if the email is sent successfully.
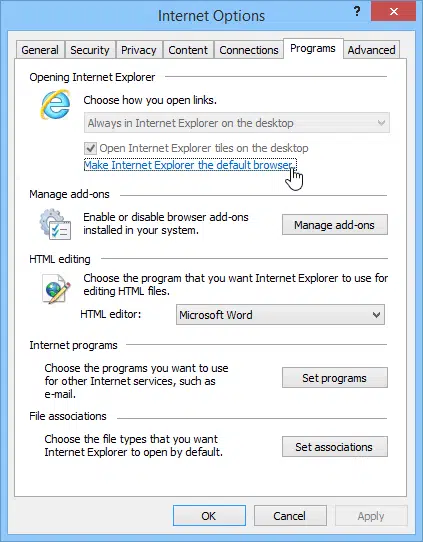
Method 6: Make Internet Explorer the default browser
This method requires you to close QuickBooks at first.
Once done with that, run the Internet Explorer browser from the start menu.
After that, move to tools.
Also, select the settings tab and click on the internet options.
Move to the programs tab.
Followed by clicking on the set programs option.
Click on Set your default programs option and further select the email service.
Hit on the apply tab.
Now, click on the OK tab.
Close the Internet Explorer and re-run QuickBooks as admin.
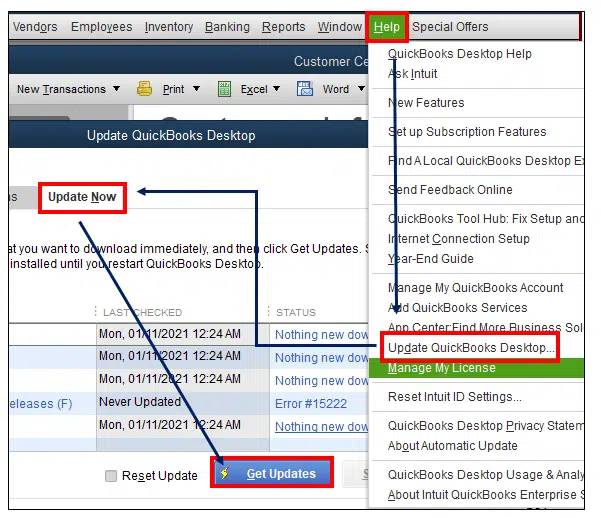
Method 7: Update QuickBooks Desktop to the latest
Here you need to run QuickBooks as admin.
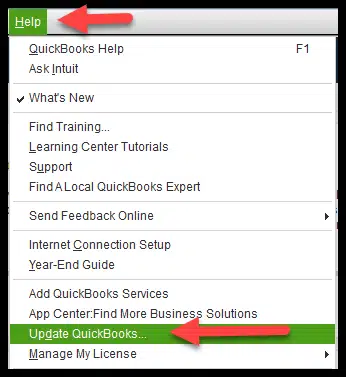
Now, head to the help tab.
Once done with that, click on Update QuickBooks desktop.
Select the Get Updates tab.
Ensure to checkmark the reset updates box before commencing with the update process.
When the updates are downloaded, close and re-open QuickBooks to let these updates get installed on the system.
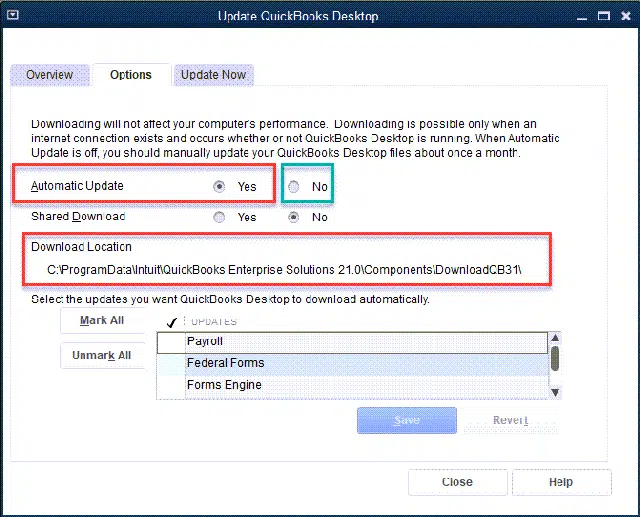
Manual Steps to update QuickBooks
You can try performing the below set of steps to manually update QuickBooks. Let us have a look:
First, move to the website of Intuit from the browser.
Now, choose the QuickBooks product and version installed on the system.
Further, click on the update tab in order to download the update.
Click on the Setup automatic updates tab.
Download and install QuickBooks.
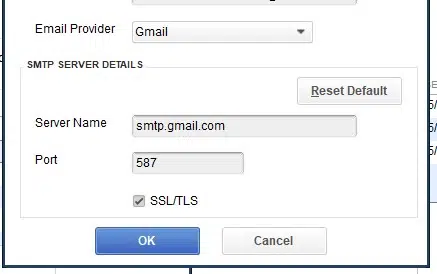
Method 7: Check for the webmail settings
You can check the settings related to the webmail preferences to eliminate such an error in QuickBooks. The steps involved here are:
Run QuickBooks as admin.
Further, right-click the desktop icon and click on run as admin.
Move to the edit menu.
Within the edit menu, go for preferences.
Select the send forms option.
You will further have to click on my preferences and select the email account.
Go for the account and click on the edit tab.
Advance to the SMTP server details section.
Further, enter the server name and port to the email provider settings.
Conclusion!
When you are unable to send emails in QuickBooks due to network connection failure, it can be extremely devastating. However, performing the above set of steps can help you with the elimination of QuickBooks email issues due to network connection failure. On the contrary, if you have any queries or if the error persists even after performing the set of steps enumerated above, then in that case feel free to connect with our technical support team at +1-888-510-9198, and we will help you with all your queries immediately.


![QuickBooks Payroll Not Taking Out Taxes [Fixed]](https://www.hostdocket.com/wp-content/uploads/2023/11/QuickBooks-payroll-not-taking-out-taxes-1080x675.png)
![QuickBooks is Unable to Send Emails [Network Connection Failure]](https://www.hostdocket.com/wp-content/uploads/2023/11/quickbooks-unable-to-send-emails-due-to-network-connection-failure-1080x675.png)