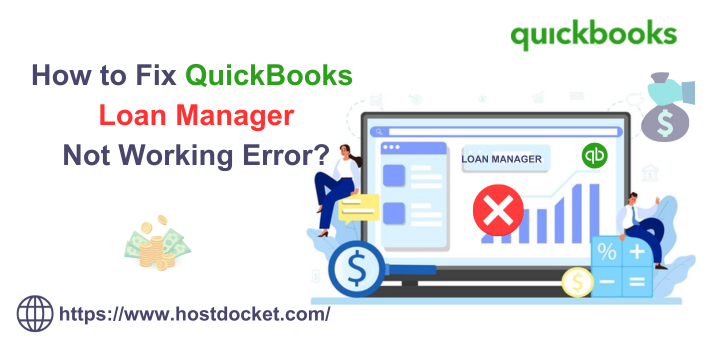
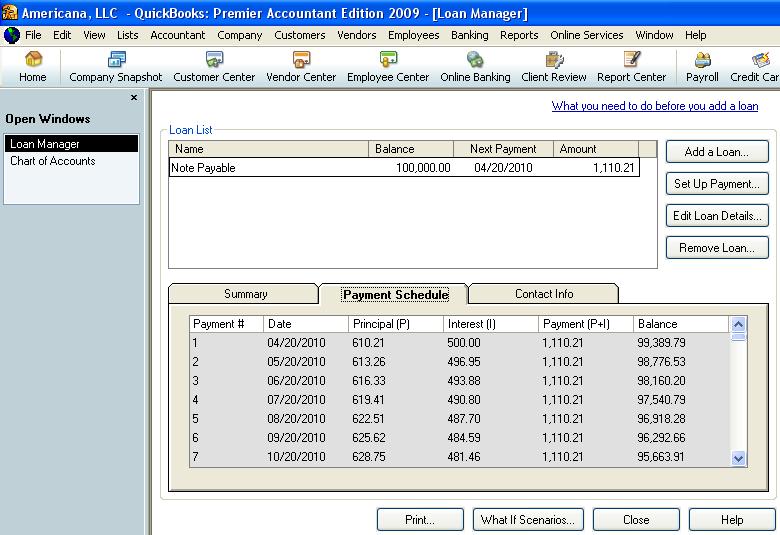
QuickBooks loan manager reflects the loans in QuickBooks depending upon the information provided on the long-term liability and current liability accounts. This feature in QuickBooks lets the users track both principal and interest without looking over the amortization tables to evaluate the accounts. QuickBooks loan manager usually establishes loans in QuickBooks based on the info given. However, at times for certain reasons, one might come across QuickBooks loan manager not work issue. To help you tackle such an error, here we are with this piece of writing, sharing the complete details about how you can fix the QuickBooks loan manager not working error.
Thus, to learn further about the issue, stick around this piece of writing, or you can also consult our technical support team at +1-888-510-9198, and we will provide you with immediate assistance for all your QuickBooks-related queries.
Loan manager in QuickBooks is one of the most helpful features. Thus, getting rid of the error immediately is essential. Reading this piece of writing might help you in getting rid of the QuickBooks loan manager not working error successfully. On the contrary, if you need our assistance at any point in time, then in that case, feel free to reach out to our technical support professionals at +1-888-510-9198, and let them clear all your clouds of confusion.
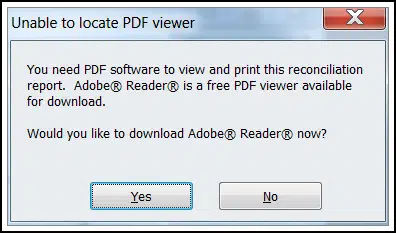
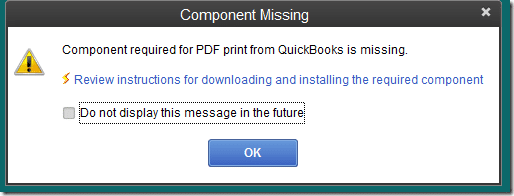
While carrying out daily accounting activities, one might have to print certain documents or pdf. However, at times due to certain factors like improper Windows print components, missing PDF components, or QuickBooks desktop setup, one might face issues with printing payroll tax forms, statements, and other documents. QuickBooks unable to locate PDF viewer is one such error that can be experienced by QuickBooks users. PDF viewer in QuickBooks is an essential component for the software to access the documents and the absence of this component can create issues in opening the essential files.
QuickBooks unable to locate the PDF viewer error can be seen when the Windows print components are damaged or outdated. To further learn about this issue in QuickBooks, sticking around this piece of writing can surely help. However, if you do not want to eliminate the error on your own, then you can simply get in touch with our technical support team at +1-888-510-9198, and they will help you tackle all sorts of QuickBooks-related issues.
What causes QuickBooks unable to locate PDF file error?
There are a bunch of factors causing such an error in QuickBooks desktop, which include:
The Adobe Reader version installed on Windows is outdated.
Another possible reason can be if the QuickBooks doesn’t have Adobe Reader set up as the default PDF viewer app.
You can also come across a similar issue if the QuickBooks desktop software is missing the latest updates.
Also, if the qbprint.qbp file is either damaged or missing from the installation directory.
Effective solutions to fix unable to locate pdf viewer error in QuickBooks
Errors related to pdf like ABS PDF driver install error, PDF and print errors, or unable to locate pdf viewer errors are pretty common in QuickBooks. You can try out the below set of steps and solutions to rectify the error unable to locate the pdf viewer in QuickBooks. Let us explore the solutions one by one:
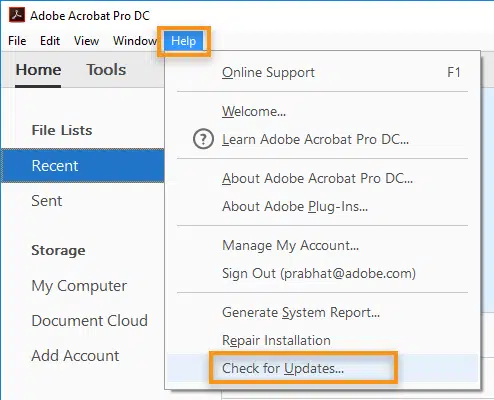
Solution 1: Repair, update, and reinstall Adobe Reader
Just in case you are unable to open a PDF document after selecting Adobe as the default program, then you might face an issue with the PDF reader software. Here is how you can update, repair, and reinstall Adobe Reader.
Further, note the version shown on the page and also open the Adobe Reader App
Once done with that, you need to navigate to the help tab and also choose About Adobe Reader.
Heading forward, check if the Adobe version shown on the page and Adobe’s website is the same.
Moreover, if the versions don’t match, then you need to click on the help tab.
Further, choose the check for updates tab.
Carry out the onscreen prompts to update the PDF viewer.
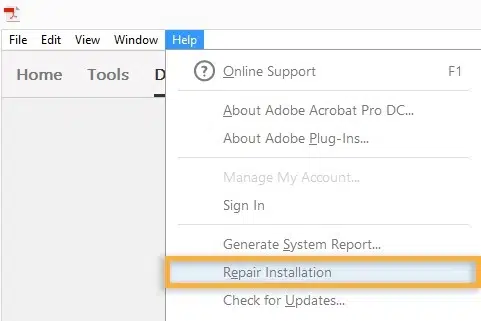
Repair Adobe Reader
Close all running programs and open Adobe Acrobat Reader.
Followed by, heading to the help tab and also click on repair acrobat installation.
Permit the application to repair itself and further, when the repair is complete, reboot the system and check if the users can print the document using QuickBooks.
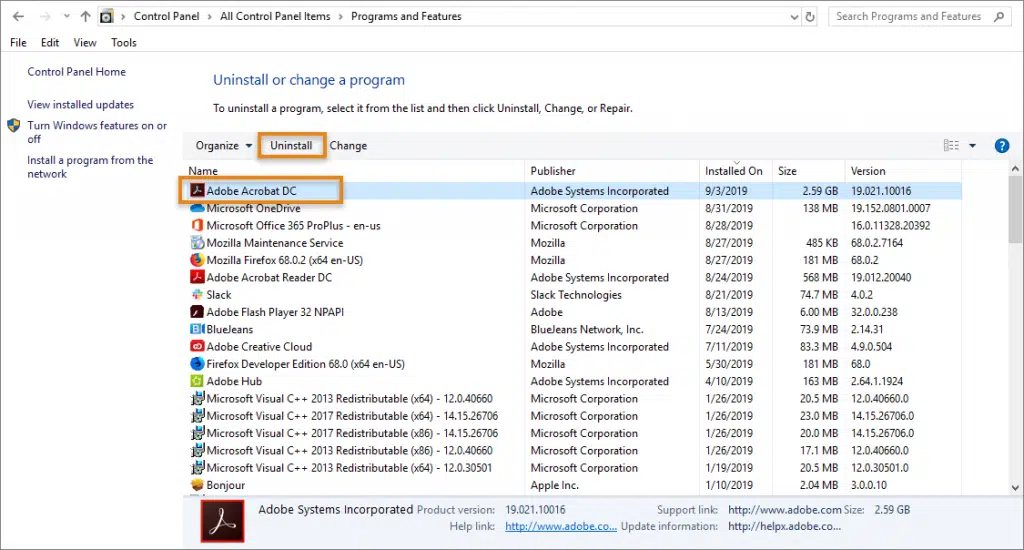
One can use the program and features option in the control panel to uninstall Adobe PDF viewer. The same can be reinstalled later on using the steps below:
First, you need to open the run command and type the command appwiz.cpl to open the program and features window.
Once done with that, choose the option to view installed updates further right-click on Adobe, and choose the option to uninstall.
Also, move to the web page for Adobe Acrobat reader download.
And then, click on the option to install now and choose the correct Windows version from the drop-down list.
Once the update file is downloaded, click on the option to run and hit the finish tab.
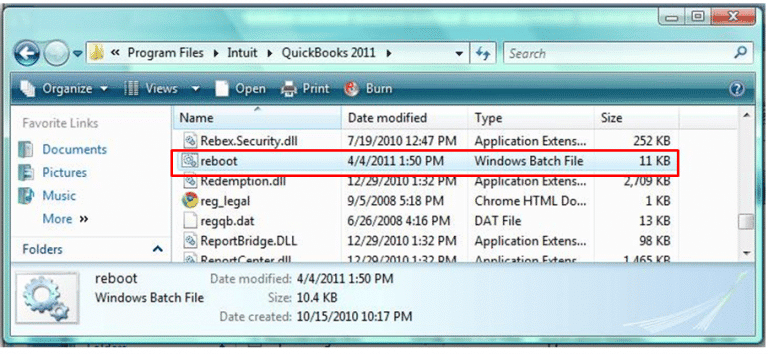
Rename Qbprint.qbp file
You can try to rename the Qbprint.qbp file to fix QuickBooks unable to locate the PDF viewer issue. The steps involved in renaming the file are as follows:
Start by opening the Windows file manager
Further, click on the organize option.
You now have to choose the folder and search option.
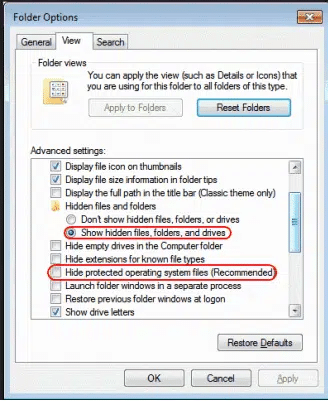
Under the view tab, you need to uncheck show hidden files, folders, and drivers.
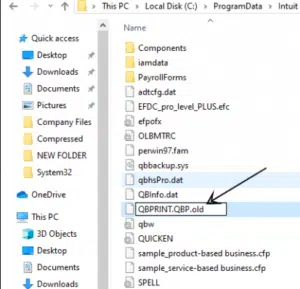
Head to the Program Data folder in the C drive and then open the Intuit Folder.
You will then have to double-click the QuickBooks folder and also right-click the Qbprint.qbp to open it.
After that, choose the option to rename and add old instead of .qbp (qbprint.old)
The last step is to save the file and check if the Unable to locate PDF viewer error continues.
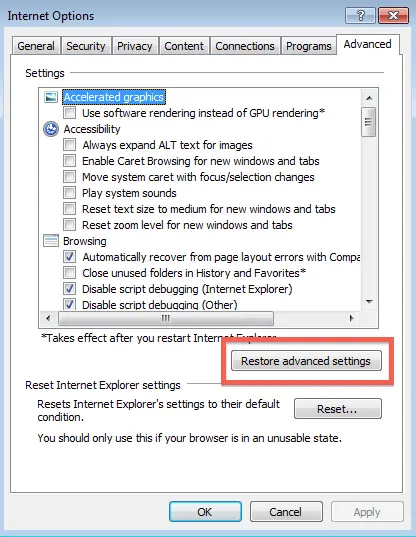
Solution 2: Set Adobe Reader as the default PDF viewer
For Windows 7, 8, & 8.1
If you are a Windows 7, 8, or 8.1 user, then you need to carry out the below steps to set Adobe Reader as the default PDF viewer. The steps involved are:
At first, click on the Windows start menu and choose the control panel from there.
You now have to select programs and click on set default programs
The next step is to find and choose Adobe Reader
Choose set this program as default.
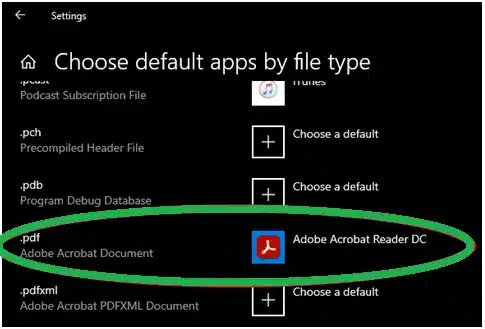
For Windows 10
You need to first click on the Windows start menu
After that, click on the settings tab and choose apps.
Further, click on default apps.
Scroll down to pdf and choose its default program.
Also, choose Adobe Acrobat Reader and click on Switch anyway
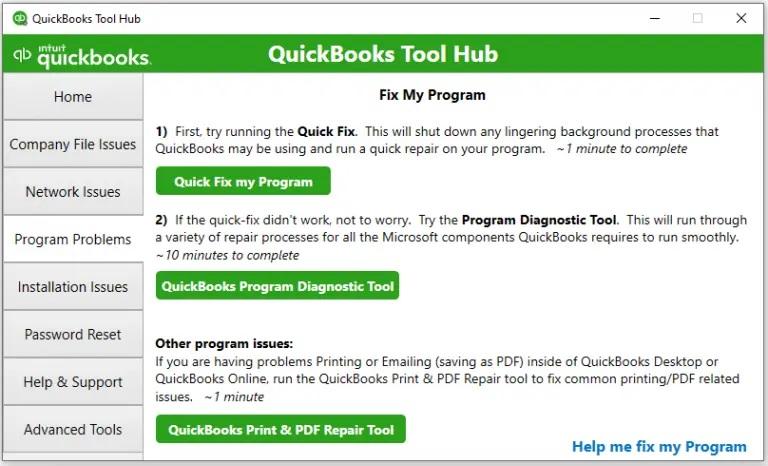
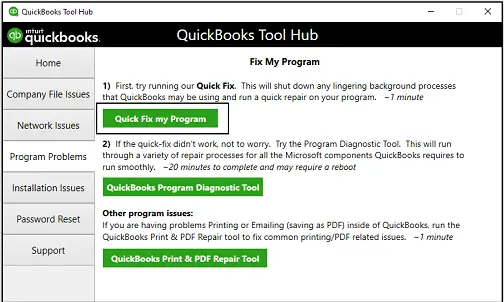
Solution 3: Run QuickBooks PDF and Print Repair Tool from the Tool Hub Program
QuickBooks tool hub consists of a bunch of tools that can help you eliminate issues that you come across when working on QuickBooks. You can access the pdf and print repair tool from QB tool hub to eliminate this error successfully. The steps involved in here are:
Initially, close QuickBooks and download the latest version of QuickBooks Tool hub.
After that, open the program and navigate to the program problems tab.
You now have to opt for QuickBooks pdf and print repair tool also note this might take a minute or so to complete.
After the scan process ends, you need to check that the issue with the pdf viewer is fixed.
The last step is to try viewing, printing, emailing, or saving as a PDF from QuickBooks again to check if the issue continues.
QuickBooks PDF viewer not found error can hinder the smooth working of the software, especially when printing pdf and documents. Thus, it becomes essential to rectify the issue as soon as possible. However, if for some reason, you are unable to tackle with the issue, or if you need any sort of technical assistance in dealing with such an error, then in that case, do not hesitate in contacting our technical support team at +1-888-510-9198, and we will provide you with immediate support and guidance.
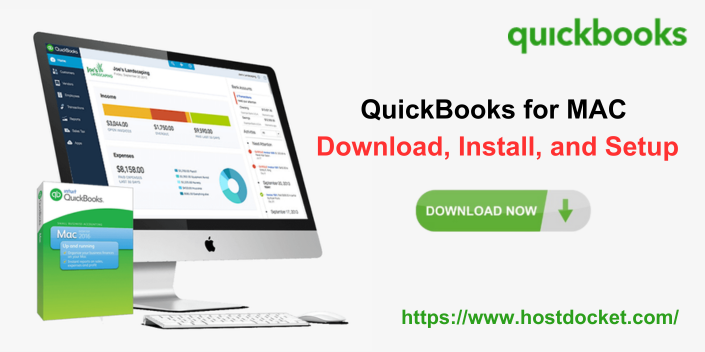
Are you a Mac user and need help with how to download, install, and set up QuickBooks? If that is the case, then this piece of writing will surely help you. Intuit has not only designed QuickBooks for Windows users, but also it has made it possible for Mac users to access QuickBooks Desktop. It comes with some assorted features including Automatic reminders in iCalendar, timely notifications in the menu bar, and auto contacts sync in the Mac operating system’s address book.
Setting up and installing the latest version of QuickBooks for Mac includes a few basic steps, which we will be elaborating on later in this article. To learn further about the process, make sure to stick around till the end. You can also get in touch with our technical support team at +1-888-510-9198, and they will help you out with the entire installation process.
System Requirements for QuickBooks for Mac Download
For every QuickBooks version you install, there are a few set requirements that you need to keep a check on. Here are a few system requirements you need to consider for QuickBooks Mac 2022.
At least MacOS 10.14 (Mohave) supported by MacOS 10.14 (Mojave)
Another requirement is an Intel processor, core 2 Duo or higher
You need to at least have a multi-user server: Intel Core 2 Duo or higher processor in order to run a server.
You require at least 2 GB RAM and further need 4GB RAM.
Make sure the product is registered.
The printer should be a 100% Macintosh-compatible printer, to print invoices, checks, deposit slips, lists, purchase orders, mailing labels, etc.
250 MB of disk space should be available.
Important points to keep in mind
There are certain points that you need to keep in mind, before heading forward:
Make sure to run QuickBooks Mac on the system and then check for the minimum system requirements for the Mac version you are planning to use.
Further, if you have accidentally purchased QuickBooks for Windows, then you need to ensure to return the product and get the right version.
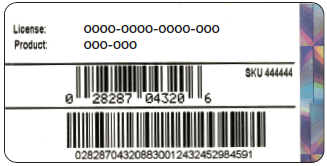
Another essential point to keep in mind is to prepare the license and product number.
If you have the CD, then you search for the scratch-off label on the packaging.
Mac users have certain limitations when it comes to certain features in QuickBooks Desktop. Here are those limitations:
Maximum three-user licenses: QuickBooks for Mac offers two user licenses and you can buy only one license additionally.
No access to data using mobile: QuickBooks for Mac users does not let you access your data on your mobile.
Limited technical assistance: Another drawback for the same can be there is unlimited tech support for Mac for an initial 30 days, but later on you will have to purchase the support plan.
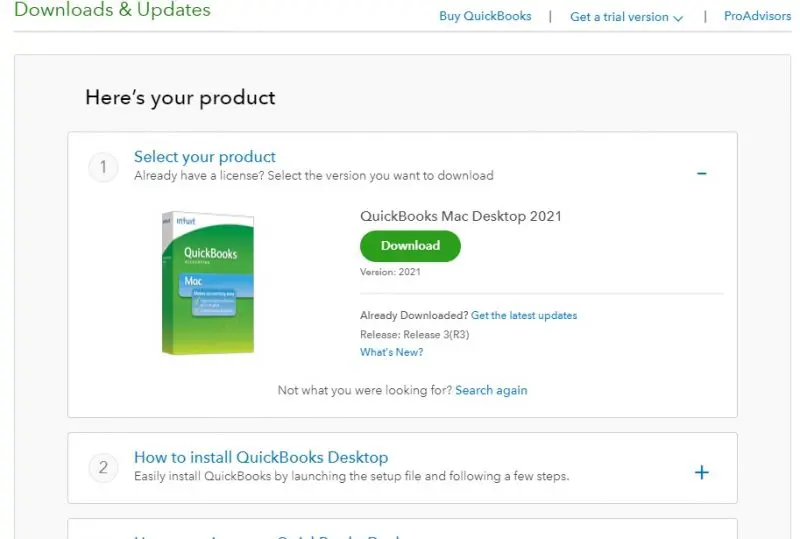
Steps to install and set up QuickBooks for Mac
Now that you know all the details related to QuickBooks Desktop for Mac 2022, it is time to perform the necessary steps to install and set up the same. Let us explore the steps one by one:
Step 1: Make sure that the QuickBooks for Mac will run on the system
System requirements:
An operating system of at least Mac OS X v11.3 (Big Sur) or later
A seamless internet connection for installation.
Integration/compatibility requirements:
Export report data – Apple Numbers v3.5, and Microsoft Excel 2016 or later, including Mac Office 365
E-mail as PDF – Apple Mail, Microsoft Outlook 2016 or later, including Mac Office 365
If you have downloaded a digital copy: You might have gotten an email confirmation that would have the license and the product number. In case the mail isn’t received, then you might have to locate the license number or you can contact the support team.
If you have a physical copy: In such a scenario, you need to look for the scratch-off label on the packaging, then you need to scratch off the label to identify the license and product number.
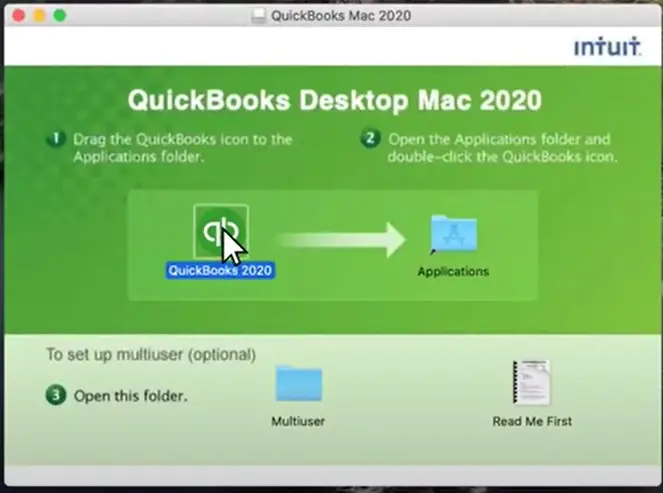
Once done with that, close all the running applications.
The next step is to double-click on the downloaded installer or the QB executable file to proceed with the installation process.
Now, after the extraction of the file is completed, you need to select yes to all options.
Followed by clicking on the next tab to start the installation.
Go through the license agreement and agree to the same.
Further, enter the license and product numbers by clicking on the next tab.
Select the installation type from express or Custom and network.
Later on, select where you will be using QuickBooks.
In case you choose express in the previous step, then skip this step.
Choose, I’ll be using QuickBooks on this computer
Or I’ll be using QuickBooks on this computer. And I’ll be storing our company file here. So it can be shared over our network: go for this option, if you will be running QB.
You now have to click on the next tab to install QuickBooks to the default directory.
Now, you need to browse the directory choose the location and further click on the next tab.
After that click on the install to continue and also click back if required.
The next step is to click on the open QuickBooks option.
Just in case you have upgraded from the previous version of QuickBooks Desktop for Mac, then you simply need to update the company file to work in the newer version. The steps to be performed are:
The very first step is to open the company file in the newer version.
Followed by, when the QuickBooks software asks to update or convert the company file, then choose upgrade.
The next step is to choose the ok tab, in case you see any pop-up on the screen.
The last step is to check the balance, reports, and accounts. This is required to ensure that the right company file is converted.
Step 5: Set up multi-user
If you have more than one license, then you can set up QuickBooks in multi-user mode, to ensure that all users can access the file at the same time. You can carry out the steps below to complete the process:
In this step, you need to open the multi-user folder.
Further, drag the QuickBooks server icon to the applications folder.
Now, you need to select authenticate to modify the applications folder, if asked.
Later on, enter the admin username and password and also hit the ok tab.
QuickBooks for Mac facilitates you to complete various accounting and bookkeeping activities with much ease. We believe that the above set of steps is enough to set up and install QuickBooks for Mac successfully. However, just in case you have any queries or if you need our assistance at any point in time, then feel free to reach out to our technical support professionals i.e., +1-888-510-9198, and we will provide you with immediate answers to all your queries.
Certain errors in QuickBooks aren’t common and can seem a bit daunting to handle. One such error that you might have heard about is QuickBooks Delivery Server Down Error. This error is often linked with the attachments in the sales or invoice when forwarding it to a customer in QuickBooks. This issue usually prevents users from sending transactions along with the attachments. As this error is a bit unique and uncommon, here we are to help you with its rectification procedures. In this article, we are going to spill the beans on how you can rectify the QuickBooks delivery server down error.
Thus, make sure to stick around till the end, or you can further get in touch with our technical support team at +1-888-510-9198 and they will provide you with answers to all your QuickBooks-related queries.
Procedures to rectify QuickBooks Delivery Server Down error
You can try to eliminate QuickBooks delivery server down error using the set of steps below:
Procedure 1: Configure the print and pdf settings
At times, incorrect printer or PDF configuration can trigger the delivery server down issue in QuickBooks. Thus, to eliminate this issue you need to configure the print and pdf settings. The steps involved here are:
Step 1: Configure Adobe Acrobat settings
You need to select the actual size.
Further, the orientation should be set to automatic
The option to choose paper source by pdf size should be on.
Step 2: Configure the pdf settings of the browser
For Google Chrome users:
Here, you will have to run Google Chrome
Further, make a move to settings
Once done opt for the advanced drop-down and then click on the content settings option.
Click on the PDF documents option.
Disable the option to download PDF files rather than automatically opening them in Chrome.
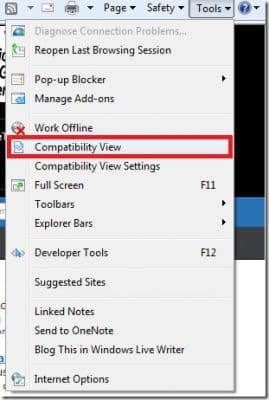
For Mozilla Firefox users:
You need to run the Mozilla Firefox browser and then move to the options.
Once done with that, click on applications and proceed to the content type option.
You now have to proceed by searching for the portable document format.
Also, click on the option to use Adobe Reader.
Exit from the options tab and move to QuickBooks Online to retry sending the invoice to make sure that the QuickBooks delivery error no longer exists.
This might rectify the issue up to a certain extent.
Under this process, you need to initially move to settings.
Further, make a move to account and settings and move to sales.
Followed by clicking on the online delivery option.
After that, select or clear the checkbox beside the PDF attached option.
Click on save and then end by clicking on done.
Procedure 3: Rectify the invoice format
You need to access or create invoice and get any special characters from the invoice info removed. The special characters include ! @ # $ % ^ & * ( ) _ – = + : ”. Make sure that the characters are not included in the information like description, message, email id, attachment name, or custom form templates.
Procedure 4: Correct the email address of the location
It is important to double-check the email address format used when sending the sales form. The steps involved here are:
Choose the settings tab.
Further, pick all lists and then locations.
You now have to search for the location used in the invoice.
And then, click on edit.
Check the email address in the section: This location has a different email address for communicating with customers.
And further, make the required changes if needed and click on save.
Procedure 5: Resolve issues with the email address formatting
If none of the above steps didn’t work, then you can try fixing the email address formatting issue. Let us have a look at the steps involved:
You need to first choose the settings⚙.
After that, you need to click on accounts and settings in the settings window and click on account and settings.
The next step is to click on the company option.
Also, click on the company info tab and check the emails for their formatting.
Getting rid of the delivery server error becomes easy using the set of steps enumerated above in this piece of writing. However, if there is any query or if the user needs any sort of QuickBooks support services, feel free to reach out to our technical support team at +1-888-510-9198, and we will provide you with answers to all your queries immediately.
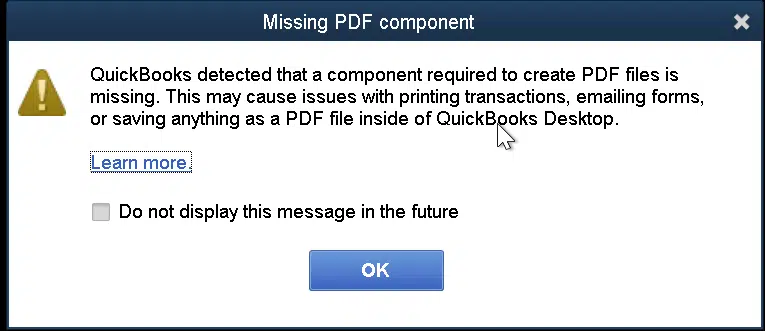
QuickBooks allows its users to print transactions and reports and convert them into a PDF format. However, there is a situation where you see an error QuickBooks Missing PDF Component. This error appears on the screen with a warning message stating: “QuickBooks detected that a component required to create pdf files is missing”. This glitch can be experienced due to many factors, which we will explain later in this writing.
To learn further about this, make sure to stick around till the end. You can also get in touch with our technical support team at +1-888-510-9198, and we will provide you with instant support and guidance.
QuickBooks missing PDF component error is basically an error that shows up when the user tries to either convert their files into PDFs or print them. This error can show up on the screen stating: QuickBooks detected that a component pdf is missing. Though identifying the causes behind the occurrence of this issue is a bit difficult, but in this segment we have tried to share the common reasons due to which this particular issue can be seen.
What triggers the QuickBooks Missing PDF component issue?
Well, there can be a bunch of factors triggering PDF component missing issues in QuickBooks, a few of which are enumerated below:
One of the basic reasons can be if the drivers associated with the printer aren’t set up properly.
Or the components required for running the feature are missing.
Another possible trigger can be if the Adobe Reader is corrupted or incompatible with QuickBooks or the Windows operating system set on the computer.
QuickBooks desktop isn’t been updated for a long time.
Signs to identify QuickBooks pdf component missing error
The signs related to the QuickBooks pdf component missing error are as follows:
Printing issues outside the QuickBooks desktop can land you into component error
Another sign can be if the system experiences any sort of glitch and crashes when running QuickBooks.
Unable to open the pdf files in QuickBooks and even otherwise.
If the error message shows up whenever the user tries to convert a PDF or print reports or transactions via QuickBooks.
Effective measures to fix missing PDF component in QuickBooks
A quick solution to rectify this issue in QuickBooks is to run PDF and print repair tool. However, if you are still facing the same error, then try fixing the missing PDF component in QuickBooks using the set of steps below:
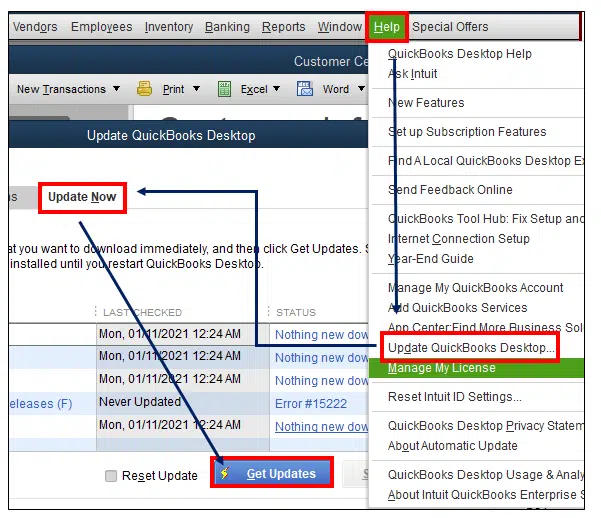
Method 1: Update QuickBooks
Outdated QuickBooks can lead to various errors in QuickBooks. Thus, it is essential to update QuickBooks to the latest release. The steps involved in this procedure are as follows:
In case the error occurred due to corruption caused in the files related to Adobe Reader. It might be possible that the version of Adobe Reader installed is incompatible with the operating system or QuickBooks. This would require repairing the program. Let us explore the steps:
Step 1: Repair the Adobe Reader Program
You need to click on start< control panel< programs and features
Further, click on Adobe Reader then uninstall/change, and further click on repair.
When the repair is complete, double-check if the program runs properly.
In case the error continues, you might have to uninstall the program and install the correct version from the internet.
Step 2: Search for Adobe updates
You will have to click on the Windows tab and further type Adobe in the search box.
Further, find Adobe Reader from the list of applications.
Now, click on the help tab and select check for updates tab.
Download the available updates, in case there are any.
The last step is to perform the onscreen prompts to install the downloaded updates.
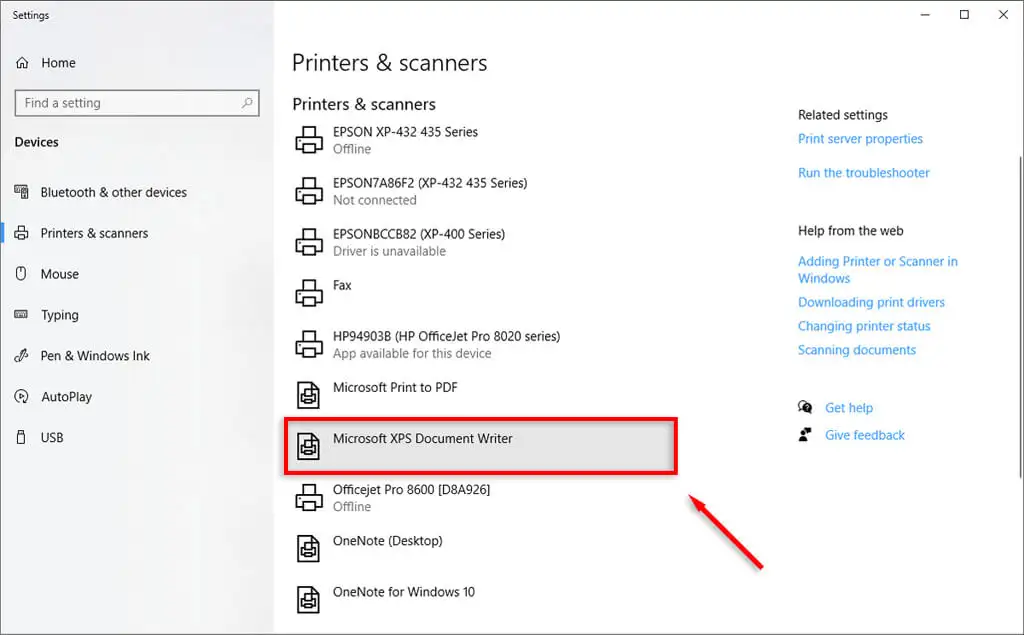
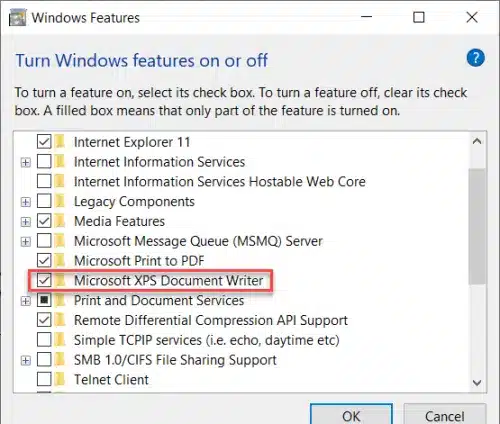
QuickBooks missing pdf component error can also occur due to MS CPS Document writer being disabled. The operation to enable the XPS write is forthcoming lines:
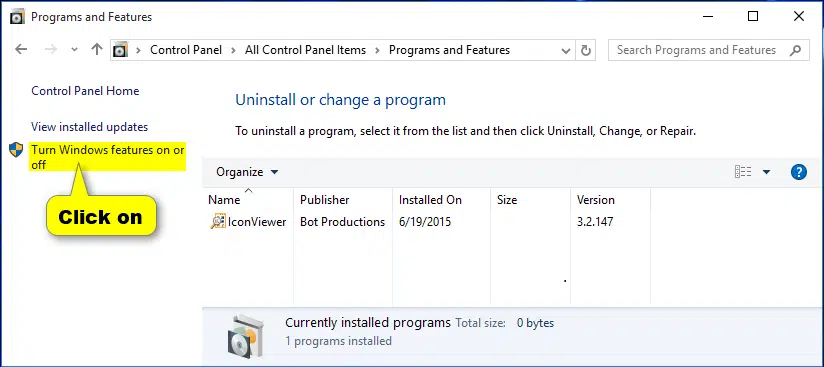
Here, you need to open the control panel.
Further, move to the programs and features tab.
After that, click on the option to turn Windows features on or off.
Click on the checkbox option to enable MS XPS document writer. This will allow the XPS writer program to run smoothly.
Method 5: Edit the Security Software Settings
At times software like Norton Antivirus or McAfee firewall might prevent the creation of .XPS files, ultimately leading to such an error. Thus, it becomes essential for the user to check these options are disabled or not. One can reach out to the system admin, network admin, and the company from whom the security software is bought. Or the user can also perform some manual steps to configure firewall for QuickBooks.
Method 6: Set PDF viewer as the default program
In case QuickBooks PDF missing component issue shows up, there can be an issue related to the PDF viewer. It is possible that the PDF viewer is not set as the default program. Thus, you will have to perform the below steps to set PDF viewer as the default program.
Under this process, you are required to choose the settings icon from the start menu.
Once done with that, select apps from the default apps.
Now, scroll until you find .pdf and then select its default program.
The next step is to choose QuickBooks to locate a PDF viewer or another PDF viewer from the list, in case you have installed it already on the system.
You now have to click on the switch anyway and the process is done.
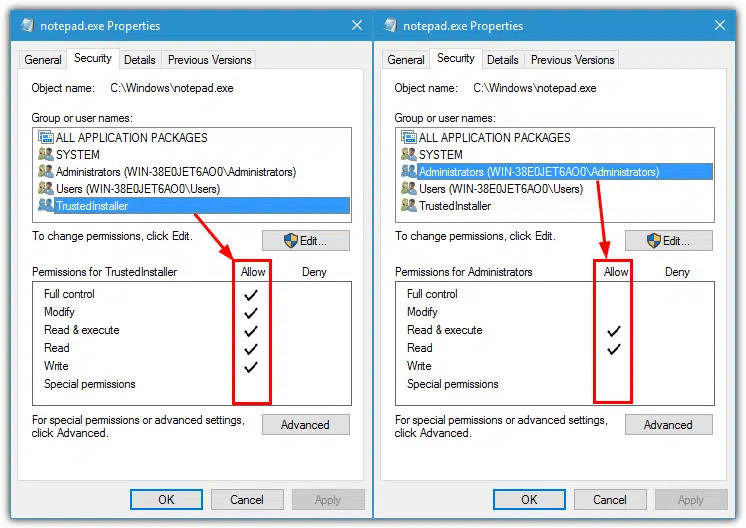
Method 7: Reset Permissions for your TEMP Folder
At times, QuickBooks users might face missing pdf component error in QuickBooks in case of insufficient permissions. Thus, it is suggested to reset permissions for the TEMP folder. This can be done as follows:
Step 1: Set Temp folder permissions to full control
This can be done by pressing Windows + R and opening the Run command first.
After that, enter %TEMP% and hit enter.
You now have to right-click the empty area in the temp folder and select the properties tab from the drop-down.
Now, head to security tab and ensure that all users have full control.
If you want to set the permissions for any username or group to full control, then continue with the steps below:
Choose the user or group name by clicking on the edit tab under the security tab.
Also, mark allow checkbox next to full control.
The last step is to save changes you have made and click on ok tab.
Conclusion!
QuickBooks PDF component missing error can be extremely annoying but needs to be addressed ASAP. Hope that this article might help you get rid of the PDF component missing issue. However, if you have any queries, or if you need our assistance at any point in time, then in that case feel free to reach out to our team at +1-888-510-9198, and we will provide you with answers to all your queries immediately.

![QuickBooks Unable to Locate PDF Viewer – [FIXED]](https://www.hostdocket.com/wp-content/uploads/2023/12/QuickBooks-Unable-to-Locate-PDF-Viewer.png)