Getting annoyed by a random QuickBooks error 1402? Well, we have a solution for you. QuickBooks error 1402 usually shows up on the screen with a warning message that reads: Couldn’t Open Key. This particular glitch is typically seen due to incomplete or inappropriate installation of the software. There is a lot more to this particular error, which we will be elaborating on later in this segment. To understand it better, make sure to stick around this segment carefully. You can further get in touch with our technical support professionals at +1-888-510-9198, and they will provide you with immediate support and guidance.
QuickBooks error 1402 is basically an error that shows up when you are working, installing, or opening QuickBooks desktop on the company file. It further shows up when you operate the corrupted QuickBooks payroll accounting software in Windows or Apple Mac OS X operating system. You might come across a similar issue when the software needs some component to run, but it is not available due to damaged Windows files.
What leads to QuickBooks Installation Error 1402?
A bunch of factors can be triggered due to QuickBooks installation error 1402. Let us have a look:
In case the QuickBooks installation on the system gets corrupted.
Another reason can be if the CD used for installation isn’t working.
You can further come across such an error due to improper installation of the software.
Such an error can also be seen if Microsoft Windows isn’t updated.
Preventive measures for QuickBooks Error 1402
One can prevent QuickBooks error 1402 by considering the following measures:
Keep creating backups of the data regularly.
You further need to let the software installations take their time and do not interrupt the process.
Also, delete the junk files from the system.
Install the new updates available for QuickBooks frequently.
You can try eliminating the QuickBooks error 1402 using the below-discussed measures. Let us have a look:
Method 1: Ensure the Microsoft.NET framework is turned on
Enabling the Microsoft .NET framework component can fix this issue up to a certain extent. The steps to be performed in this process are enumerated below:
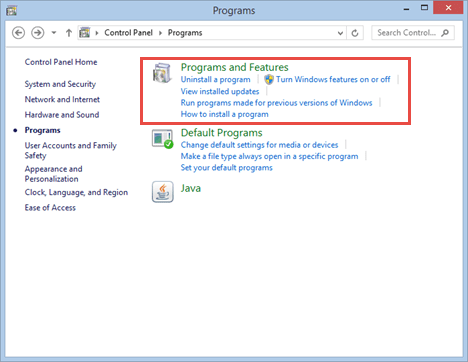
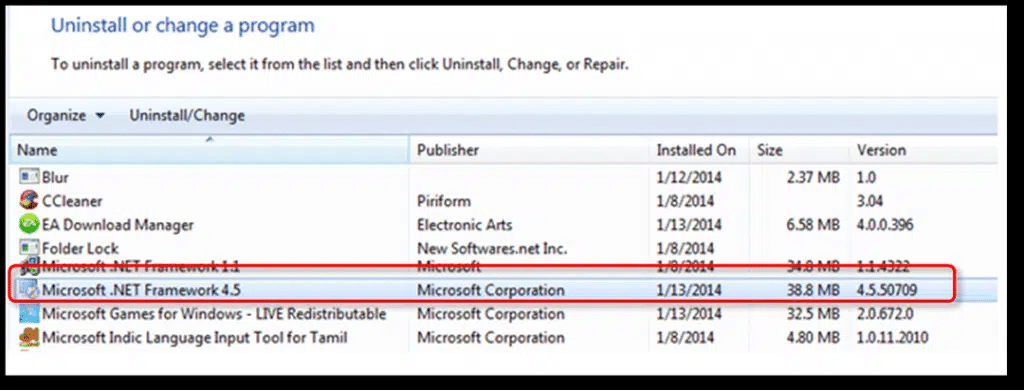
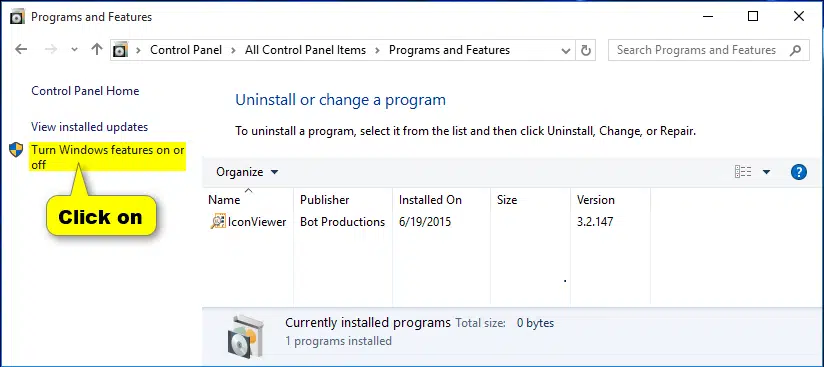
At first, open the control panel and then head to programs and features.
Once done with that, select Uninstall a program
And further, you need to opt for the Turn Windows features on/off option.
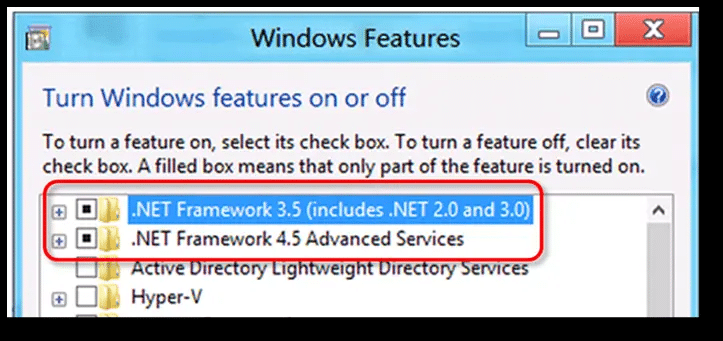
The next step is to find .net framework on the list
And ensure that you checkmark on .NET framework 4.5 or later versions to enable it.
The last step is to click on the ok tab to save the changes and reboot the system.
Method 2: Use Selective Startup
Using selective startup mode can help you in fixing the issue, as any third-party app might be blocking the installation. To fix this, you can simply perform the below steps:
Step 1: Prepare the data
At first, you need to create a backup of the company file
Step 2: Start the system in selective startup mode
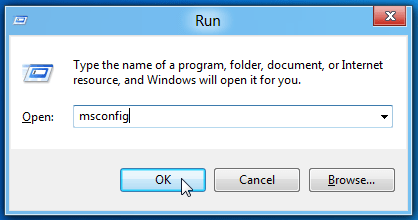
Here, you need to press Windows + R to open the run command.
Now, type in msconfig and select the ok tab.
Go for selective startup in the general tab.
Select load system services.
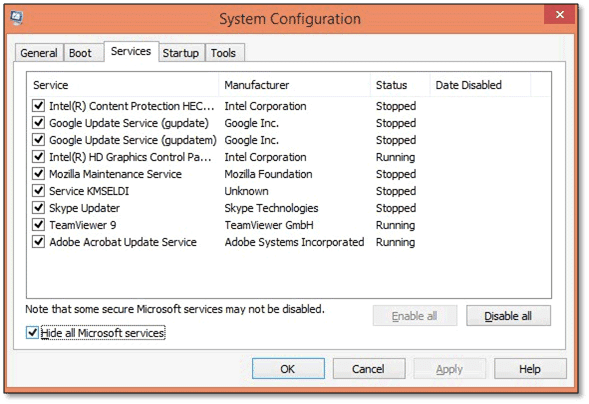
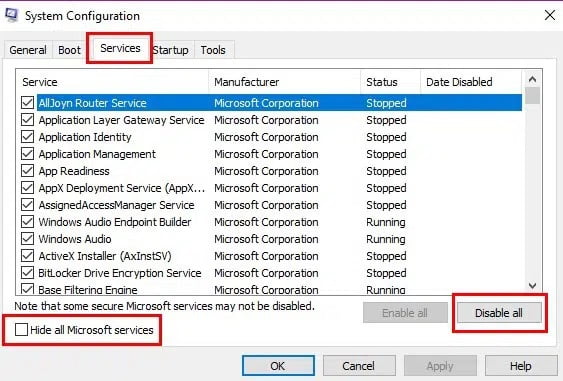
The next step is to move to the services tab.
Select Hide all Microsoft services.
The last step is to select the Disable All tab.
Step 3: Uncheck hide all Microsoft services checkbox
Ensure to select the Windows installer checkbox from the list of services. In case not, then opt for the checkbox.
Now, select the ok tab.
Toward the end, restart the system configuration window.
Step 4: Uninstall or install QuickBooks
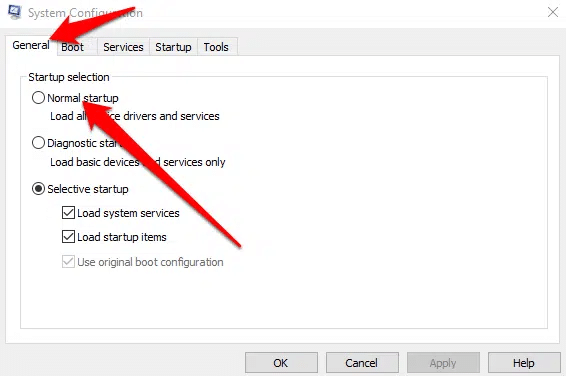
Step 5: Switch back to normal startup mode
At first, press Windows + R to open the run command.
After that, enter msconfig and hit the ok tab.
In the general tab, you need to select normal startup
Select the ok tab.
You now have to choose to reboot the system configuration window.
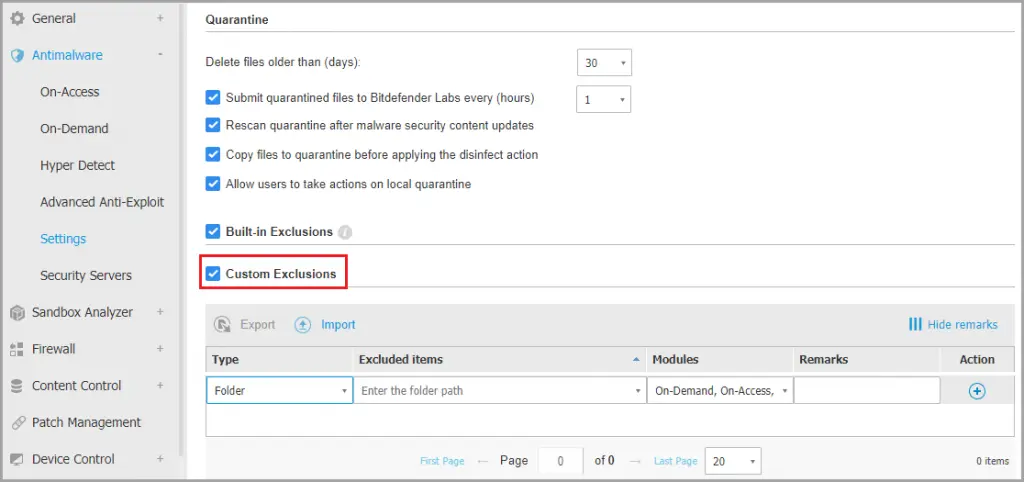
Method 3: Add QuickBooks to the Bitdefender exclusion list
Note that this method is not for every user, as it can be implemented by the ones having the Bitdefender program. If you are using it, then try disabling it using the right steps and further add QuickBooks to the exclusion list of the Bitdefender.
For 32-bit Windows OS, you need to put C:\Program Files\ Common files in the exclusion list.
On the other hand for 64-bit Windows OS, put C:\Program Files\ Intuit (C:\Program files (x86)\Intuit) in the exclusion list.
Using outdated windows can lead to such an error in QuickBooks. Thus, update Windows to the latest release.
Begin the process by clicking on the start tab on the Windows icon.
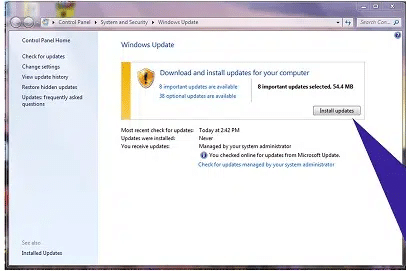
Then, look for the Windows update tab.
You now have to click on check for updates and find available updates.
Install all available updates
To end the process, reboot the system to make changes.
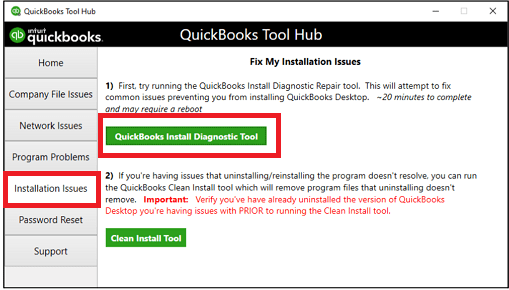
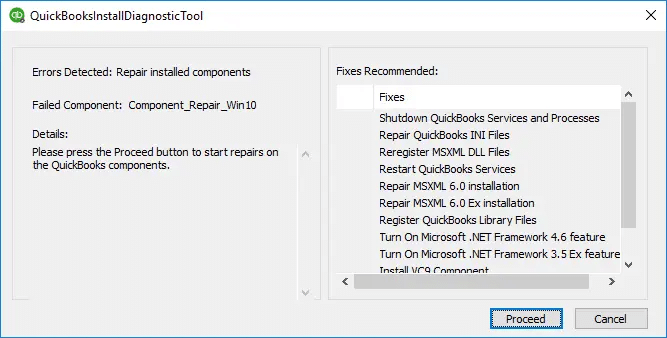
Method 7: Install and run the QuickBooks install diagnostic tool with the QuickBooks tool hub
You can make use of the tool hub to run the install diagnostic tool, which is usually used to fix all sorts of installation errors. The steps to use the install diagnostic tool are:
QuickBooks error 1402 can be an easy-to-fix error, especially once you are versed with the right measures. Hopefully, this segment might have helped you in eliminating this particular issue successfully. Just in case you have any issues, give us a call at our toll-free customer support number i.e., +1-888-510-9198, and our certified QuickBooks ProAdvisors will ensure to answer all your queries immediately.
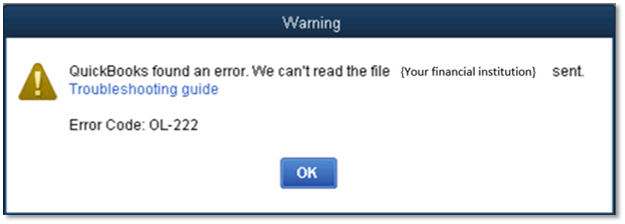
Did you get an error OL-222 when importing a company file downloaded from the bank’s website? Well, the QuickBooks error code OL-222 usually shows up in both QuickBooks online and desktop versions for Mac and Windows. It further indicates import failure. When such an error occurs, the import process of the .QBO file from the bank stops in between. This is basically a bank-related error that can be a bit confusing for the user to handle. Thus, to help you understand this issue in a better way, here we are with this segment sharing the complete information related to this particular error in QuickBooks, along with some quick fixes. Thus, to understand this issue, stick around this segment carefully, or you can also get in touch with our technical support team at +1-888-510-9198, and they will help you with immediate support and guidance.
A QuickBooks user’s bank account is linked with the software in order to keep a check on the proper flow of the financial processes. QuickBooks error OL-222 is often associated with the registered bank linked in QuickBooks. It shows up when the user tries to import .QBO or .QBW file from the bank’s official website. It also shows up when the financial institution doesn’t respond due to a scan error. This error message shows up on the screen stating: QuickBooks could not complete your process. Or QuickBooks is unable to verify the financial institution information for this download. Please try again later. This particular error further impacts the bank transaction downloads and might not allow to access the bank feed.
What leads to QuickBooks error code OL- 222?
There are a bunch of factors causing QuickBooks error OL-222. Let us evaluate these reasons and find out the root cause:
Just in case you are trying to import non-compliant characters, then experiencing such an error is possible.
Another reason can be if the company file has not been formatted properly.
You can also come across this issue in case of non-compliance of QBO file with the Open financial exchange OFX standard.
Be prepared for a similar issue if the financial institution server doesn’t provide a valid reason.
The user can further come across similar issues in the case of outdated QuickBooks.
Moreover, if the company file is damaged, then such an error can be seen.
Also, a third-party application interfering with the QuickBooks application can cause this error.
A slow internet connection can land you in such an error.
Damaged or corrupted bank files that have to be imported
Once you have gone through the factors causing this issue, it is time to find out the methods that can be performed to get rid of QuickBooks error OL-222. Let us unleash the core fixes:
Method 1: Create a Test File
A damaged company file is a major trigger of such an error. To identify damaged QuickBooks company file, you can try creating a test file. The steps involved in this are:
Begin with clicking on the file option and further click on new company.
The next step is to click on Express Start and create a new company named TestCompany.
You are then required to click on the start working option
And towards the end, try importing the .QBO file in the newly created TestCompany file.
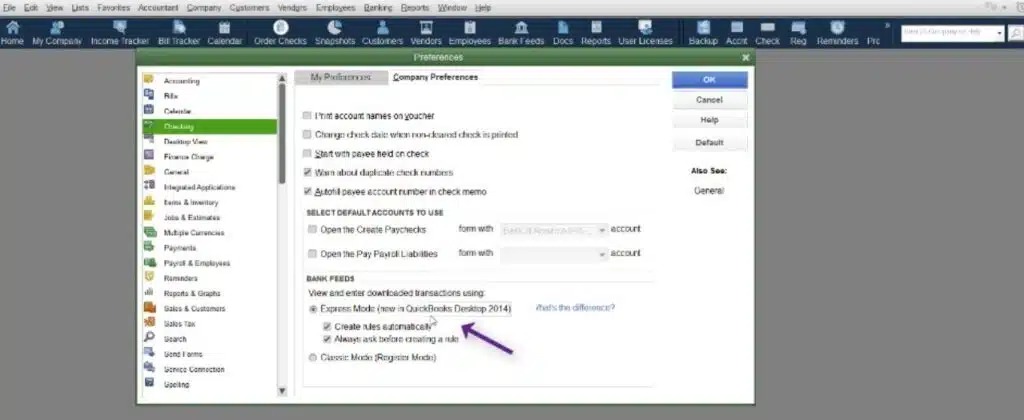
Method 2: Change bank feeds
At times, changing Bank feeds can fix the web import error up to a certain extent. Perform the below steps to change the bank feeds issue:
The very first step is to run QuickBooks and click on the banking menu.
After that, click on bank feeds and thus, click on change bank feeds mode.
You now have to go for the classic mode and then try to import QBO file.
Using outdated software can cause a bunch of errors. Thus, it is recommended to update QuickBooks to latest release. The steps involved in here are:
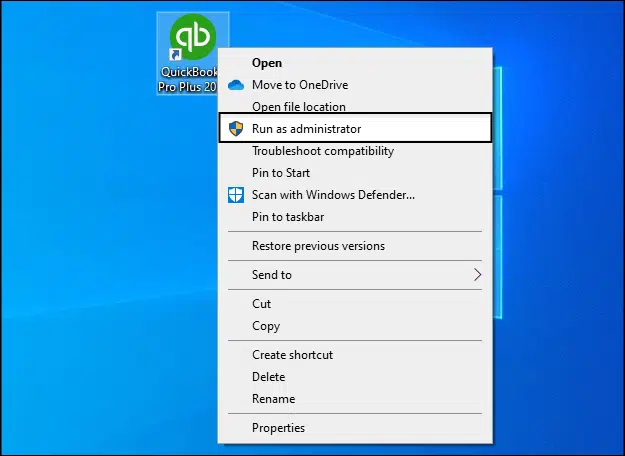
You need to initially ensure that no active windows of QuickBooks are open in the background.
Run QuickBooks as admin.
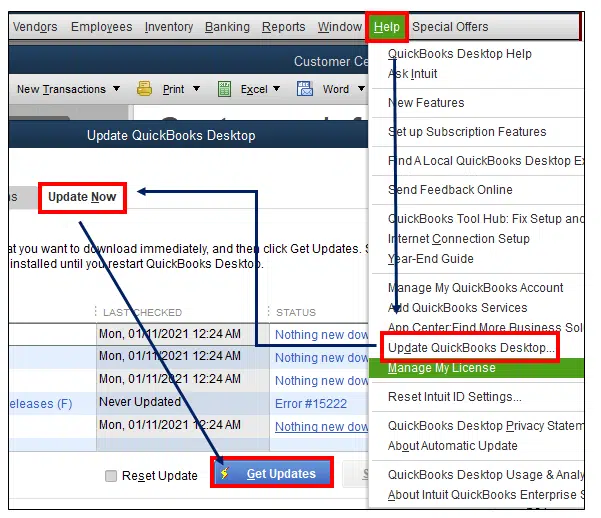
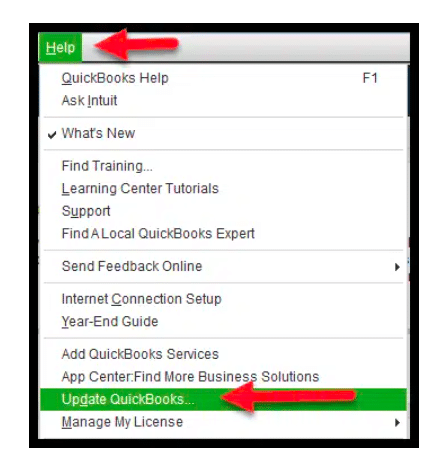
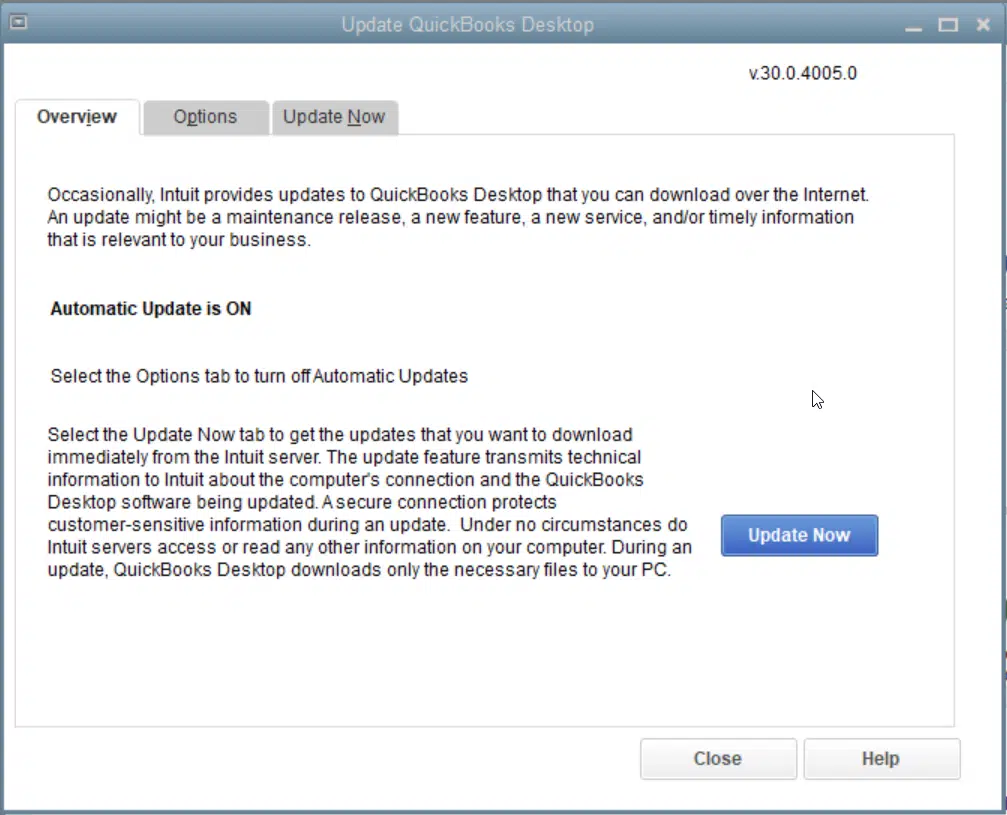
Now, press the help tab and then click on Update QuickBooks.
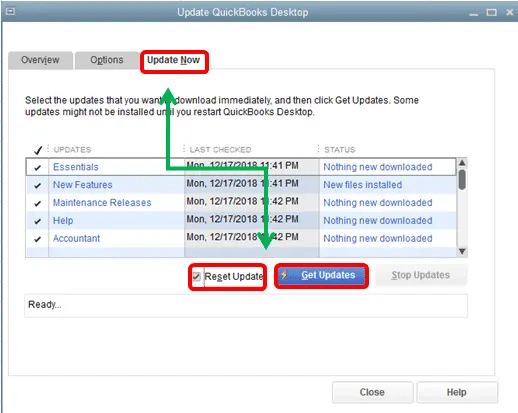
Click on the get updates tab.
And then click on the Update Now tab.
The last step is to restart QuickBooks.
Conclusion!
Now that you know what measures can be taken to eliminate QuickBooks error OL-222, it is time to implement those steps. However, if you are unable to rectify the issue even after performing the steps enumerated above, then in that case, consult our tech support professionals at +1-888-510-9198, and they will help you with instant support for all your QuickBooks-related queries.
Did you see a QuickBooks server not responding error when updating QuickBooks payroll or software? This can be possible when your internet connection is not stable. You must identify the root cause of the error and then implement the right rectification fixes. Another reason can be when the payroll update or program goes wrong. Understanding QuickBooks maintenance release server not responding issue is crucial, so as to ensure that you implement the right set of steps to rectify it. Let us explore what factors can drag you into such an error, along with some quick fixes for the same.
However, if you are seeking expert guidance to eliminate this issue in QuickBooks, then in that scenario, do not hesitate in connecting with our technical support team at +1-888-510-9198, and they will surely help you deal with the issue.
What factors can land you into QuickBooks Maintenance Release Server Not Responding Error?
There are a bunch of factors that can drag you into such an error. Let us evaluate:
In case there is a faulty setup or corrupted download on QuickBooks, you can experience this issue.
Another possible reason can be if there is any sort of malware attack that has corrupted the Windows system for QuickBooks payroll program files.
One of the most common reasons can be if the Internet Explorer browser isn’t configured properly.
Or if any other application mistakenly deletes QuickBooks-associated files.
You can further come across a similar issue if the internet connectivity isn’t secure.
Signs and Symptoms to identify the error
Sometimes, identifying the error becomes difficult. However, to spot the QuickBooks update server not responding issue, you can check out the below signs and symptoms. Let us have a look:
It is probable to experience this issue if the active window or application crashes.
You can further expect to experience this issue if the system regularly corrupts when running the same program
Another possible sign can be if the error message itself shows on the screen.
You can expect the same issue if the system starts running slowly and is not responding to the commands.
Furthermore, expect this issue if the desktop freezes for a couple of seconds.
Effective Solutions to fix QuickBooks Maintenance Release Server Not Responding error
There are a bunch of methods that can be implemented to successfully get rid of the error server not responding in QuickBooks. Let us explore each of the methods one by one and check if the error can be actually fixed.
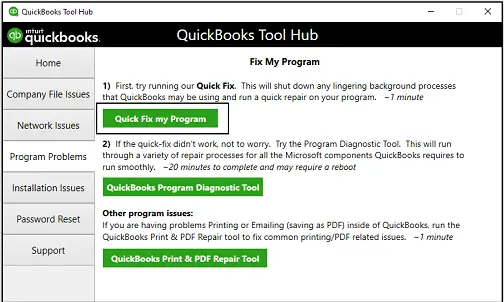
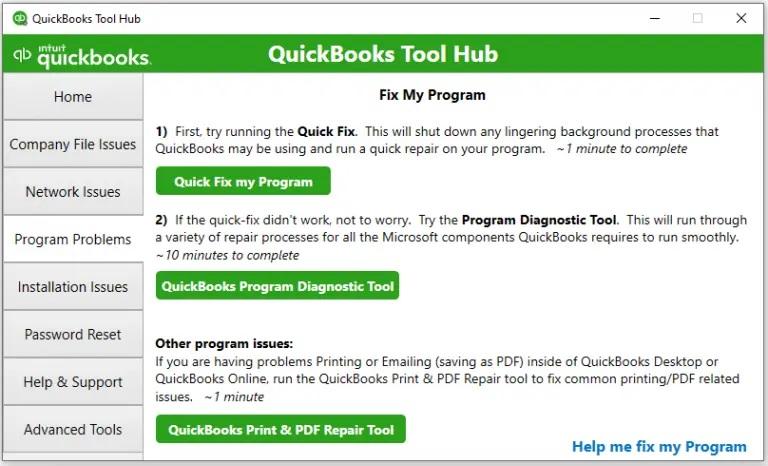
Solution 1: Download Quick Fix My Program using the tool hub
In case you haven’t already, make sure to download the QuickBooks tool hub to incorporate this particular method.
Begin the process by downloading the QuickBooks tool hub from the official Intuit website.
Once done with that, you need to head to the browser downloads.
In the download list, you will have to click on QuickBooksToolHub.exe
You will further have to click on yes to allow the app to make changes.
The next step is to click on the next tab, so as to install it and then click on yes to accept the license agreement.
Furthermore, click on the next tab and further click on the install tab.
You will then have to click on the finish tab after the installation is complete.
Open the QuickBooks tool hub program.
After that, move to the program problems tab and click on the quick fix my program option.
This might take some time to run.
Later on, you will have to reopen the QuickBooks update.
Solution 2: Reset QuickBooks update to Fix QuickBooks Maintenance Release Server Not Responding
Under this method, you will have to try resetting the QuickBooks update, as the corrupted update might have instigated this particular issue. The steps to be performed under this procedure are:
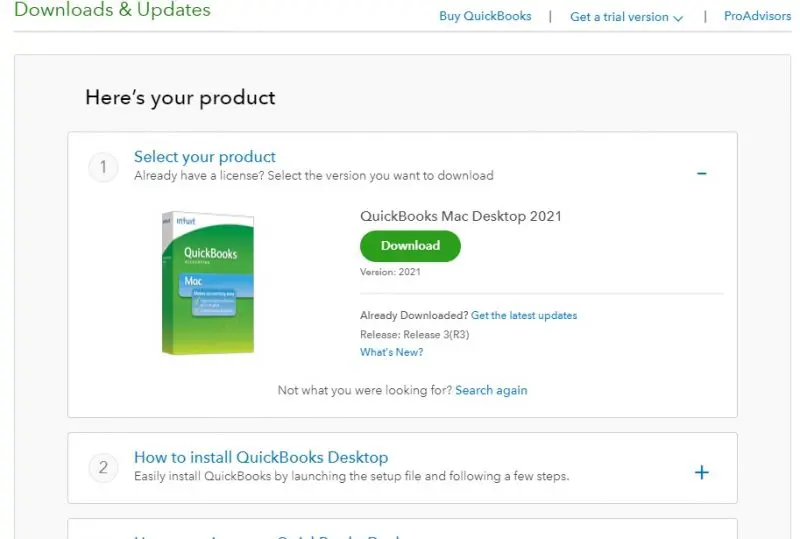
After that, move to the QuickBooks download and update page.
Once done with that, select the country, product, and version.
You will then have to click on the search tab
And further, click on Get the latest updates.
Once you have downloaded it, click on the same.
And you are good to go.
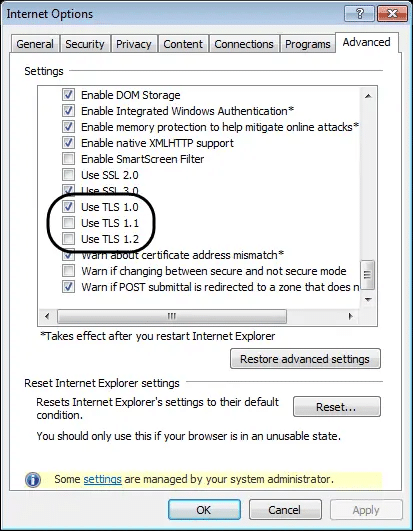
Solution 4: Verify Use TLS 1.0 is checked and use TLS 1.1 and Use TLS 1.2 are unchecked in Internet options windows of IE
It is essential to check if the Use TLS 1.0 is marked and the other two are unchecked to avoid this particular error in QuickBooks. The steps to be performed here are:
The very first step is to close QuickBooks.
You will then have to click on the tools tab in Internet Explorer and further click on the Internet option.
Once done with that, click on the advanced tab.
You will then have to click on the advanced settings tab and also search for Use TLS 1.0, Use TLS 1.1, Use TLS 1.2.
The following options might not be seen on the Internet Explorer version.
Confirm Use TLS 1.0 is verified.
Further, confirm that Use TLS 1.1 and Use TLS 1.2 are not verified.
After that, click on the ok tab to close the window.
The next step is to click on Internet Explorer.
And then, reboot the system and reopen QuickBooks desktop when restarted.
Identifying, and understanding the core triggers, and fixing the QuickBooks update server not responding issue is crucial, so as to ensure that the error doesn’t create a further nuisance. Hopefully, reading this segment might have helped you in some way to eliminate the error. However, if you require any sort of technical guidance in getting rid of this issue permanently, then in that scenario, give us a call at +1-888-510-9198, and our certified professionals will help you eliminate the error successfully.
Trying to work on QuickBooks, and suddenly got interrupted by a warning message that stated: QuickBooks Internet Explorer is Turned Off? Well, recently many QuickBooks users have reported this error. This particular issue is experienced when opening QuickBooks desktop. There are a bunch of factors behind the occurrence of such an error. One of which can be a disabled Internet Explorer browser. The IE is turned off error can also be termed as QuickBooks won’t open without Internet Explorer. The error message that shows up on the screen is:
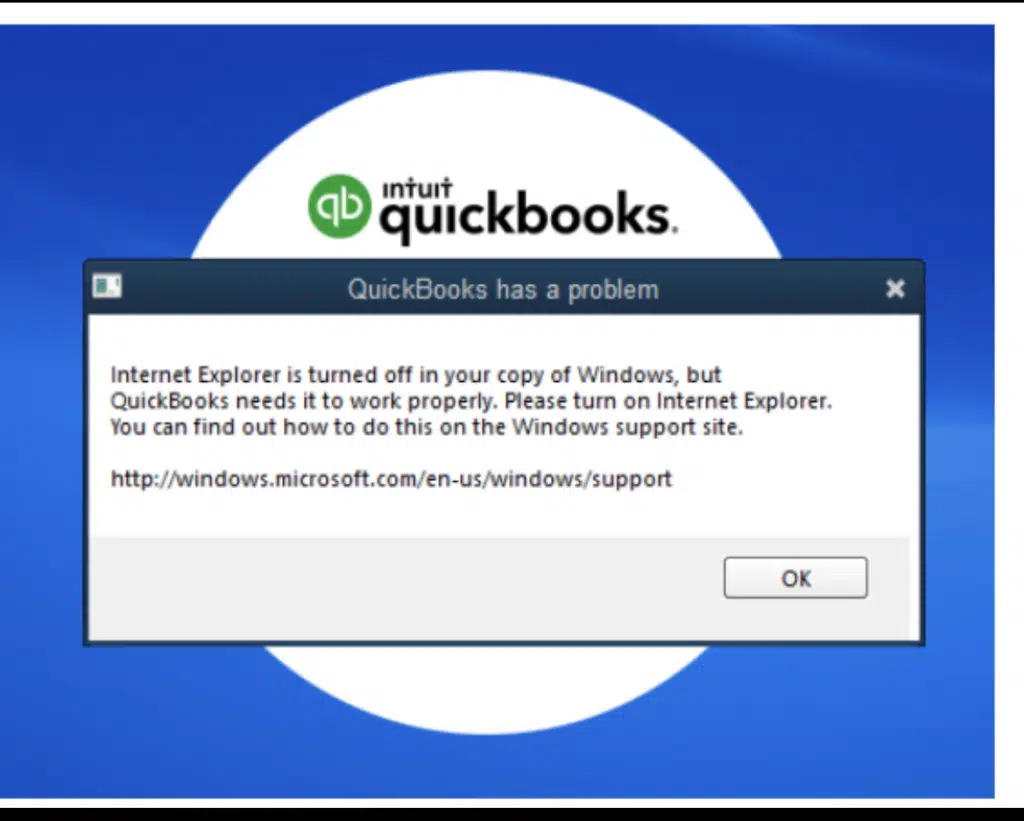
QuickBooks has a problem
Internet Explorer is turned off in your copy of Windows, but QuickBooks needs it to work properly. Please turn on Internet Explorer, You can find out how to do this on the Windows support site.
To help you understand this glitch better, here we are with this segment sharing the complete details about this issue along with the right fixes that can be implemented to get rid of it immediately. However, if you do not want to tackle this issue manually, then we can definitely help you with that as well. You can simply get in touch with our technical support team at +1-888-510-9198, and we will provide you with instant support and guidance.
What factors can lead you to QuickBooks Internet Explorer being Turned Off error?
There are a bunch of factors that can drag you into such an error. Let us evaluate a couple of the common ones:
One of the basic reasons can be if Internet Explorer is disabled.
Another possible factor can be if the Internet Explorer is uninstalled from the system.
You can further come across similar issues if the installed version of Internet Explorer is older than the 6.0 version.
Procedures to fix QuickBooks Internet Explorer is turned off issue
Getting rid of the QuickBooks won’t open without Internet Explorer error becomes easy, once you go through the steps below. Let us have a look at each of the procedures that you can carry out to fix the error from its root cause:
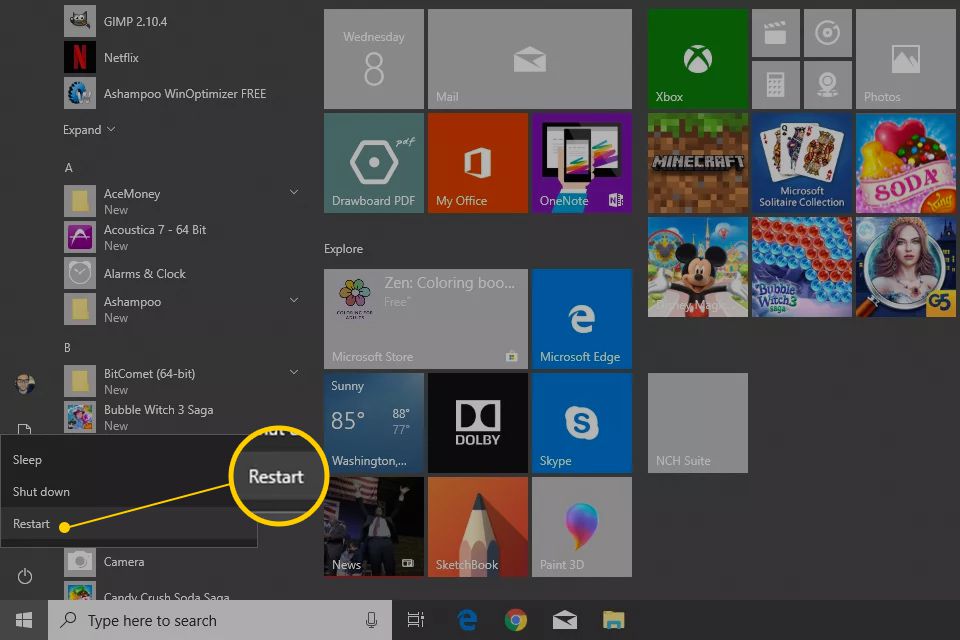
Procedure 1: Restart the System
At times a mere restart can fix a bunch of glitches. Thus, we suggest you to first try restarting your system and then try to open QuickBooks and check if the issue still troubles you. The steps involved here are:
Begin the process by hitting the start menu.
Once done with that click on the power tab.
You now have to go to the restart tab.
Now, wait for the system to restart
You will then have to open QuickBooks after the system has restarted.
Also, the software should be functioning normally now and if the same issue continues, try implementing the procedures listed below.
As mentioned earlier, using an outdated Internet Explorer browser can also lead to such an error. The steps involved in updating the browser are:
You need to first right-click the start tab.
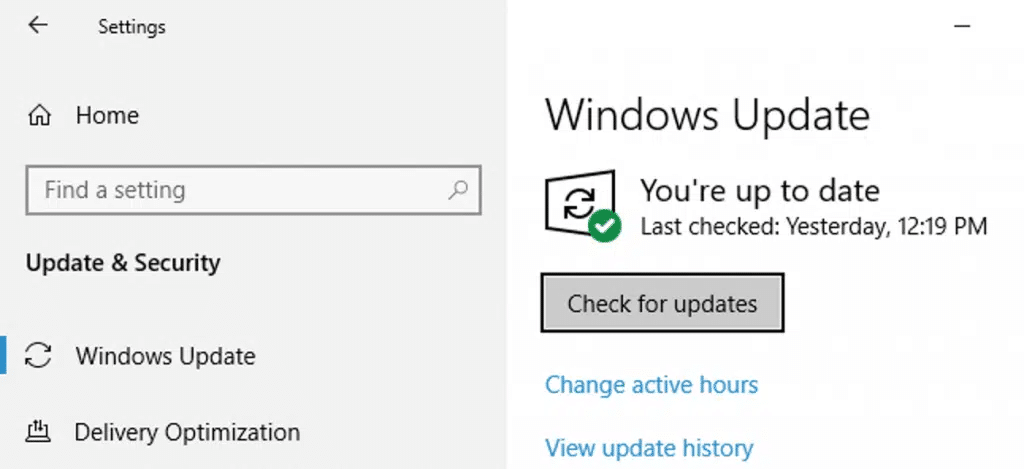
Once done with that head to the settings tab
After that, go for the update and security tab.
Also, select the Windows update menu.
You will now have to click on check for updates.
Followed by selecting the updates and clicking on the update tab.
The last step is to restart the system and apply the updates.
Procedure 3: Uninstall and reinstall QuickBooks desktop
If you still face the issue, then it can be due to faulty QuickBooks software. Thus, try to uninstall and reinstall QuickBooks. The steps involved in here are:
In order to access the run command, click on Windows + R tabs.
After that, enter control in the run window and click on the ok tab.
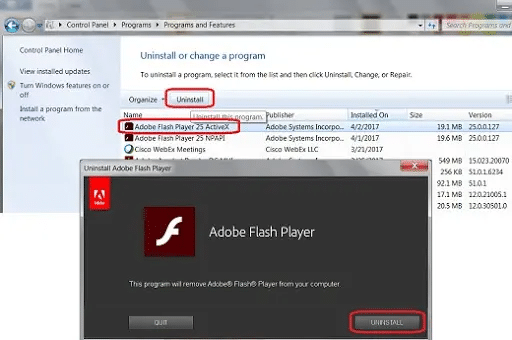
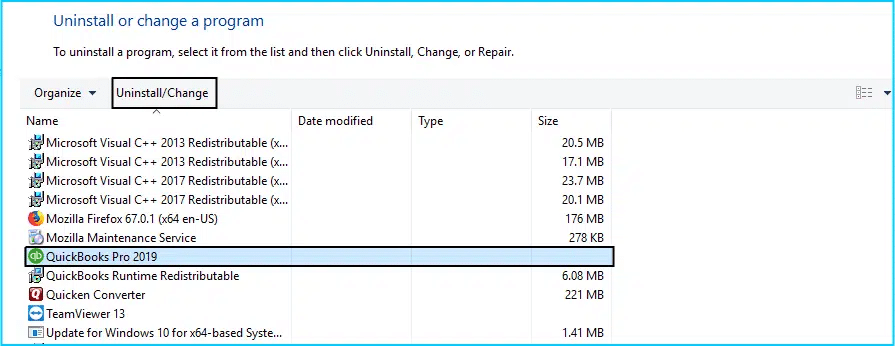
Select the programs tab and opt for programs and features.
You will now have to click on uninstall after selecting QuickBooks Desktop from the list of programs.
In case asked to, click on yes.
Also, select Remove by clicking on the next tab.
Removing QuickBooks from the system might take some time.
Once the uninstallation ends, click on the finish tab.
Reboot your system, reinstall QuickBooks through the official Intuit website, and check if the issue gets resolved.
Procedure 4: Enable the Internet Explorer in programs and features
Here in this process, you would have to turn on the Internet Explorer to let QuickBooks access it.
Initially press windows + R and let the Run command open.
Enter Control and click on the ok tab.
There from the control panel window, head to the programs and select the programs and features tab.
Click on the left panel and further click on turn Windows features on or off.
After that check the box next to Internet Explorer to turn it on and click on the ok tab.
Procedure 5: Reinstall Internet Explorer if uninstalled earlier
In case you uninstalled the Internet Explorer browser, then reinstall the same to get it fixed. The steps to reinstall the Internet Explorer are as follows:
You need to first download the Internet Explorer installation package from the Microsoft website.
After that, double-click the .exe file.
You will then have to click on Install to finish the installation.
Select the Restart tab.
And towards the end, restart the system, but before that activate Internet Explorer under turn Windows features on or off menu.
Internet Explorer is a crucial factor in opening QuickBooks, thus, the occurrence of such an error can prohibit you from working on your software. Thus, it is essential to eliminate the error as soon as possible. However, if you are still unable to access QuickBooks and the same error shows up even after performing the set of steps and procedures enumerated above, we recommend you to connect with our technical support professionals at +1-888-510-9198. You can discuss your queries with our technical team and seek for professional guidance. Our team will ensure instant support and guidance for all your QuickBooks-related queries.
Suddenly got interrupted by a QuickBooks printer library error and couldn’t find the right fix for the same? Well, we can help you with that. The Intuit QuickBooks printer library error might seem to be a very odd error that shows up when you carry out the printing process. As a result of this issue, one might face issues with printing the invoice. Here is what reflects on the screen when such an error occurs:
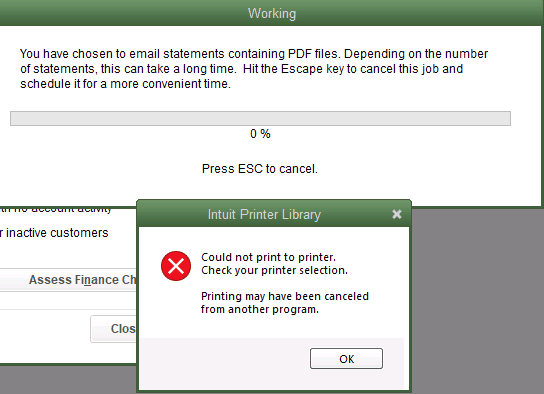
Intuit Printer Library Error
Could not print to printer. Check your printer section. Printer may have been canceled from another program.
Warning
You have chosen to email statements containing PDF files. Depending on the number of statements, this can take a long time. Hit the Escape key to cancel this job and schedule it for a more convenient time.
The error might seem to be a bit unique, yet can be eliminated using a bunch of fixation procedures. Let us evaluate the factors causing such an error, along with the ways in which the issue can be resolved. However, if you need our technical support at any point in time, then in that scenario, connect with our team at +1-888-510-9198, and let them help you with your queries immediately.
Eliminating Intuit QuickBooks Printer Library Error becomes easy, once you perform the right set of steps. We hope that this segment might have helped you in some manner to get rid of this particular error. However, if you have any queries that are still unanswered, give us a call at +1-888-510-9198, and our team will surely help you. We are a team of certified QuickBooks ProAdvisors who work round the clock to provide immediate support guidance.