QuickBooks is a versatile accounting software that is trusted by millions of business owners across the globe. However, despite it being an innovative software, QuickBooks users at many occasions face errors and glitches. The errors may appear on the screen at any time, for example, while installing the software, updating or upgrading it, or opening a company file. One common error that appears while opening a company file is QuickBooks Error Code 6150.
This article will discuss the causes and the solutions of QuickBooks error 6150 in detail. In case you need an assistance in regards to this error or any other error, you can contact us at +1-888-510-9198.
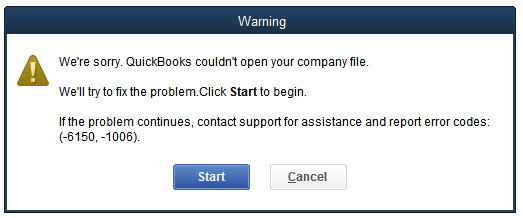
This error code often appears when users attempt to open a QuickBooks file or work on it. You can retry to open the company file of QuickBooks.
QuickBooks Error 6150 and 1006 messages may appear at the time of program installation during windows startup (or shut down) or during Windows installation while another QuickBooks software is running. Knowing when and where the error appears may be a great help in troubleshooting the problem.
Sometimes, this QuickBooks error may appear because the file you may be trying to access is on a damaged platform. Another major reason may be that you are trying to restore data from a corrupted drive.
There are a bunch of measures that can be taken to eliminate the QuickBooks error code 6150. Let us explore these measures one by one:
Method 1: Check for Cryptowall
The cryptowall virus and other malicious software can trigger this error in QuickBooks and prevent the user from opening the software. The steps involved in this process:
The very first step is to open the windows start menu
Once done with that, type in file explorer into the search bar and then open the file explorer
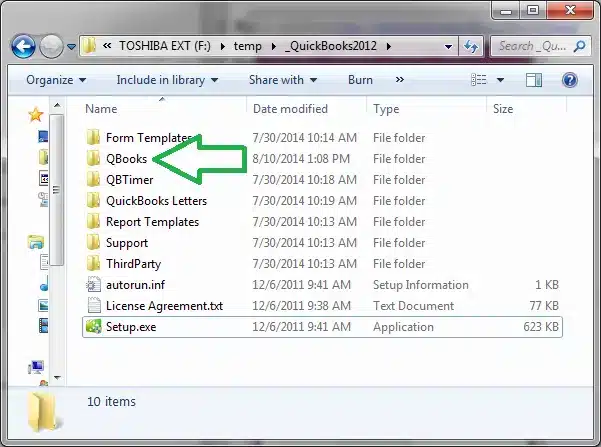
The next step is to look for the QuickBooks folder in the C: drive and then access it
The user should now spot the files that have words like decrypt or instructions
In case you find any of the files that fit this description, then ensure to reach out to your anti-virus provider
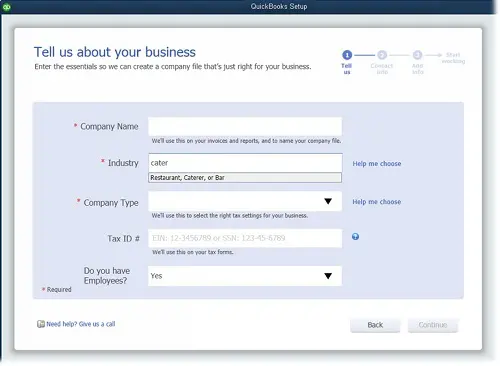
Method 2: Create a new QuickBooks company file
Initially, the user needs to open QuickBooks desktop
After that move to the no company open window and also click on make a new company
Once done with that head to the QuickBooks setup window and then enter the required info
The next step is to select create a company option
Now, create customers, charts of accounts and services
Method 3: Restore backup
The user can restore the company file from backup using the set of steps listed below. Let us have a look:
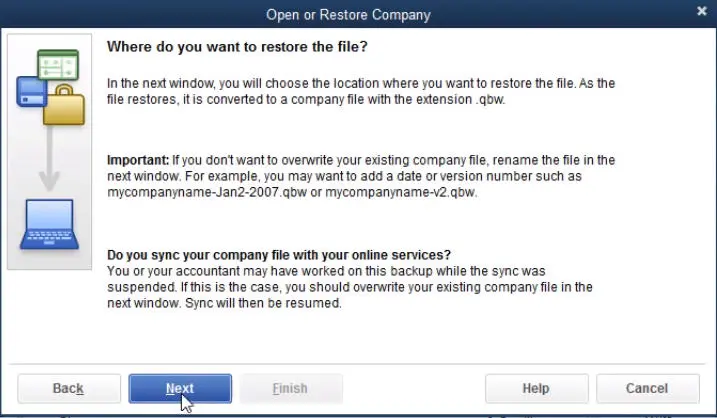
At first, the user needs to move to QuickBooks and also click on file option
Once done with that, select open or restore company option
Now, click on the restore a backup copy option and also click on restore a backup copy option and also click on next tab
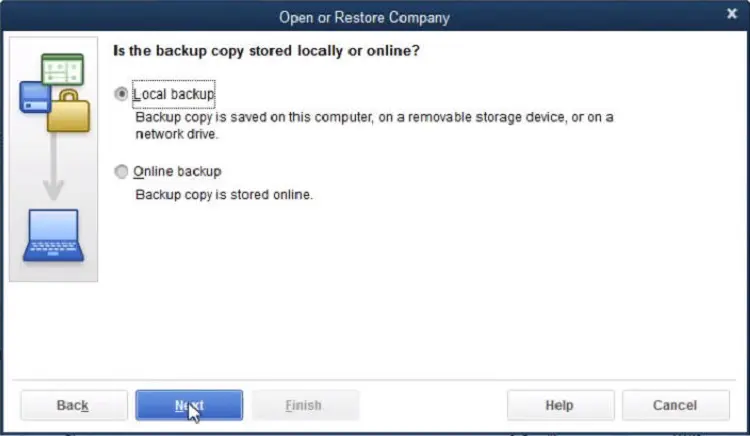
After that, select the local backup option and also click on next tab
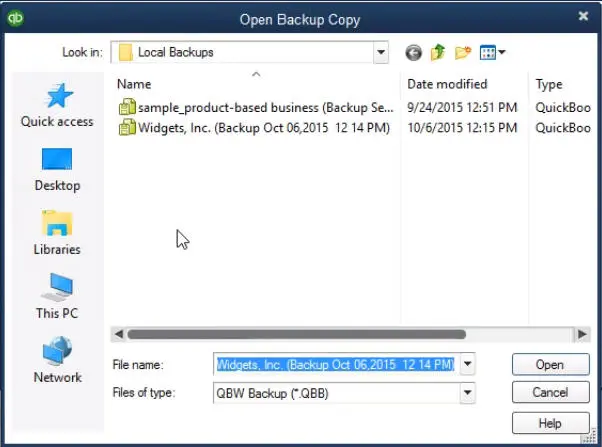
Select the location of the company file backup from the look in drop-down menu
Go for the backup having the .qbb extension
Also, click on open option by clicking on next tab
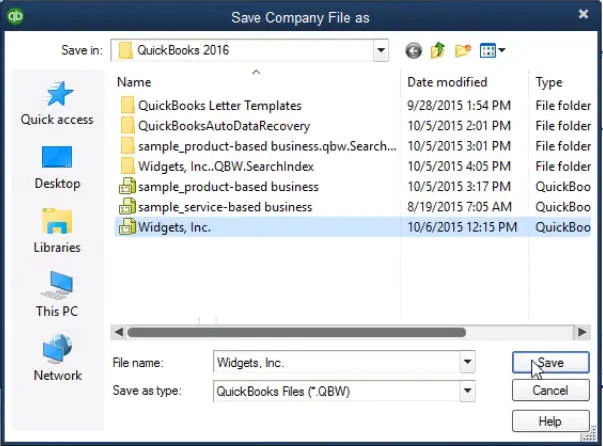
Move to the save-in drop down menu and then browse for a preferred location to restore the backup file
The user is then required to type in company filename in the name field and then save it in the .qbw format
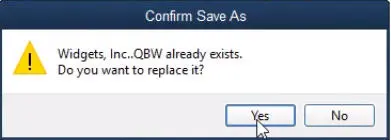
Also, click on yes to confirm the overwrite process
The last step is to click on yes to confirm to delete the entire file
Method 4: Use auto data recovery
Here, the user is supposed to create a new folder with the name of QBTest
After that, locate the tlg files in the company file folder
The user needs to copy the tlg file from the company file folder and then paste it into the QBTest folder
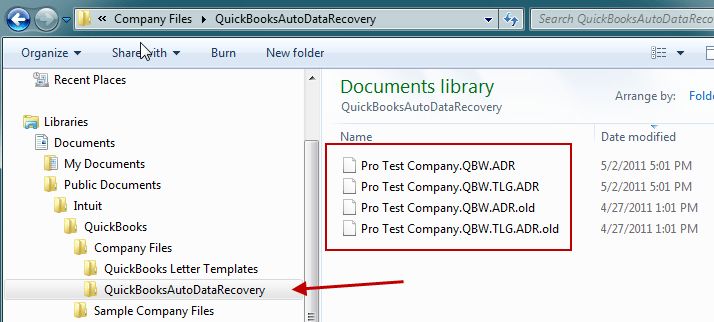
The user will then have to access the Auto Data Recovery folder inside the company data folder
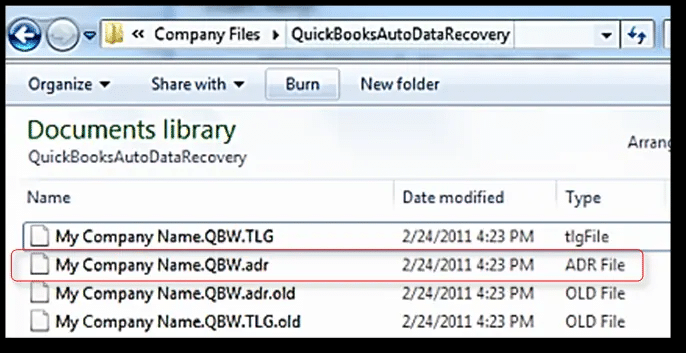
Copy the .QBW.adr file from the QuickBooks auto data recovery folder and then paste it into the QBTest folder
Remove adr from the end of the filename and open the QuickBooks software
The user needs to open the company file from the QBTest folder
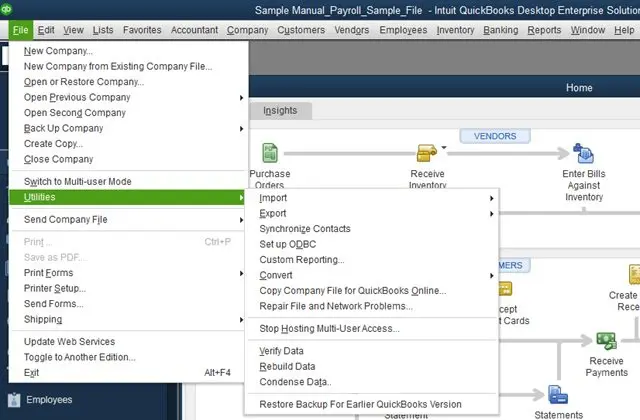
Also, under the file tab, click on the utilities tab
Select the verify data option to check if the issue exists
Once done with that, the user needs to replace the company file in the QuickBooks data folder with the company file from the QBTest folder
The above steps might fix the issue up to certain extent, make sure to check if the error is fixed or not
Limitations of QuickBooks auto data recovery
There are certain limitations of QuickBooks auto data recovery tool. Let us have a look:
Note that the QuickBooks auto data recovery tool is not feasible with QuickBooks pro, premier, and enterprise
Also, auto data recovery is not available for the accountant version
Moreover, there is a limit on the size of the file, it shouldn’t exceed 1.5 GB
QuickBooks desktop should be updated to the latest version
Method 5: Use QuickBooks file doctor tool
One can try to get rid of the issue using the QuickBooks file doctor tool. The steps involved in this process are as follows:
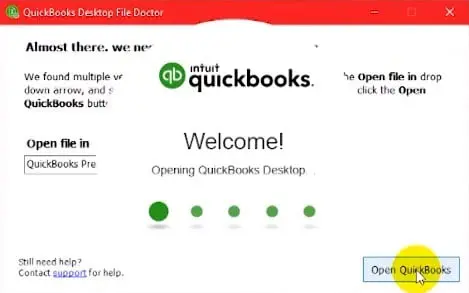
The user is first required to launch the QuickBooks file doctor tool and then wait till the screen shows any pop-up of no company open
After that move to the file and utilities tab
Now, click on repair file and select the network problems option
The user is now required to click on ok tab when the dialog appears
The user needs to have admin rights to start the application and then click on yes tab
Open the file doctor tool and click on continue tab
The user will then have to enter the credentials and log into the file.
This will start the file doctor to work on repairing the file
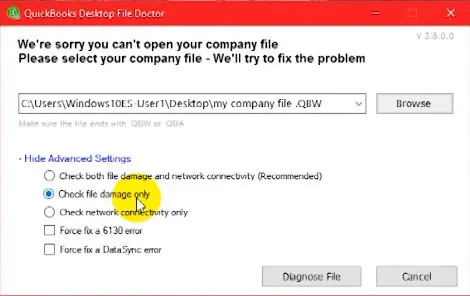
Select the diagnosis file only from the option of advanced settings
The next step is to click on next tab
Open the file and check if the issue persists
Method 6: Clean the PC and virus
The user is required to move to the system antivirus
And update the antivirus program if needed
The antivirus will activate and then you will have to scan the system
The user is then required to fix the viruses or malware on the system
His might fix the issue up to certain extent
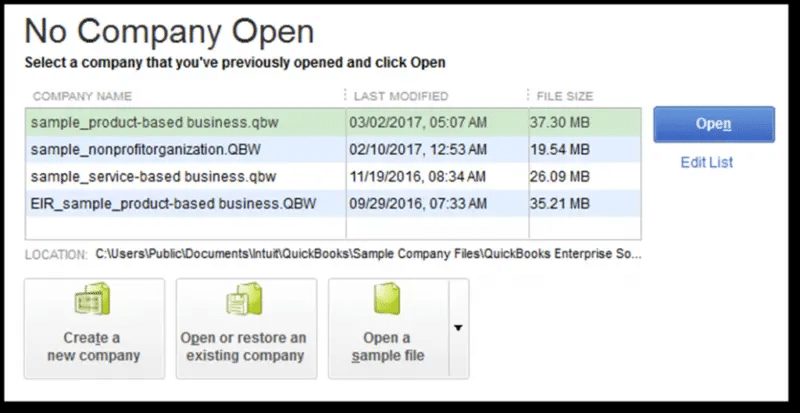
Method 7: Open a sample company file installed locally
The very first step is to open QuickBooks without the company file
And then select the open sample file option
After that select any company file
Also click on ok tab
And click on yes tab when asked to update the sample file
Method 8: Update QuickBooks software
The user can update the QuickBooks software using the steps listed below:
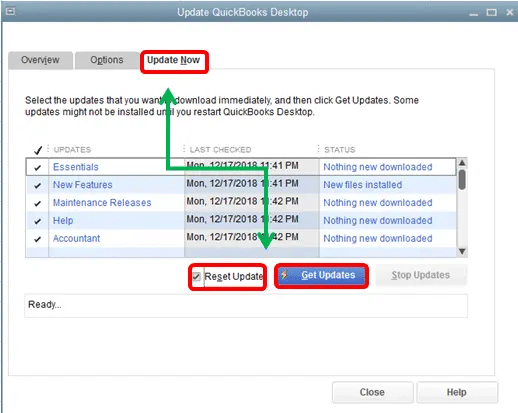
The user needs to click on help menu and click on the update QuickBooks option
Select the updates to download and sail to the get updates option
If you are not able to get rid of QuickBooks Error 6150 on your own, you can contact us. We are hostdocket, a leading company in QuickBooks Support service providers. We are equipped with right tools and technology to assist you round the clock. With us, you can rest assure of a quick and precise solution. you can contact QuickBooks Support team also you can take help from our QuickBooks enterprise support phone number .i.e. +1-888-510-9198.
While using QuickBooks Point of Sale, even the smartest businessman gets irritated when he faces unexpected errors and his work gets hampered. Every business man wants to get the best revenue of his services and goods, thus, it gets quite essential to resolve the QuickBooks Point of Sale unexpected errors. When processing a transaction or opening POS, you might come across the following errors:
Unexpected error happened, please restart Point of Sale. Exception from HRESULT: 0x88980406
Unexpected error happened. The error is: Value cannot be null. Parameter:s
Unable to open the program through the Point of Sale icon
Error: Exception has been thrown by the target of an invocation
These errors can often be encountered when POS isn’t compatible with the system requirements or there is damaged .NET framework. In this article, we will discuss about these unexpected errors that occur in QuickBooks Point of Sale, also we will share best troubleshooting steps for it. For more details, stick around this post till the end, or you can further connect with our technical support team at +1-888-510-9198, and we will provide you with immediate support services.
Resolving unexpected errors when opening QuickBooks Point of Sale (POS)
While opening QuickBooks Point of Sale, you find it difficult to resolve the unexpected errors. Here are some quick methods that you can opt for to fix unexpected errors when opening QuickBooks POS.
Method 1: Make Sure QuickBooks POS is updated
It should be noted that before completing the update process and ensuring issue resolution, you might require renaming the intuit entitlement client folder. You can now go to the product updates page and ensure that point of sale is selected as your product and also follow the instructions to install a manual update. You might have to reboot later on.
Method 2: Make Sure that Configuration of System is essential
To start, check the minimum configurations that re required for your system to run the program.
Click on the Windows logo and right click on Computer.
Go to Properties
Check installed memory, that is RAM [Random Access Memory]
Double click on the saved file and when asked for security prompt, click on Yes.
Now, click Yes on the next two screens as well.
When everything is over, reboot when prompted.
This will take 15-20 minutes to complete and requires a reboot. During this process, a couple of black screens will appear. At that time, you need to just observe and wait when the process is over.
Method 6: Uninstall and reinstall .NET framework and QuickBooks point of sale
Uninstall QuickBooks Point of Sale
Uninstall .NET Framework 4.0 and 4.5
On Programs and features window, choose Microsoft.NET framework 4.0 (or 4.5)
And then, choose uninstall and click on next tab.
Perform the onscreen instructions to uninstall the application.
Reinstall it and ensure to reboot your system after uninstalling .NET framework.
Note: In case you come across any sort of issues when uninstalling .NET framework, please connect with a qualified IT professional or Microsoft as this is a Microsoft component that interacts with operating system, not just QuickBooks.
Installing .NET framework 4.5 (4.0 client and extended built in)
You need to download .NET framework 4.5 (.NET framework 4.5 is a combination of .NET framework 4.0 client and extended) from Microsoft’s website.
You need to then save the file to your desktop and then double click the file and perform the instructions to install.
Restart after the installation.
In case you come across any errors when installing .NET framework, please connect with a qualified IT professional.
I hope all the above steps will be useful to you in order to resolve the QuickBooks Point of Sale Unexpected Errors. For any further assistance, you can call our QuickBooks Point of Sale Support team on our toll-free number +1-888-510-9198.
FAQs Related to QuickBooks POS unexpected errors
How do I fix point of sale in QuickBooks?
You can repair QuickBooks Point of sale using the steps below: 1. Close QuickBooks point of sale 2. You now have to open windows start menu 3. Further, enter control panel in the search and hit enter 4. Once done with that select your version of QuickBooks point of sale. 5. Further perform the onscreen instructions
Where is QuickBooks point of sale data stored?
You can find the POS data file on your computer stored in C:\drive in program data to Intuit folder, the POS data folder usually named by QuickBooks POS XX for version 2013.
How do I clean up company data in QuickBooks point of sale?
From the file meny, choose utilities tab and further select clean up company data. Further check mark on the compress data box and hit ok after the warning message appears.
Best ways to tackle QuickBooks point of sale error 100060 from your Point of sale software.
When we work on QuickBooks Point of Sale, then it is likely that we would face the error 100060 which means that the system is not able to create the required accounts. This error has a number of reasons behind it for its occurrence and along with this, there are various steps to resolve it as well.
In this short article we are going over concerning QuickBooks Point of Sale Error 100060. There are different factors behind this sort of error yet the excellent point is that we could resolve this problem simply by adhering to general actions in QuickBooks Financial software. For Further assistance, you can call our QuickBooks error support helpline i.e. +1-888-510-9198.
What is QuickBooks POS Error 10060 and Why it Occurs?
You receive error 100060 when there are necessary accounts which cannot be created and the error occurs when you try to run a Financial Exchange, the first time for an account. There are two reasons due to which this error can occur:
While you made your first Financial Transaction may be the account was already active in the QuickBooks Pos.
When a user logs into QuickBooks but does not have QuickBooks administrator permissions.
Error 100060: QuickBooks POS Could Not Create Some Necessary Accounts
Fixing QuickBooks Point of Sale Error 100060
To fix QuickBooks Point of Sale Error 100060, follow the below given steps:
Solution 1: To Continue using account numbers in QuickBooks Desktop
Open the QuickBooks Financial software.
Go to ‘Edit‘, select ‘Preferences‘ and then go to ‘Accounting‘.
Go to the ‘Company Preferences‘ and clear the ‘Use account numbers’ checkbox.
Click ‘Ok’.
From QuickBooks Point of Sale, perform a ‘Financial Exchange‘.
Go to ‘Edit‘, then preferences and then accounting.
Now, click on ‘Company Preferences‘ and select ‘Use account numbers‘ checkbox to reactivate the account number feature.
Solution 2: Log in as an admin in QuickBooks Desktop
At first, move to the file menu and choose close company/logoff.
Once done with that, log in to the company file as admin.
And further, move to the window menu and choose close all.
The next step is to head to the file menu on QuickBooks desktop point of sale, choose preferences and then company option.
You now have to select accounts under financial. And further ensure all the accounts under the basic and advanced tabs have no brackets.
In case you have any account field with brackets, but are unable to find the appropriate account from the dropdown list, then simply create the account in QuickBooks desktop.
This can be done by heading to the lists menu on QuickBooks desktop and further choose chart of accounts.
From the account drop down, choose next tab.
And also go for the right account type and hit continue.
Enter the required information and choose save and close.
On QuickBooks point of sale, close and re-open the company preferences window. Select Accounts, and check both the basic and advanced tabs. There should be no brackets at this time.
Condition 3: If you find that the accounts still have brackets and you are not able to find the appropriate account, then you can create a new account in QuickBooks:
Go to QuickBooks, click on ‘Lists‘ and choose ‘Chart of Accounts’.
Click on Account in the lower left portion of the screen and then choose ‘New’.
This will open the account types you want to open.
Then, choose an appropriate account type and give it a name. Fill in the required details.
This will help you in resolving the error. After the above steps, go to POS, close and reopen the ‘Company Preferences window‘ and then choose ‘Accounts checking‘ both basic and advanced. Make sure that this time, there are no brackets at this time.
For further assistance or help, you can get in touch at our QuickBooks Point of sale support helpline .i.e. +1-888-510-9198. Our experts are available 24*7 and are extremely qualified and experienced to resolve all your queries.
FAQs Related to QuickBooks Point of Sale Error 100060
How do I fix point of sale in QuickBooks?
You can try fixing point of sale in QuickBooks by performing the below repair steps: 1. At first, close QuickBooks point of sale. 2. After that, open windows start menu. 3. You now have to enter control panel in the search bar and hit enter tab. 4. Once done with that, choose your version of QuickBooks desktop point of sale. 5. After that, perform onscreen instructions to repair the program.
How do I set up POS in QuickBooks?
You can create a purchase order in QuickBooks desktop for windows using the steps below: 1. In case you haven’t already, turn on purchase orders. 2. Now, move to the suppliers and choose create purchase orders. 3. After that, in the supplier dropdown, choose the supplier you would like to create a purchase order for. 4. Enter the rest of the fields and add the items you would like to order.
Does QuickBooks generate POS?
QuickBooks point of sale is a retail point of sale system suitable for small business such as clothing and shoe stores, small franchises, sporting goods stores, etc. It further offers inventory and customer management tools, merchandise planning and a tablet-compatible POS.
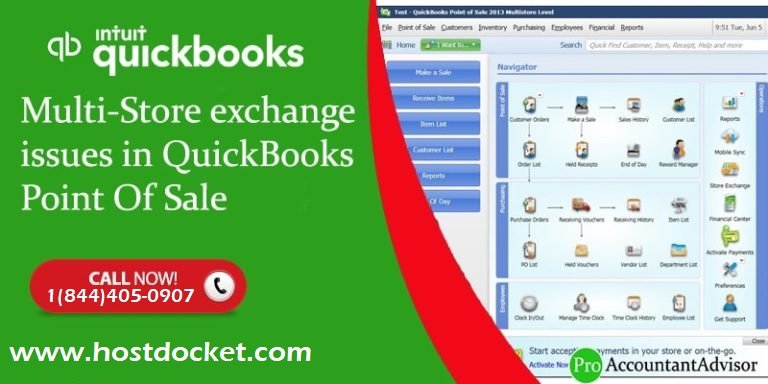
QuickBooks is accounting software which faces a lot of errors and problems and one such problem is Multi Store Exchange Issue in POS [QuickBooks Point of Sale]. This error causes delay or non-delivery of the mailbags that are pending. Due to this problem, a series of errors can occur with QuickBooks while one tries to run multi store exchange issue in pos. The following are the errors that can occur:
Error Code 175135: When you find yourself unable to store exchange file.
Error Code 193: When the primary key for dept keywords is not unique.
Error Code 175305: You encounter errors, click on ‘VIEW LOG’ to get the details about the error.
Error Code 175411: When you mistakenly enter the number that has been used by any other store
Error Code 175414: When you try to copy a file and detect this error.
File s0X#####.qbt (Error Code:2):The store exchange password you enter does not match the password in preferences.
When you find that no files are to be processed, choose to exit the software.
To learn further about multi store exchange issues in POS, make sure to read this article till the end. Or you can give us a call at +1-888-510-9198, and we will provide you with immediate support and guidance.
Causes of Multi Store Exchange Issue in POS
The common causes of these errors in store exchange:
As a user, you won’t be able to receive the mailbags during a store exchange in QuickBooks POS and this may be because of any of the following reasons:
There is not proper set-up of the Multi-store preferences.
The .QBT has been damaged.
The Windows you are using is facing compatibility issues.
You are not logged into Microsoft Windows as an administrator.
The store exchange password available in the Remote Store is not matching the password at Headquarters.
You attempt to process in a mailbag from one Headquarters file to another file.
There is some another store configured using the license number.
Now, it’s time to resolve the errors that you face during multi-store exchange issues in QuickBooks POS.
Steps to resolve Multi Store exchange issue in POS
If the file is received through an email attachment, open the file with the .qbt extension and save it to the desktop.
Fixing QuickBooks Error Code 175135
Click on ‘Stores‘ and then, choose ‘Receive Files‘.
Hit a click on ‘Browse for Files‘, find and open the mailbag.
Click on ‘Close‘.
Follow all the general troubleshooting steps for store exchange.
Solving Error Code 175414
When you face this error, you can follow the below steps to resolve it:
Firstly close the ‘Point of sale POS‘ system.
Right click on ‘POS icon‘ and select the ‘Run as administrator‘.
Run the ‘store exchange‘.
You also need to ensure that if you are facing this error in the remote store, then you can follow different steps for different versions of Windows which are as below:
Version 10:
Make sure that your internet connection is working properly.
Click to open the web browser outside of POS and trying to access a web page.
If you find that there is no connection, then reboot the routers and retry to access the web page.
Now, you can try to send the mailbag again.
Version 9 & Older:
Ensure that internet is working properly.
Choose File> Preferences > Company.
After that, chose Communication Setup in the left pane.
Click to setup the internet connection.
Hit a click to use computer’s internet connection settings.
When you find this error, you can follow the below steps:
Select Customers > Customer List.
Click on any one of the computers at a time.
Click on Delete until the list is empty.
Note: Send a mailbag to Headquarters and then receive it.
When you have more customers to click:
Version 10 and 2013: Click on the first customer in the list, and press Shift. After that, click on the last customer in the list.
Version 9: Press the Ctrl + A keys in order to select the entire thing.
When you see this error in Headquarters, you can follow the below steps:
Select File > Utilities > Resend Files.
Click to resend.
Receive the resend mailbag at the remote store.
When you follow all the above steps, then you can try and if you find the same error, then you need to create a new Remote store file and resend the mailbag from the Headquarters to the Remote store.
When you configure the other store using the license number, this error may occur and you can follow the below steps to fix this:
Reset to default.
Select File > Company > Preference
On the top of the window, there will be button. Click on ‘I Want to’ and reset to default setting.
Select Store Exchange preference and enter a unique license code for each remote store.
Then, click save.
Check each preference to ensure that the resetting preferences reflect all your needs. You can change them as required and save your changes.
QuickBooks Error Code 175305 & Troubleshooting
This error is displayed in the Sending Files dialog and when a processing error occurs:
Make sure that you have logged into Windows as an ‘System Administrator‘.
Click ‘OK‘ on the error dialog window.
Click ‘View Log‘ and identify all the errors listed.
Search QuickBooks for the additional errors and if you find that no one is listed, then you can continue to the ‘Next step‘.
Verify whether the file ‘qbpos.exe‘ has been added.
Fix Error – Store Exchange password does not match password in preferences. File s0X#####.qbt (Error code:2)
It occurs when the store exchange password in the exchange file and the password entered in the store exchange preferences do not match.
Enter the same password in the store exchange preferences for all stores to fix it. After this run the Store Exchange again.
Fix Error – “No files waiting to be processed, select close to exit”
Firstly you need to verify that the mailbag you are trying to receive is from a remote store or not. From the activity log, please ensure that the mailbag you are trying to process in does not start with the letter HQ.
If it does, then follow these steps as below:
From the Remote Store company file, select ‘Edit‘ option
Go to ‘Preferences‘ tab
Then go to ‘Company‘.
Choose the ‘Multi-store preference‘.
Click on ‘Change to Remote Store‘.
Resend the mailbag from the remote store and try to process in again at Headquarters.
If any of these errors still occurs, follow the general troubleshooting steps for multi store exchange issue in pos. If you are not good in technical aspects or looking for instant support then you can contact QuickBooks error support team directly.
FAQs Related to QuickBooks point of sale store exchange issues
What is store exchange QuickBooks point of sale?
Well, store exchange is the transfer of data between your headquarters and remote stores. The data is sent between stores in a compressed file referred to as a mailbag.
How to do an exchange on POS?
You need to perform the below steps to do an exchange on POS: 1. From the shopify POS app, you need to tap orders. 2. Now, click on order for which you want to create an exchange 3. Click on exchange 4. On the select items to run screen 5. Hit next 6. On the select new items screen, choose the new product from the products list to exchange the returned item for 7. After everything has been added, hit next
How do I verify data in QuickBooks point of sale?
For this: 1. You need to select help and further select point-of-sale 2. Now, the QuickBooks point-of-sale information window appears. 3. The verify utility is hidden on a special debug menu, to access the menu you must depress the left CTRL, left ALT, D, and B keys simultaneously.
There are many accounting software are available in the market such as Xero, Wave and many more. But QuickBooks is one of the most demanding software which is like favorite of all the businesses. Being able to do the complex bookkeeping tasks of a business it has become highly popular among everyone. Known for simplifying the tasks, QuickBooks has many versions and one among the popular ones is QuickBooks Pro Software which is right for the small and medium sized businesses. In addition to this, QuickBooks also has an online as well as an offline version for the convenience of its users. The online version of the software is accessible from various locations and from any device.
Moreover, various versions including QuickBooks Pro allow multiple user advantages which ultimately make the work easier for the organizations. To find out whether QuickBooks Pro is an ideal accounting software for your business or not, give us a call at +1-888-510-9198, our technically sound QuickBooks professionals will help you with your queries.
So, in case you are evaluating the various versions, we would suggest you to go with QuickBooks Pro. Here are the reasons:
A simple, robust and a great solution for the businesses that solves various needs of the businesses. As mentioned earlier, QuickBooks Pro allows three simultaneous users at the same time.
The software does inventory part tracking, invoice tracking, expenditure tracking, time and mileage tracking. And records all the banking activities such as deposits, withdrawals, credits, bank charges, paychecks, online banking, bank reconciliation, credit card charges, and much more.
It keeps a regular track of the receivables and the revenue which includes credit memos, statements, sales receipts, receive payments, and prepare invoices and bills.
Keeping a regular track of all the payables and expenditures such as purchase orders, item receipts and pay bills. The software ensures that the revenue of the business is not wasted in any case. This is how the software keeps track of accounting processes of a business.
Job costing, calculating sales tax, paying taxes on time, handling multiple currencies, maintaining price levels, running as per the defined budget, and do financial reporting are all the major tasks of the software which helps a business grow while keeping track of every single penny spent and generated.
Along with these reasons, there are various advantages of QuickBooks Pro as well which makes it essential to own the software:
QuickBooks Pro automates Point of Sale and manages various credit and debit transactions from your bank account. This also includes sales tax and invoicing. Moreover, the software can also be integrated into the process of accepting payments which will make it possible and quite easy to capture all the payments and analyze them.
With a range of automated features, QuickBooks Pro manages and tracks expenditure of a business. It has specified tools for keeping track of the outstanding bills and payments. Allowing the user to directly print the checks from the software, it keeps track of the payments in an innovative way. It has tools for tracking inventory items which enables it to track inventory at multiple locations.
If you won a business outside your currency or your business is international, then you have a great benefit of the software. As it tracks both income and expenditure in more than one currency.
QuickBooks Pro produces automated documentation for invoices, reports, business plans and much more. As all these are modeled as templates in the software. You can either use default templates or create your own for producing documentation that suits to your business needs.
QuickBooks is primarily a tool captures accounting and financial data and play a central role to all the long-term operations of a business which ranges from sales to planning. The data captured by the software is of great value and produce tailored reports which can be used in making future planning decisions.
With all the above benefits and functions, it is ensured that QuickBooks Pro not only keeps the accounts of a business in order but also plays a key role in the direction that one can choose for the business. All these features make QuickBooks Pro, must-own software.
I Hope, this informative article will surely help you to choose QuickBooks Pro as a business tool. If you have any query or you want to know more information about this software tool or you are planning to buy this software feel free to contact our QuickBooks Technical Support Number that is +1-888-510-9198 and speak with experts.
FAQs Related to QuickBooks Pro
Why is QuickBooks better for small business?
QuickBooks online automates tasks, ultimately making accounting less time-consuming and less stressful for small businesses. With the help of this software, you can send recurring invoices and payment reminders, sync data from bank and credit card transactions and reconcile expenses.
How much does QuickBooks Pro cost?
QuickBooks desktop pro ranges from $549.99 per user to $749.99 per year for two users. And $949.99 per year for three users.
What’s the difference between QuickBooks and QuickBooks Pro?
QuickBooks desktop pro allows a few more calculation features than online. In QuickBooks Pro, you can calculate and rebill jobs costs and further calculate discounts by customer.
What is QuickBooks Pro?
QuickBooks Pro usually allows automated payments and deposits from the linked bank account and further manage the employee payrolls via a single application.