Learn
The Process to Create and Modify QuickBooks Memorized Transactions
Interested in learning the procedure to create, edit, or delete QuickBooks memorized transactions? Well, your search ends right here. The memorized transaction feature of QuickBooks will let you never miss a transaction again. You can let QuickBooks memorize it for you so you get a reminder every time it’s due. Not just that but the memorized transactions feature lets you automatically enter your memorized transactions to save time. To help you get a better insight into memorized transactions, we have come up with this piece of writing sharing the complete information from create to edit and even delete memorized transactions successfully.
Thus, stick around to this piece of writing and unleash the complete process. For further details, continue reading the article, or dial our toll-free number .i.e. +1-888-510-9198, and consult our 24*7 QuickBooks payroll support team for immediate assistance.
Memorized transactions in QuickBooks is a feature that provides you reminders for transactions that are recurring or can be rapidly entered using a template. As a business, you can simply enter the transaction since they function as templates. You can see your memorized transactions at any point in time. All you need is to head to the lists menu and choose the memorized transaction list. Let us explore further about memorized transactions in detail!
Significant features of Memorized transactions in QuickBooks
Time-saving
Enhanced accuracy
Accurate bookkeeping
Keeps better tabs on the cash in the bank
Things that can be memorized in certain transactions:
Recurring Purchase Orders
Purchase Orders which repeat with several same products. When you make transactions like these, you can opt manually from the list of memorized transactions and remove the lines to exclude items not required for the next purchase.
Recurring Sales
Recurring sales for the supply of products or services based on a regular or monthly basis.
Cash Flows
Recurring checks in your QuickBooks or other personal services payable on a regular basis.
Electronic withdrawals of checks every month like installment payments of business
Insurance or payments made through internet access.
Monthly installments are due from customers
Health insurance premiums for the month
Recurring invoices/bills in QuickBooks
Payments for lease or loan
Tuition invoices
Rent Collection
Rent Payable
Journal Entries
Journal entries for Monthly Depreciation
Overhead is allocated to other departments
Recurring Estimates
If you choose the same items frequently while making a quote
Procedure for creating QuickBooks Memorized transactions
Want to create QuickBooks memorized transactions? If yes, then go through the steps below, and make sure that you follow the same order. So, without further ado, let us have a look:
To begin with, the very first step is to ‘Enter the transaction‘ in the same way as you want it to be memorized.
Note: The point to be noted here is that the user can leave those fields blank that contain the information that might change.
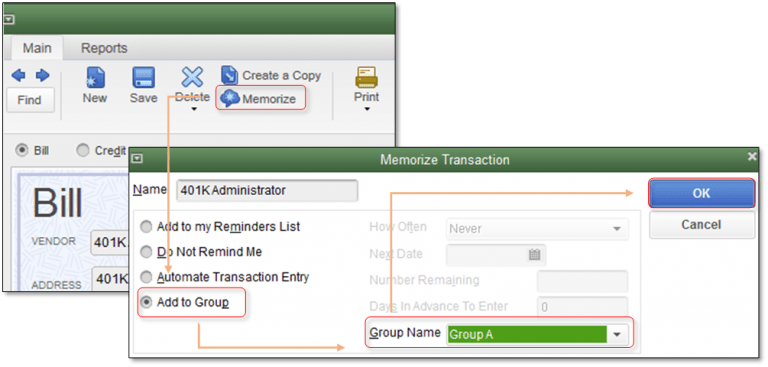
The next step is to visit the ‘Edit menu‘ and then select the ‘Memorize option’ that is seen there.
Now, in order to ‘Memorize the transaction‘, the user is required to press the ‘Ctrl and M‘ keys simultaneously and then click on the ‘Memorize‘ icon.
Once done with that, the user is required to enter the name of the transaction that is being memorized. The name you enter should be the one with which you wish to handle the transaction in QuickBooks.
Add to My reminder list: Now comes the process of adding the same to the reminder list. For this, three simple steps can be followed, which include the following:
The first step is to ‘Add the memorized transaction‘ of your reminder list.
After that, the user is required to enter ‘How often the user wants the reminder to occur‘.
Now, the last step is to ‘Enter the transaction next date‘ when the transaction will be due.
Don’t remind me: Another case can be when the user doesn’t want the software to remind for the same. In such case, the user is required to select the ‘Do not remind me‘ option available, and the transaction will not be used to get memorized.
Robotic Transaction entry: Well, in this case, the transaction will be automatically entered at the times when it will get due. This actually means that the QuickBooks software will automatically enter the details, and the users need not be concerned for the same.
The first step is to enter how often the user wants the software to enter the transaction.
The next step is to enter the next date when the transaction will be due.
This means that the user will be required to fill in how often and next date fields.
Points to be noted:
The very first thing is to ensure that the ‘Next Date select‘ is set to a day in the future due to its automatic schedule.
While filling in the number remained field, the user is required to make sure that it includes the ‘Next Date transaction‘.
Also, another point that the user should be concerned about is, in case the user wants to enter the other important information in the Transaction, he/she is required to enter the same and then tap on ‘OK‘.
The last and most important thing to consider is to click ‘Save & Close‘ or ‘Save & Next‘, to enter the ‘memorized transaction‘. Select the ‘Clear button‘ and close the window, in case the user is only entering the transaction information for the future purpose.
Procedure to edit or delete the Memorized transactions in QuickBooks
The process to delete memorized transactions manually is different for windows and mac. When deleting a transaction, it is suggested to select the correct transaction to delete. And further, it is recommended to choose the right set of steps to delete the transactions.
Method 1: Delete Memorized Transactions on Windows
The very first step here is to launch QuickBooks desktop.
Furthermore, choose the lists menu.
Also, click on the memorized transaction list.
The next step is to select the transaction you wish to delete
Also, right-click the memorized transactions.
And then, click on delete memorized transaction.
And hit ok tab.
Method 2: Deleting Transactions on Mac
Under this process, the first step is to run QuickBooks desktop on mac
Find and click the lists menu
Once done with that, press memorized transactions
Further, hover to the edit menu and also click on the same
The last step is to click on delete memorized transactions and you are done
Rectifying issues encountered while memorizing reports
In case the QuickBooks user encounters any error message while attempting to memorize the report, then QuickBooks will not retain the report. This basically might be done on the grounds that the report’s definition is excessively vast. In such case, the user is required to take a stab at lessening the number of channels or the particular quantities of things that picked in each of the channels to curl up the report’s size.
If the user select the ‘Process Multiplier Reports‘ from the ‘Reports‘ menu, and the same doesn’t appear, then it might be brought about by a harmed report or a report that is imported from another form of the software. In such cases, the user is required to discover, erase, as well as re-make the report causing such issue.
Exporting Memorized Transactions from QuickBooks
You can simply export your lists of memorized transactions from QuickBooks to use the lists however you like using the steps below:
The very first step is to log in to the QuickBooks account
Furthermore, head to the dashboard and choose reports
Once done with that, go for the lists and click on memorized transactions listing
Followed by using the excel option to generate a new spreadsheet
And lastly, export the memorized transaction
After the sheet gets prepared, simply export it to any software. The last steps might take some time.
Edit a memorized transaction
The first step is to head to the lists menu, and choose memorized transaction list.
Once done with that, double-click the memorized transaction you wish to modify.
Further, make the necessary changes.
The next step is to choose memorize at the top.
Also, choose replace to update the transaction or add to create a new one.
With this, we come to the end of the article, and we hope that this article might be of some help to the reader. In case the above methods do not work in your favor, or you require any kind of help, then you can get in touch with our team of QuickBooks support experts and professionals, by dialing our toll-free number .i.e., +1-888-510-9198.
We own a pool of experts who are well-versed with the ways to resolve any kind of issue associated with QuickBooks. So, do not hesitate to consult our team of experts, as they provide round the clock assistance, and do not leave any stone unturned to attain the highest possible customer satisfaction.
Frequently Asked Questions (FAQs)
What is the purpose behind the QB memorized transaction feature?
The major focus is to assist companies and individuals get reminders of their recurring business transactions. This feature works as a template and makes it simple to create quick entries of transactions.
How to disable memorized transactions in QuickBooks?
One can simply disable the QuickBooks memorized transactions using the steps: 1. At first, run QuickBooks and choose lists 2. After that, right click memorized transactions 3. And choose edit memorized transactions 4. Also, click on do not remind 5. The next step is to hit ok and you are done
How to generate a memorized invoice under QuickBooks?
Use the steps below to generate a memorized invoice under QuickBooks. 1. The first step is to create an invoice 2. And then click on memorize above transaction 3. Enter a name and select the way QuickBooks will handle it 4. Assign other info and also click ok tab 5. Select save and next or save and close to end the process
How do I clear an un-entered transaction from the past?
In order to clear an un-entered memorized QuickBooks Transaction you need to first launch QuickBooks, and then choose edit tab and also go for preferences menu. The next step is to click on reminders and also click on company preferences. Now, choose don’t remind me and hit ok tab.
QuickBooks is an extraordinary software that allows entrepreneurs to manage their accounting activities and other business tasks. At times, this amazing software might come up with certain glitches as well. One such error is QuickBooks unable to open company file. Well, it is very much frustrating when the QuickBooks user is unable open the company file. If you are also facing similar issue, then there is no need to panic, as this article is there to rescue you. In this article, we will be discussing the facts related to this error just like, the triggers, symptoms, rectification, etc. A quick fix to this error can be consulting our 24X7 QuickBooks Support team at our toll-free number, .i.e. +1-888-510-9198.
Why does QuickBooks Company file can’t open error occurs?
The error QuickBooks unable to open company file can be caused due to several factors. Before exploring the troubleshooting steps, it is very much important to first find out the actual reason behind it. The reasons include:
The very first reason can be issue with the file location and extension.
Another reason can be corrupt hard disk.
In case the same file is opened on a shared network, the user might encounter this type of error.
If the user applies incorrect methods to open certain files.
Issue with reports in the file might end up in such errors.
Damaged QuickBooks Company files can be another factor that triggers such errors.
Troubleshooting Error: QuickBooks unable to Open Company File the error
Now as you have explored the causes, symptoms, error messages, as well as the safety measures, it is time to find out the ways to get rid of the error QuickBooks unable to open company file. In order to rectify this glitch, the user has a few available options. We will be discussing each of the solution and the steps to be followed in each of the solution. So, without wasting much time, let us begin:
Process 1: Open the file directly from the QuickBooks
To begin with, press and hold the ‘Ctrl key’, at the time of double-clicking in the QuickBooks icon.
The next step is, until no window QuickBooks file open, the user should not let go the hold key.
Moving to the next step, once the QuickBooks program opens up, the user is required to ensure that only a single computer is hosting the company file. In case more than one system is hosting the company file, then close down the other servers that open the company file.
Now, the QuickBooks user has to turn off the hosting in other computers by following the steps enumerated below:
For single-user:
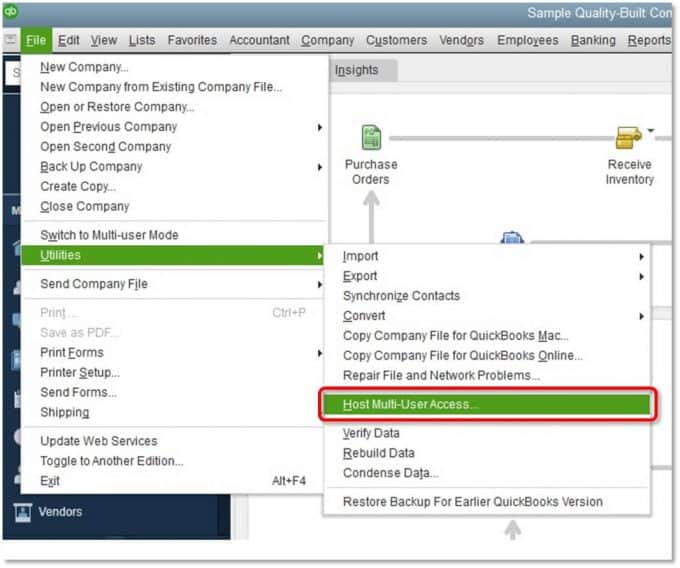
The first step is to go to the ‘File‘ and then click on the ‘Utilities‘ and then click on the ‘Stop hosting multi-user access‘.
At the time when the user follow the above step and stop hosting the multi-user access, a message will appear on the screen, and on that the user is required to select ‘Yes‘.
Once the company file is closed, a message will appear on the screen, on which you have to choose for ‘Yes‘ and you are good to go.
For Multi-user:
This error message generally displays on every client computer.
Now, the user is required to visit the ‘No Company‘ window, and then select the file, followed by selecting the ‘Utilities‘ option.
Once done with the above step, the user can confirm that the menu option of the host multi-user access is displayed. It should be noted that one or more than one client computers can display the menu options on the screen. The client computers prevent hosting multi-user access, that indicates that they are already hosting multi-user access.
Now, choose the ‘Option‘ to stop multi-user access hosted on any client computer, display hosting of ‘Stop multi-user access‘, and then the user is required to follow the prompts to stop the hosting.
The last step is to try to open the problem file again, after which the log-in window would appear on the screen.
Process 6: Preventing the automatic opening of QuickBooks Windows
The very first step is to go to the ‘No Company Open Window‘.
After that, ‘Find the company file‘.
The next step is to press and hold the ‘ALT‘ key.
Once done with that, tap on ‘Open‘,
Once you have opened the company file, then carry out the steps below:
First of all, go to the ‘Edit‘ menu.
After that, click the ‘Preferences‘ option.
The next step is to select the ‘Desktop view‘.
And then, click on the ‘Don’t save‘ the desktop option.
The last step is to click on ‘OK‘, and you are good to go.
Process 7: Troubleshooting the Installation
The user should move the company file to a different system, and then try to open it there, and if the file works on that system, then the issues lies in your system or QuickBooks desktop original installation. In such cases, you can do the following:
Here, the user needs to download the most recent version of QuickBooks tool hub
And then, save the file where it is easily accessible.
Open the previous file
Now, perform the onscreen steps to install and agree to the terms and conditions
Now, double click the icon on the windows desktop for the purpose of opening the tool hub
Select company file issues tab from QuickBooks tool hub
Run QuickBooks file doctor tab
This might take some time, then launch the file manually
Choose the company file option from the drop-down menu in the tool
In case you are unable to find it, choose the browse option
Choose check your file option and click on continue tab
Enter the admin password and hit next tab
Process 9: Open a sample company file
The very first step is to head to the windows start menu
And then, type in file explorer and open the same
After that, find the QuickBooks.exe file and you can find this file in the QuickBooks folder
Find the file then hold the ctrl tab and double click on the QuickBooks.exe file
Don’t release the ctrl tab until the QuickBooks software doesn’t open completely
Choose QuickBooks from the desktop and click on the ctrl until QuickBooks opens
The last step is to choose to open the sample file
In case the sample file opens normally, then this indicates that there are issues with the company file. Fix the issue through the QuickBooks tool hub and then run the Quick fix my program.
Process 10 : Turning off the hosting on workstations
In case you are using the QuickBooks application in single user mode or the company file is not hosted on any network, then this step can be skipped. The user can try performing the steps below:
The user needs to first open QuickBooks on any one of the workstations
And then, open the company file and head to the files from the top menu bar and then choose the utility tab
The next step is to check if host multi user access is available in the options. If yes, then head to the next workstation
Or if you see stop hosting multi user access, then click on it
And perform the same steps on all workstations
Now move to the server computer
Open the QuickBooks application on the server system
And then click on the file menu and choose the utility tab
If you see the host multi user access option and choose it
Head to the file menu and choose utlities and choose stop hosting multi user access
Click on the file menu and head to utility tab and choose host multi user access option
Process 11: Turn off the save when closing feature
The user needs to first open QuickBooks desktop
After that, move to the no company open window and select the company file
Press the alt tab and choose the open option
Don’t release the alt tab and wait till the company file is not open
After the company file is opened, turn off the save when closing feature. This can be done by performing the steps below:
The first step is to choose on edit tab and also select the preferences tab
The next step is to click on desktop view tab
Choose the don’t save the desktop and save it
Lastly, close the QuickBooks and open it and try opening the company file
Winding Up
With this we come to the end of this article, and also we hope that these methods will help in tackling it.
However, if you are a new user and unable to get rid of the error even after following the above steps, then you can consult our QuickBooks enterprise support team by dialing our toll-free number .i.e. +1-888-510-9198.
FAQs-QuickBooks unable to open company file
How do I restore company file in QuickBooks?
To restore company file in QuickBooks, one simply needs to right-click the file or folder, and then choose Restore previous versions. A list of available previous versions of the file or folder will appear. It will also include files saved on a backup as well as restore points, if both types are available.
How to fix company file in QuickBooks?
Fix the company file issues or the company file in QuickBooks using the steps below: 1. Move to the File menu 2. Hover over Utilities and choose Rebuild Data. 3. On the QuickBooks Information window, choose OK tab. 4. Let the tool repair your file. 5. After the tool finishes, choose OK. 6. Head to the File menu. 7. And let the tool check your file for data issues.
How to open QuickBooks without opening company file?
To open QuickBooks without opening company file, you need to press and hold the Ctrl key. After that, double click your QuickBooks program icon. And, hold the Ctrl key until you have the no Company Open window.
Learn the advantages and disadvantages of accounting software
We live in a tech-savvy era, where with each passing day the scope of computerized accounting has flourished immensely. Not to be known to many, accounting software can completely transform the way any business performs its accounting operations. In order to discover the advantages of accounting software, it is necessary for you to ask yourself why you want to use accounting software for business management. It is an undeniable fact that some of the top finance professionals find accounting software one of the most valuable assets of their businesses, and reduction in cost is not the sole reason behind it.
No doubt, accounting software is designed to automate much of the accounting process, and also with a purpose to make accounting much easier, accurate, and error-free, but at the same time it is important to understand the accounting fundamentals, as relying solely upon technology may end up in certain disadvantages. At the end of this post, we expect that you might be well aware of the advantages and the disadvantages that the accounting software possesses. We will be exploring the pros and the cons of accounting software one by one. However, in case you have any queries or if you need any sort of technical assistance at any point in time, then in that case, feel free to consult our tech support team at ++1-888-510-9198.
It is the digital age, and incorporating technology into every single facet comes with plenty of benefits. Speed and accuracy reign supreme, and this is the reason why accounting software is preferred by a majority of people. The advantages can be endless, out of which below enumerated are some of the most compelling ones:
1. Simplification
Accounting software place finance control in hands, as they are designed to give a meaning to numbers and also to perform automated calculations. Having either minute or no training in creative accounting at all, entrepreneurs can successfully complete the accounting operations.
2. Accurate Forecasting
Accurate forecasting is one of the main advantages of accounting software. Understanding the patterns and trends of your financial performance in detail is not that simple. It is a fact that accounting software gives logic to the numbers, ultimately assisting the users to comprehend where there is a requirement to cut the expenses.
The accounting systems basically drill deep inside the most complicated, day-to-day tasks of companies from collecting, organizing, to analyzing some of the most sensitive data. Thus, it can be stated that accounting software enhances the productivity of the business.
4. Cost Savings
Accounting software takes control of the revenue framework to assist you to get rid of the outsource finance management simply by handing it over to an external expert. Along with that, this software decreases the costs of printing and distributing the documentation. All sorts of sensitive data are stored by this software in secure and monitored locations.
Numerous feature-packed accounting software are available in the market that is dedicated to payroll support, reporting, and also sticking to tax regulations on their own i.e. automatically. In order to maintain a transparent workflow, the software store all the necessary details for the company.
6. Ease of use
Though a few of the users might find it difficult to operate this software in the very beginning, once the user gets to the grips with the layout and features of the software, it becomes pretty easy to operate and monitor this software.
7. Improves your digital skills
Not only this software benefit business operations, but it also enhances the digital skills of the person. Having the right accountancy software that works in your favor can transform you from a technophobe to an internet wizard.
Disadvantages of incorporating accounting software
Well, to be very true, there are not many negative points regarding accounting software. The fact is that, just like other things, even accounting software may not equally benefit all businesses. There are numerous things that should be considered before incorporating this technology. A few of the disadvantages of accounting software are enlisted below:
The very first negative point about this technology is the learning time that might be consumed in certain cases. For the ones who are unaware of the policies of the accounting world, they may find this accounting software much harder to operate.
The cost of purchase, support, and maintenance is another drawback, but only in the case of extremely small businesses. It should be noted that there are low priced packages available on the market, especially for small businesses.
We expect that after reading this article, you might understand the actual value of accounting software in this tech-driven era. The accounting software can definitely help to save much time, as well as money. It is not less than an addition of a valuable asset to your company.
In a nutshell, it can be stated that accounting software has changed the style, way, and geography of the accounting sector. Users might face certain challenges while dealing with the software, but ultimately the benefits are greater in number.
Hopefully, this article might help you in deciding whether to incorporate accounting software to perform day-to-day activities or not. If still you have any doubt in your mind, then feel free to get in touch with our accounting and bookkeeping team of experts at ++1-888-510-9198.
FAQs Related to Accounting Software
What factors should be considered when selecting accounting software?
The major key factors to consider when opting an accounting software are: 1. Scalability 2. Compatibility 3. Usability 4. Price 5. Customer Support
What is the main purpose for QuickBooks?
QuickBooks is a user-friendly, simple accounting software that tracks your business income and expenses, and organizes your financial information, eliminating the need of manual data entry.
What are the benefits of QuickBooks Online?
QuickBooks online can be beneficial in the following ways: Better shared access to data with employees and accountant, no software or local data to manage, no upgrades or release updates.
An easy guide to change QuickBooks services or Inventory item types
It’s important for every business owner to create inventories of their purchases, sales, products, services, and anything else that needs to be tracked. And since QuickBooks is extremely user-friendly accounting software, it makes it as simple. QuickBooks services or Inventory Item or QB inventories is not a tough task, here are some simple and effective methods to add them to QuickBooks. To learn further about changing service or inventory item types in QuickBooks, make sure to read this segment till the end. Or you can also consult our technical support team at +1-888-510-9198, and we will provide you with instant support and guidance.
Understand QuickBooks services or QuickBooks Inventory items
Before jumping onto any conclusion, it is important to understand the basic difference in between QuickBooks Services and QuickBooks Inventory Items:
An Inventory Item can be defined as anything that the company offers, resells or acquire within the course of company, just like the product, delivery fees as well as handling fees, discounts and excise responsibility (tax) (if applicable). It seems as a line on an invoice or various other sales forms. Setting up things integrate inventory part and also sub-assemblies right into a single product.
QuickBooks Services or Inventory Item
A Service is something that you offer to your clients to help them with their business and individual needs. You charge them to complete a task or by the hour. Service items can be created in QuickBooks Pro inside the list of items for the services that you provide. This helps the users to get rid of manually writing the similar item details into sales forms of the services that they offer.
QuickBooks Inventory Items:
A QuickBooks inventory item, on the other hand, is anything that your business sells, resells, or purchases within the course of business such as the product, charges for shipping, charges to handle the product, and applicable excise duty or tax. On invoice and other sales forms, it would appear as a line. Assemble items put together the inventory part and sub-assemblies.
The user can simply create service products in QuickBooks pro inside the Item list, for the services that are offered by the user. This assists in escaping repeatedly writing a comparable item information into sales forms for services offered.
Steps to create your service items in QuickBooks Pro
Go to the “Item List” window.
Click “Item” on the lower left.
Once the drop down box opens, click the “New” command.
After “New Item” window pops up, choose “Service” from Type drop-down menu.
In the “New Item” window, the fields will appear and look like ones like creating “Inventory Part” items.
In case you face any trouble or require assistance you can contact Pro Accountant Advisor team that is certified from Intuit. Our team of certified QuickBooks enterprise support experts has cutting-edge tools and technology to fix all sort of QuickBooks related issues.
Different types of Products and Services and ways to change them
With an exception for bundle and inventory items, it should be noted that the products and services can be easily changed for one type of item to another. The items mentioned generally have a different way of tracking. It should also be noted that there are 4 item types in the Products and Services list on QuickBooks accounting software.
Different product/services types
Inventory items: Inventory items can be purchased and sold and
their quantities can be tracked. You will be required to choose the Tracking
Quantity on Hand option for this item type.
Non-inventory items: To define Non-inventory items, it can be said that they are those items that can be purchased and sold but it is not possible to track their quantities, such as nuts and bolts used in an installation.
Services: You provide services such as support, landscaping, and
training to your customers.
Bundle: They are like a collection of products and/or services you sell jointly, for example, a beach kit that includes sunscreen, towel, flip flops, and other items. It’s the decision of the user whether to hide or display bundle components, when sending/printing transactions.
In order to add or edit bundle items, the user needs to visit the products/services option via bundle section and set as he/she wishes to put on show your bundle items.
Important: It should be noted that the feature for tracking inventory is available just in QuickBooks Online Plus. Also, bundle items can only be used or created in the browser version of QuickBooks Online. Android or iOS mobile apps are yet to support them.
Ways to change the types of products/services
Below we have discussed few points to change the product/service type:
Change Service Item(s) to Non-inventory items:
Click on the “Gear icon” on the top and select “Products and Services“.
Hit a click the checkbox in front of the service item you have to change.
And then the user needs to click on the “Batch actions” drop-down box, followed by selecting the “Make non-inventory” option.
Change Non-inventory item(s) to Service Items:
In this, firstly tap on the “Gear icon” on the top, and then select “Products and Services“.
Click the “Checkbox” in front of the non-inventory item(s) you have to change.
Now give a single Click on the “Batch actions” drop-down box and choose “Make service“.
Service or Non-inventory items to Inventory Items:
First of all, the user needs to tap the “Gear icon” on the top, along with that select “Products and Services“.
Now, search and spot the “Item you want to update” and then visit the “Action column” and click on “Edit” button.
Once done with that, the user needs to select the “Change type link” and select “Inventory” button.
Here are the additional details you’ve to enter:
Initial quantity on hand.
As of date or an effective date (It should be noted that the date mentioned must be a date prior to any transactions where this item was used).
Inventory Asset, Income, and Expense accounts.
Sales Price, Cost, and Sales/Purchasing information
The last and final step is to select “Save and Close“.
Steps to change service types in QuickBooks online
The steps below can be performed to change the service types in QuickBooks online. Let us have a look:
The very first step is to sign into the QuickBooks online
After that head to the settings tab.
Select the products and services option from the settings tab.
Once done with that, select the edit option from the action column.
Now, choose the change type tab.
And then, select the appropriate type.
The user will then have to select the save and close tabs to save all the changes.
Note that, you can use the batch action from the product and services list, in case you want to change multiple items to any type.
Important: Please note that inventory items can’t be converted to any other types. If you want to change the type of Inventory items, you will have to create a new item.
Steps to change the inventory items in QuickBooks online
The user can try performing the below set of steps to change the inventory items in QuickBooks online. Let us check it out.
Step 1: The user needs to adjust the Quantity of inventory item
The first step is to choose the products and services option from the settings tab.
After that, from the products and services list, look for the inventory item.
Now, choose the edit option from the action column.
And then head to the quantity on hand section.
After that select the edit option from the action column
Now, head to the quantity on hand section
And also choose adjust tab
Later on select quantity tab
In the inventory quantity adjustment window, enter the 0 value, in the new window.
Save the changes and close by clicking on save and close.
Step 2: Find the Total Value of Adjusted Inventory
Head to the settings tab
After that choose charts of accounts.
From the Chart of Accounts section, find out the Inventory Shrinkage Account.
Now, choose Run Report option.
Search for the inventory item that you have adjusted.
And keep the amount of the adjusted note in another place.
Step 3: Create a Journal Entry to Account
Start with clicking on the new tab and choose the journal entry
Head to the Account drop-down menu.
Now, choose the Opening Balance Equity option.
Debit Column – Enter the adjustment amount in this field. From the second line, go to the Account drop-down menu, and choose the Inventory Shrinkage option.
Credit Column- Enter the same adjustment amount in this field
We hope that you are able to add as any services or items as you wish and run your business with ease. In case you have any query or require assistance, you can contact our experienced QuickBooks technical support team at +1-888-510-9198.
We are available round-the-clock and offer nothing but the best solutions and services for all QuickBooks related issues.
FAQs
Can you change the type of an item in QuickBooks desktop?
Well, of course, one can change an item’s type, if the item is a non-inventory part, other charge item, or an inventory part. For this, you simply need to head to the lists menu and choose the item list for windows or items for Mac. And then, double click the item you want to change. After that, from the type drop-down, choose the new item type.
How to set up service and non-inventory items in QuickBooks?
For the non-inventory items: 1. The first step is to head to the sales menu. 2. After that choose products and services. 3. Once done with that click on new and then select non-inventory. 4. The user needs to then add the name of the item. 5. Followed by selecting the category that best describes the service item from the category dropdown. 6. The user will then have to enter the rest of the fields and information. 7. The last step is to click on save and close tabs.
How to change the default product or service in QuickBooks?
This can be done by performing the steps below: 1. At first, login and navigate to settings tab. 2. After that, in the top right corner, choose the gear icon. 3. The user needs to then head to the firm settings. 4. Now, under the integrations, choose QuickBooks. 5. Once done with that, choose the default QuickBooks service. 6. And save the changes. 7. Enter the information and you are done
How to edit the inventory items in QuickBooks desktop?
To edit the inventory items, the below steps would work: • In the inventory items, select lists and then choose the item list option for windows • If you are a Mac user select items. • Now, double click the item you want to change. • Also, edit the info for the item. • The last step is to click on ok tab.
Having a problem in Syncing QuickBooks files between two computers?? Don’t you worry..! Here, you will get the answers of your all queries. In this informative article – we are going to clarify all such topic. Moreover, you can also converse with a QuickBooks expert to attain the best possible solution without wasting time & effort. Sync augmented productivity and increases the flexibility to access the data. In many situations, it has seen that many users desire to connect their data between multiple devices to enhance their productivity & flexibility in accessing the data. Unfortunately, they fall short to sync QuickBooks files between two computers as they don’t have proper awareness about it.
Here, we will endow you the exact insight & knowledge for – how to sync QuickBooks files between two computers? This information is provided as we understand that many QB users desire to sync data or files between the devices in their workplace or home.
Note: Ensure that there is a right installation alternative for each PC, before syncing the files. And, also you must confirm that both computers linked with the same network or not. There is one additional choice available for you that you can also uninstall the QuickBooks software on both the machines & later, reinstall it with the correct options.
To synchronize the QuickBooks file between two PC’s, one of the best way is to confirm that you chose the correct installation alternatives for each machine. Also, sync both of the computers on the same network. On the other hand, you can also uninstall the QuickBooks on both PC’s & reinstall it with the correct options. When the QuickBooks re-install & configuration get completed on both the computer then, be sure that the primary computer stores all the company files. It also allows you to synchronize the QB data to other machines on the same network. Apart from this, you can also use the ‘Data Transfer Utility’ also known as a third-party commercial utility.
Note: Synchronize the QB files between two systems that allow & makes it trouble-free for employees to work together on one combined accounting report.
Important points to remember
Before you start with the process, it is important to make sure that there is a correct installation option for each of the systems. Moreover, check if both systems are connected to the same network. The user also has the option to uninstall and reinstall QuickBooks on both systems and then use QuickBooks on both computers with the right options.
After reinstallation, the configuration gets completed on both desktops. The primary desktop will store the company file and will permit the user to sync the data to other systems on the network.
One can also leverage the benefits offered by the Data transfer utility, also known as a third-party commercial utility. This is possible only if it contains two separate company files that need to be merged. Having visited these facts, let us jump on to the process to sync QuickBooks files between two computers.
How to Sync the QuickBooks File between two Computers?
Checkout and follow the systematic steps to sync the QuickBooks files between two computers:-
Blog Summary in Infographic
From the Intuit’s official website, download & install the ‘Data Transfer Utility’.
Copy the QB company files from the secondary company and paste it to the primary computer.
In the primary computer, open the QuickBooks software.
In the “Export Data from the source company”, choose the ‘Open Source Company’ button.
Select the dialogue ‘Yes and permit access even if QuickBooks is Not Running’ and see the option to permit the application to access the personal data. Now, click on the ‘Continue’ icon => ‘Yes’ icon => finally ‘Done’ icon.
Select the ‘Close’ tab in ‘Currently Connected To’ section within the Data Transfer Utility.
Verify the ‘File’ menu & select the ‘close Company’ in QuickBooks.
Select the ‘File’ option & then, choose the ‘Open or Restore Company’ & select the ‘Open a Company’ in the QuickBooks.
In the ‘Import Data Into Destination Company’ section, select the ‘Open Destination Company’ of Disk Transfer Utility.
Select the dialogue ‘Yes, Always permit access even if QuickBooks is Not Running’ and allow the application to access the personal data. Hit onto the “Continue” tab => “Yes” tab => finally “Done” tab in the QuickBooks.
Select the ‘Close’ tab for the ‘Currently Connected To’ section in the Data Transfer Utility.
Choose the ‘File’ menu & ‘Close Company’ in the QuickBooks.
Select the ‘Type of Data’ and ‘Change’ tab of Data Transfer Utility.
In the ‘Data Transfer Utility’, go to the ‘Import Data Into Destination’ and select the ‘Import Data’ button.
If you have to sync your QuickBooks file to another computer
You may also be interested in learning how you can sync QuickBooks file to another computer.
Start by copying the QB installer file on both the computers.
Next, choose the ‘Use QB on this computer’. On the main computer, select the ‘Store company file for Network Sharing’.
Now insert your product number and license and click ‘Install’. Select: File < Utilities < Host Multi-User Access.
Go to ‘Scan Folders’ select ‘Add Folder’ and proceed to ‘Scan’ for the QuickBooks company file.
After you find the QB Company File, close the folder.
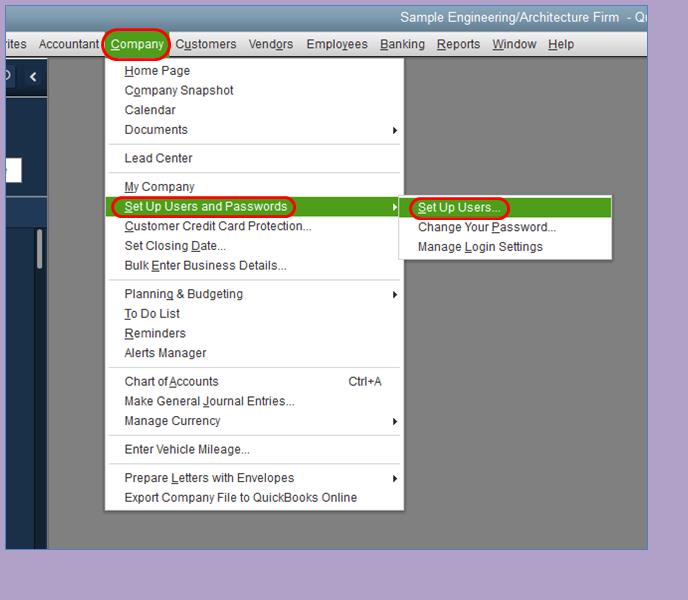
Now create a username and password by clicking ‘Set up users and passwords’.
Select options for changing and deleting transaction permissions and then click ‘Next’ and ‘Finish’.
Next, open the other computer and look for the option ‘File’.
Click ‘Open or Restore Company’ in QuickBooks accounting software.
Browse the accurate network location of the primary company file in that other computer.
Steps for database server setup for synchronization
The user is suggested to store the company file or network sharing on the primary computer. One can also use the QuickBooks software without storing the company file on the secondary computer. The steps involved in the process of synchronization are as follows:
The first step is to scan folders.
And then click on the scan tab to scan the primary computer for the QuickBooks company file.
After that click on close once the verified company file has been found.
The user will then have to click on the Company menu and head to the Set up users and password and opt for the Set up users tab within QuickBooks on the primary system.
Now, click on the Add user tab in the system display and then assign the QuickBooks username and password.
Once done with that select the Access options for the secondary computer and hit on the Next tab.
The user is then required to go for the Changing or deleting transaction permissions and proceed to the Next and Finish tabs respectively.
After that click on the Open or restore company and hit on the Open a company in QuickBooks on the secondary computer system.
Look for the Location on the network where the primary company file is stored.
Also select the file, and then log in with the username or password created on the primary system
By following the above given steps we hope now, you have successfully synced the QuickBooks files between two computers. We anticipate that this technical editorial would be helpful for you to comprehend this issue in a better manner. However, it could be possible that there are some indistinct topics or trouble associated with the QuickBooks. In such an event, you can directly speak to the QuickBooks support team anytime.
We, Host Docket is a specialized team of expertise technicians to fix, Resolve all QuickBooks issues and Errors. You can even avail our services by just making a call on our toll-free helpline i.e. +1-888-510-9198.
FAQs
What are the Important Points to be Aware of Prior to Synchronizing Data Files on other Computers?
It is important to consider the following points before synchronizing the data files on other computers: 1. Search for both computers and check if they are connected to the network or not. 2. Make sure that there is the right installation on every computer prior to syncing the files. 3. Or uninstall the QuickBooks and then reinstall QuickBooks on the two computers and after that use QuickBooks on the computers with the correct options.
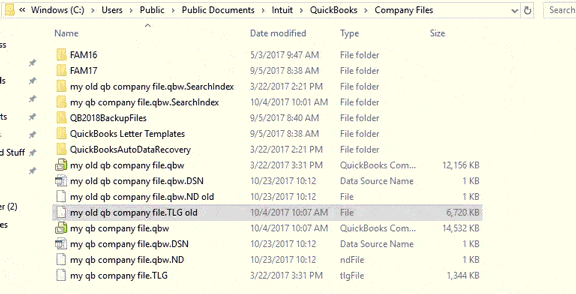
What are the Different Types of QuickBooks Files?
QuickBooks has a bunch of files containing a different set of data. The different types of QuickBooks Files are as follows: QuickBooks Backup files QuickBooks Company files QuickBooks Bank Statement files
How to sync data in QuickBooks?
The user can try performing the below steps in QuickBooks to sync the data: 1. The first step is to choose settings. 2. Now, under Sync, choose Preferences. 3. Also, click on edit. 4. Choose the QuickBooks Online accounts to use. 5. After that choose to save and you are done with the process.
What is QuickBooks Sync Manager?
QuickBooks Sync Manager is one of the tools used that securely syncs your QuickBooks company file data with 3rd party applications and some internal add-on services such as recurring payments. It is a crucial tool to sync files in QuickBooks.