QuickBooks, no doubt, is widely used accounting software and is available in a range of versions. In this article, we would apprise you of the ways to manage your account, product and subscription in QuickBooks. First of all, you are required to know the advantages of the QuickBooks site page which is one-stop page specially designed to help users access and manage all their products and services. If you want to purchase a product, then you can update your credit card information or in other cases, you can cancel the product or the service you have ordered. And obviously you can manage your account information. You can further connect with our technical support team for any sort of assistance. Give us a call at 1-844-405-090, and we will provide you with immediate support services. Our technical team of QuickBooks experts will help you with managing your accounts, products, and subscriptions successfully.
Log in to the account with your user id and password. If you have forgot your login credentials then you can follow the steps given below and do as required:
There will be an option “I forgot my user ID or password”. Click on that option
Enter the required details and recover your account.
Set a new password, add a security and you will receive OTP.
Once you enter this OTP, you will be directed to a new page where you can see all the details of your product.
Once you have got access to your profile, Start choosing a specific product title
QuickBooks Online Accountant: When you go to this option, you will be directed to your QBOA Account page where you cannot just update the information about your account but also manage your clients.
Online QuickBooks (QBO): Here you will be directed to QBO Account page that allows you to see and manage your billing and personal information.
QuickBooks Payment: This option will also take you to the page where you can see all your payment. And you will be provided an overview of the charges as well as the fees that will be based on the account you select. On clicking the Payments Service Center button, you can also reach to your merchant center.
QuickBooks Desktop: When you click on QuickBooks Desktop, a page opens with the list of all the Desktop products and services that you have chosen. This page also consists of your account and payment details. You can see the Customer Account Management Portal Site for more information.
Intuit Online Payroll: When you select this option, you are taken to the Intuit Online Payroll Account.
Important: “If you notice that your products are not listed or one or more products are missing, then you have an option to look for another account using email address already associated with the account.”
On the top left section, you will find an option to manage your account which will have your email address and allows you to select ‘My Profile Link’, and also has a Log Out and Help icon.
Go to the My Profile Link
Moreover, if you want to edit the info of your login page then you can easily go to the ‘My Profile Link’. Under this, you will find three tabs-
Profile: In this tab, you are allowed to edit the information given in your profile such as your name and other details.
Security: In the security section, you can change the password and keep your account secure.
Apps: Here you can manage all the apps and the products connected to them.
In case, you are facing any difficulty, you can click on the Help (?) icon that will take you to the support page. And to get instant help, you can dial our toll-free QuickBooks help number @ +1-888-510-9198 and get in touch with our advisors now.
FAQs Related to Manage your account, products, and subscriptions in QuickBooks
How do I manage accounts in QuickBooks?
You can manage accounts in QuickBooks desktop for windows using the steps below: 1. At first, move to the lists menu and further choose chart of accounts. 2. The next step is to right click the account to edit. 3. Furthermore, choose edit account 4. You now have to update the account details. 5. And choose save and close
How do I manage billing payment and subscription info in QuickBooks desktop?
In order to upgrade subscription and payment info, you need to: 1. Update credit card and subscription billing info 2. Go to settings ⚙ and choose subscriptions and billing. 3. Select the billing details tab. 4. And further choose edit billing information and update your payment info
What are the different subscriptions for QuickBooks?
QuickBooks online has five versions: Self employed, simple start, essentials, plus, and advanced. Pricing runs from $15 to $200 per month.
QuickBooks accounting software is loaded with tons of features and functionalities, one such feature is to undo or delete reconciliation in QuickBooks. Often when the user reconciles an unwanted transaction or enters a wrong date or an incorrect statement date, the need to undo or delete the reconciliation arises. This is when the QuickBooks users make use of this feature. Another situation where the user might need to undo reconciliation is when the QuickBooks balance sheet doesn’t match the bank statement following a monthly reconciliation. There are certain steps that can be performed to undo or delete reconciliation in QuickBooks, which we will be discussing later in this segment. To unleash the steps involved, make sure to read the segment till the end. Moreover, you can also connect with our tech personnel at +1-888-510-9198and ask them to help you with the undo or deletion process.
At times, it becomes obligatory to undo reconciliation or delete a reconciliation in QuickBooks, especially when the QuickBooks balance sheet doesn’t match the bank statement. Here are a few situations when you might need to undo a bank reconciliation. Let us have a look:
The payment was recorded for an inaccurate date.
A transaction was appropriately checked off and discovered that it had not cleared yet.
The bank reconciliation was forced and now requires it to be corrected in a proper method.
The bank statement date was incorrect or not an actual day.
It should be noted that small changes can unbalance your accounts. You can minimize the impact by reconciling transactions one at a time.
Benefits of Account Reconciliation
Reconciling accounts ensures accuracy and various other perks. Here are a few perks associated with account reconciliation.
Reconciliation allows you to look for any sort of error in account and bookkeeping activities.
It prepares you for any further activity. For example: In case you pay a check to any vendor, and he/she continues to delay the payment, then in such case, it is probable that you might miss out to deduct it from the account. Whereas, using reconciliation can help you in keeping track of all the transactions.
You can further keep the business deposits correct with reconciliation.
Follow the below steps to undo or delete a reconciliation of an account
Below are the following steps to undo or delete a reconciliation of an account
The first thing to do is go to Banking in the left menu.
After this select Banking on the top
Now choose the Account at the top.
After this above the Action column select Go to Register/Account History
Now search for the transaction that you require to reconcile but one at a time.
Then highlight tab on the transaction.
After this tap on the R which is on the top line of the transaction which is situated between the Amount and Deposit or charge and payment amount.
By clicking in this field will allow you to change the status of the transaction to the desired status from Blank=unreconciled to C=Cleared
Now click on Save.
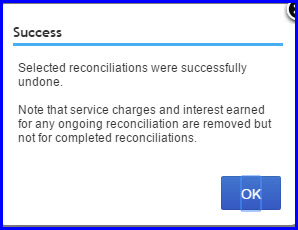
A pop up will display as the image you are showing in below:
The QuickBooks Online reconciles the transactions separately and that’s why you have to reconcile one at a time.
In the start, you need to select Registers from the Banking Menu and after that choose the Account from the Register Name drop-down menu.
After this, you have to tap on the transaction that you want to reconcile and then delete R at the top of the transaction in order to modify its rank to the unreconciled.
In case you want to reconcile each part of the transactions for a period of time then it may help to print a list of the reconciled transactions by using the reconcile alternative from the banking menu.
In QuickBooks Desktop Versions
If you have QuickBooks Desktop version like QuickBooks Pro or QuickBooks Premier, then you can unreconciled a complete reconciliation by tapping on Reconcile Now from the Banking screen and then choose Undo Last Reconciliation. But before do it you have to click on Locate Discrepancies so as to produce a list of discrepancies to find the mistake. Well, the process to undo reconciliation in QuickBooks desktop is the easiest amongst all. The steps below will help in undoing reconciliation for QuickBooks desktop versions like QuickBooks pro, premier, and enterprise. The steps involved are as follows:
The user needs to first launch QuickBooks and then move to the banking option
Once done with that search for the transaction that you wish to reconcile
The next step is to hit the Reconcile Now tab
End the process by opting for the option to undo the last reconciliation
Steps to undo reconciliation manually
The very first step is to hit the gear icon and also pick the chart of accounts tab
Later on, look for account row that you wish to see
Once done with that go for account history/view register
Furthermore, spot the particular account you wish to edit and then head to the reconcile status shown by the checkmark
The last step is to select the top mark to change it. It is suggested to choose the acronyms: C(Cleared), R (reconcile), and blank (neither cleared not reconcile)
Undo an entire reconciliation
Before you begin, you need to download any attachments tied to the reconciliation. When you undo a reconciliation deletes all existing attachments.
Important points:
When you undo an earlier reconciliation, it also undoes all of the reconciliations that follow. For instance, in case it is May and you undo January’s reconciliation, then you will also have to undo Feb, March, and April, as it may cause errors. You need to start with the most recent reconciliation and work your way backward.
Further, undo reconciliation doesn’t work on manually reconciled transactions. The transactions that remain in the register for the dates that were undone might have changed manually. You can also check the transaction audit history.
You need to sign in to QuickBooks Online Accountant.
Further, find and open the customer’s QuickBooks online company.
When you are in their company file:
Firstly, head to the accounting menu
After that choose reconcile tab.
You now have to choose history by account.
Choose the account you want to reconcile and date range from the dropdowns.
Now, find the reconciliation on the list.
You now have to opt for view report to open the reconciliation report.
Furthermore, review any discrepancies and changes your client wants to make.
When you are ready, choose the dropdown in the action column and further choose undo.
The last step is to choose yes tab and undo to confirm.
It should be noted that, if you do not see Undo, ensure that you have opened your client’s company file from QuickBooks Online Accountant. Now you are you client can redo the reconciliation if required.
Winding Up
If you are still unable to Undo or Delete Reconciliation in QuickBooks then you should seek assistance from the QuickBooks Payroll Customer Service experts. They will in no time help you with the whole process. You can call us at +1-888-510-9198 in case you are facing any issue in your QuickBooks Desktop.
FAQs Related to QuickBooks Reconciliation
How to undo past bank reconciliation in QB online?
In case you are using QuickBooks online accountant, you can use the undo reconciliation feature to unreconcile previous transactions without manually editing individual transactions from within the register.
How to remove one transaction from reconciled account?
It is recommended to make sure that you have opened the client’s company file. and then: 1. Go to QuickBooks in the toolbar. 2. Choose the client’s QuickBooks company and open it. 3. After accessing their books, go to the accounting screen and open the reconcile tab and click on the history by account. 4. Select the account you want to reconcile and specify the date range. 5. Find the appropriate reconciliation and press its view report option. 6. Review the discrepancies/changes the clients want to make. 7. Use dropdown in the action column and click on undo. 8. Choose yes and also click on undo.
Can anyone tell me how to undo the reconciliation of a bank account?
You can undo reconciled transactions one at a time, using the steps below: 1. Head to the accounting menu. 2. Choose chart of accounts 3. Find the account and go for view register 4. To assist you in focusing on this task, filter the register to only include the last 60 days of transactions. 5. Review the check column and choose the box and click on it till it is blank. 6. Now, go for save and close your register.
Why can’t my accountant undo a reconciliation?
There is a problem with reconciliation in QuickBooks that many users are facing. You can contact our Customer Support Team to further understand the error and find out a quick fix.
For any QuickBooks user who aspires to work on payroll, it is quite essential to at least know how one gets started with QuickBooks payroll. We will now start with Payroll Service Key. You get this 16-digit key when you purchase/buy QuickBooks Payroll. This key is specific to your EIN and payroll service. When you will try to activate payroll service in your QB file, you will have to enter this security key.
A payroll service is a company that handles the process of paying employees for a business. They typically handle tasks such as calculating employee paychecks, deducting taxes, and distributing payments. Payroll services work by receiving employee data from a business, calculating the necessary deductions, and processing payments to employees.
What are the benefits of using a payroll service for my business?
Using a payroll service can provide many benefits for your business, including saving time and reducing errors in payroll processing. It can also help ensure that payroll taxes are filed correctly and on time, avoiding costly penalties. Additionally, some payroll services offer additional HR services, such as benefits administration and employee onboarding.
Can I use a payroll service if I only have a few employees?
Yes, payroll services can be a great option for businesses of any size. Even if you only have a few employees, using a payroll service can help ensure that you are complying with payroll tax laws and that your employees are paid accurately and on time.
How do I get started with payroll services for my business?
To get started with payroll services for your business, you can call our toll-free number at +1-888-510-9198 to speak with one of our representatives. They can help you understand the services we offer and guide you through the process of setting up payroll services for your business.
What should I look for when choosing a payroll service for my business?
When choosing a payroll service, it is important to consider factors such as cost, level of service, and additional features such as HR services. It may also be helpful to read reviews from other businesses who have used the service. Finally, it is important to ensure that the payroll service you choose is able to integrate with your existing accounting software and processes.
QuickBooks Payroll tax tables play a vital role in getting your payroll process extremely smooth. To provide the users with the proper knowledge of QuickBooks Payroll tax tables, we have come up with this article. At the end of this article, the reader would be well versed in downloading, installing, and verifying QuickBooks Payroll Tax Table. Therefore, stick to the article until the end. However, for any query associated with QuickBooks Payroll tax tables, you can simply consult our QuickBooks Payroll customer support team at +1-888-510-9198.
Before digging in deep and exploring the steps to download, install, and verify QuickBooks Payroll Tax Tables, it is better to understand what it actually means. To define Payroll tax table, it can be stated that it is a chart that characteristic different columns, assisting to find out the apt taxes to be suspended from the employee’s paycheck.
It should be noted that the withholding taxes are generally affected by numerous factors just like, the income sum, the marital status of the worker, and also the payment schedule, just like bi-weekly, monthly, etc.
Important points to remember
Before downloading, installing, and verifying the QB Payroll Tax Table, the user is required to keep in mind certain factors, such as:
The user is required to have an active payroll subscription, if they wish to update the tax table.
It is recommended by Intuit that the user should download the tax table at least within 45 days, or they can update the same every time they make payment to their employees.
Lastly, the user is required to turn on the automatic updates feature in QuickBooks Desktop, if they want to receive the payroll tax table updates automatically, the moment the update releases.
Procedure to download the QuickBooks payroll tax tables updates
Undoubtedly, it is essential to download or install the newest available QuickBooks Payroll Tax Table updates, in order to safeguard that the Payroll has precise information. Being a QuickBooks Payroll user, all you need to do is follow certain steps, and you are good to go.
To begin with, opt for ‘Employees‘ and after that select ‘Get Payroll Updates‘.
Moving forward, the user is required to select ‘Download entire payroll update‘.
Tap on ‘Update‘ button
Once the downloading procedure comes to an end, a pop-up message will appear stating “A new tax table and updates to your payroll tax forms have been installed on your Desktop. Click OK to read about the modification.”
Considering the prompts, hit ‘OK‘ and you are good to go.
Steps to Install a Payroll Tax Table update from a CD (Disk Delivery Service:)
To start with, the user needs to insert the ‘Payroll Update CD‘.
Once done with that, open the ‘Get Payroll Updates‘ option.
QuickBooks Desktop Pro and Premier: The user is required to choose the ‘Employees‘ option and after that the option stating ‘get payroll updates‘.
Moving forward, if the user is prompted to locate the ‘update.dat‘ or ‘data file‘ in the ‘Install Payroll Update window‘, then he/she is required to take the necessary actions and respond to the prompts.
Moreover, once you have completed that, tap on ‘Browse‘.
Furthermore, tap to choose CD drive from the ‘Look in the drop-down arrow‘, in the install from window.
Now, either select the ‘date or update3.dat‘ from the ‘Payroll Update Disk‘ and after that click on ‘Open‘ to proceed.
Also, choose between the ‘update.dat or update3.dat‘.
Additionally, hit the ‘Open‘ option.
After that, the user is required to move on to the ‘Payroll Update Window‘, and then tap on ‘OK‘.
Note: In case the user receives a pop-up message displayed on the screen which says “File Not Found” go through your CD drive by following the below-enumerated steps:
Firstly, the user is required to ‘close‘ the QuickBooks Desktop and after that hit the ‘Start Button‘, once done with that, select ‘My Computer‘.
Moving ahead, right-click the ‘CD drive‘ and after that select the option “If you cannot see the files, test the CD on a second desktop.” In case the files are visible on the second desktop, then there might be some issue with the hardware on the first desktop.
Whereas, if the user is unable to see the file on both the desktops, then he/she is required to order a new payroll update disk.
The user is required to authenticate, in the ‘install confirmation window‘ that the user is installing the accurate location and that the ‘tax table versions‘ in the current and new fields are precise.
The next step is to click when the update is complete, or a message appears stating ‘A new tax table has been installed on your desktop‘.
The next step is to click ‘OK‘ in order to read about the modification.
The last step of the verification process is that in case the tax table version has not modified, a pop up message will appear on the screen stating that “You have successfully installed payroll update”.
How to Download the latest payroll tax table update?
The payroll tax table update will provide the user with the accurate and updated rates and calculations for:
E-file options
Supported provincial and federal tax tables
Payroll tax forms
How to find out the version of QuickBooks?
Included in the new update: July 2018 payroll tax tables updated
Current Version: Version 108
Release date: June 28, 2018
Effective date: July 1, 2018, to December 31, 2018
To check the version of QuickBooks, the user is required to follow the following steps:
The first step is to go to the ‘Employees menu‘ in QuickBooks, after that select the ‘My Payroll Services‘.
In the next step, the user is required to select the ‘Tax table information‘.
The first three number reflects the tax table version in “You are using Tax table version”.
Note: The user should be QuickBooks 2018 or QuickBooks Desktop 2018 or QuickBooks Desktop Enterprise Solution 18.0 to download the tax table update.
Check out the Current and historical TD1, CPP & EI amounts:
TD1 Amounts:
Effective
date
7/1/2018
1/1/2018
7/1/2017
1/1/2017
7/1/2016
1/1/2016
7/01/2015
1/1/2015
Tax
table version #
108
107
106
105
104
103
101
100
TD1 Amounts
Federal
11,809
11,809
11,635
11,635
11,474
11,474
11,327
11,327
AB
18,915
18,915
18,690
18,690
18,451
18,451
18,214
18,214
BC
10,412
10,412
10,208
10,208
10,027
10,027
9,938
9,938
MB
9,382
9,382
9,271
9,271
9,134
9,134
9,134
9,134
NB
10,043
10,043
9,895
9,895
9,758
9,758
9,633
9,633
NL
9,247
9,247
8,978
8,978
8,802
8,802
8,767
8,767
NT
14,492
14,492
14,278
14,278
14,081
14,081
13,900
13,900
NU
13,325
13,325
13,128
13,128
12,947
12,947
12,781
12,781
ON
10,354
10,354
10,171
10,171
10,011
10,011
9,863
9,863
PE
9,160
8,160
8,320
8,000
8,292
7,708
7,708
7,708
QC
15,012
15,012
11,635
11,635
11,550
11,550
11,425
11,425
SK
16,065
16,065
16,065
16,065
15,843
15,843
15,639
15,639
YT
11,809
11,809
11,635
11,635
11,474
11,474
11,327
11,327
ZZ (employees outside Canada)
0
0
0
0
0
0
0
0
Canada Pension Plan (CPP)
Effective
date
7/1/2018
1/1/2018
7/1/2017
1/1/2017
7/1/2016
1/1/2016
7/01/2015
1/1/2015
Tax
table version #
108
107
106
105
104
103
101
100
Canada Pension Plan (CPP) – outside Québec
Maximum Pensionable Earnings
55,900
55,900
55,300
55,300
54,900
54,900
53,600
53,600
Basic Exemption
3,500
3,500
3,500
3,500
3,500
3,500
3,500
3,500
Contribution Rate
4.95%
4.95%
4.95%
4.95%
4.95%
4.95%
4.95%
4.95%
Maximum Contribution (EE)
2,593.80
2,593.80
2,564.10
2,564.10
2,544.30
2,544.30
2,479.95
2,479.95
Maximum Contribution (ER)
2,593.80
2,593.80
2,564.10
2,564.10
2,544.30
2,544.30
2,479.95
2,479.95
EI amounts:
Employment
Insurance (EI) – outside Québec
Maximum Insurable Earnings
51,700
51,700
51,300
51,300
50,800
50,800
49,500
49,500
Premium EI Rate (EE)
1.66%
1.66%
1.63%
1.63%
1.88%
1.88%
1.88%
1.88%
Premium EI Rate (ER) (1.4*EE)
2.62%
2.62%
2.62%
2.62%
2.62%
2.62%
2.62%
2.62%
Maximum Premium (EE)
858.22
858.22
836.19
836.19
955.04
955.04
930.60
930.60
Maximum Premium (ER) (1.4*EE)
1,201.51
1,201.51
1,170.67
1,170.67
1,337.06
1,337.06
1,302.84
1,302.84
Québec Pension Plan (QPP)
Maximum Pensionable Earnings
55,900
55,900
55,300
55,300
54,900
54,900
53,600
53,600
Basic Exemption
3,500
3,500
3,500
3,500
3,500
3,500
3,500
3,500
Contribution Rate
5.40%
5.40%
5.40%
5.40%
5.33%
5.33%
5.25%
5.25%
Maximum Contribution (EE)
2,829.60
2,829.60
2,797.20
2,797.20
2,737.05
2,737.05
2,630.25
2,630.25
Maximum Contribution (ER)
2,829.60
2,829.60
2,797.20
2,797.20
2,737.05
2,737.05
2,630.25
2,630.25
Employment Insurance (EI) – Québec only
Maximum Insurable Earnings
51,700
51,700
51,300
51,300
50,800
50,800
49,500
49,500
Premium EI Rate (EE)
1.30%
1.30%
1.27%
1.27%
1.52%
1.52%
1.54%
1.54%
Premium EI Rate (ER) (1.4*EE)
1.820%
1.820%
1.778%
1.778%
2.13%
2.13%
2.16%
2.16%
Maximum Premium (EE)
672.10
672.10
651.51
651.51
772.16
772.16
762.30
762.30
Maximum Premium (ER) (1.4*EE)
940.94
940.94
912.11
912.11
1,081.02
1,081.02
1,067.22
1,067.22
Québec Parental Insurance Plan (QPIP)
Maximum Insurable Earnings
74,000
74,000
72,500
72,500
71,500
71,500
70,000
70,000
Contribution Rate (EE)
0.548%
0.548%
0.548%
0.548%
0.548%
0.548%
0.559%
0.559%
Contribution Rate (ER) (1.4*EE)
0.767%
0.767%
0.767%
0.767%
0.770%
0.770%
0.782%
0.782%
Maximum Contribution (EE)
405.52
405.52
397.30
397.3
391.82
391.82
391.30
391.30
Maximum Contribution (ER) (1.4*EE)
567.58
567.58
556.08
556.08
548.81
548.81
547.40
547.40
Commission des normes du travail (CNT)
Maximum earnings subject to CNT
74,000
74,000
72,500
72,500
71,500
71,500
70,000
70,000
Fix QuickBooks Payroll update issues:
If the TD1 amounts are not updated even after installing the latest tax table update, the user is required to perform the following checks:
The user is required to ‘confirm the tax table effective date‘, whether it is on or after the date.
After downloading the product update that contains the new tax tables, the user is required to start with payroll, or open and close the QuickBooks Desktop for the TD1 amounts to update.
If in case the user has ever manually updated the TD1 amounts for an employee, the new tax table would not dominate any previously adjusted amounts.
Employees set up over the basic TD1 amounts? ‘Yes‘, or ‘No‘
The reason is that the QuickBooks Desktop will update TD1 amounts on its own, only for the employees with the basic amounts for the previous tax tables.
Payroll tax
table is now out of date: One of the most commonly encountered error
When the user opens the payroll tax table on the computer, he/she might encounter the pop-up stating the Payroll tax table is now out of date. It should be noted that any of the calculations that the users perform using this tax table will be either zero or will show as $0.00. There can be various reasons behind this error, a few of which are listed below:
The very first reason can be that the QuickBooks Desktop is not updated to the latest payroll tax table release.
The last reason can be that not all the versions of QuickBooks located within the network might have been updated to the latest tax table.
How to rectify this commonly encountered error?
The very first thing is to analyze the QuickBooks Desktop and check whether it is using the latest product update or not. The next step is to check whether all the versions are located on the network or not, especially in the case you have the multi-user network.
The next thing the user has to do is to equate the product release number of the currently installed product with the product update page at the time when the user is working in QuickBooks. After that, the user is required to press F2 key to view the release reference number.
Lastly, if the user hasn’t updated its product to the latest release, it would be better to update it first, in order to resolve the error. The user can get rid of the error and backup the file first, by clean uninstall and reinstall of QuickBooks Desktop.
We conclude this article, with the hope that it might help you to download the latest QuickBooks Payroll tax table and also get a better insight into the same. After reading this article, you might be able to deal with the errors that you may stumble upon and many other related information. However, in case of any difficulty, our QuickBooks support team is there to guide you. You can consult our team of experts at our toll-free number .i.e. +1-888-510-9198.
How do I update my QuickBooks payroll tax tables to ensure accurate tax calculations?
To update your QuickBooks payroll tax tables, simply navigate to the “Employees” menu, select “Get Payroll Updates,” and follow the prompts. Regularly updating your tax tables ensures that you are using the most current tax rates and calculations, allowing for accurate payroll processing. Don’t forget to keep an eye on tax-related news and announcements to stay informed about changes to tax laws.
What if I encounter issues while updating my QuickBooks payroll tax tables?
If you experience any difficulties or have questions while updating your payroll tax tables, don’t hesitate to reach out to our expert support team at our toll-free number +1-888-510-9198. We are available to assist you and ensure that your payroll tax tables are up-to-date and functioning correctly.
Can I manually edit the payroll tax tables in QuickBooks?
QuickBooks payroll tax tables are designed to be automatically updated through the “Get Payroll Updates” feature. However, if you need to make manual adjustments, we recommend consulting with a tax professional or contacting our support team for guidance. Making manual changes without proper knowledge can result in inaccurate payroll calculations and potential compliance issues.
How often should I update my payroll tax tables in QuickBooks?
It’s essential to update your QuickBooks payroll tax tables at least once every 45 days to ensure the most accurate tax calculations for your employees. Keep in mind that tax rates and regulations can change frequently, so staying updated is crucial for maintaining compliance and avoiding potential penalties.
How can I verify that my QuickBooks payroll tax tables are up-to-date?
To confirm that your QuickBooks payroll tax tables are current, navigate to the “Employees” menu, select “Get Payroll Updates,” and check the “You are using tax table version” section. The displayed version should be the most recent one available. If you’re unsure whether you have the latest tax table version, feel free to contact our support team at our toll-free number +1-888-510-9198, and we’ll be happy to assist you.
Understand how to add an EIN to an existing QuickBooks desktop Payroll account
QuickBooks accounting software has helped millions of small and mid-sized business owners in managing their accounts and records effectively. A few Add-ons to the software can make it one of the most useful accounting software to another level. One such tool that the user can add to the existing QuickBooks Payroll subscription is EIN. Many QuickBooks users find it troublesome to add EIN to QuickBooks payroll. Thus, we have come up with this article, where we will be discussing the step by step process to add EIN to QuickBooks Payroll Basic, Standard or Enhanced subscription.
However, for expert assistance, do not hesitate in speaking to our QuickBooks payroll technical support team via our toll-free number i.e. +1-888-510-9198. Our team will be there to assist in you in a single call.
Well, there are certain requirements, as well as limitations for adding EIN to QuickBooks payroll. Below is the list of essential requirements and limitations.
The user will have to use the same registered copy of QuickBooks Desktop on the same machine, in order to process payroll for all companies on one payroll subscription.
QuickBooks Desktop Payroll is programmed to support just one company data file per EIN. If you try to use more than one company files under the same EIN and payroll subscription, you may encounter errors.
The contact details and QuickBooks Desktop payroll administrator for the payroll subscription will be the same for all companies that you add to a single subscription.
If you use Direct Deposit (DD) to pay your employees, you can choose to have several companies (separate data files with different EINs) with Direct debit on the same DIY Payroll subscription.
Each QB Desktop Payroll service can add a limited number of companies to a single subscription. Please note that the limit does not depend on number of employees but company data files.
If the user is an Enhanced Payroll for Accountants license owner, then it is recommended not to give service keys to the clients. This might expose the payroll subscription account to unauthorized users.
Service
Maximum
number of EINs
QuickBooks Desktop Payroll Basic
3
QuickBooks Desktop Payroll Standard
3
QuickBooks Desktop Payroll Enhanced
3
QuickBooks Desktop Payroll Enhanced for Accountants
50
QuickBooks Desktop Payroll Assisted
Each EIN is charged separately.
Discounts apply for multiple companies
Steps to add an EIN or another organization to your subscription
Choose the “Employees” menu.
And then Go to “Payroll” option.
Select “Use My Existing Payroll Service” from the top menu bar.
In Account Maintenance window, choose “Add File“.
Choose the “Add to Subscription Number” XXXXXXXXXX-(SUBSCRIPTION NAME) radio button.
Put in your information that includes of Zip code and select other “I have an existing subscription if you do not see your own subscription in the list.”
If the radio button (Add to Subscription Number XXXXXXXXXX-(SUBSCRIPTION NAME) is not available, that means the payroll service has already been authenticated in the company file.
You can move the EIN to your existing subscription, if you have a service key in the file and you wish to “add the EIN” in your existing subscription (you can contact us if you face an issue).
Tap on “Next” button.
Click next again to add the company EIN at no extra fee when the “Review Information” window appears.
Select “Print”, or go back to QuickBooks. You will find a payroll subscription window open to validate and the service is added automatically.
Verify the “Service Key” now.
Click on “Employees” section
And go to “My Payroll Service” option
From the top menu bar, select “Manage Service Key” opt.
Tap on “View “and it will open up the new service key with an Active Status.
Important: You will not find the payroll subscription number when you click “Use My Existing Payroll Service” if you bought a subscription directly from Intuit before creating a payroll company file.
If you face the mentioned issue, check the following solution
Tips to follow If you purchased a subscription directly from Intuit prior to creating a payroll company file:
Find the service key of the “EIN” that have to add.
Use Intuit’s Automated Service Key or “Disk Delivery key” tool.
Provide the EIN to us, and we will provide you with a unique service key. (Please use the automated service key or disk delivery key tool, in case you receive updates by disk.)
Click “Employees” section.
Go to “Payroll” menu.
Enter “Payroll Service Key” from the top menu bar.
Tap on “Add” and put in the service key as one number without hyphens.
Next, Click “Add” and put in your service key, in case the “company file” already has the payroll service key.
Adding EIN to QuickBooks payroll subscription doesn’t include any rocket science, all it involves is a few steps. The given steps will assist you to move or add an EIN to a different QuickBooks desktop payroll subscription. If you still need assistance with this process, you can contact our QuickBooks online support .I.E. +1-888-510-9198 and talk to a certified QB expert.
Our experts have the right tools, technology, and expertise to assist you with any QuickBooks related issue in the least possible time. Thanks for your valuable visit. You are always welcome here anytime soon.
FAQs Related to Adding EIN to QuickBooks Payroll
How do I add an EIN number to QuickBooks?
You can do this by: 1. Moving to the settings tab ⚙, and further click on payroll settings. 2. You now have to, choose edit tab ✎ in the federal tax. 3. Update the employer identification number. 4. And further click on save and done tabs respectively.
How do I update my payroll subscription in QuickBooks?
You can do this by performing the steps below: 1. Sign in to QuickBooks online. 2. Further, choose settings tab ⚙ and hit account and settings 3. You now have to choose billing and subscription tab. 4. Once done with that, ensure that your payment info is updated. 5. Moreover, in QuickBooks online payroll section, choose upgrade your plan or downgrade your plan.
Does QuickBooks subscription include payroll?
Yes, all QuickBooks online payroll plans offer full-service payroll. This indicates that in addition to automated payroll, you will get full-service features. Automated taxes and forms: Federal state payroll taxes, including your year end fillings are calculated, filed and paid automatically.
How do I check my QuickBooks payroll subscription?
For this: 1. You need to first sign in to your QuickBooks desktop company file as the primary admin or payroll admin. 2. Once done with that, choose employees, and then payroll center. 3. You now have to see which payroll service you are using under the subscription statuses in the payroll center.