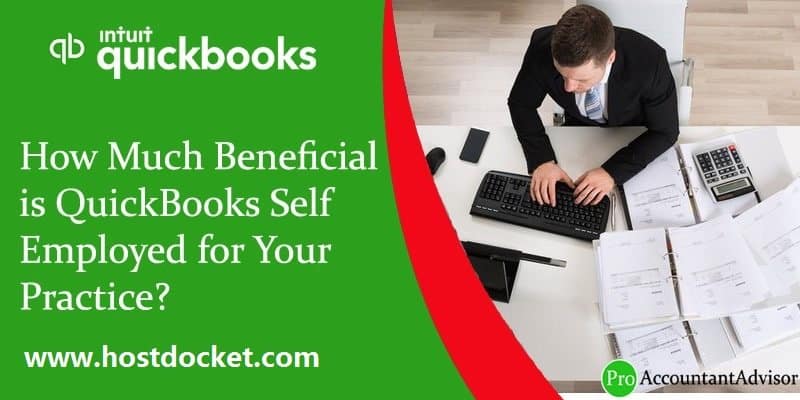
Self-employed is one of the most admired words now-a-days. Self-employed refers to being not pressurized and work on one’s own principles. This aspect makes one boss of their own business. QuickBooks is essential and beneficial for those who aspire to work for themselves and grow in their career. In this article, we are going to discuss the pros and cons of QuickBooks self-employed. To understand this better, make sure to read this segment carefully.
QuickBooks Self-employed suits best for the following:
Freelancers
Coaches
Creatives
Bloggers
Social Media Strategist and more.
Business Consulting:
The one who is self-employed do their business on their own terms and manage their bookkeeping account. If your client is using this form of QuickBooks, means that he is using QuickBooks Self employed as a partner in business success or commodity service provider.
Tax Planning:
Tax planning is among the important terms for a
self-employed person and they need to assemble their records and prepare their
tax. Clients usually face issue with filing for tax and find it difficult to do
tax planning.
It is available for their rescue as it helps them with tax planning and managing them. With this, they get information related to tax planning.
Retirement Planning:
For self-employed persons, it is necessary to plan for their retirement as they are not given any government recognized retirement plan. With QuickBooks self-employed, users have an option to plan their retirement at the right time and with the right standards. It has been observed that a client depends on accountant to manage his tax planning and QuickBooks self-employed help to manage all the things of business.
Here’s a table that lists the pros and cons of QuickBooks Self-Employed:
Pros
Cons
1. User-friendly interface that is easy to navigate.
1. Limited features compared to the full QuickBooks software.
2. Automatically categorizes business expenses.
2. Does not support multiple users.
3. Also, integrates with popular payment platforms like PayPal and Square.
3. Does not handle inventory management.
4. Provides detailed reports on income and expenses.
4. Limited access to customer support.
5. Offers mileage tracking to help with tax deductions.
5. No option to upgrade to a more advanced version of QuickBooks.
Overall, QuickBooks Self-Employed is a great option for freelancers and self-employed individuals who need a simple way to track their finances and manage their business expenses. However, if you have a larger business with multiple employees, more advanced financial needs, or require more robust features, you may need to look for a different accounting software or choose QuickBooks Desktop.
Benefits of using QuickBooks Self-Employed
Below we have discussed five major points of QuickBooks Self Employed that makes it unique from the other providers.
✔ Mobile Technology
Mobile technology is growing on a rapid rate because of the ease and access it provides. Users have an advantage that they can use QuickBooks self-employed on their phones which makes it quite mobile friendly.
✔ Cloud-based Data
QuickBooks also comes with an option to upload all the data on Cloud making it quite easy to handle and work upon.
✔ Data Collection
In addition to the other features, all the data is collected by QuickBooks self-employed in the similar way done by QuickBooks online.
✔ Globalization
When a user is using a product which is popular in the world, then it makes the best position in the market.
✔ Single person business and contract workers
Single person business means that you are handing all the things of your business and the aim of your product is also the one person business. QuickBooks Self Employed allows you to fetch the client’s data by just adding the account in the QuickBooks Accountant client list. In addition to this, it also allows you to review the work rather than just doing it.
✔ Globalization is the key
It makes the best the best position in the market. QuickBooks is self-employed available in the UK, USA and Australia. But, as soon this product is available in all states.
✔ Single person Business and on contract workers
Single-handed business is a good idea because you need to handle all the tasks of your own business. Aim of this product is one person business. This product is best suited for contract workers or part-time- 1099 workers rather than the W2 employee.
Focused of his product is all the tasks of business are classified and working in proper order. Everything’s gone through a process. With the help this product, you will review the work rather than to do all the data entry. It is quite easy to access all the client data by summing the clients QuickBooks Self Employed account in your QuickBooks Accountant client.
Hope the provided information is enough to understand about QuickBooks Self Employed and it’s benefits. To get immediate support or additional information, you can call us at our toll-free QuickBooks Support and Helpline number at ++1-888-510-9198. We are Intuit Certified ProAdvisors and always ready to help you.
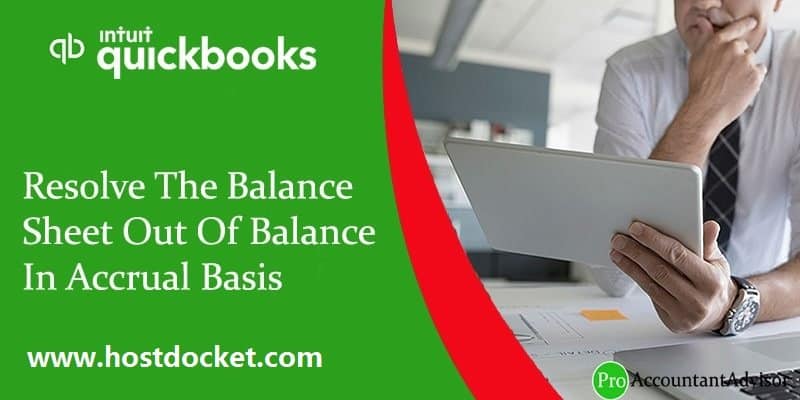
Balancing a balance sheet is one of the most time-consuming task. You should always ascertain that the total number of assets and the amount of liability and equity in QuickBooks balance sheet must always be same. In case the numbers are not in sync, you might receive the balance sheet out of balance issue in QuickBooks. Moreover, regardless of the changes in cash flow, according to accrual basis, The QuickBooks accounting software records revenues and expenses as they occur. And in majority of the cases, the reports might reveal variations in the balance sheet.
However, there are solutions that can be performed to fix the balance sheet out of balance issue in QuickBooks. To understand what those fixes are, make sure that you read this segment carefully, or you can also connect with our technical support team at +1-888-510-9198, and we will help you with your queries immediately.
What is Balance Sheet Out of Balance Error in QuickBooks?
A balance sheet is basically a statement of business-related data that jots down the assets and liabilities of a business. A balance sheet needs to be equal on both the asset and liability side. The balance sheet out-of-balance error indicates the contrast between the aggregates of assets and liabilities. There can be a bunch of reasons behind the occurrence of such an error, which we have discussed later in this segment.
Know When Your Balance Sheet Went Out of Balance
To know when your balance sheet went out of balance, you simply need to carry out the steps below:
You need to first open Reports and choose Company and Financial.
Once done with that, you need to head to the balance sheet summary and select Customize report.
After that, click on the display tab.
And also, set the report basis to cash.
Perform necessary changes in the columns as per the year/month/week/day when the QuickBooks balance sheet out-of-balance issue occurred.
Common issues leading to Balance Sheet Out of balance
You need to check in case any type of transaction is causing the balance sheet out of balance in QuickBooks. You need to keep a check on the following transactions.
Inventory return and discount on an invoice.
Possible Scenarios
Recommended Fix
One or more inventory items are sold.
For the Sale and the discount, you have to create a new invoice.
The customer returns one or more inventory items.
For the inventory return, create a credit memo.
Discount items are there.
In the Receive Payments, link the credit memo.
Unconventional Inventory Transactions
Possible Scenarios
Recommended Fix
1. Transaction Reports that adversely affect your inventory such as # Transactions which make your Quantity on Hand negative. # Transactions records that revert the Quantity on Hand for the last entered assemblies and cause the assemblies to be labeled pending. # Washing Transactions with (-) and (+) units of the same item on the same price. # Transactions that use a damaged item and a damaged customer or vendor are damaged.
You have a negative inventory that affects your Cash Basis Balance Sheet. You have tried implementing basic data damage troubleshooting your company file when your Balance Sheet becomes out of balance one more time.
1. Transaction Reports that adversely affect your inventory such as # Transactions which make your Quantity on Hand negative. # Transactions records that revert the Quantity on Hand for the last entered assemblies and cause the assemblies to be labeled pending. # Washing Transactions with (-) and (+) units of the same item at the same price. # Transactions that use a damaged item and a damaged customer or vendor are damaged.
You have a negative inventory that affects your Cash Basis Balance Sheet. You have tried implementing basic data damage troubleshooting your company file when your Balance Sheet becomes out of balance one more time.
A Discount Applied at Job Level When Entered At Customer Level
Possible Scenarios
Recommended Fix
# Your cash basis balance sheet will be out of balance. You have a customer with several jobs. You receive a payment for the invoice, but your customer includes a discount for Job in the payment. # Enter or record the payment to the invoice when you Enter the discount on the credit tab. # You completed all of the jobs and invoices of the customer, including all jobs on the invoice.
# You have to re-enter the payment and crack open it among the job. Now enter discount at the job the level so it matches the invoice.
Journal Entry linked to a credit memo
Possible Scenario
Recommended Fix
# Open Credit Memo and enter an offsetting General Journal Entry (GJE) and then link it to the Credit Memo.
# Edit Journal Entry. # Move the A/R account to the source line, generally the first line of the GJE. # Save the GJE and ensure it still linked to Credit Memo.
Discount that offsets to a Balance Sheet account.
Possible Scenario
Recommended Fix
# You have recorded a discount and used a Balance Sheet account to offset the discount.
Change the discount account to an income or expense account. If you are instructed by your accountant to use a Balance Sheet account, and it is essential that you have to use Accrual basis reporting, instead apply this: # Offset the discount to an expense account. # Make a journal entry moving the discount from the accounting expense to the account of the balance sheet. # This will pop the discount to the Balance Sheet account while keeping your Balance Sheet in balance.
Essential Points To Remember for Balance Sheet out of Balance issue in QuickBooks
If the report is back in your balance after then you need to change the report to total by Year.
For more information check Balance sheet Report out of balance- Recurring.
If the report is back that you have to log out and login back into your balance sheet report.
Make sure to repair the server computer, if you are using QuickBooks multi-user environment.
Quick Fixes to Balance Sheet Out of Balance Issue in QuickBooks
Before you perform the detailed steps to rectify the QuickBooks balance sheet out-of-balance issue, it is essential to perform some quick steps.
You need to modify the reported total by the year and then check if the balance sheet is back in balance.
Log out the QuickBooks file and then log back in. Furthermore, check if the balance sheet is back in balance.
Back up QuickBooks company file before carrying out any troubleshooting steps.
In case you are working in a multi-user environment, then it can end up in damaged company file and the balance sheet might go out of balance. Thus, you need to fix data damage and use the main system from where the file is being hosted.
Verify and rebuild QBWIN logs before proceeding.
How to solve the Balance Sheet out of Balance Issue in QuickBooks?
Here are the measures that can be performed to fix QuickBooks balance sheet out of balance. Let us explorer
You have to enter the date/s when the Balance Sheet goes out of balance, to help you identify the transaction/s causing the problem to create a Custom Transaction Detail Report.
Click on Reports menu and then select the Custom Report.
Click on Transaction Detail.
The Modify Report window should open and if not then select Customize Report and then go to the Display tab.
From Report Date Range, enter the date when your Balance Sheet went out of balance in the From and to fields. Example: From= 3/14/00 To 3/14/00.
Make Report Basis to Accrual.
Uncheck Account, Split, Clr and Class then check Amount. It will make the report more comfortable to read.
Select OK.
The ending balance on this report will be the amount that is out of balance.
Verify the Amount column for a transaction that equals the balance of end of the report. In case there is a single transaction which matches the ending balance then implement step 3.
If you are not able to find the transaction/s which is responsible, then run the following reports.
Customer Report
Click on Reports menu and then select Customer Reports.
Click on Transactions Details.
Customize the Display tab:
Change the Report Basis to Accrual.
Customize the From and To Fields to the day the Balance Sheet has gone out of balance.
Change Total by Customer.
Click on Filter tab and then:
Onto the Filters list, click on Transaction Type.
Select Multiple Transactions from the Transaction Type drop-down and then mark Invoice, Credit Memo and Payment.
Click on OK.
✔ If the total is the amount by which the Balance Sheet went out of balance of this date: Identify the customer who has a non-zero (negative or positive) subtotal.
✔ If the total is non-zero (negative or positive) and the Balance Sheet went out of balance on this date by both the amount. Add other transactions to the Transaction Type filter such as Journal Entries and Checks.
Vendor Report
Click on Reports menu and then click on select Customer Reports and then click on Transaction Detail.
Modify Report window will open automatically. If it does not open, then you can select Customize Report, to do that click on the Display tab.
On the Display tab:
Change the Report Basis to Accrual.
Alter the From and To Fields to the day the Balance Sheet goes out of balance.
Change Total to Customer.
Click on Filter tab:
Select Transaction Type, on the Filters list.
Select Multiple Transactions and then mark Bill and Bill Credit and Bill Payment.
Click on OK.
✔ If the total is the amount by which the Balance Sheet went out of the balance on this date: Verify the vendor who has a non-zero (negative or positive) sub-total. This Vendor is the reason for damaged transactions.
✔ If the total is non-zero (negative or positive) and not the amount by which the balance sheet went out of the balance on this data: Add other transactions to the Transaction Type filter such as Journal Entries.
Journal Report
Click on Reports menu and then select Accountant and Taxes.
Click on the Journal button.
Select the Customize Report and then go to the Display tab.
Change the Report Basis to Accrual.
Change the From and To fields to the day the Balance Sheet goes out of the balance.
Click on OK.
Important Note: The Credit and Debit Totals will not match, which indicates that you have the right date when the Balance Sheet is out of balance.
Other transactions
Click on Reports menu and then select Custom Report.
Click on Transaction Detail.
A Modify Report window will open automatically, and if does not then you have to click on Customize Report and then redirect to Display tab.
From the Display tab:
Select the Report Basis to Accrual.
Choose All, from the Dates drop-down.
Change Total by to Account List.
Mark Item, from the Columns list.
Click on OK.
Go to the bottom of the report, if the last group of transactions has the heading No account and the Account column is blank, and then these transaction targets have no accounts assigned to them. Fix this by:
Click Item List from the Lists Menu.
Click on Edit Item by right click on the item.
Change the Account.
Select OK.
You can repeat all the steps for every transaction on the above given report that does not have an account.
Determine whether a particular type of transaction is putting the Balance Sheet out of Balance issue in QuickBooks.
Solution 3: Check and resolve specific forms of data damage
If there are not transactions leading the Balance Sheet to be out of balance, you will have some data damage that usual data damage resolution cannot fix. The options mentioned below provide some specific forms of data damage troubleshooting you can do. Ensure that you have created a backup before going through any of them.
Summary of Balance Sheet is out of balance while the Balance Sheet Details are in balance or vice versa.
Solution 4: If both reports have the same basis and the same data range then you may have a corrupted account.
To solve this follow the steps mentioned below:
Differentiate the two reports. Identify the account/s having two different amounts on the two reports.
Combine the corrupted account into a new account.
NOTE: You can only combine accounts which are the same type.
First of all you need to go to the Lists menu.
Now Select Chart of Accounts.
Right-click on the damaged account.
Click on Edit Account.
Add an asterisk (*) to the name of the account.
Click on Save & Close.
Perform right-click operation and then choose New.
Recreate the original account with its original name.
Click on Save & Close.
Right-click on the original account, then select Edit Account.
Remove the asterisk (*) from the name.
Finally Click on Yes to confirm that you are agree to combine the 2 accounts.
Accrual Basis Balance Sheet is in balance for Dates= All Dates, but out of balance for any other range of data.
Perform the right-click operation on the Uncategorized Expense account.
Click on QuickReport.
Now customize report.
After that click on the report date range and then select all.
Tap on filters menu and select the posting status.
Select All, from the Dates drop-down.
On to the Filters tab and then select Posting Status from the Filters list.
Click on Either and then select OK.
Repair each transaction.
Your accrual Balance Sheet is out of balance, but your cash Balance Sheet is in Balance.
Solution 6: To repair this, you have to identify damaged income or expense accounts that have a balance but have nil transactions and then combine them into the new accounts.
Learn the difference between assets and liabilities.
Click on the Reports menu and then select Company & Financial.
Click on Balance Sheet Standard.
Tap on the Customize button.
Select All from the Dates drop-down.
Change Report basis to Accrual.
Note down the difference between Liabilities & Equities and Assets.
Search the corrupted or damaged account.
Export your chart of accounts and then open the file in MS Excel.
Highlight the first two rows of the spreadsheet and then delete them.
Highlight Column G-onwards and then delete them. These columns not needed for our purposes.
You have to see OBAMOUNT in Column F and Row 1.
Choose the cell above Row Header 1 and left of the Column Header A to highlight the whole spreadsheet.
Sort the whole spreadsheet by Column F.
Search the row whose Column F amount is the difference between the Liabilities & Equities and Assets.
Make sure to write down the name of the account.
Fix the damaged account
In QuickBooks, run a QuickReport for All Dates on the account listed in Step 3B-8 above in QuickBooks.
If there are no transactions, then the reason is in Account.
There should be no balance if there are no transactions in the Account.
Make a check for one cent ($0.01) to this account.
Run the basic data damage troubleshooting on the company data file.
QuickZoom (double-click) on the account and delete the check for one cent.
Finally Run the accrual basis balance sheet to be sure it is in balance.
If your Balance Sheet is out of balance and the JE’s displays the amounts without associated accounts.
After Condensing your data, your balance sheet is out of balance, and the JE’s show amounts without associated accounts.
Solution 7: Correct the affected journal entries:
This problem will occur if you change the associated account on a payroll item after it was used on a paycheck and then run the Condensed utility.
Click on Reports menu and then select Accountant & Taxes.
Click on Transactions List by Date.
Verify the report for Transaction Type: Journal and All Dates.
Slide down and identify any Journal Entries showing an amount without an associated account.
Double-click the report entry to open the Make General Journal Entries window.
Click on Edit menu and then select Delete General Journal.
Again, go to Edit menu and then click on New General Journal.
Select Save and New.
If One column setting (e.g. Total Only) shows out of balance, other column settings (e.g., by Year) show in balance.
When viewing a Balance Sheet, total assets match total liabilities and equity in some column views, but not in others. One or more of your accounts may be damaged.
Solution 8: Identify the damaged account and merge it into a new one.
Know which view of the report data is out of balance:
Click on Reports menu and then select Company & Financial and then click on Balance Sheet Summary.
After that click on Dates drop-down arrow and select All.
Now tap on OK.
Onto the Columns drop-down arrow, select Total only and then note whether Total Assets match Total Liabilities and Equity.
When total does not match in at least one column, then note the column.
From the Columns, drop-down arrow, note whether Total Assets match Total Liabilities and Equity for all the columns onto the report.
If the total does not match in at least one column, list the column heading of the earliest instance where the totals not match.
Verify the damaged account:
Click on Reports menu and then select Company & Financial.
Choose Profit & Loss Standard.
Enter a date range in the From and To fields that match the column heading you noted in Step 1. Select OK.
On the report, Audit the integrity of each account:
Note the amount next to the first account displayed on the report.
Double-click the amount to open the Transaction Detail by Account
Scroll to the bottom of the report and note the total in the Balance
Close the Transaction Detail by Account
Combine the corrupted account(s) with the new one(s).
Your Balance Sheet is out of balance on both Accrual and Cash bases.
Solution 9: To fix this, verify and solve transactions which do not have accounts assigned.
Run the Custom Transaction Detail report
Change the Dates to All.
Now Change the Basis to Cash.
Change Total by to Account List.
Add Item column.
Finally Click on OK.
Now Scroll down of the report. If the last group of transactions has the heading No account and the Account column is vacant, then in that case transaction Targets have no accounts assigned to them. Try the method below:
Open the Edit Item window for the Item.
Set the Account and click on OK.
Restart the Edit Item window.
Change the Account back to the original account and then click on OK.
For the above report that does not have an account, You have to repeat Steps 1 – 4 for each transaction.
Some FAQ Related to Balance Sheet Out of Balance in Accrual Basis Error
What is a balance sheet out of balance in accrual accounting?
A balance sheet out of balance in accrual accounting occurs when the sum of the debits does not equal the sum of the credits in the balance sheet. This can happen if there are errors in recording transactions or if adjustments have not been made to reflect accrual accounting principles.
How can I resolve a balance sheet out of balance in accrual accounting?
One way to resolve a balance sheet out of balance in accrual accounting is to review all transactions and make sure that they have been recorded correctly. If you need further assistance, feel free to call our toll-free number at +1-888-510-9198. Our team of experts will be happy to assist you.
How can I prevent a balance sheet out of balance in accrual accounting in the future?
To prevent a balance sheet out of balance in accrual accounting in the future, it is important to have a clear understanding of accrual accounting principles and to ensure that all transactions are recorded correctly. If you have any questions or concerns, please don’t hesitate to call our toll-free number at +1-888-510-9198.
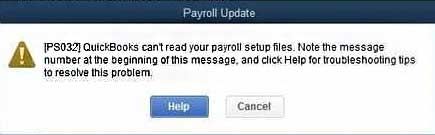
QuickBooks Payroll is an eminent tool to manage and maintain the financial transactions. In the past few years, QB Payroll productivity has immensely increased due to its great demand in the market. This software enables you to create your employees’ payroll, salary, and insurance while deducting the holidays & leaves accurately. In this post we will demonstrate how to fix payroll service server error.
But it has been reported that QuickBooks Payroll users encounter a problem while sending data or direct deposit paychecks. These errors usually appear with an error message:
Payroll service server error. Please try again later. If this problem persists, please contact Intuit Technical Support.
Payroll Connection Error
Error: QuickBooks Desktop has encountered a problem sending your usage data.
In this article today we are going to explain you about these payroll server error/connection error also we have provided quick fixation methods for these payroll service error.
What Causes QuickBooks Payroll Server Error?
This payroll server error can be caused due to one or more reasons that are given below:
Invalid security certificate.
While sending data in multi-user aptitude.
Common Internet Connection issues.
When the system date & time properties are incorrect.
When the Internet security & firewall setting configuration is not correct.
Quick Fixation Steps to Resolve Payroll Service Server Error
Important Note: If the Be Safe application is installed into your computer, it will make you unable to send the information. This application will block the entire financial details/info that is sent or received by the computer.
Reboot the computer & retry.
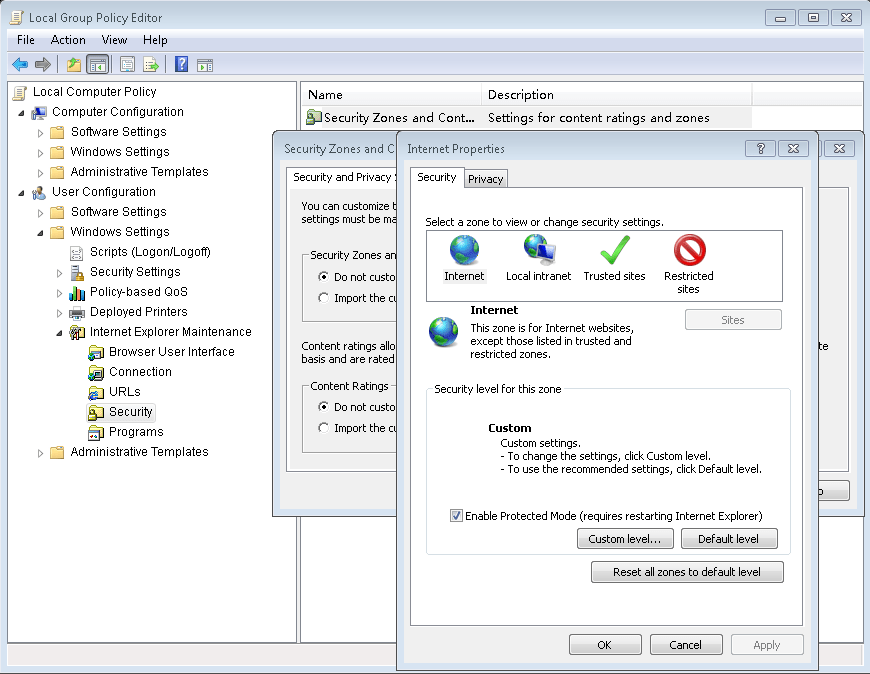
In the Internet options window of the Internet Explorer, ensure that the Use TLS 1.0 is checked where the Use TLS 1.1 & Use TLS 1.2 are unchecked. Finally, restore the Internet Explorer Advanced Settings.
Ensure the single-user mode while transmitting the payroll data.
Ensure that nobody else except you logged into the QuickBooks Desktop.
If anyone else logged in to it, you need to ask them to sign out.
In the QuickBooks File menu, hit the Switch to Single-user Mode.
Follow the command prompt to continue to switch & log in again.
Try an attempt to resend the payroll. If in any case, it doesn’t work then proceed with the steps given below.
Update the payroll.
First of all, Select the Employees > Get Payroll Updates.
After that, Hit the Update
Once the update is completed, restart the QuickBooks Desktop.
Again, try an attempt to resend the payroll information. If it’s still unsuccessful, follow the next step given below.
Verify the system date & time properties.
In the Microsoft Windows taskbar, double-click the time display.
Make sure that the date, time, year, and time zone in the Date and Time properties are correct. If it’s not, then correct them and press OK.
Now, restart the computer.
Finally, resend the payroll information. If it doesn’t, proceed with the following steps.
Ensure that the Internet Explorer is set as the default browser.
Once you set the Internet Explorer as a default web browser, try to resend the payroll information again. If it doesn’t, then proceed with the following steps.
Ensure that you can access the secure web pages or websites .i.e. your personal banking institution’s website. Again, resend the payroll details/info and if it sent unsuccessfully – proceed with the next step given below.
Make sure that you have downloaded the latest QuickBooks & tax table released updates. Later, resend the payroll information. If it doesn’t send, follow the steps mentioned below.
Hit the Options Select the Yes or No for Shared Download.
Later, try to resend the payroll information.
Re-validate the payroll subscription.
Verify the QuickBooks Internet Connection.
Firstly, go to the Help menu, select the Internet Connection Setup.
Now Choose the Use my computer’s Internet connection settings to establish a connection when this application accesses the Internet.
Now Select the Next
Select the “Advanced Connection Settings”.
Choose the LAN Settings. Ensure that the Automatically Detect Settings box is chosen but not the Proxy Server checkbox.
Select the OK tab twice. Hit the Done
Again, try to resend the payroll information.
Ensure that the personal firewall & internet security software is configured correctly.
Winding Up
If you are facing any trouble related to QuickBooks Payroll Server or Error associated with it, you can immediately contact the QuickBooks Payroll Customer Service team.
We are one of a well-renowned and top globe QuickBooks software, services and technical help provider from last 7 years. Also, we have an efficient and certified expert team of QB accounting experts to solve the entire QuickBooks issues such as QuickBooks Installation, QuickBooks Updates, QuickBooks Integration, and QuickBooks Error Codes. In case you need an urgent support, you can call on our toll-free support number i.e. +1-888-510-9198 with no hesitation.
Frequently Asked Questions!
What is QuickBooks payroll service?
Talking about QuickBooks Payroll Service, it is basically a subscription that you can activate to enable the payroll features in your QuickBooks Desktop Software. Depending on the features you need, you can choose from Basic, Enhanced, or Assisted Payroll. However, it should be noted that the QuickBooks Payroll service does not work with QuickBooks Mac
How do I fix QuickBooks payroll errors?
QuickBooks payroll errors can be experienced due to a bunch of factors such as insufficient permissions or file corruption. One can try to rectify these issues by simply accessing the software using admin access or can edit the windows permissions.
How to update QuickBooks desktop?
Intuit the developer of QuickBooks releases the latest version of QuickBooks software from time to time. QuickBooks users are always recommended to update their QuickBooks software to the latest release, in order to access the new features and functionalities. One can easily update the QuickBooks software by heading to the help menu and checking for available updates.
How to deal with firewall issues in QuickBooks?
At times, QuickBooks users might face firewall configuration issues, or the firewall might be blocking the communication of the software with the server, in that case, one can take the assistance of the QuickBooks file doctor tool. Other than the file doctor tool, firewall issues can be eliminated by creating firewall port exceptions.
Everything you Should know about Print 1096 and 1096 forms in QuickBooks
Professionals like doctors, lawyers, accountants, contractors, etc., who work independently, for a business or firm where they offer their services to the public are generally independent contractors. Though, in some cases, can also be employees. To make a long story short, an individual is called an independent contractor if the payer can control or direct only the outcome of the work and not what how the work is done. This article is created to assist you to set up a 1099 Independent Contractor vendor in QuickBooks Desktop.
What needs to be reported?
If the users pay the vendor more than $600 in a year, the user would have to fill out a 1099 MISC form. Note that the IRS doesn’t permit electronic payments to be reported on 1099 MISC forms. We can take an example to understand the situation in a better way in case the user has paid via credit card, debit card, paypal payments, gift card, etc., then he/she would not require to report those on a 1099 MISC. The reason behind this can be that the QuickBooks desktop software automatically excludes the above-mentioned modes of payment. And the payment companies will report those payments, so the user need not worry.
For whom is the creation and filing of 1099s mandatory
The creation and filing of 1099s are very important for the following:
Filing 1099s is indispensable when the user makes payments to contractors in different forms like cash, direct deposit, and checks.
In case the user is an employer and has hired vendors or freelancers, then in that case, also the filing of 1099 is essential
Under the withholding rules, if you have withheld the federal income tax, then filing 1099s is important.
Prior to establishing a 1099 vendor in QuickBooks Desktop, examine the IRS standards initially to recognize if your vendor falls under the group of an Independent Contractor. Below we have given few important points to start setting up your Independent Contractors:
Set up an Autonomous contractor
Note: We recommend you to check the IRS guidelines before performing this step to determine if your vendor falls under the Independent Contractors’ category.
Open QuickBooks Desktop, go to Edit tab and select Preferences.
Select 1099 for Tax.
Choose company preferences tab.
Click Yes when “Do you file 1099-misc forms?” option.
Select ok in order to save the settings.
Add a vendor in QuickBooks
Open Vendors and select Vendor Center.
Click on the drop-down option and choose New Vendor.
Type a supplier name of your choice to be listed in the Vendor Name field. This will be found under Vendors listing.
Fill details in the tabs.
Supplier can be modified to include additional details.
Select OK.
Set up Vendors to get 1099-MISC in QuickBooks
Open Vendors and select Vendor Center.
Find supplier’s name and do a right click.
Tap on Edit Vendor.
Go to Address info tab and verify the Details.
Set up an expense account for vendor payments.
To set up an expense account in QuickBooks Desktop:
Firstly, you need to choose Edit and then choose Preferences.
Next, Select Tax: 1099 On the left.
Then Click on the Company Preferences tab.
Next to Do you file 1099-MISC forms? click to select Yes on top.
After that, If you intend to map your account to boxes on Form 1099-MISC, you need to click on this link.
The QuickBooks 1099 Wizard will certainly open up.
The QuickBooks Desktop accounts to track payments to your 1099 vendors will be listed.
In the Apply payments to this 1099 box column, click the drop-down menu as well as select the ideal 1099-MISC box.
Most Vendors get paid with Box 7: Non-employment Compensation, although you will certainly intend to ask a tax professional first before choosing which box to utilize.
Please note: The only supported boxes QuickBooks Desktop support remain in this checklist.
You need to Select an 1099-MISC box for each account noted or choose Omit these payments from 1099.
Click Save & Close once the accounts have actually been mapped.
Important Points to Remember:
Put appropriate state abbreviation and postcode in the address field.
In case of an individual vendor, the supplier’s name must appear in first, middle and family name boxes.
Leave the Company Name box empty if you know the business name but not the individual’s name.
Choose the Tax Setup button.
Select the eligible Vendor for 1099
Type in the tax obligation id number of the supplier in the Vendor Tax ID Field and click OK.
Perform the steps (2 to 6) for every 1099-eligible vendor.
Understand how company and vendor names appear on the 1099-Misc form
QuickBooks features three name fields in QuickBooks Desktop:
Vendor/Contractor Name
Company Name
Full Name
Possible Scenarios Based on What’s Entered in 1099-MISC forms
Here are the probable scenes based on details entered in these fields:
Vendor Name as well as Company Name have values in QB Desktop
Outcome: 1099-MISC Form will have both the Vendor Name and Company Name on it.
Blank Vendor Name and a value for the Company Name in QuickBooks Desktop
Outcome: You can’ leave the Vendor Name blank. You have, however, an option to specify the Vendor/Contractor Name and leave the Full Name field blank. In a case like that, just the Company Name will show up on the 1099-MISC Form.
Values for Vendor Name and blank Company Name in QuickBooks Desktop
Outcome: The 1099-MISC Form will only have the Vendor Name.
Different values for Vendor Name, Company Name and Full Name fields in QuickBooks Desktop
Outcome: Just the Full Name and Company Name will display on the 1099-MISC Form.
NOTE: Vendor Name usually auto-populates with the details provided in the Full Name fields, unless you (or someone) changed the Vendor Name manually.
Forms can only be printed in single-user mode, and you must have pre-printed 1099 and 1096 forms to perform this. You can also choose to e-file your 1099 forms to the IRS.
Verify your 1099 details through QB Desktop 1099 wizard.
In the wizard, at step 6, choose a filing method and click on Print 1099s. Read the message and click OK to get the print.
The message states “From Tax Year 2016, the State of Wisconsin mandates Employers (doing business in WI or paying contractors living in WI) to include state-specific information in boxes 16 and 17. After printing the 1099-Misc from QuickBooks Desktop, you are required to manually enter these 2 fields as applicable.”
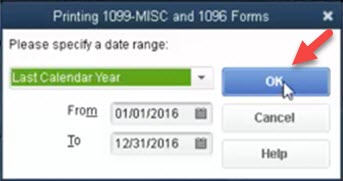
Select the range (of date) the 1099s were paid from and click OK.
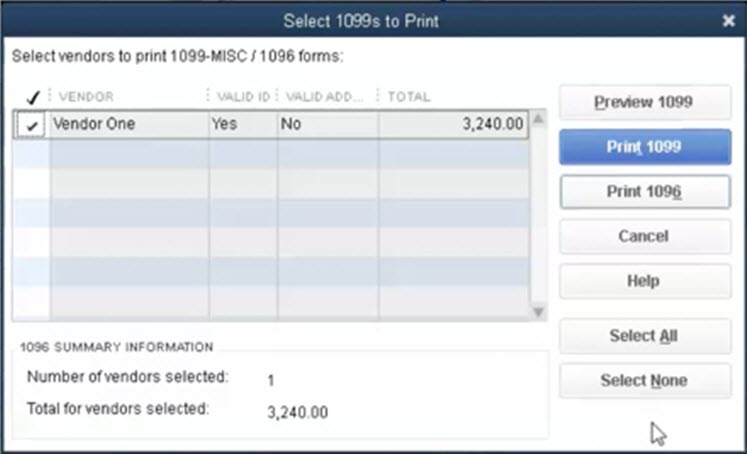
Select the form 1099(s) you wish to print and click the Print button.
You can click Preview 1099 and check the alignment. To align the form:
Firstly, Click File on the top menu bar
Then Click on Printer Setup.
Now close 1099s/1096 from the list in Form Name
Click the Align button and adjust alignment as needed.
Click OK, and then OK again to save your changes.
Choose 1099(s) you wish to print and click Print 1099(s).
Few important tips to use while printing 1099/1096
Print separate copies than all at one with a page-oriented printer.
You must not collect your pre-printed forms prior to placing them in your printer. You can first load all the Copy 1 forms. Once all the Copy 1 forms are printed for each vendor, then load and get prints of the Copy 2 forms.
Copy A (non-perforated) is for the IRS and copy B (perforated) is for the vendors/suppliers. A page can only print 2 vendors per page.
Alignment will prompt you to select -1 in order to bring the print down or +1 to bring that up.
This selection can lower or enhance the print 1/100th of an inch.
Verification – The status of filing 1099 needs to be verified
The below steps should be followed to check the status of the 1099s filing:
The very first step is to access the Tax1099 account and log in
Tap the plus sign.
It is located in the page’s upper right corner.
Thereafter, check the status checkbox
The reference number has nine digits.
Hit on check status
We hope that this article provides you will all the details to be able to print QuickBooks desktop forms 1099/1096. In case you need any further assistance, you can call us at +1-888-510-9198. We are available 24×7 and offer our QB users with best in class QuickBooks support. Contact us today..!
FAQ (Frequently Asked Questions)
Question: Is there a way to file 1099/1096 forms electronically from QuickBooks Desktop?
Ans. Yes. You may use QuickBooks 1099 E-File Service to file your 1099/1096 forms electronically from QuickBooks Desktop.
Ans. No, Assisted Payroll does not support filing of 1099/106 forms. The fastest way to file your 1099/1096 forms from QuickBooks Desktop is by using our 1099 E-File Service.
Question: Does Form 1096 prints with 1099-PATR box checked instead of 1099-MISC?
Ans.
Description: When printing type 1096, the checkbox in the bottom of the form for 1099-PATR is examined as opposed to box for 1099-MISC.
This problem has actually been fixed with a program upgrade released around January 26th 2015. Please download as well as install the most up to date QuickBooks Desktop updates:
Opening balance in QuickBooks is basically the amount of money in a company’s account at the beginning of a new financial period or year. This is known as the first entry that is done when a company starts its processes or after a year-end. The process to record opening balance in QuickBooks Desktop involves a few basic steps, which we will be focusing later in this segment. The user might the process to be a bit technical, so in that scenario, we would expect the readers to keep scrolling through the segment till the end, and this might help them to understand the process a little better.
Points to Note while recording opening balance in QuickBooks:
It is considered a good option to contact the accounting professional always before entering the opening balance. While setting up the account, you can press F1 key or you can simply click on the link that says- ‘Should I enter an opening balance?’. In this way, you can get information about the opening balances.
Also, you must not enter the opening balance, if you do not have balance prior to the QuickBooks start date.
You are allowed to enter the Opening Balances using one or more GJE that you may have created from the Balance Sheet for the previous fiscal year. This can be done when you start a new company with the date later than the actual one. You should keep the following points in mind if you are using journal entries in order to record the opening balances:
Use Opening Balance Equity account as the offset account so that you keep the journal entries in balance.
When you enter balances from the beginning of the year, then you can enter balance for the previous year’s retained earnings instead of entering each income, expense and cost of goods sold.
Per journal entry, you can enter only one accounts payable or receivable transaction. Therefore, you need to have multiple journal entries to load the balances for these accounts.
Do not forget to include the name of the vendor or customer in the names column of journal entries to accounts receivable, sales tax payable and accounts payable.
You can choose to use the Inventory Adjustment screen instead of entering the Inventory Asset Balance through a journal entry so that you can adjust both inventory quantity and value.
The steps to record opening balance in QuickBooks involves different set of steps, which we have tried to justify below:
Bank or credit card accounts
Click on Chart of Accounts from the Company menu.
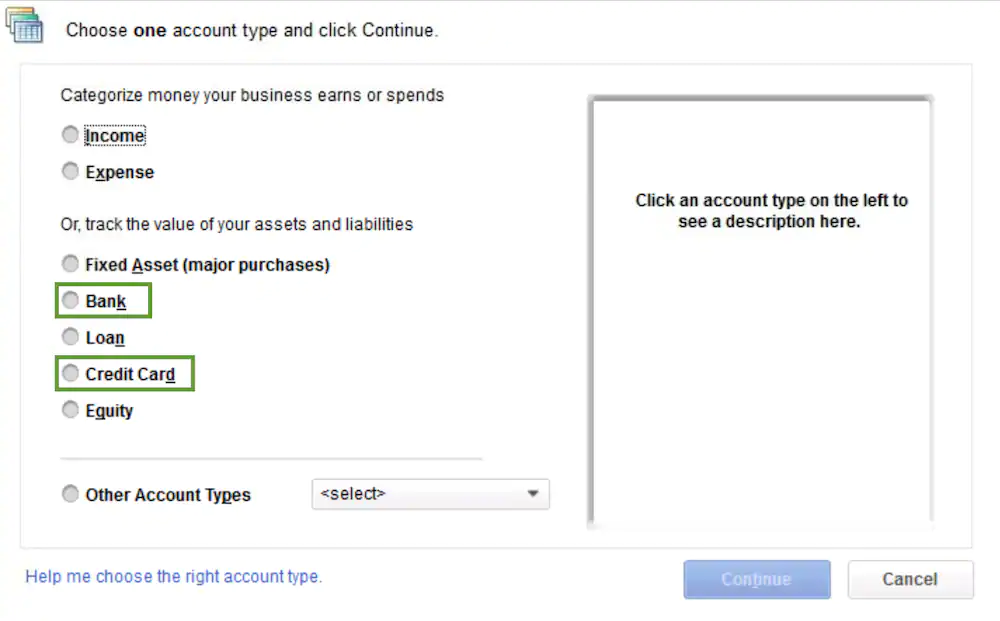
In this window, right click and select ‘New’.
Then, choose the account type- Bank or Credit Card.
On the ‘Add New Account’ Screen:
Fill all the required details.
Click Enter Opening Balance Button. This button will only be available if you have not entered any transaction yet. As soon as you enter a transaction, the button will change to Change Opening Balance button.
Now, enter ending date and ending balance from your credit card statement or last bank statement.
Then, click OK.
Click ‘Save & Close’.
To ensure that all your future reconciliation is accurate, you would be required to account for all the outstanding transactions in the credit card or bank.
After Entering opening balances, follow the steps below
Take the ending balance from bank statement and increase the amount by any outstanding checks, and decrease the amount by outstanding deposits.
Enter the journal entry debiting the bank or credit card, and crediting opening balance equity.
Select ‘Make General Journal Entries’ from the Company menu
Set the date and enter a number of journal entry
Now, choose the bank or credit card account from the Account column and enter the amount calculated in step 2 in the Debit column.
In the next line, click on Account and choose ‘Opening Balance Equity’ from the drop-down.
Now, in the credit column, put the amount calculated.
Create checks and deposits by using Opening Balance Equity and enter all the outstanding transactions.
This will become available for reconciliation without any impact on the prior balance sheet.
Now, reconcile the opening balance journal entry for each account through mini reconciliation, a process to do it.
While entering an opening balance for Equity, Fixed Asset, other Asset, Current Asset, and Other Current Liability, be careful as it is possible that you may create a double accounting entry. In QuickBooks, both the Accounts Payable and Accounts Receivable are considered different.
✔ Through the Chart of Accounts:
Click on Chart of Accounts from the Company menu
Right click anywhere on the window appeared and select New, in the Chart of Accounts window
Choose the right Account Type
In the Add New Account screen:
Fill all required details.
Click Enter Opening Balance button.
Enter amount of opening balance and the date. You can use the date before the QuickBooks start date.
Now, click ‘OK‘.
Click Save and Close.
✔ Using a Journal Entry:
Select ‘Make General Journal Entries’ from the Company menu.
Now, set the date and enter the number required for the journal entry.
From the Account column, select the account you want to enter.
You can also enter the accounts in the order in which they appear on the balance sheet or trial balance.
Depending on the type of account, enter the account balance as a positive amount and that too, in the right column.
For example:
Positive balances will appear in the Debit column, for Asset accounts.
For Liability and Equity, these positive balances appear in the Credit column.
Now, for each account, you shall repeat the steps 3 and 4.
Make sure that once all the balances have been entered, the total amount in Debit and Credit column is equal. You can use the Opening Balance Equity as the offset to check any difference noticed between the two columns.
Click Save and Close.
To enter the balance for accounts payable, accounts receivables, and sales tax payable create an additional journal entry. You can also enter any other account that is not included on the first journal entry.
Now, create a final journal entry in order to distribute any remaining balance in the opening balance equity account among other retained earnings and equity accounts as desired.
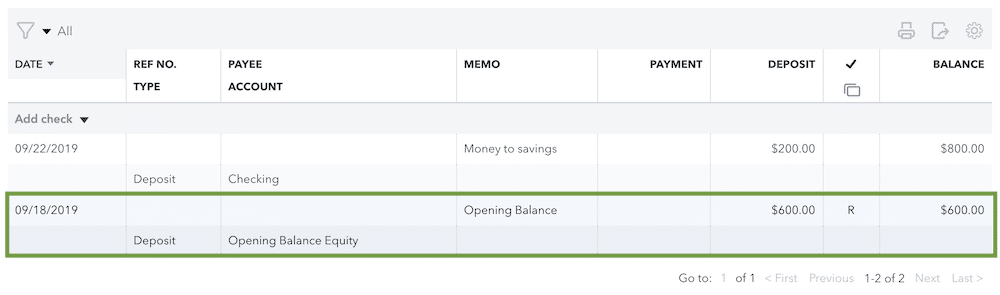
✔ Through the Register:
When you have transactions in the account, you are required to go to the account register so as to enter the opening balance.
Click on ‘Chart of Accounts’ from the Company menu.
Choose the account for which you wish to enter the opening balance. Then, select Use Register from the Edit drop-down list.
Fill the following fields for the new transaction:
Date of the opening balance
Number/Type- Leave this section blank
Payee- Type Opening Balance (Optional)
Account- Choose Opening Balance Equity
Payment or Deposit: In this field, enter the opening balance in the Deposit field if it is positive and in the Payment field if it is negative.
Click ‘Record’.
✔ Income and Expense Accounts:
There is no option to enter balance for income and expense accounts because the balance for these accounts comes from transactions that are entered like bills, invoices and checks.
If any of your customer or vendor has an outstanding balance BEFORE the commencement date, following options can be used:
Option 1: Put the outstanding balance in the Opening balance field with as of date equal to your start date. These opening balance entries will track to Uncategorized Income or Expense. You can enter opening balance for the individual jobs in case you are planning to setup jobs for customers. Moreover, the name of the customer will reflect the total balance for all the jobs. Also note that when you add new customers or vendors, the opening balance field is available only at that time.
Option 2: To create opening balances for vendors and customers, use the opening balance item that you will create anew and use the same in invoices. This will aid in determining the account you want entries to track to.
Option 3: Enter the individual unpaid bill or invoice rather than entering the total balance for each of the customers or vendors. All the unpaid transactions will result in open balances for vendors and customers. And these will ultimately result in A/R and A/P opening balances. This option will help you keep track of all the individual sales and bills that make up your vendor and customer opening balances.
For Transactions which occurred after your start date:
When you find that the transactions of the customer or the vendor have occurred on or after the start date, then you have an option to use standard QuickBooks forms so that you are able to enter the appropriate individual transactions which include:
Bill Payments
Deposits
Sales tax payments
Vendor Bills
Vendor Credits
Invoices and Sales Receipts
Customer payments and returns
How to Edit Opening Balance?
✔ Bank, Credit Card and other balance sheet accounts
Choose the Chart of Accounts from the Lists menu
Double click on the account that you want to edit.
Then, find the opening balance transaction (usually the first one) in the account register. It will also have Opening Balance Equity in the Account field.
If essential, also edit the date as well as amount.
Click on Record to save all the changes.
✔ Income or Expense Accounts
Select Chart of Accounts from the Lists Menu.
Double click on the income or expense that you wish to edit.
Change the date to your start date in the Account Quick Report. If you don’t know the exact start date, then you can choose ALL in the Dates drop-down.
After this, you can search the report for the correct transactions that are usually among the first transactions.
Hover the mouse pointer over a transaction and QuickZoom it. As soon as the magnifying glass appears, double click on that.
Do all the required changes. If changes done affect journal entry, then General Journal Entry transaction requires- total debits equal total credits.
Some FAQs related to – Record Opening Balance in QuickBooks
What is a Balance Sheet?
A balance sheet in terms of financial accounting is a summary report of company assets, liabilities, and shareholder equity of an individual or an organization, whether it is a sole proprietorship, a corporation, a business partnership, private limited company or other organization such as a not-profit entity or government organization.
Why do you need to pay the outstanding balance?
It is mandatory to pay the due balance each month in order to improve the savings and credit score of your organization. It is also necessary to pay all the due taxes on time to maintain a good standing of your business with the state.
How to record an opening balance in QuickBooks?
From “Company” menu click on “Charts of Accounts” Right click and select ‘New’. Choose the account type On the ‘Add New Account’ Screen: Fill all the required details. Click on “Enter Opening Balance” Button. Now, enter ending date and ending balance. Then, click OK. Click ‘Save & Close’.
How to change the opening Balance in QuickBooks Desktop?
From Accounting menu, choose Chart of Accounts Choose the Account Select View Register Search for the opening balance Note the balance and date Compare your real-life account with the entered opening balance Find you bank’s statement Check the account’s balance on the same day of the opening balance If QuickBooks doesn’t match with your bank records: Select the opening balance entry Edit the balance, in the Deposit column, so it matches your bank records