Paycheck is important for an employee, and the procedure to make one paycheck in QuickBooks Online is just like paying your employees simultaneously. The main difference is that, in this case, you will choose only the only employee to cover from the list- not all of your employees. If that you would like to create one-time payroll check in QuickBooks Online which means that you need to follow some steps.
The steps for create one-time payroll check in QuickBooks are mentioned below. However, if you want to ask any question or share your inquiries with us, you can join our QuickBooks payroll customer service team for immediate help. Give us a call at +1-888-510-9198, and we will provide you with immediate support and assistance. Our certified QuickBooks professionals will ensure to answer all your queries immediately.
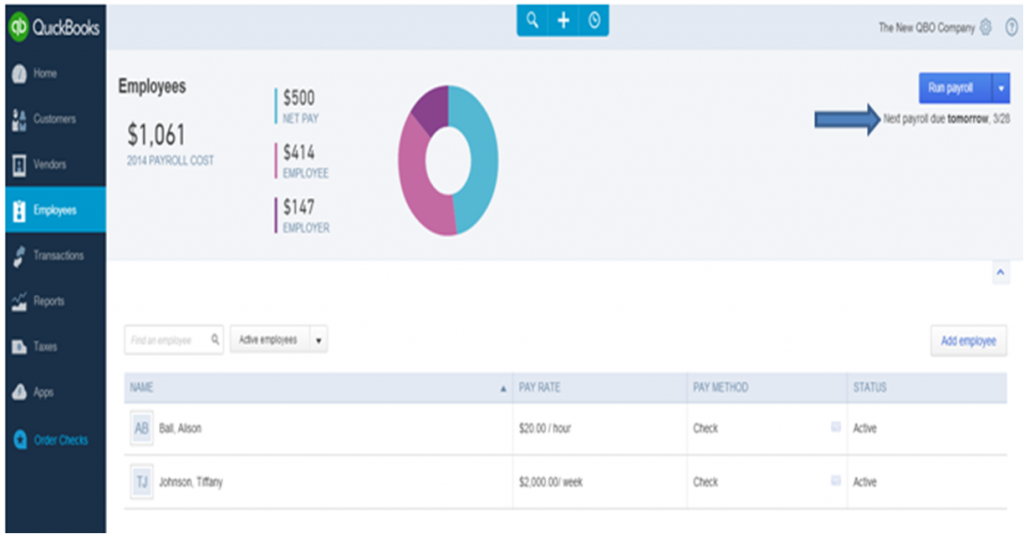
A payroll reminder may also look under “Run payroll“. It’ll change dependent on the cover date. Or in case you have pay programs, then you will realize the date the payroll is expected. Cut off time is contained if deposit is busy.
The concept to get second payroll run will even upgrade once all workers are compensated. Or the pay date has now passed.
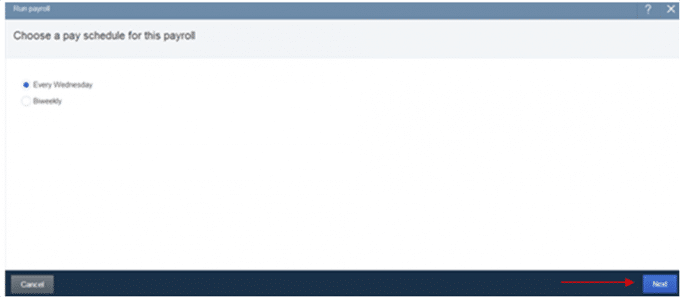
Choose the ‘Pay Schedule’ icon and then choose the “Continue” icon to proceed.
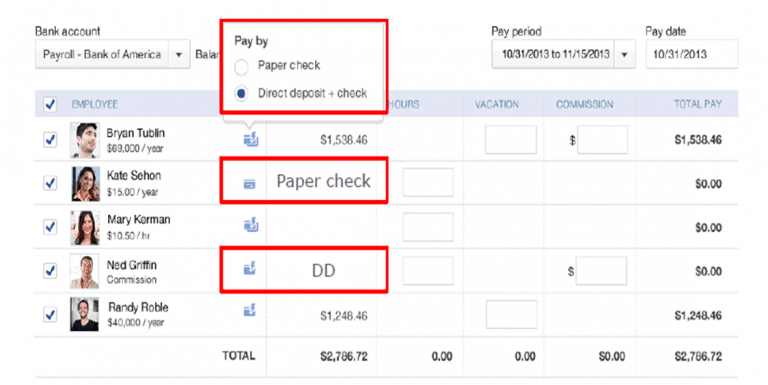
Choose the name of the desired employees that you would like to pay. Whether you’ve got the pay period and assess date check.
Input the amounts and hours to your workers.
In case you are not able to observe all pay forms, “resize or maximize” your browser window.
Choose the “Gear icon” to hide or show “Pay forms“.
Hourly, Salary and Commission cover forms cannot be concealed
To get rid of it from payday, simply assess the cover type. The system will remember the settings till you alter it.
You could also put in a memo about the Memo area. The amount is dependent upon width and the size. We advise that you restrict the amount of letters.
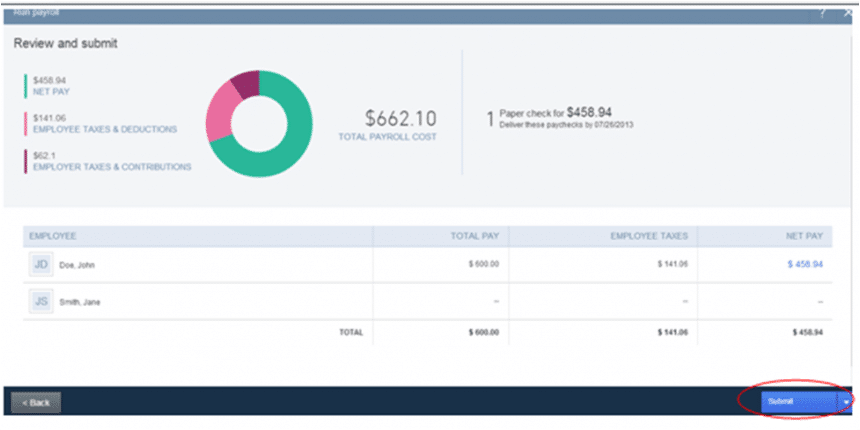
Choose the “Preview Payroll” to proceed further. Or you can also click on “Save for Later” icon to save the progress.
You also have the capability to toggle between DD, Direct Deposit +check, and Payday display. This is a 1 time change.
Choose the “Submit” the pages.
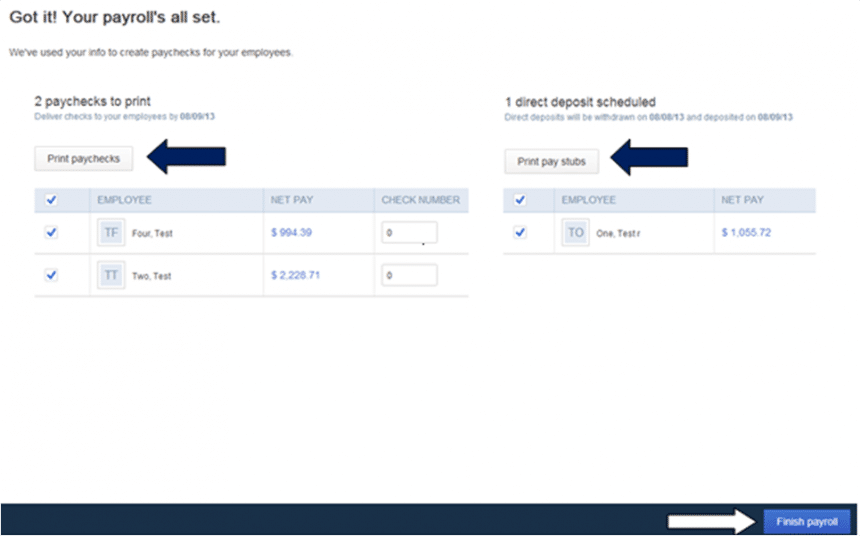
Choose the “Printing Paycheck” & “Printing Pay stubs” icon. Later, choose the “Finish Payroll” tab.
You’ve got an choice to auto-fill assess amounts. To accomplish this, enter the primary number and choose Auto-fill to fill out the list. It will override some amounts. This is available from the advance that is cash flow.
For direct deposit checks, an email is delivered before the cover date confirming direct deposit checks have start to process.
The number of deposit checks will show up in the mail. You might also see the TotalCost account (on the Reports tab) to examine your complete direct deposit payroll amount.
How to Resolve Error: Submitting payroll QuickBooks Online Payroll?
Most of the times, it happens that you may get an error: “You have selected tax liability account on a transactions where it is not allowed or have not specified a tax rate” when you submitting a payroll.
This error occurs if the accounting preferences mapping were incorrect.
How to Fix this error?
To resolve this error follow the below given steps:
Important: The account is set up for payroll liabilities and payroll expenses.
How to Create Paychecks — Intuit Online Payroll?
To create Paycheck in QuickBooks online Payroll, follow the following steps.
First of all Choose the “Payday” option.
Select a Pay schedule in case you’ve got multiple.
Enter in the amounts & hours for employees. When an employee does not appear on the initial page in Create Paychecks:
Mark the employee checkbox to deselect all employees.
Choose the ‘Continue’ icon to keep to another page of employees.
Choose the “Create Paychecks” tab.
Verify the pay check amounts, and also the payment procedure.
Direct deposit checks:
“Yes” icon will show in the Direct Deposit column when the tests will act as direct deposit.
“No“, in black text, means that the worker is put up to be given a paycheck rather than direct deposit. However, your payroll account isn’t yet active for direct deposit:
To validate the business bank evaluation trade, visit Verify test trade. (Choosing Approve Paychecks also spares direct deposit checks for transmission out of the bank to the worker’s bank. The true processing and transmission of capital will not happen until 5:00 p.m. PST two business days prior to the cover date.)
If one or more workers will be given a paper test, enter the test number(s). Then pick the “OK” icon.
After picking Approve Paychecks
You’ll have the ability to Printing Paychecks.
For immediate deposit checks, an email is delivered before the cover date confirming direct deposit checks have begun to process. The number of deposit checks will be displayed in the mail. You might also see the “Total Cost account” (on the Reports tab) to examine your complete direct deposit payroll amount.
Use the above-shown methods to create one-time payroll check in QuickBooks Online. If you are facing any technical hassle or issues, you can freely contact the QuickBooks online support number .i.e. +1-888-510-9198.
We appreciate for your visit..! To get more information related to QuickBooks and bookkeeping come back soon.
FAQs Related to Create one-time Payroll Check in QuickBooks Online
How do I run one time payroll in QuickBooks online?
You can run payroll using the steps below: 1. Navigate to the payroll menu and further choose run payroll. 2. After that, choose a pay schedule and hit continue. 3. The next step is to choose the employees you want to pay. 4. Further, verify that you have selected the correct pay period and pay date. 5. Once done with that change the employee’s pay method as required. 6. Enter hours worked, if applicable.
How do I create a check in QuickBooks online payroll?
You can do this by: 1. First select employees. 2. After that go for pay employees and choose from the check types scheduled payroll, unscheduled payroll, or termination check. 3. The next step is to choose the appropriate schedule a and choose start scheduled payroll. 4. Once done with that verify the pay period ends date, check date, and QuickBooks bank account.
Can I do payroll in QuickBooks online without subscription?
In case your client only needs payroll services, then you can simply offer then QuickBooks payroll service without QuickBooks online software subscription. This means that even without QuickBooks online, you can manage payroll-only client.
Is QuickBooks payroll free?
QuickBooks online payroll pricing are as follows: Each employee is an additional $6/month for core, $8/month for premium, and $10/month for Elite.
Keeping your books accurate isn’t just about entering transactions it’s about regularly confirming that what’s recorded in QuickBooks actually matches what’s happening in your real bank account. That’s exactly what bank reconciliation is for. If you’ve ever wondered why your QuickBooks balance doesn’t quite line up with your bank statement, reconciliation is the process that catches and corrects that gap.
In this guide, we’ll walk you through what reconciliation actually means, why it matters for your business, and the complete step-by-step process to reconcile your accounts in QuickBooks Online. We’ll also cover how to read and use the reconciliation reports QuickBooks generates once you’re done since understanding those reports is just as important as completing the reconciliation itself.
If you’d rather have a certified bookkeeper or ProAdvisor handle this for you, our QuickBooks customer support team is available at +1-888-510-9198 just give us a call.
Well, reconciliation is basically a process that notes the similarity and dissimilarity between two sets of records to examine that accounting records are correct and accurate. Moreover, a reconciliation basically assists in disclosing accounting errors and resulting transactions. In order to avoid the mismatching of account, reconciliation plays a vital role. There are also a few types of accounts that are incorporated in a business It is crucial for a business to perform reconciliation procedure for the main accounts, which might include:
Sales and Purchases accounts
Inventory
Cash account
Trade receivables and account payables
How to Reconcile Your Accounts in QuickBooks?
Don’t be anxious with the term Reconciling & why it is necessary? Reconciling is a process that lets you tohandle the bank account effortlessly & in an appropriate way with no perplexity. After reconciling the bank/credit card account you can simply compare the beginning balance & all the transactions listed within the QuickBooks company file. Later, you will be able to contrast monthly reports/statements that have been created by a bank or credit card company. At this point in time, you can ensure that it matches & also saves precious time.
Watch this video to understand easily the process for Reconcile Your Accounts with in QuickBooks Desktop US version.
What is the Need of QuickBooks Online Bank Reconciliation?
It is a systematic way of comparing the data entered by you in QuickBooks with the physical data that clears the account. If you forget to enter any data entry into QB software this can lead to great data damage in the whole accounting system.
Hence, it is essential for us to identify the missing entry. This is the main reason why a lot of small business owners utilize the running bank account balance feature in the QB software that investigates every missing data entry.
Reconciliation is highly recommended to be done on a regular basis. As a result, all the discrepancies between the record & bank record can be fixed.
There possibly a query that might pop up in your mind that is – how can I reconcile into the QuickBooks online? Don’t you worry about it…! You swiftly reconcile the accounts in QuickBooks Online. After the bank account reconciliation, your account starts giving most of the details associated with the transactions.
You attach the oldest bank reports/statement that hasn’t been reconciled & you will contrast the monthly bank statement with the registered transactions within QB software and that difference among them supposed to be ZERO! Now the reconcile procedure is done.
You should further match each of the deposits in the bank report to those important to the bank statement. If you have planned a deposit that the bank had not yet collected along with an activity the month, list this deposit as reconciling detail/information that supposed to be added to the bank’s ending cash balance for the account.
6 Easy Ways to Set-up QuickBooks Bank Reconciliation Online
Below are the 6 ways to set-up the QuickBooks online bank reconciliation:
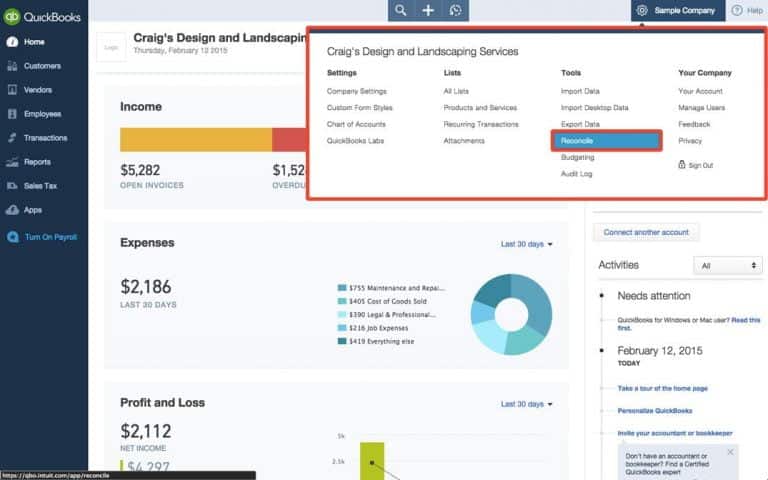
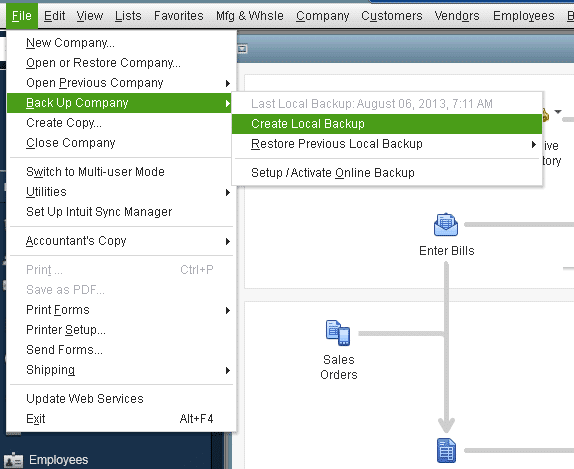
Step 1: Go to the Reconciliation Menu:
First, you should select the “Reconcile” tab from the home page. Later, tap on the “Gear” icon which is at the left-side of the company name & then, hit onto the column heading Tools & choose the “Reconciliation” icon.
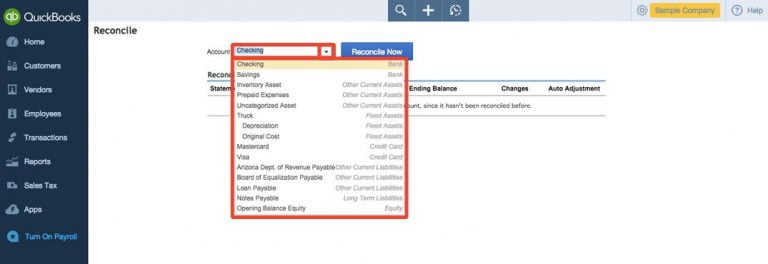
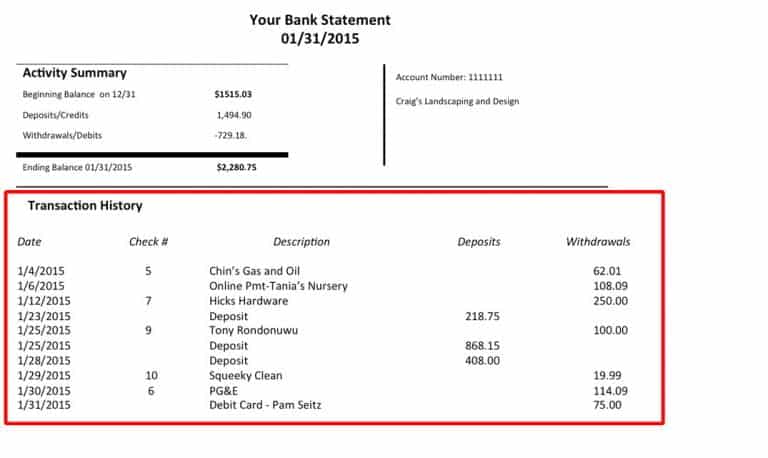
Verify the bank account Transaction history for the statement & see the financial transactions.
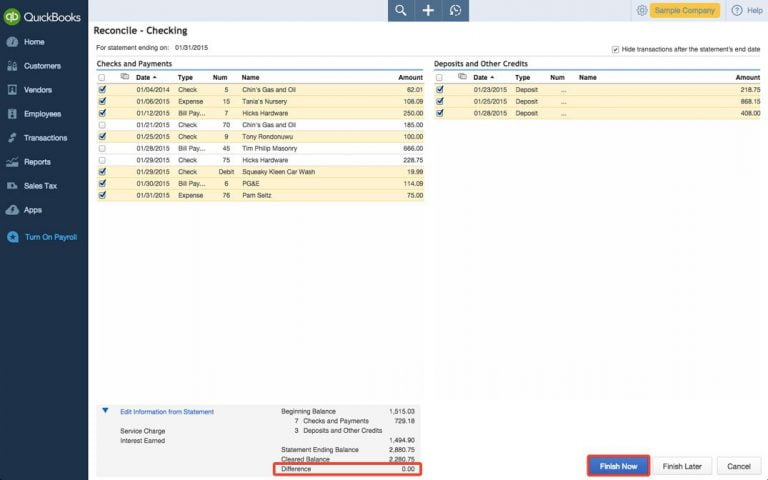
Open the “Reconcile window”, then match each and every financial transaction from the bank report/statement with items in the list, you obviously match the entire transactions & checking the box to the right of each transaction to match.
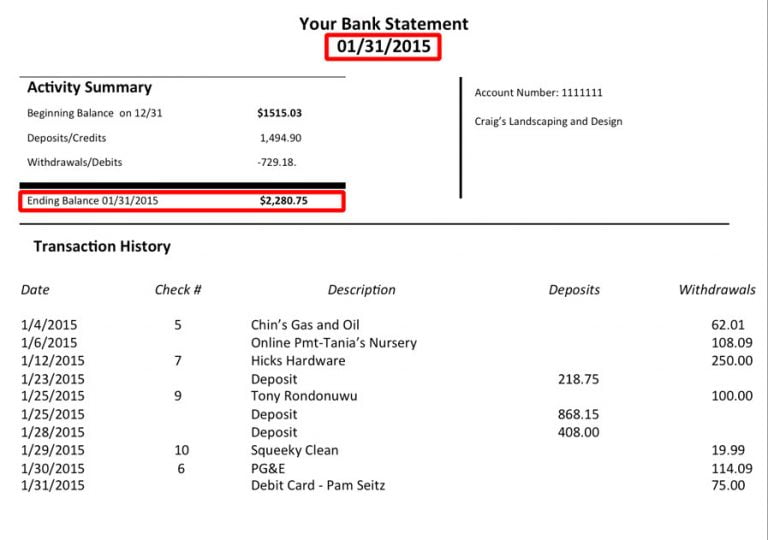
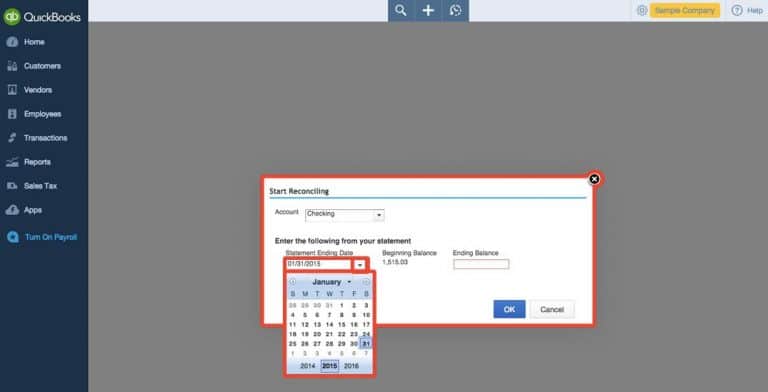
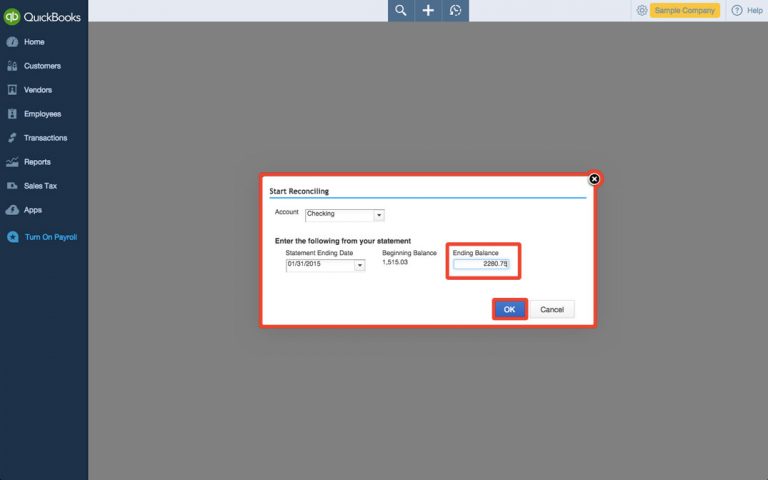
Statement Ending Balance
It shows you the amount which you have entered in your bank/credit card statement.
Beginning Balance
This is the end balance from last month’s statement.
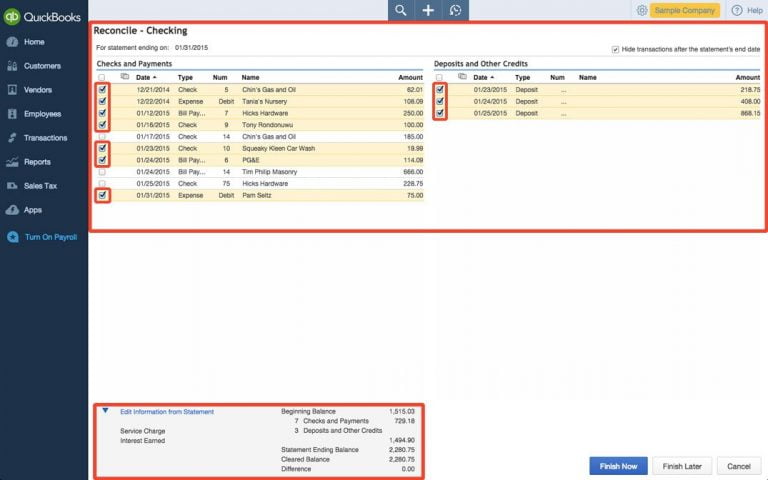
Cleared Balance
When you commence reconciling each and every item, this amount will change depending upon whether you have chosen a payment or a deposit transaction.
Payments
Payments will rise when you choose the payments to reconcile from the detailed transaction section given below.
Deposits:
When you choose deposits to reconcile from the detailed transaction below this transaction will amplify.
Difference:
QuickBooks Online estimates the variation. It demonstrates the result among your statement balance & the cleared balance, the difference is zero is a good result for you.
We share an instance with you for better insight, while spending money with QuickBooks Online so you confirm overall withdrawals or payments on the bank statement ($2548.25) match the total withdrawals we have cleared in QuickBooks ($2548.25). If it happened, you can move onto the next step.
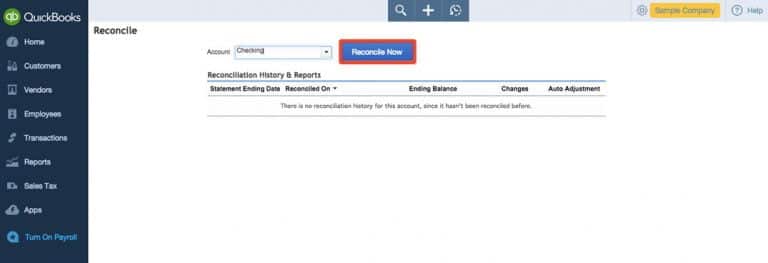
If you achieve the ideal difference value at the bottom – zero. Also, hit onto the “Finish now” icon to create the bank reconciliation reports. Thus, the QuickBooks online bank reconciliation process will be completed.
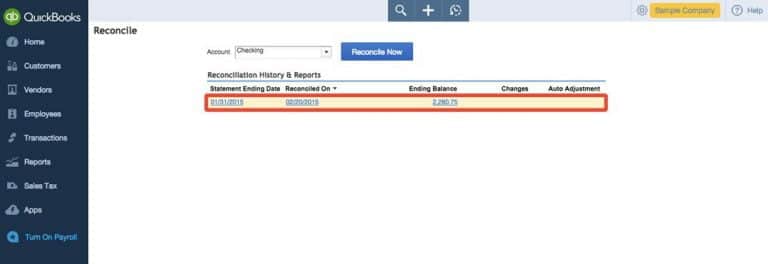
Now look thoroughly at the Reconciliation Reports, navigate back to the “reconcile” section where you will notice the reconciliation entered by you, and hit onto it to open the detail window for checking purpose.
Then, hit onto the “Run Report” tab to open detailed information about the reconciliation.
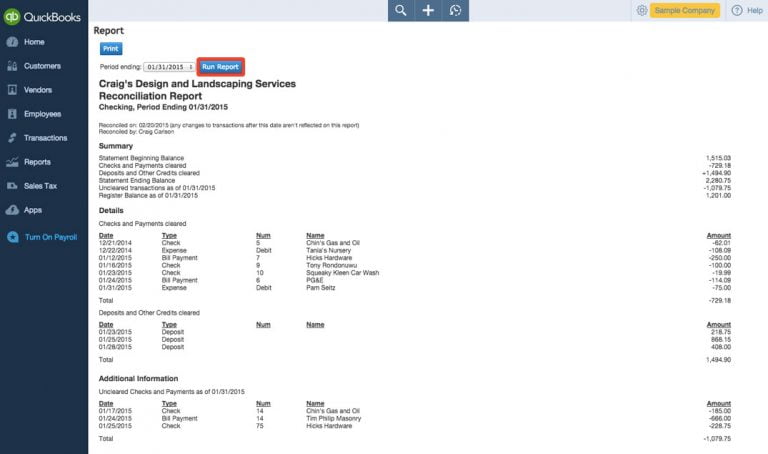
In the accounting process, the report plays a significant role in decision making. Reporting assists us to examine the data we have entered in reconciliation. It also guides us to keep the transactions record that can be requisite in the future.
If you would like to print the QuickBooks Online bank reconciliation reports, you can press click on the report window & print the reconciliation report.
Important: You can create a folder which names Bank/credit card account also that can save all bank reconciliation reports in it.
Other Method to Get the Detailed Report
Checkout the steps are given below: –
Search the reconciliation report, hit onto the “Gear” icon.
Choose the “Reconcile” tab, from the drop-down menu,
Furthermore, from the upper right corner of the window, select the “Reconcile History” icon.
From the account drop-down, choose the “Account” icon.
Moreover, click on the “View report” under the “Action” tab to open the report.
Finally, to print the report click on the “Print” tab in the upper right corner of the report.
Once you’ve completed your reconciliation and confirmed that difference reads zero, your books for that period are officially trustworthy. Make it a habit to reconcile every account checking, savings, and credit cards on a monthly basis, and keep your reconciliation reports organized so you have a clear audit trail if questions come up later. If anything about the reconciliation process still feels unclear, or you’d simply rather have an expert handle it for you going forward, our certified QuickBooks ProAdvisors are available 24/7 at +1-888-510-9198. We help businesses keep their books accurate every month reach out whenever you need us.
FAQs Related to QuickBooks Online Bank Reconciliation
How does reconciliation work in QuickBooks online?
When you reconcile, you compare our bank statement to QuickBooks for a specific period of time. The difference between both should be zero. However, at times processing payments can cause a gap.
How to upload bank statements to QuickBooks Online for reconciliation?
You can perform the below steps for accounts connected to online banking. 1. At first, choose bank transactions from BOOKMARKS 2. Now, choose the blue tile for the account you want to upload the transactions into. 3. Further, go for the link account dropdown and then upload from file. 4. Once done with that, choose drag and drop or select files and the file you downloaded from the bank.
What are the different types of reconciliation?
There can be five primary types of account reconciliation namely: Bank reconciliation, vendor reconciliation, business-specific reconciliation, intercompany reconciliation, and customer reconciliation.
Can you reconcile daily in QuickBooks Online?
Well, you can reconcile the ending balance of each transaction or each day’s activity.
What should I do if my reconciliation doesn’t balance to zero?
First, double-check that every bank statement transaction has a matching entry in QuickBooks and that you entered the correct statement ending balance and date. If the discrepancy persists, look for duplicate entries, missed transactions, or incorrect amounts. As a last resort, QuickBooks lets you finish the reconciliation and create an adjusting entry, though identifying the root cause is always the better long-term fix.
How often should I reconcile my QuickBooks Online accounts?
Monthly reconciliation, done shortly after you receive your bank statement, is the recommended practice for most businesses. Reconciling regularly makes it much easier to catch errors early, before they compound into larger discrepancies that take longer to untangle.
Can I undo a completed reconciliation in QuickBooks Online?
Yes, QuickBooks Online allows you to undo a previous reconciliation if you discover an error afterward. You can do this from the Reconcile History section by selecting the specific reconciliation and choosing the undo option. Keep in mind that undoing a reconciliation will require you to redo it once the underlying issue is corrected.
Recurring errors like QuickBooks error code 15106 can be extremely annoying for QuickBooks users. Well, QuickBooks error 15106 is usually seen when updating QuickBooks accounting software. This error indicates that the update program has been damaged. As this is an update error, it can trigger a bunch of issues. Thus, it becomes crucial to get this error fixed as soon as possible.
To help you deal with this issue successfully, here we are with this segment sharing the complete set of steps that can be performed to get rid of the error code 15106 in QuickBooks. However, if there are any queries, then consulting our technical support professionals at +1-888-510-9198 is suggested.
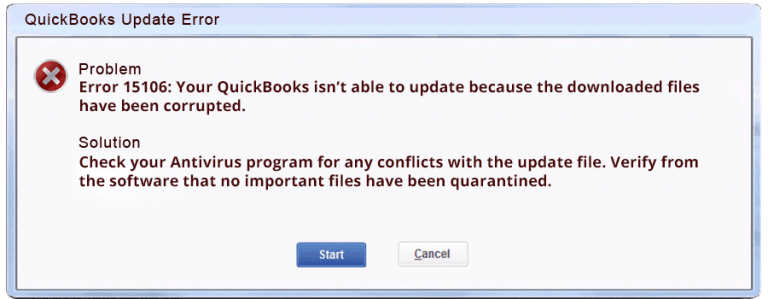
When you come across QuickBooks payroll error 15106, it will show up the following error messages on the screen:
Error 15106: The update program cannot be opened
or
Error 15106: The update program is damaged
These error messages can be seen when your antivirus blocks your QuickBooks update or you aren’t signed in as a Windows admin user. You can further land into a similar issue when trying to update QuickBooks to the latest release. QuickBooks error 15106 indicates that the update program has been damaged. It is a payroll update error and can be a bit annoying to tackle. There are a bunch of factors triggering such an error in QuickBooks, which we will be discussing later in this segment.
Possible Causes of Payroll Error 15106
There can be a few possible reasons causing such an error in QuickBooks. These include:
Antivirus or system security application installed blocking the communication.
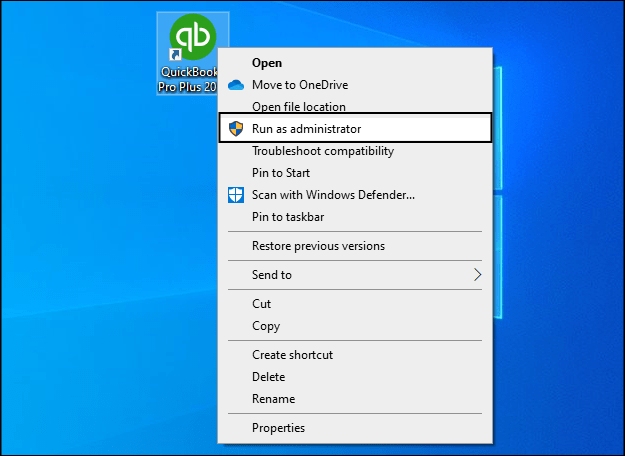
There must be some limitation to write or read the new file because the QB user not logged in as an administrator
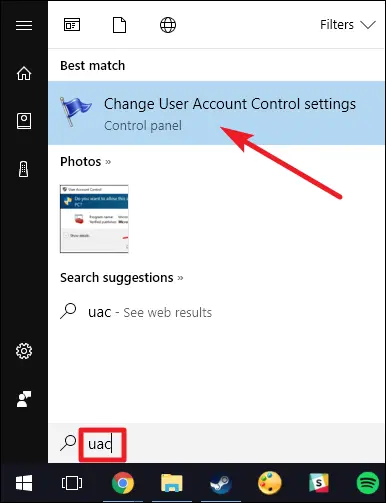
In case the user account control is enabled, then error 15106 can be triggered.
It has been seen that many QB users face frustrating error QuickBooks payroll error 15106 and issues related to their accounting software. Due to this, we have a specialized team of Intuit QuickBooks Certified ProAdvisors gathered in a team.
What are other Solutions to Fix QuickBooks Error Code 15106?
Other than the above solutions, the user can try to eliminate the issue by using the solutions listed below: · Disable User Account Control. · Perform a clean installation and try to install QuickBooks in selective startup mode
Can Spy Sweeper cause QuickBooks Error 15106?
Spy Sweeper is basically Webroot’s antivirus program. And the error code 15106 can be caused by it, as it treats the QuickBooks update program as malware and downloads unwanted files onto the computer. The user can check whether the spy sweeper is running or not by simply clicking on Ctrl + Alt + Esc to launch the task manager and then clicking on more details tab and also look for the processes tab for spysweeper.exe.
What is QuickBooks payroll error 15106?
The payroll error 15106 in QuickBooks belongs to the 15xxx series and is basically a payroll update error. It can be seen when the user tries to update QuickBooks payroll and fails to do so due to a handful of reasons.
QuickBooks is an advanced accounting software that is trusted by millions of business owners and accountants worldwide. This software helps the users perform tasks related to accounting, bookkeeping, and payroll with ease. However, sometimes QuickBooks receives some errors and glitches despite being a robust software. This article is crafted to assist you in case you have been facing payroll related issues. New payroll features in QuickBooks offer improved business experience to users, but payroll problems may cause a delay in their work and can also cause a shutdown. It’s necessary that you verify a payroll sheet at least twice before concluding it, in order to fix QuickBooks payroll issues. You can also code up multiple devices in the software to further reduce your manual work.
Different types of payroll problems– (fix QuickBooks payroll issues)
Accounting is quite a daunting task and more often than not it may be challenging. In case the business being served is too large, the job may be even tougher as the payroll of the employees is a very sensitive thing to do.
Not everything can be performed manually. And if tried, there might be more chances of encountering various errors. Though, many of the payroll problems encountered by organizations can be fixed using QuickBooks accounting software.
Below enumerated are different types of payroll problems organizations have reported:
Overtime issues
Employee misclassification
Unreliable time records
Untimed payroll processing
1. Overtime Issues:
An organization may have employees getting different payouts. Furthermore, not all employees work for regular hours. While some sources decide to work for extra hours to earn extra wages, a company may also require some employees to deliver more hours to meet some delivery agreements. The working hours and payment must be included in the profiles of every individual employee.
As per the Fair Labor Standards Act, all organizations should pay their employees with the fair, which should be one and half-hour higher than their regular work period. For that, it is mandatory to create and maintain the overtime data sheet to keep the payroll process simple.
2. Employee misclassification:
A company might not give every individual the status of an employee. The owners may also hire freelancers or sources on contract to get some work done. In situations like that, it’s necessary to keep a note of such work agreements.
The process incorporated to pay the organization’s permanent employee may vary from the process through which the freelancers are supposed to pay. The same may apply when reporting to IRS, the processes may be dissimilar. W2 cases are supposed to be used for the company’s employees and 1099 should be used for freelancers and other non-employees.
If you must use paper time cards, the unpredictability in timing may cause an issue. If an employee or resource is unable to use his paper time cards, the payroll for the employee may be delayed. In the time records, the error may display the salary underpaid or overpaid.
The payroll management must be performed with a significant software like the QuickBooks. Among all the apt accounting applications, QuickBooks is especially known to help the small- and mid-sized business enterprises. Make sure that you have an updated version of QuickBooks to solve payroll related issues.
Using QuickBooks may enable you to record the in and out timings of all the employees. The software assists you to maintain a clear calculation of the time records and also assists you in processing the payroll with ease.
Maintaining the accurate data of overtime for all the employees of the firm manually is not possible. Thus, it’s imperative to use QuickBooks accounting software that can help you create and maintain records of the firm’s employees. When it’s time to push the payroll, details can be extracted from QB without any manual assistance.
4. Untimed payroll processing:
Employees working for an organization may have multiple commitments related to their payout. A delay in processing the payroll may impact their commitment towards work. If there appears any sort of error in the payroll management, then fixing it manually may take a lot of time. If you want seamless payroll processing every month, you can opt for an updated version of QuickBooks accounting software.
There are multiple ways to fix payroll issues, out of which a few are described in this article. However, using a robust accounting software like QuickBooks is something that ensures a seamless payroll system. Also, you can contact our Pro Accountant Advisor team whenever you have a query or you need assistance. We feature a Payroll support team of QuickBooks experts that is available round the clock at +1-888-510-9198. Our experts ensure quality assistance and ensure to provide the most relevant information for all QuickBooks related queries to fix payroll issues.
Did you just come across QuickBooks Error Code 15223? Not sure what to do? Well, QuickBooks error code 15223 appears while updating QuickBooks desktop or downloading QuickBooks tax table updates. A wide range of causes may lead you to this error, however, issues with Internet settings and corrupt Windows files are among the most common reasons behind the occurrence of QuickBooks Error 15223. This article shares the complete information related to QuickBooks error code 15223, from causes to fixes and more. However, in case of any queries, you can consult our technical support team at +1-888-510-9198, and we will clear all your clouds of confusion.
What is QuickBooks error code 15223?
QuickBooks error code 15223 is basically a 15xxx series error that can be seen when updating company file or when downloading a payroll update. You may have received either of these two errors:
Error 15223: The QuickBooks Desktop update did not complete successfully.
Error 15223: Cannot connect to QuickBooks Desktop Payroll.
This error is commonly seen with the windows registry. There can be a few reasons behind the occurrence of this issue, which we have tried to elaborate later.
Reasons which trigger to QuickBooks Error 15223
A bunch of reasons can land you into QuickBooks error 15223. These reasons include:
In case QuickBooks-related files are deleted mistakenly by any of the programs
Or if there are any damaged windows registry files
You can further come across similar issue if the windows or QuickBooks desktop files are damaged.
If the internet configuration isn’t done properly, then such an error can be experienced.
Also, if the internet explorer digital signature needs an update, then be prepared for such an error.
You can further end up in this issue if the QuickBooks desktop installation is unsuccessful.
Above we have discussed the reasons behind QuickBooks Error code 15223 and now it’s time to discuss how we can resolve this error. However, you can contact our customer service team for QuickBooks Payroll to get instant help from our experts. Below we have mentioned steps to resolve this error, just implement the points mentioned below in sequence:
Solution 1: Manually Registering .dll Files
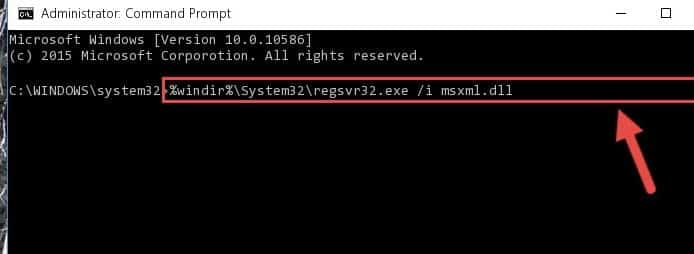
Registering the First File:
From your keyboard click on the ‘Windows button‘ and then open ‘Run’.
Copy and paste this text: “regsvr32 /s %SystemRoot%\system32\softpub.dll” in the text field.
Click on the ‘OK‘ tab.
If the file has been already registered then you won’t get any message.
You will receive a message, confirm that the copied registry file is exactly the same as appeared on the screen.
You need to press Windows + R to open run command and then copy the following code: regsvr32/s %SystemRoot%\system32\WinTrust.dll
You will not get any messages.
At the end, you need to verify and ensure to copy the register file the same way.
Registering the second file
You need to simply register the second file by pressing Windows
After that, copy the regsvr32/s% systemroot/system32/wintrust.dll
Now, paste in the open field and then click on ok tab
And then, clear IE SSL state.
Open the internet explorer again.
Select the tools and then internet option and click on content
You now have to press clear SSL
Restart the system and open QuickBooks to download the tax table update
The last step is to end the process by configuring the firewall.
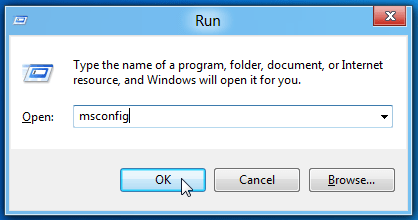
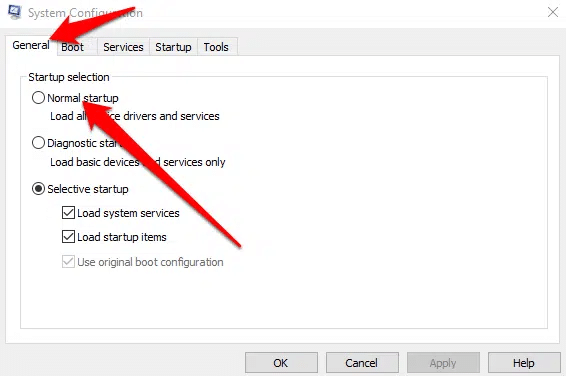
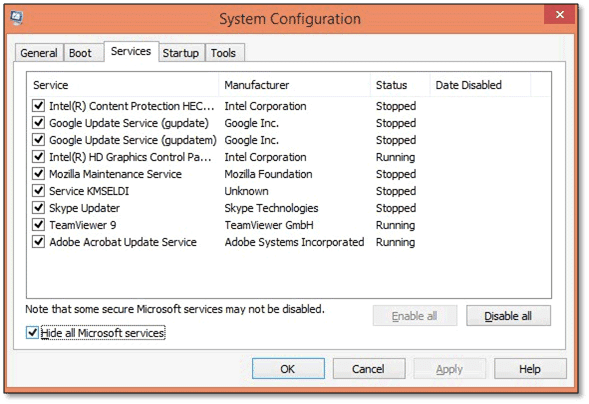
Open ‘Run ‘window by pressing Windows and R keys on the keyboard.
Type ‘msconfig’ in the open box and hit Enter.
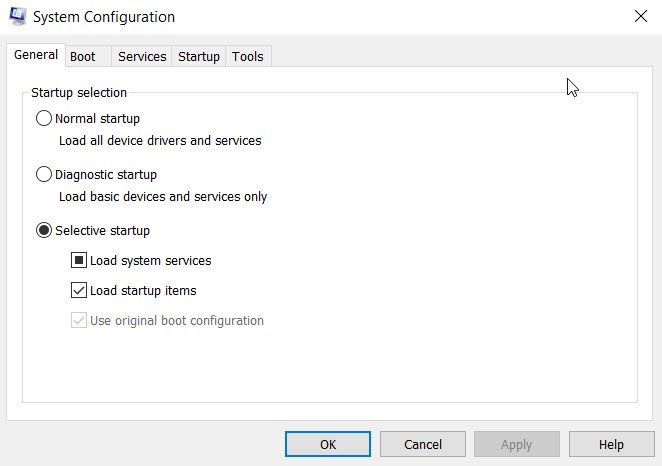
Go to General tab and click ‘Load System Services & Selective Startup’.
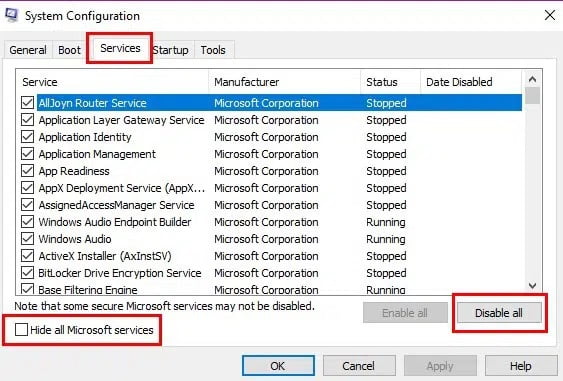
Check the ‘Hide all Microsoft Services’ check box on the Services tab.
Click the Disable all option and uncheck Hide all Microsoft Services checkbox.
Leave the Windows Installer service marked since it’s required for installing QuickBooks updates.
Click ‘Apply‘ and then ‘OK‘.
‘Restart‘ your computer when prompted. After your system is back on, try installing the available updates and see ‘QuickBooks update error 15223‘.
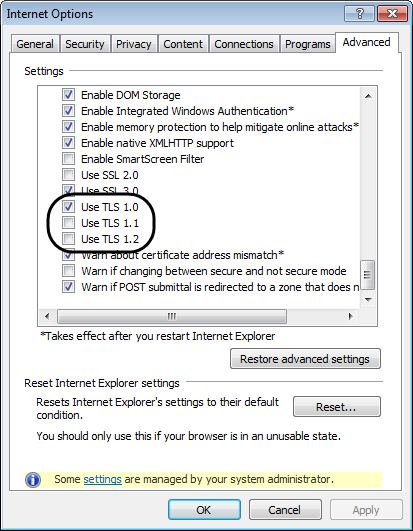
Solution 3: Verify Use TLS 1.1 and Use TLS 1.2 are unchecked and Use TLS 1.0 is checked in the Internet Options window of Internet Explorer
Follow the steps stated below-
Firstly, open ‘Internet Explorer‘.
Choose ‘Tools‘ and then select ‘Internet option‘.
Click on ‘Advanced window‘.
Go to ‘Settings panel‘ scroll down and then find the use of ‘TLS 1.0, 1.1‘ and use ‘TLS 1.2‘ option.
Confirm the use ‘TLS 1.1‘ and use ‘TLS 1.2‘ is unchecked or use ‘TLS 1.0‘ is checked.
Click on ‘Apply‘ and then press ‘OK‘ button.
Now, try once more to download the update.
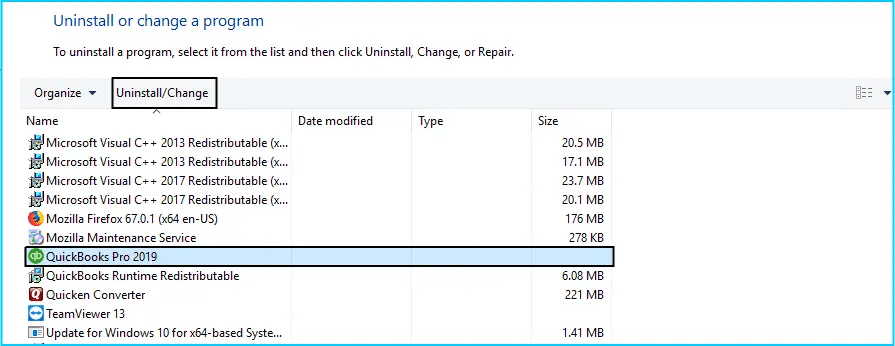
If the error is still irritating then clean uninstall/restore in a selective startup and don’t forget to rename “C: \ Program Files \ Common Files \ Intuit \ QuickBooks” manually.
Try to download and update the QuickBooks Desktop once you successfully re-installed the QB Desktop to the selected startup.
If the error still persists then follow the ‘Next‘ solution.
Solution 4: Manually Configure Your Firewall and Antivirus settings
Some QuickBooks programs need an active internet connection and you might be facing issues as the Firewall restricts Internet access. So to solve this just download and install the latest version of the firewall and the problem will be resolved.
At first, you need to click on the start menu and further move to the windows firewall.
The next step is to pick the advanced tab from the right side.
Once done with that, right click on the inbound rules and select new rule.
The user will then have to choose program and click on next.
After that, click on the program path and click on browse.
Also, choose any of the path and click on next tab.
The user should now choose allow the connection option and also click on next.
The next step is to click on finish tab and name the rule.
Repeat the steps for outbound rules.
Lastly, open QuickBooks in multi user mode.
Solution 5: Delete the IE SSL state
Firstly, Open your ‘Internet Explorer‘ browser.
After that choose the ‘gear icon‘ and then select ‘Internet Options‘.
Now navigate to the ‘Content tab‘
Choose ‘Clear SSL state‘.
Finally reboot your system once.
Once the system restarted open your QuickBooks Desktop and retry the update.
We hope that the steps mentioned above really did help you a lot and if there is any doubts or issue regarding QuickBooks payroll error code 15223 or any other QuickBooks related issue then do not hesitate to call on our QuickBooks enterprise technical support team at ++1-888-510-9198. We are Intuit certified QuickBooks ProAdvisor and we provide services around the clock.
FAQs Related to QuickBooks error code 15223
What is QuickBooks Payroll Error Code 15223?
QuickBooks error code 15223 is a payroll error that can be seen when downloading a payroll update or when updating QuickBooks. It further indicates an issue with the digital signature certificate.
Why does QuickBooks payroll error 15223 occurs?
You can experience this issue in case of damaged windows files or in case of incorrect configuration of internet explorer. Also, if the internet explorer digital signatures need to be updated.
How do I fix error code 15223 in QuickBooks?
To fix this issue in QuickBooks, perform the steps below: 1. Open internet explorer 2. Choose gear icon and the internet options 3. Move to the advanced tab 4. Under the security, locate USE TLS 1.0, TLS 1.1, USE TLS 1.2 5. Ensure that USE TLS 1.0 is unchecked while USE TLS 1.1 and USE TLS 1.2 are checked. 6. Now, choose apply tab and also click on ok tab.
![How to Setup QuickBooks Online Bank Reconciliation: Process & Overview? [Guide]](https://www.hostdocket.com/wp-content/uploads/2019/03/An-Overview-of-QuickBooks-Online-Bank-Reconciliation-Process.png)