QuickBooks, the world’s leading accounting software is instrumental in putting small and mid-sized business owners, entrepreneurs and accountants close to their business goals. Though it’s an innovative software, it’s not entirely free from errors. One error that as a user you may receive is “QuickBooks Banking Error 102”.
This error may occur when your bank’s website has some technical glitches, website maintenance is going on, or a server has some issue in transferring data between website of the bank and QBO. If you are facing this error, these following tips may help you. If you want quick resolution of any QuickBooks Issue then you can contact our QuickBooks error support team that remains active 24/7. Give us a call at +1-888-510-9198, and get answers to all your queries immediately.
QuickBooks banking error 102 is basically an error that can be seen when there is an issue in connecting to the bank’s website or if the bank’s server is undergoing some maintenance. Such an error further prevents QuickBooks from downloading or uploading transactions and can further be seen when you try to connect to the bank account from within QuickBooks. When such an error occurs, it displays a warning message on the screen stating: Online banking connection has been interrupted. It can be a bit annoying for the user to tackle. Thus, here in this article, we have tried to dig in the complete information related to the banking error 102.
What leads to QuickBooks banking error 102?
There are a couple of reasons triggering this banking error in QuickBooks. This include:
Issues in connecting to the internet.
Furthermore, any failure of the network equipment can trigger such an error.
Not just that, bank website undergoing maintenance can trigger such issue.
You can further experience similar issue if you are using outdated version of QuickBooks.
Or if the login credentials you entered in QuickBooks doesn’t match the information provided by the bank.
Here are some suggestions to resolve the banking error 102.
Tip 1: Check if Your QuickBooks Online Requires Account Updates
If there is no maintains sign on your bank’s or credit card’s site or any other issue you can find out, you should manually update your account details in QuickBooks Online. There will be an update button at the top right-hand corner. Click the button and it will provide you with more information with updates. You should try to run at least three manual updates at the hours that aren’t supposed to be busy for the bank website.
Manual updates:
Not all accounts are automatic. Some may demand manual updates. In such a case, you will be informed in connection interview. While, in case of an auto update, if you don’t see the current days details after an auto update, you will have to update your information manually.
Go to the “Menu” at the left corner of your screen and select “Banking.”
Select “clear unwanted accounts” if you wish to update only selected accounts.
Choose “Update now.”
Provide your “MFA (Multi-factor Authentication)” upon being prompted and select “Continue” to update the details.
One manual update will have you covered for 90 days. A new listing mentioned in those 90 days will be downloaded. Doing this will ensure that even if you require to leave the days between updates, despite you will get the most updated information even if your account is connected to your bank account.
Try to login to your bank’s account using the URL provided by your bank with online banking. In case you fail to connect to your bank, follow the given six steps. Check out the below mention details adding your bank accounts to download and fix transactions in QB Online – The banking error 102 might be caused because you are not able to connect to your bank.
Steps to connect to your bank account in QBO
Here is how you can connect to your bank Account in QuickBooks Online:
Go to the “Menu” at the left corner and select “Banking.”
In case you are linking to a bank for the first time, go to “Search” and see if the name of your bank is there.
If you are already linked to a bank, click “Add Account” and find the name of your bank.
Choose your bank from the list.
For the website of your bank, put in your “User ID/Login ID” and Password
Click “Continue”.
If needed by your bank, furnish the added security verification steps, and click “Connect securely”.
Click on the symbol of the bank to the left of your account to connect it and from drop-down menu, select your bank type or credit card account. In case you do not have an existing account, you will find an option “Add + new” to make a new account.
After you join your account for the first time, QuickBooks software will download online transactions for last 90 days and also your banking and cc transactions overnight. Transactions can also be downloaded for less number of days.
Select “Connect”. It may take a couple of minutes or longer.
Once the download is complete, you will automatically go back to the banking page. Next, the “Review” tab will consist of transactions that were downloaded from your bank or financial institution. You can review, classify and accept the transaction in QuickBooks.
In case your bank is not listed, or you fail to connect or the data you require in older than 90 days, you will have contact your bank or download transaction from the site of your bank and then upload them to your QuickBooks.
Tip 3: Read all Account Information or Notifications
If you can login successfully, read messages, notifications or warning that you may have received from your bank. This may tell you what is not working properly. Furthermore, you should able to check your account summary, history, and transactions with ease.
In case you are still receiving the error, you should wait for your bank to work on it. They may be trying to fix any probable issue with your server. Give your bank at least 24 hours to work on it.
Tip 5: Check if Your Account is New to the Bank
You may also get the banking error if you have recently opened your account, or that is new to the bank or credit card. Please note that some new accounts do not function with online banking. In this case, you should contact your bank/credit card provider for more details.
Tip 6: Set it to Update Itself Automatically
In case QuickBooks fails to update from a bank account, then it will try to perform the same update five additional times throughout the next five hours. You can monitor the updates using the steps below:
Access banking from the left sidebar.
After that, look for the option to update in the upper right corner.
You will then see the last updated time and date.
Now, perform a manual update.
Followed by, access banking again.
To only update the accounts you wish to, select clear unwanted accounts.
Select now available update option.
And further, enter your MFA info and head to the software upgrade by clicking on the continue tab.
For the next 90 days, you can count on your updates to be complete.
If the error still exists, you can call our round the clock available QuickBooks online support team at+1-888-510-9198 and speak to our experts. We will fix the QuickBooks banking error 102 as well as any other QB related issue for you in the least possible time.
QuickBooks banking error 102 indicates that there is some issue with the bank website, either it is a maintenance issue or some connectivity error. The server can have issues when transferring data between the bank and QBO application.
How do I fix a bank error in QuickBooks?
To fix a banking error in QuickBooks: 1. Go to bookkeeping and select transactions. 2. Choose bank transactions and select the title for the bank account. 3. You now have to choose edit icon. 4. And further select edit sign-in info. 5. Further, update your info when needed.
How do I fix error 102 in QuickBooks?
You can fix 102 error in QuickBooks by either manually updating the bank connection or by checking bank or credit card’s website and check if everything is working fine.
Reconciling an account in QuickBooks is essential so that they match the bank and credit card statements. The way to balance your checkbook, you are supposed to review your accounts in QuickBooks and ascertain that they tally with your real-life bank and credit card statements. The entire process of reviewing is what it means when you say as reconcile an account in QuickBooks. When you get your bank statement, you will have to compare each of the transactions with the ones that you entered into QuickBooks. If everything tallies, then this means that your accounts are balanced and accurate. It is recommended to reconcile QuickBooks including checking, savings, and credit card accounts every month.
To help you with the process to reconcile an account in QuickBooks, here we are with this segment sharing the complete set of steps that can be performed. Note that, the procedure for QuickBooks online and QuickBooks desktop might vary. Thus, we have tried to cover both procedures in detail. For better understanding, read this segment carefully, or you can further get on a call with our QuickBooks technical support team, for any sort of professionals guidance. Dial our toll-free customer support number i.e., +1-888-510-9198, and all your queries will be answered immediately.
Steps to Reconcile an Account in QuickBooks Online
Here are the steps that can be performed by QuickBooks Online users to successfully reconcile an account in QBO.
Step 1: Review your Opening Balance
When you are reconciling an account for the very first time, it is crucial that you review the opening balance. It is important that it matches to the balance of your real-life bank account for the day you started tracking transactions in QuickBooks.
A quick tip- You can save your effort by connecting your bank and credit cards to online banking, as it automatically downloads transactions and further records the opening balance in QuickBooks for you. In case you forgot to enter an opening balance in QuickBooks previously, then need not to worry, you can perform the steps to enter an opening balance later on.
Also note that, entering a service charge and interest earned options are only available when the bank account is not connected to online banking.
Step 2: Start a Reconciliation
After you have your monthly bank or credit card statement, it is time to start with the QuickBooks reconciliation. Keep in mind that if you are reconciling multiple months, do them one statement at a time, starting with your oldest statement. The steps involved here are:
Just in case your accounts are connected to online banking, ensure you match and categorize all the downloaded bank feed transactions.
Now, head to the Settings tab ⚙ and further click on Reconcile. In case you are reconciling for the very first time, then click on Get Started.
After that, from the Account ▼ drop-down, choose the account you wish to reconcile. Ensure it is the same one on your statement.
It should be noted that, if you witness a message regarding a previous reconciliation, then you need to opt for We can help you fix it. This needs to be fixed before you continue with the steps.
Furthermore, review the Beginning Balance. Ensure that the beginning balance in QuickBooks matches the one on the statement.
Now, enter the Ending balance and Ending date on the statement. Note that, certain banks might call the ending balance a new balance or a closing balance.
In case you see it, review the last statement ending date.
This is basically the end date of the last reconciliation. Your current bank statement should begin the day after.
Once you are ready to begin, click on Start Reconciliation.
It is now time to simply compare the transactions on the statement with what’s in QuickBooks. Review them one by one. As this can be a tricky part, you need to ensure that you have the right dates and transactions in QuickBooks. Continue with the steps below for the type of account that you are reconciling.
Reconcile accounts connected to online banking
As all of the transaction info is obtained directly from the bank, reconciling becomes easy. In certain cases, the accounts are already balanced.
You need to start with the first transaction on the statement.
Now, look for the same transactions in the Reconciliation window in QuickBooks.
After that, compare the two transactions. In case they tally, put a Checkmark next to the amount in QuickBooks. This usually marks it as reconciled.
To speed up things a little bit, the transactions that you added or tallied from online banking are already selected.
In case a transaction doesn’t show up on the statement, but it is present in QuickBooks, then do not put a checkmark.
You need to compare each transaction on the statement with what’s in QuickBooks.
A quick tip: In case you are sure that you have found a match but something small isn’t right, like the payee, then you can choose the transaction in QuickBooks to expand the view. Further, click on edit and make the edits so the details tally.
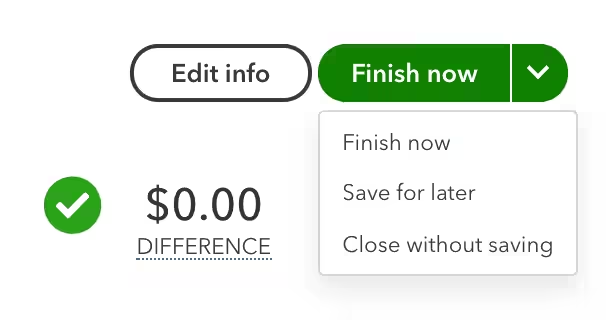
After you reach the end, the difference between the statement and QuickBooks should be $0.00. If it is, then make sure to click on Finish Now.
Reconcile accounts that aren’t connected to online banking
If your accounts are not connected to online banking, then here is what you can do:
Begin with the first transaction on the statement.
Find the transaction in the Reconciliation window in QuickBooks.
You now have to compare the two transactions. In case they tally, you need to put a checkmark next to the amount in QuickBooks. This will mark it as reconciled.
In case a transaction doesn’t show up on the statement, but you see it in QuickBooks, skip putting a checkmark.
Furthermore, compare each of the transactions on the statement with QuickBooks.
Quick Tip- In case you are sure that you found a match but there is some small issue, then you can simply Edit the transaction.
Now, toward the end, you will see the difference between the statement and QuickBooks as $0.00. If that is the case, then click on Finish Now.
Steps to Review Past Reconciliations
You will have to run a QuickBooks reconciliation report to review your work. The steps involved in here are:
Initially, head to Settings tab ⚙ and also click on Reconcile.
Furthermore, choose History by Account.
Now, make use of the dropdown menus to choose the account and date range.
Or you can further print or export your reconciliation reports, in case you need to share them.
Steps to edit completed reconciliations
You can perform necessary changes to past reconciliations, but keep in mind that changes can unbalance the accounts and other reconciliations. It further affects the beginning balance of the next reconciliation. You need to start by reviewing a previous reconciliation report. In case you reconciled a transaction mistakenly, then you need to start over again or connect with an accountant. Note that, these changes can get a bit complicated for you to handle.
Steps to Reconcile an Account in QuickBooks Desktop
If you are a QuickBooks Desktop user, then here are the steps that you need to perform to reconcile accounts in QuickBooks Desktop.
Step 1: Review Your Opening Balance
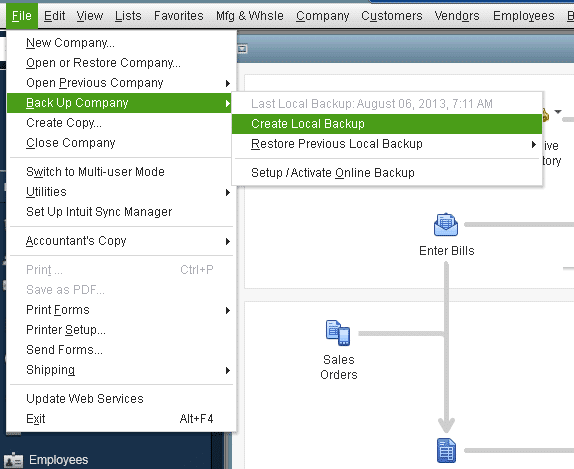
Before you begin with reconciliation, ensure that you back up the company file. In case you are reconciling an account for the first time, then simply review the opening balance.
Step 2: Prepare for Reconciliation
Ensure that you enter all the transactions for the bank statement period you plan to reconcile. In case there are transactions that haven’t cleared the bank yet and aren’t on the statement, you need to wait to enter them.
Step 3: Start Reconciliation
After you get your bank statement, you can start reconciling. In case you are reconciling multiple months, start with your oldest bank statement. You can reconcile each month separately, one statement at a time. It should be noted that, in case you are reconciling a merchant or payments account and QuickBooks desktop sees that you aren’t signed in, then you will see a sign-in window. This further ensures that your account is successfully linked to a valid company ID.
Head to the Banking menu and further choose Reconcile.
Once done with that, in the Account field, choose the bank or credit card account you want to reconcile.
The statement date is entered on its own. Usually, it is 30 or 31 days after the statement date of the previous reconciliation. You need to change it as needed, in order to match the bank statement.
QuickBooks further enters the beginning balance. It uses the ending balance from the last reconciliation to get this number.
Further, enter the ending balance based on the bank statement.
You now have to enter the service charge and interest earned based on the bank statement.
Do not enter charges that you have already entered in QuickBooks.
Also, review the fields. In case the info is correct, choose the continue or ok tab.
In case you beginning balance doesn’t match your statement, then need not to worry. There are a few tools that can help you.
Just in case the number doesn’t match, choose Locate Discrepancies. This gives you reports that can be used to find discrepancies and other reconciliation issues.
In case you have issues, then try fixing the opening balance and beginning balance.
To start over from scratch, select undo the last reconciliation.
It should be noted that, when you undo a previous reconciliation, your beginning balance reverts to the beginning balance of the previous reconciliation. Moreover, all cleared transactions on the reconciliation become uncleared.
In order to reconcile, simply compare the list of transactions on the bank statement with what’s in QuickBooks. Ensure that you have the right dates and transactions. After you are done reviewing the statement, you will know everything made it into QuickBooks.
Here are a few things that you can do to make reconciliation is little easier.
In case you only want to see the transactions for the statement period you are working on, simply choose Hide transactions after the statement’s end date.
Or if you are reconciling a credit card account, then the sections are Charges and Cash Advances and Payments and Credits. Focus on one section at a time.
In case you are reconciling an account for online banking, then choose Matched.
You now have to enter the Statement Ending Date from your bank statement. This automatically selects transactions QuickBooks downloaded and matched.
Note that, a matched transaction in the register has a lightning bolt next to ti. Once you reconcile it, a checkmark replaces the lightning bolt.
In case you want to sort the list, choose the header or title of a column.
Or if there are more transactions in QuickBooks than there are on your bank statement, resort the list.
Match Your Transactions
Once you are ready, start with the first transaction on the statement.
Now, find the same one in the reconciliation window in QuickBooks.
You now have to compare the two transactions. In case the transactions match, choose and put a checkmark in the checkmark column.
This reconciles the transaction.
You need to compare each transaction on your statement with what’s in QuickBooks.
As you clear or add transactions to the reconciliation, the Cleared Balance amount decreases.
The amount increases, in case you clear or add deposits and other credit amounts.
In case a transaction doesn’t appear on the statement, do not mark it as reconciled. Here are the ways to check if things tally or not:
In case you wish to see the total number and amount of transactions you have added to the reconciliation, you need to look for the items you have marked in the cleared section. The majority of banks provide the same summary of transactions on bank statements. You need to compare the total number of transactions to see if anything is missing.
Just in case you want to edit or get more info about a specific transaction, then select the transaction and then click on Go To or double click.
If you want to take a step back and make a change to the info you entered in Step 3: Start your reconciliation, then choose Modify. The service charges, interest, and ending balance info are available in the section next to it.
After you reach the end, the difference between the bank statement and QuickBooks should be $0.00. If that is the case, then choose Reconcile Now.
What to do if balances don’t match after you Reconcile QuickBooks?
In case the difference isn’t zero, then you can fix it using a bunch of steps. For bank accounts, QuickBooks opens the Reconcile Adjustment window. You have the following options:
Return to Reconcile: Head to the reconciliation to review everything again.
Leave Reconcile: You need to save the reconciliation so you can review or edit any existing transactions causing issues. You can come back and finish the reconciliation process later on.
Enter Adjustment: In case you wish to complete the reconciliation, you can force QuickBooks to create an adjustment to balance everything. This should only be done if you know all of the correct transactions are in QuickBooks and what you entered is right. QuickBooks will automatically enter the adjustment as a journal entry.
The journal entry goes into a special expense account termed as reconciliation discrepancies.
Steps to review the reconciliation Adjustment
In order to find all your adjustments on your list, you can simply review a previous reconciliation report for the reconciliation you adjusted. This will show the cleared transactions and any changes that are made after the transaction that may not show in the discrepancies.
Begin with the edit menu, and choose the find tab.
Now, in the find window, choose the Advanced tab and then head to Memo.
The next step in the memo field, type Balance Adjustment, and choose Find.
You can try to review all the cleared transactions using the set of steps enumerated below. Let us have a look:
At first, navigate to the Reports Menu and choose Reports Center.
After that, search and open the Previous Reconciliation Report
Now, choose the account you reconciled, then either detail, summary or both.
Go for transactions cleared, plus any changes that are made to those transactions since the reconciliation.
You now have to choose Display.
Note that, for other types of accounts, QuickBooks opens the Make Payment Window. This will let you write a check or enter a bill to pay to cover the outstanding balance. In case you do not want to record a payment, then choose the Cancel tab.
In case you run into issues or discrepancies, which simply means that the transactions in QuickBooks do not tally to the bank statement, then need not to worry. You can fix the mismatches by performing some simple steps.
Review Reconcile QuickBooks
Once you reconcile, you can choose the Display tab to view the Reconciliation report or Print to print it. In case you want to review a reconciliation report later on, then simply carry out the below steps:
Head to the Report menu, and choose Reports Center.
Now, search and open a previous reconciliation report.
Choose the account you reconciled, then either Detail, Summary, or Both.
Conclusion!
Now that you know the correct ways to reconcile an account in QuickBooks desktop and QuickBooks online, it is time to implement these steps. Hopefully, this segment might be helpful in successfully reconciling in QuickBooks. However, if you have any queries, or if you need our support and assistance at any point in time, then give us a call at +1-888-510-9198, and all your queries will answered immediately.
Intuit QuickBooks is a widely used accounting solution for various businesses. Right from sending invoices to its customers, managing business expenses, and accessing information about the company, QuickBooks Online (QBO) does it all very swiftly. This QuickBooks online edition features high-speed functioning. If we talk about Google Chrome and QuickBooks Online, both are widely used. But when using QBO Login Online, a user sometimes faces to fix QuickBooks Online Login Errors On Google Chrome. There may be different types of errors responsible for this.
If you are also facing qb online not working error, then make sure to read this article till the end. This article will brief you on the factors responsible for QuickBooks Online Login Errors on Chrome and also the ways to get rid of this problem. However, if the user continues to face the same error, then in that case, it is recommended to consult our QuickBooks online support team. You can ring up at our toll-free number i.e. +1-888-510-9198, and our certified professionals will resolve the issue for you in the least possible time.
What are QuickBooks Online Login Errors on Chrome?
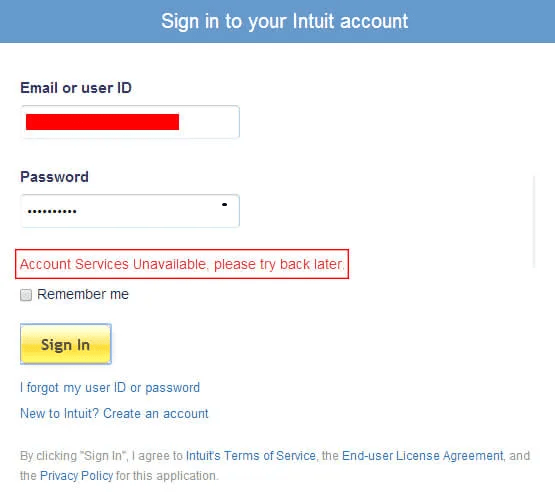
At times, QBO users face QuickBooks Online Login Errors on Chrome, which can be very much frustrating. This error can be often encountered due to security issues. In case this account is encountered, the user will have to update to a new Intuit account with enhanced security. Quick book log in error comes up on the QuickBooks online login page with an error message stating “Account services unavailable, please try back later“.
When you login to QuickBooks Online on Chrome, you can face the following QuickBooks login problems:
You get the loading message on your screen but nothing actually loads.
You may also receive a message of qbologin services not available
The Chrome gets confused sometimes, and takes you on a tour moving from the sign-in screen, to choosing a company and then back to the sign-in screen.
Google Chrome is one of the widely used browsers, and also it is a perfect match for accounting software. However, a wide number of factors might be responsible for the login issue to occur, which will be discussed later in this article.
What triggers QuickBooks Online Login Error on Chrome?
As stated before, there can be plenty of factors that might lead to QuickBooks Online Login Errors on Chrome. A few of the most common factors responsible for QBO log in errors are listed below:
In case the user forgets to sign out appropriately from the previous QuickBooks online session, then this kind of issue is most likely to happen.
If someone logged into the QuickBooks online on Chrome or any other system using the same credentials.
The issue can also be seen if the firewall or antivirus program blocks access to the software causing QuickBooks login issues.
Solutions to fix QuickBooks Online (QBO) Login Errors for Chrome
You need to follow the given steps in order to resolve your Chrome Login problems.
Step 1: Make use of any other web browser
There are chances that the user is facing login problems only with Google Chrome, whereas the other browsers do not show any error in logging in. Thus, in that case, the user can also use Internet Explorer to export your data to QBO Desktop.
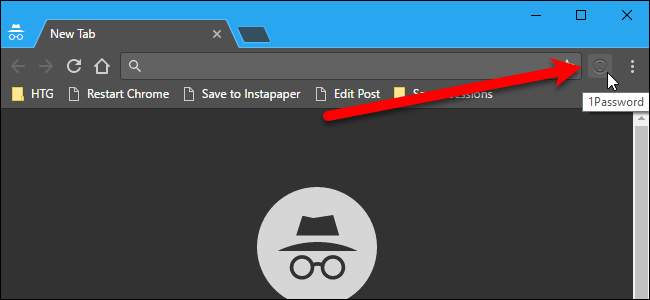
Step 2: Use Chrome Browser in the Incognito Window
Another option for the users can be to try logging in to the website using the incognito mode of Google Chrome. As it does not record the browsing history and has no cookies saved, the user will be able to log in to the website.
Follow the exact steps mentioned below:
For this, the user needs to open the Chrome browser :
First of all, the user will have to click the customize and control icon in the upper right.
And then, choose the New incognito window (Use shortcut key Ctrl+Shift+N).
Once done with that, the user will see a separate window in “incognito mode” You can note the icon in the upper left corner.
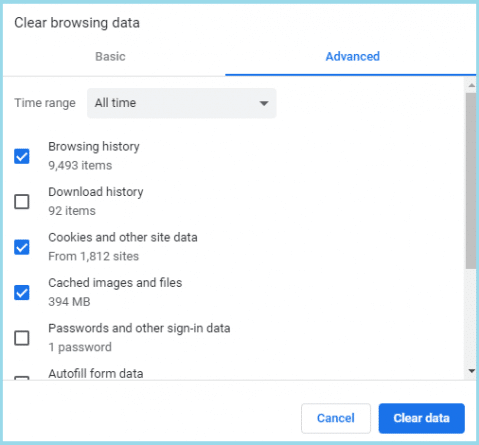
Old history and cache can be responsible for the slow performance of the Google Chrome browser you are using. Just clean the cache or delete the history!
In this method, the user will have to click on the ‘Customize and control icon’ to the right side and select the ‘Settings’ option.
After that, the user will have to click on the history tab and then, click on the Clear Browsing data button.
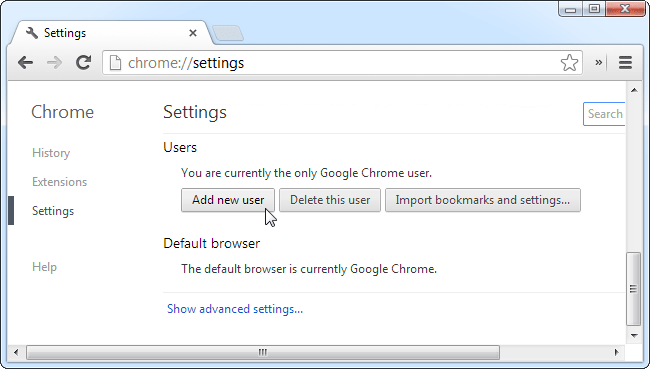
Step 4: Create an Additional Chrome User
Since you have to work on QBO, you can create another/ additional Chrome user in order to work with QBO Login. This will help you lessen your working hours.
You can create an additional Chrome user in the following ways:
In this method, the user will first have to open Chrome Browser and select Settings tab on the left
And then, the user will find a users section near the bottom section of the page
After that click on the ‘Add New user’ button
Followed by selecting the icon, enter name, and click the Create button.
Now, you will see that a new user icon appears on the top left corner of your browser which means that you can now switch between two users.
Whenever you are facing QuickBooks Online Login Errors on chrome with any of the websites you are trying to access, then, there is a problematic circumstance. When such problem arises, you can examine the web browser’s settings and make sure that there is no such problem linked to the chrome. After this, also check whether both JavaScript and Cookies are enabled or not. If you find difficulty in accessing the website, then you can take help from our 24/7 QuickBooks error support team by simply dialing our toll-free number .i.e. +1-888-510-9198. We will be happy to help you out in your all accounting related problems.
FAQs Related to QuickBooks Online Login Problem
Why am I having trouble logging into QuickBooks Online?
This can be because of your browser cache. Thus, we suggest you to clear your browser’s cache. Certain unexpected browsing issues like quick books online log in can be simply rectified by deleting the browser’s temporary internet files. For steps to clear the cache, you simply need to choose the browser below: Microsoft edge, Mozilla FireFox, etc.
How do I reset QuickBooks Online?
You can simply delete your company data to reset QuickBooks online.
Simply sign in to your QuickBooks online account.
You will have to sign in as admin
Confirm that you want to delete the company data and click on yes tab
Choose the industry from the dropdown
Go for create accounts based on the industry
Opt for wipe data
Why is QuickBooks Online not working with Chrome?
There could be a bunch of reasons including, browser cache and cookies, compatibility issues, poor network connection, or use of an outdated version of Chrome.
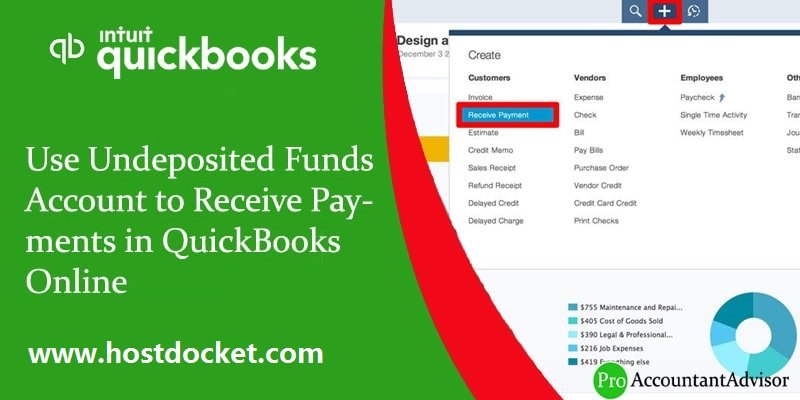
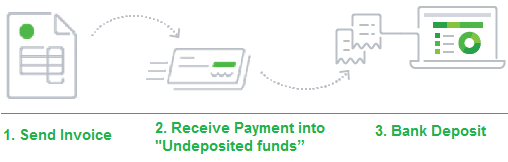
Learn the best ways to use the undeposited funds account to receive payments in QuickBooks Online (QBO)
No doubt, QuickBooks is the world’s best accounting and bookkeeping software made by Intuit. Talking about the undeposited funds account in QuickBooks online, it serves a special function, as it is a special temporary account that is used by the QuickBooks accounting software for holding the payments that are received from invoices before the user deposits them into the bank account. If you are one of the users who import payments data from external processing services, and do not process transactions via QuickBooks payments, then this workflow is essential for you.
In today’s article, we are going to discuss the use of the undeposited funds account, in order to receive payments in QuickBooks Online. Thus, if you are looking for the entire process to use the undeposited funds account to receive payments in QuickBooks online, then your search ends with our article.
Go through the article till the end, to learn the process. However, for expert assistance, you can make a call at our toll-free number i.e. +1-888-510-9198, and discuss your issue with our QuickBooks support team of experts and certified professionals.
As stated above, undeposited funds is an account in QuickBooks accounting software that holds funds from the payments until they are deposited in the bank account. As per the experts, the user can’t deposit the fund directly to undeposited funds. The reason behind this is that it is just a temporary account that means that the user can deposit the funds in a single transaction only after he/she takes the deposits to the respective bank account.
Making a lump sum payment is beneficial in a way that the transactions remain itemized in the account register, but all that user is supposed to do is to check the lump sum deposits when reconciling transactions with the statements of bank.
Reason behind using Undeposited Funds Account
Many QuickBooks users ask this question very often that why they should make use of the undeposited funds account. The undeposited funds account is an internal “other current asset account” crafted by QuickBooks. For instance, if the Undeposited funds account is a lockbox or safe, where the user keeps the payments till the time, they are not deposited in the bank account. This account in actual serves as a default “deposit to” account and is designed in a way to work with the receive payments and bank deposit features, in order to complete the invoicing process. The user can make use of this account for single or group payments.
Steps to enter transactions with Undeposited Funds
If you want to enter the transactions with undeposited funds, you need to follow a step by step process. The steps involved are as follows:
The very first step is to click on the ‘Lists‘ menu, followed by selecting the ‘Items‘ option.
The next step in the process is to select the option of payment from the ‘Type drop-down list‘ and then add any additional information for the transaction, if needed.
Lastly, the user is supposed to tap on ‘Account drop-down list‘ and also select the “UndepositedFunds“, followed by hitting “OK“.
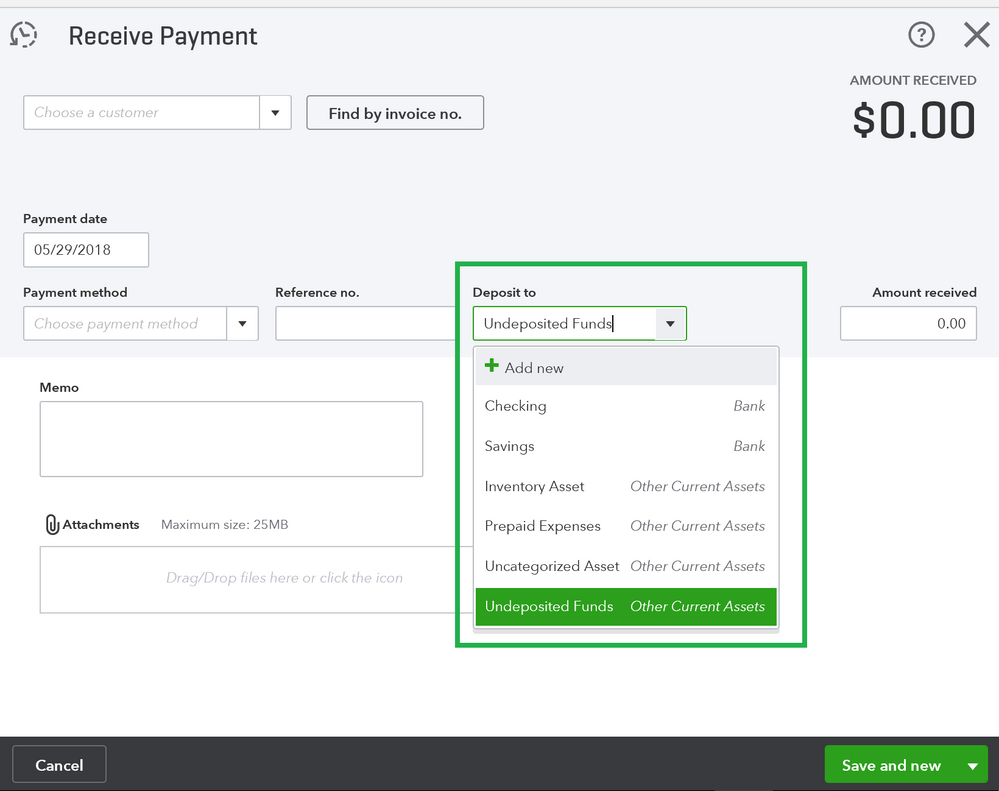
How to Deposit Undeposited Funds in QuickBooks?
The user can implement the steps below for depositing Undeposited Funds Account to Receive Payments in QuickBooks Online–
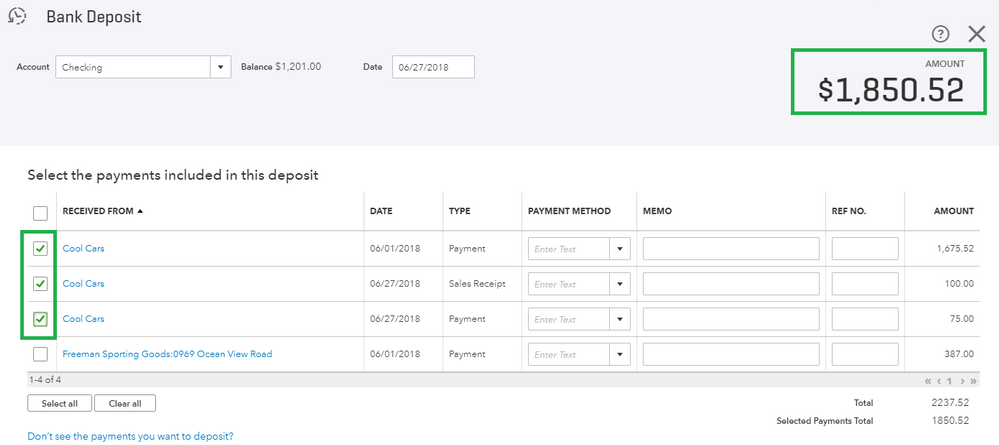
To begin with, the user is required to hit ‘Banking‘ tab and then select the “MakeDeposits“ option.
The next step in the process is to select the payments from Undeposited Funds that the user wishes to deposit. In case the “Payment to Deposit” window does not open on its own, then in that case the user is required to select “Payments” on the “MakeDeposits” window.
Now, the user should hit ‘OK‘ button.
Moving ahead, click on the ‘Deposit To list‘and then opt for the bank account for the deposit purpose.
Once done with that, the user is required to type in the date in the ‘Date field‘ and then if permitted enter any additional payments to deposit.
The next step to be performed by the user is to click on ‘Print‘ option so that the user can have a hard copy of deposit slip.
The last and final step is to hit ‘OK‘ so that the transaction can be saved and after that take the slip to the bank and deposit the funds into the account.
The user can make the best use of the Un-deposited Funds account, in case the company accepts the transactions all day by cheque or cash and later on deposit them in the bank in a single trip. Companies that accept only credit cards as payment option, they deposit one transaction at a time straightforward to the bank account, and other online payments basically do not use the Undeposited Funds account.
If you are not using an undeposited funds account just because of unawareness of the procedure to use it, then reading this article will help you to make the best out of it. However, if any of your queries remain unanswered regarding undeposited funds account, then do not hesitate in discussing it with our QuickBooks Online Support team.
Simply make a call at our toll-free number i.e. +1-888-510-9198, and our experts and certified QuickBooks professionals will be there to provide you with proper support in a single call. Hope this article will be helpful for you. Thanks for your visit. Love to see you soon here again.
FAQs Related to Undeposited funds Account in QuickBooks
What type of account is undeposited funds?
Undeposited funds is simply a holding account that usually tracks payments received from customers that have not been deposited to the bank account.
How do I resolve undeposited funds in QuickBooks?
You can correct the undeposited funds in QuickBooks using the steps below: 1. Click on the +New tab 2. After that, choose Bank deposit 3. From account ▼dropdown, select the account you wish to put the money into. 4. Enter a checkmark on the boxes for each transaction. 5. Further click on save and close.
Is undeposited funds debit or credit?
Well, it can have both debit as well as credit balance. When you get the payment, the balance will be debited to the undeposited fund account, and when you make the deposit entry, the account will be credited with the amount of the deposit in the QuickBooks.
Switching computers? Want to transfer QuickBooks from old computer to a new computer? Well, all this is possible by performing some basic set of steps. To assist in this migration process, Intuit offers a QuickBooks migrator tool that helps in transferring QuickBooks software from their old to new computer with maximum three files, and if the user is using a US version of single-user QB desktop. Not just that, we have designed this piece of writing, sharing the complete details about transferring the software to the new computer. Thus, make sure to stick around the article till the end. Or you can further connect with our tech support team at +1-888-510-9198, and we will provide you with immediate guidance to all sorts of QuickBooks related queries.
Requirements for transfer QuickBooks to another computer
The user system needs a few things to transfer QuickBooks desktop to a new system. Let us have a look:
Make sure to register for the software after the installation and also ensure that the new system is connected to proper internet connection
Also, uninstall QuickBooks desktop from the old system, but before that create a backup of the QuickBooks company file
Keep the QuickBooks software installation disk or the setup file stored on an external device
The license and product registration details are other important things
External storage device to store the QuickBooks desktop files
Make sure to have a USB flash drive with enough free space to hold QuickBooks files.
Learn to move or reinstall QuickBooks files to another computer
You can perform the below discussed set of steps to move or reinstall QuickBooks files and data successfully from your old computer to new computer. Let us explore:
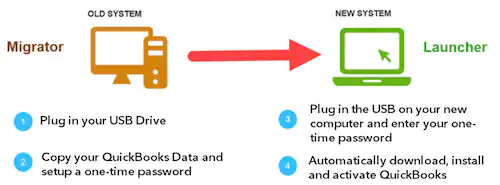
How to transfer QuickBooks from one computer to another using Migrator Tool?
Migrator tool is one of the great features of the QuickBooks software. A user can complete the process of transfer in just a few clicks due to this feature only. The transfer will be processed in two parts. However, before beginning the process make sure that you have access to the admin user, as the steps can be performed only the admin users.
How does migrator tool work to transfer QuickBooks from one computer to
another?
Migrator Tool is also known as Move QuickBooks tool. This tool can be accessed only if you are an Admin user. You will need to create a complex password and need to remember it by writing it somewhere, however, it is required only once.
The migratory tool will allow you to copy max three company files in the USB flash drive along with the supporting documents. The pen drive will physically move the files and the migratory tool will do technical work in background. The tool will also download the right version of QuickBooks Desktop in the new computer and will aid in setting up all the files.
Note: Using migratory tool will not delete any file or reformat your system.
Requirements of migratory tool to transfer QuickBooks to new computer:
There should be an internet connection to the new computer.
The pen drive should have a good amount of empty space. Free space around 150-200 MB is usually required.
Data which gets copied through migratory tool while moving QB to new
PC:
All the data required to run QuickBooks Desktop gets copied, however, the list is as below:
Version and other QB Desktop details
Recent company files- max 3 files with supporting documents
All other related files and custom templates and forms
We have tried to sumnmarized the steps for old and new computers below. Let us evaluate them one by one:
Step 1: On the old Computer
At first, you need to download and save the QuickBooks Migrator tools on a USB flash drive.
After that, you can download it from the official Intuit Website.
Once done with that to the old system plug in the USB drive.
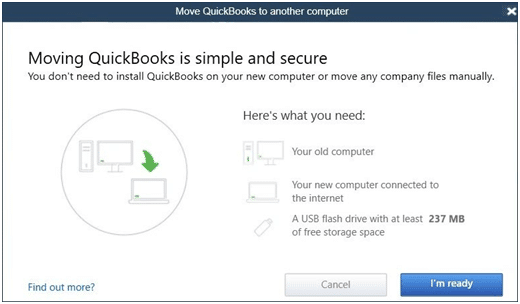
The next step is to open QuickBooks and move towards files> utilities> move QuickBooks to another system.
And further select the option I’m ready.
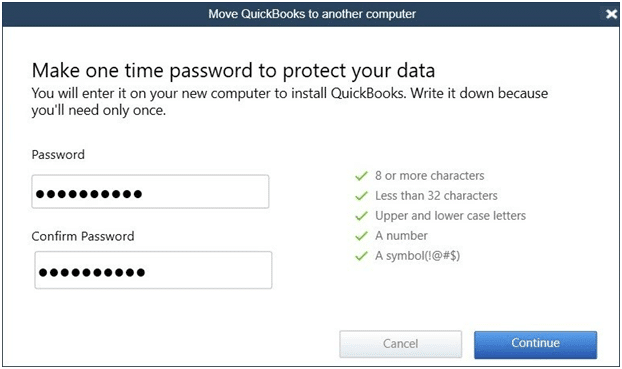
QuickBooks will now ask you for creating a complex password in order to secure the company files in the USB flash drive.
Also, remember that it is a one time password and you will require this password when you plug in a USB into the new system.
You now have to pay attention to the steps that are visible onscreen.
This might take some time, as it mainly depends upon the size of the company files.
Step 2: On the new computer
Here you need to insert the USB drive. The Migrator tool won’t run all alone because of the windows security protocols and this is the explanation that you want to manually run it.
To start the migrator tool, you can open the flash drive and search for Move_QuickBooks.bat file record and later on run it.
Now, enter the one-time password made before, and wait for the tool to finish the process.
QuickBooks migrator tool file will delete upon the completion of the process and other data in the USB will stay untouched.
You can change the name of the files on the old system.
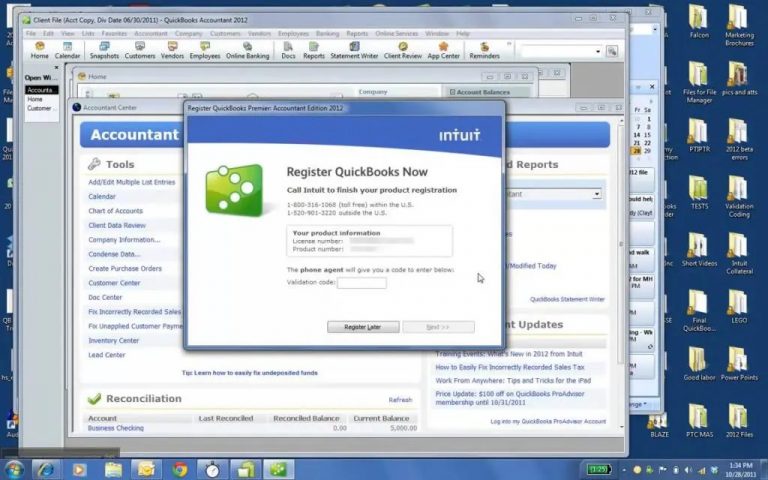
And can further move to the help menu and click on the register QuickBooks.
You can enter all the necessary details like phone number, postal code, and license key for finishing the registration.
What is not copied using migratory tool when QuickBooks is transferred from old to new computer?
Multi-user set configuration.
Payroll or payments services set up in QuickBooks will not be copied as per Intuit policy to protect data.
Intuit Data Protect needs to be uninstalled in the old PC and reinstalled in the new PC
Company files which have not been recently opened will not be copied.
Manual backups created by the user will not be copied.
Manual Procedure to transfer QuickBooks desktop from old computer to a new computer
The users can manually transfer QuickBooks from old computer to new computer. The steps involved in this process are as follows:
Step 1: Create a backup of the company files and QuickBooks license
The first step is to create a backup of company files and QuickBooks product license to the external storage device
The next step is to install the latest or current QuickBooks version to the new system
Once done with that, download and restore the backup file to the new system
After that uninstall the QuickBooks software
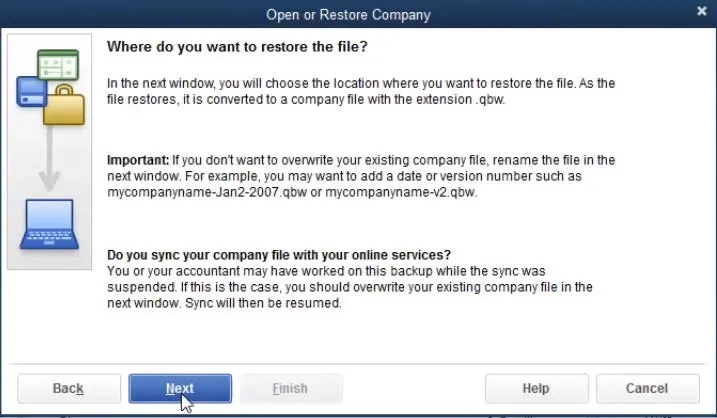
Step 2: Restoring the backup of the company files on the new system
Initially, the user needs to install the QuickBooks on the new system
And then, insert the storage device
Followed by opening QuickBooks and navigating to the file menu
Later on, choose the open and restore company option
Also, click on restore a backup copy and also click on next tab
After that click on local backup option and head to the backup file created in the old system
The last step is to pick a location in the new system for saving the backup and also click on save tab
Winding Up!
There is no fix time on how much time will it take to complete the process. It completely depends on the internet speed and size of company file. In case you face any issue while following these steps, you can contact our QuickBooks enterprise support team or accounting consulting professionals at toll-free number. i.e. +1-888-510-9198.
FAQs Related to transfer QuickBooks from old computer to new computer
Can I transfer QuickBooks from one computer to another?
You can try to transfer QuickBooks from one computer to another using the steps below: 1. Move to file menu from QuickBooks. 2. Choose utilities and further go for QuickBooks to another computer. 3. Go for I’m ready and then create a one-time password. 4. Perform the on-screen instructions to choose the USB Flash drive you’ll use
Can QuickBooks be installed on two computers?
QuickBooks with a single license can be accessed on multiple computers. However, files are only accessible to a single user, a maximum of two computers, but one at a time.
How long does QuickBooks migration tool take?
90% of conversions are processed in under 12.5 minutes. Whereas, 100% is completed in 72 hours. This usually completes within 45 minutes. However, the data is held in secure AWS servers during migration and destroyed once the conversion is approved.
How do I transfer data from old QuickBooks to new?
To do this, you need to perform the steps below: 1. At first open your new version of QuickBooks desktop 2. Move to the file menu and then choose open or restore company. 3. Choose open a company file and further hit next. 4. In case you have a backup company file instead of a company file, then choose restore a backup copy.