Form W-3 stands for Transmittal of Wage and Tax Statements. It summarizes W-2 employee information about the total W-2 earnings, FICA wages and tax amount withheld. It further consists of the federal income wages and tax amount withheld. In certain cases, you don’t need to file a W-3 form. Filing form W-3 is based on how your W-2s are filed with the social security administration. But if you are required to file for W-3, then this segment will help you in learning the complete procedure to print w3 form in QuickBooks. Let us explore the complete set of steps in detail.
On the other hand, if you are seeking professional guidance to carry out the procedure to file and print W-3 in QBO or for any related to intuit forms, then do not hesitate in connecting with our technical support team at +1-888-510-9198, and they will provide you with immediate solutions.
What is w3 form?
W3 form is a tax form that is used by the employers to report an employee’s total income to the Social Security Administration and to the Internal Revenue Services (IRS). Employees who get more than one W-2 Form from their employers need to be addressed to the IRS and Social Security Administration about their total salary payments and withholding amounts. This is done by filling W3 form by the employers and sending it to the respective authority.
As a business, you might need to print various forms in QuickBooks. Below we have stated the steps to print W-3 form in QuickBooks online payroll. Note that in QuickBooks online, printing W-3 forms depends upon how you pay and file the form.
Condition 1: When Intuit pay and file w-3 form for you.
In such a scenario, the form will be emailed to your employees starting January 16-31. In case you need to, you can reprint them on plain paper on January 13. The current year’s or any previous year’s form can be printed from when you started using QBO payroll.
Also, opt for print both employer and employee copies of your w-3 form.
The next step is to choose view on the transmittal wage and tax statements (W-3)
In case you are printing employee copies, then you will see those who want a paper copy and those who want to opt for paperless.
A printed copy won’t be provided to the ones chosen paperless.
You will now have to click on the view tab.
In case you come across a question asking if you or your employees contributed to a retirement plan outside of QuickBooks online, you will have to select yes or no, and carry out the steps above to get back to the W-3 form.
The last step is to click on the print tab on the Adobe Reader toolbar.
For this, you need to first head to the taxes menu.
Further click on payroll tax.
And also choose filings and opt for resources.
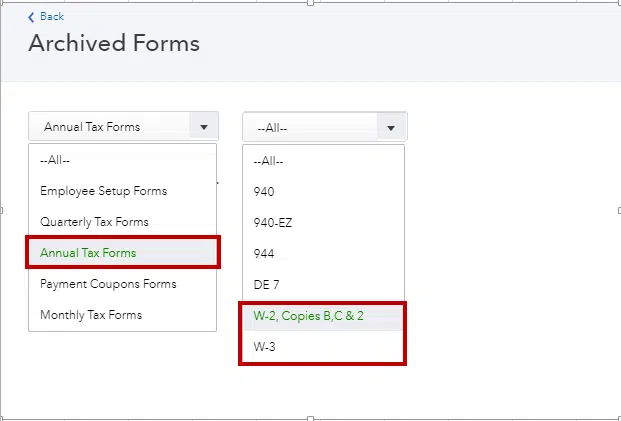
Once done with that, click on Archived forms and filings and also set the date range you need, or search the QuickBooks forms you need.
The next step is to choose the view on the w-3 form that you want to print.
Also, click on the print icon on the reader toolbar.
After that, choose print again.
Condition 2: In case you pay and file electronically or manually
In case you pay and file your W-3 form electronically or manually. You can print the W-3 form starting January 1. And can print the current year or any previous form from when you started using QBO payroll.
Printing the current year or a year prior
For printing the current year or a year prior W-3 form, you need to perform the set of steps below:
Navigate to the taxes menu.
Followed by clicking on the payroll tax.
And further choose filings.
From there, you can further choose to print both employer and employee copies of W-3.
Once done with that, choose archive or view on transmittal of wage and tax statement.
In case you are printing employee copies, you will see the following:
For W-2 Print setting: 4-part or 3-party perforated paper. Opt for the change setting, in case you need to change your paper type.
Employees who need a printed W-2 and those who want a paperless W-2. Note that, the employees who need paperless won’t be selected and won’t get a printed copy. You will then have to click on view.
A question might appear asking if you or your employees contributed to a retirement plan outside of QBO. Choose yes or no accordingly and further perform the steps above to get back to your W-3 form.
The last step is to choose the print icon on the Adobe Reader toolbar. Also, click on print again.
Now that you know the steps stating how to print W3 in QuickBooks online and desktop, it is time to implement those steps. However, in case you have any queries or if you get stuck at any step, feel free to ring our QuickBooks support team up at +1-888-510-9198, and they will help you with the procedure smoothly. Our technical team consists of professionals having sound QuickBooks knowledge. Thus, reach out to us in case of any queries related to QuickBooks.
FAQs Related to W-3 forms in QuickBooks
What is w3 form?
W-3 in QuickBooks payroll is Transmittal wage and tax statements that summarize W-2 employee information about: Total w-2 earnings, etc.
How do I print tax forms in QuickBooks desktop?
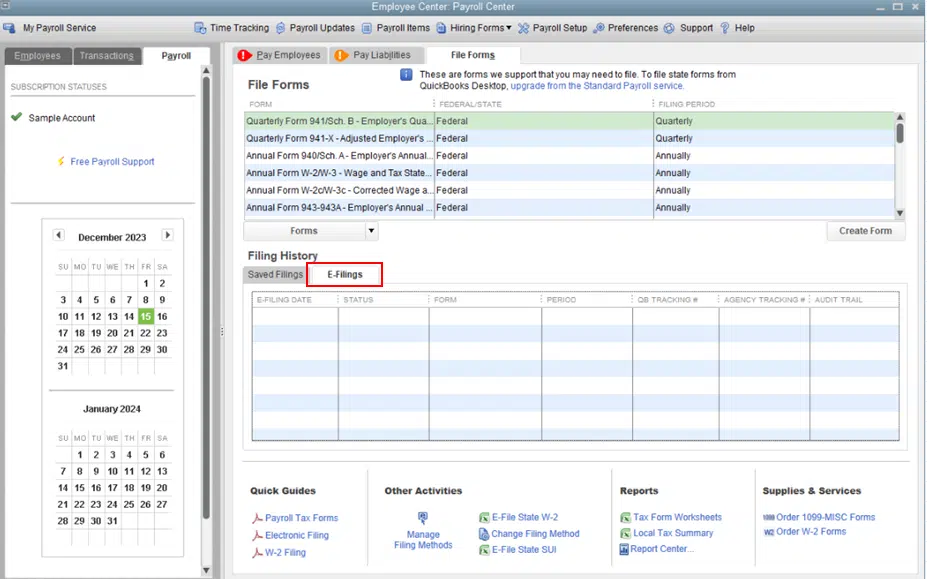
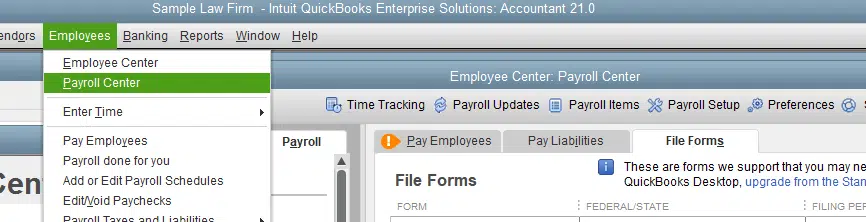
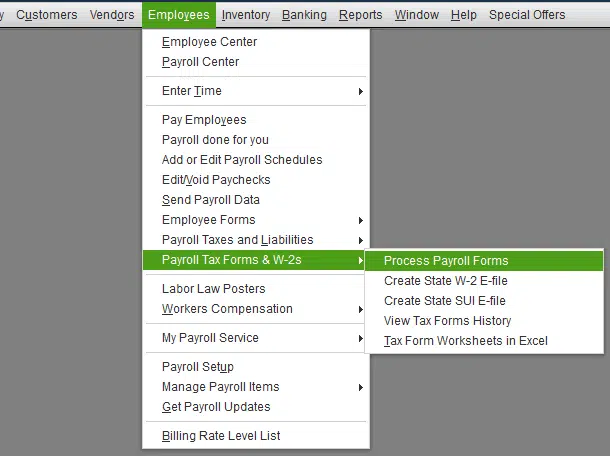
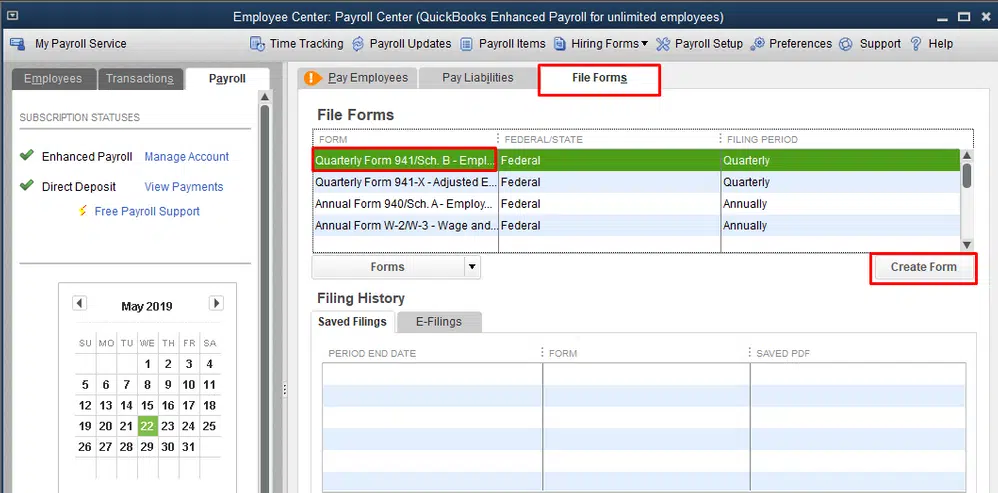
In order to print tax forms in QuickBooks, you can perform the steps below: 1. Move to the employees menu. 2. Choose the payroll center. 3. After that, select the file forms tab. 4. Now, select view/print forms and W-2s
Can I print w2 from QuickBooks desktop on plain paper?
You can print W2 on plain paper by clicking on W-2 printing settings. Under how do you want to print form W-2? you need to click on employee W-2 forms on plain paper. After that click on ok tab and this will print it for you successfully.
Where is W3 in QuickBooks Desktop?
You can find W-3 and print it using the steps below: 1. The very first step is to choose taxes. 2. After that, opt for payroll tax. 3. Now, choose filings. 4. You will see your W-2s and W-3 listed, but you can only file them from here. 5. Choose resources, and further click on W-2s or W-3s. 6. Once done with that, perform the steps to print it successfully.
Mistakenly turned-on sales tax, and now unable to turn it off in QuickBooks Online? Well, here is a quick guide for you. Automated sales tax is an amazing feature in QuickBooks. However, if you mistakenly turn on sales tax, but don’t want it to affect your overall invoices or do not charge sales tax, then you have an option to turn it off. In simple words, if you have the setting turned on in your QuickBooks online account, you will have to turn it off before using the new invoices experience. This will further help you in setting up your account for hassle-free use later on.
To help you out with the process to turn off sales tax in QuickBooks online, we have curated this piece of writing sharing how to turn off sales tax in QuickBooks online? For more details, stick around to this piece of writing till the end, or you can further get in touch with our technical support team at +1-888-510-9198, and let them help you out with your QuickBooks online sales tax queries and more.
Well, the ability to disable sales tax is available to all customers on both classic and automated sales tax from September 13, 2023. However, this is possible only if you haven’t created a transaction with sales tax in the past. In case you have any, you will have to delete these first. Removing the tick from the taxable box on the invoice will simply not work. You will have to manually remove sales tax transactions. And this can be done using a couple of steps enumerated below:
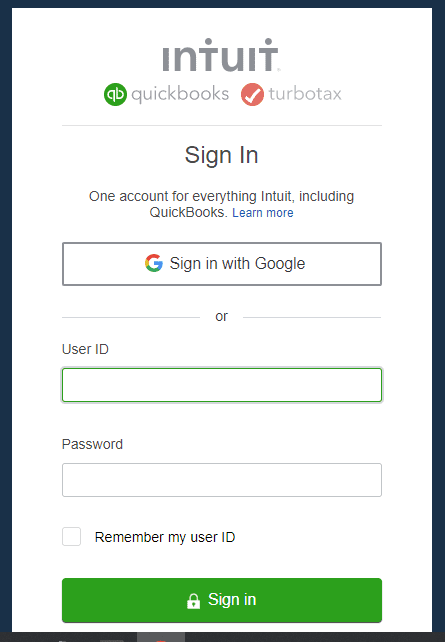
You will first have to sign in to your QuickBooks online account.
Heading forward, navigate to the reports tab.
Once you reach there, look for and open the sales tax liability report.
Now, set the report period to all dates. All agencies and tax items are displayed in the report.
Followed by selecting the taxable amount, in order to open a report with all transactions having global sales tax on them.
To continue, carry out the steps below:
Note down the details of the transactions.
Further, you need to delete the transactions. Note that the transactions deleted can be viewed in the Audit log.
Once done with that, turn off the sales tax feature.
And further refer to the sections for manual or automated sales tax.
Towards the end, re-enter the deleted transactions.
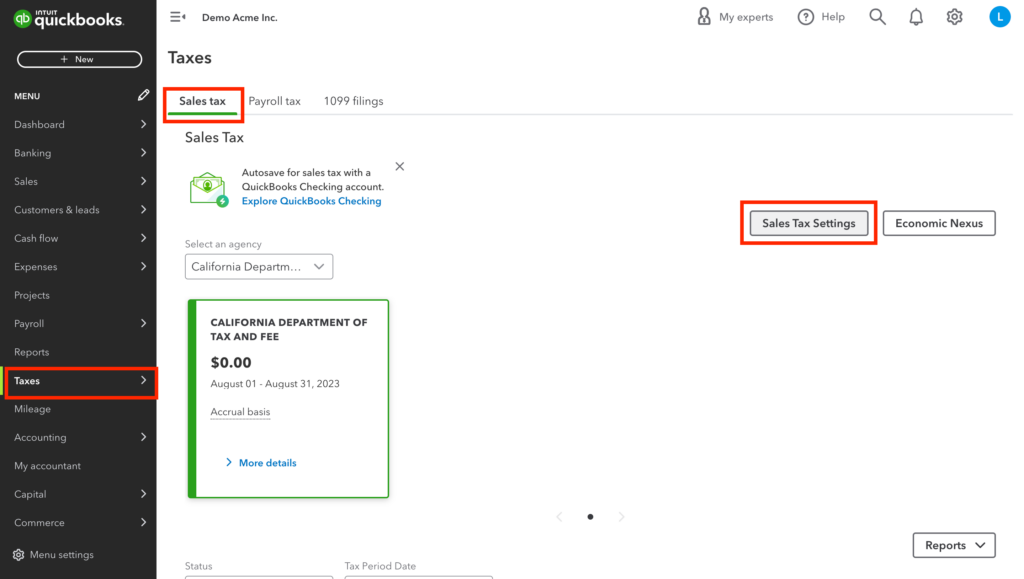
Turn off Sales Tax in QuickBooks Online (Automated Sales Tax experience)
Now that you have removed transactions having the sales tax, it is time to turn off the sales tax. The below steps are related to turning off sales tax in the automated sales tax experience. Let us have a look:
Initially, head to the taxes tab and further choose sales tax.
Once done with that, opt for sales tax settings
Followed by selecting turn off sales tax.
You now have to choose yes to confirm.
Turn off Sales Tax in Manual Sales Tax Experience
If you want to turn off sales tax in manual sales tax experience, then the steps might differ from the automated ones. The steps involved in this procedure are:
Navigate to the taxes tab and further opt for sales tax.
You now will see an option to go to the new sales tax experience, where you will have to choose do it later tab.
Once done with that, choose edit sales tax settings under related taxes.
After that, you will see a tab asking Do you charge sales tax? where you need to opt for No option, in case you don’t charge sales tax.
Delete Sales Tax Rates and Agencies in QuickBooks Online
Deleting sales tax rates or tax agencies in QuickBooks online isn’t possible. However, you can deactivate the tax rate or rename the tax agency, in case you no longer need or use them. It should be noted that, if you are unable to spot the settings below, it indicates that you are using Auto sales tax feature. Let us explore the steps to deactivate the tax rate.
Steps to Deactivate a tax rate in QuickBooks Online
Before you perform the steps below, note that you cannot reactivate a tax rate. Thus, if you deactivate this one, you will have to create a new one in future.
For deactivating a tax rate, you will first have to navigate to taxes.
Now, choose sales tax
Followed by heading to the related tasks section in the sales tax center.
Once done with that, choose add/edit tax rates and agencies.
Here, you need to choose a tax rate name, and opt for deactivate option.
The last step is to choose the continue tab on the dialog box.
Steps for renaming a tax agency
This process requires you to first head to the taxes tab.
Once done with that, choose sales tax.
Followed by heading to the agency name table in the sales tax center.
Also, choose rename for the agency name you want to edit
The next step is to make changes you want and choose save.
Alternate Solution (unable to turn off sales tax in QBO)
Another effective option is to manually edit the invoices and select a 0% tax rate to remove the automated taxes. In case this rate isn’t available, then create a custom rate and make use of it to calculate the sales tax when creating the invoices. Let us have a look at the steps below:
Steps To add the rate:
You need to first move to the taxes menu and further choose sales tax settings
Once done with that, click on add rate from the custom rates section.
Further click on single or combined and enter the name of the custom rate.
You will then have to choose the agency you file payments to and enter the rate.
The next step is to press save.
Steps to use the rate on invoices:
For this, you need to first open the invoices you want to edit one by one.
After that, on the select tax rate section, click on the drop-down and select 0%.
Enter in the required information.
Followed by clicking on save and close.
Note that this function works perfectly when you create an invoice directly in QuickBooks online.
Turning off sales tax in QuickBooks online can be a crucial feature for many businesses. It is believed that the above discussed steps might be of some help in successfully turning off the sales tax in QBO. However, if you are stuck at any point in time, or if you need any sort of technical assistance in carrying out the procedure, then in that scenario, we recommend you to connect with our technical support team at +1-888-510-9198, and let our certified QuickBooks professionals help you with all your queries.
To turn off sales tax in QuickBooks online, you simply need to perform the steps below: 1. Head to taxes tab and choose sales tax 2. Once done with that, choose sales tax settings 3. Choose turn off sales tax 4. And now, choose yes to confirm
How do I turn off VAT in QuickBooks online?
Note that, once you set up VAT in QuickBooks online, it can’t be turned off. However, you can set the default VAT to No VAT and stop VAT from showing in future transactions.
How do I remove GST from QuickBooks?
To delete GST adjustment, you need to perform the below steps: 1. Head to the settings tab first and then choose chart of accounts. 2. Once done with that find the income or expense account you used to add an adjustment. 3. You will now have to choose run report 4. Followed by selecting the adjustment you need to delete and further choose delete tab. 5. Click on confirm to end the procedure.
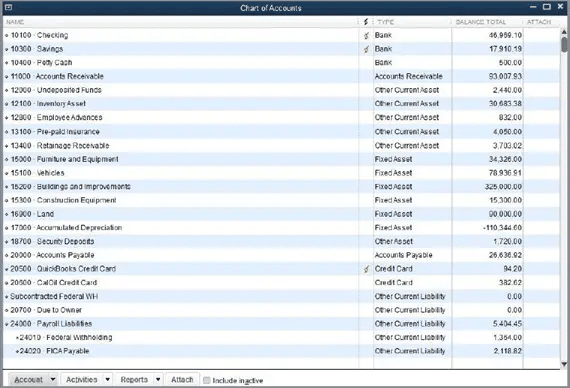
QuickBooks Chart of Accounts is basically a list of accounts that helps in categorizing assets, owner’s equity amount, liabilities, and income. To understand it better, you can say that it is a list of balances and chart of accounts in QuickBooks of the company, which further assists in understanding the amount of money a company has, how much it owns, and the amount it owes. It provides a full-proof financial report. This is an important feature for businesses, as it helps in analyzing the financial aspect of a business and reviewing its financial performance.
Setting up a chart of accounts in QuickBooks is quite easy, as it involves some basic set of steps, which we will be elaborating on later in this segment. So, if you are interested, then make sure to go through the segment carefully. For any kind of professional or technical assistance, you can simply connect with our tech professionals at +1-888-510-9198. Our certified QuickBooks professionals have years of experience and expertise in dealing with issues related to QuickBooks.
What is Chart of Accounts (COA)?
Before you dig in deep to learn the steps to setup chart of accounts in QuickBooks, it is sensible enough to understand a little more about the chart of accounts in QuickBooks. Well, as mentioned earlier, chart of accounts is basically a list of account numbers and names that are relevant to the company. It is majorly categorized into these four standard accounts namely:
Asset accounts
Liability accounts
Income accounts
Expense accounts
Within each of the categories, the line items will distinguish the specific accounts. Moreover, each line item represents an account within each category. It should be noted that a few charts of accounts also display equity accounts. This represents anything that remains after accounting for all operating expenses and revenue accounts.
There are basically four types of charts of accounts. Let us understand each one of them in detail:
1. Asset Accounts
The very first category is asset accounts. These accounts basically contain everything having a value like buildings, vehicles, land, inventory, valuables, etc. This type of Chart of Accounts helps in tracking the amount a user paid for a property and also other factors like depreciation. Items that are in liquid forms, like cheques and other bank accounts, also fall in this category.
2. Liability Accounts
Second comes the liability accounts. It consists of things like mortgages, payroll taxes, promissory notes, credit card balances, bank loans, personal loans, and income tax payables. When users add a loan to this account, it is recommended to ensure that users have also added the sum of the loan.
Here, the users will have to log just the principal amount and forgo the interest owed. When one reaches each monthly payment and enters the payment in the accounting system, the user would have to split the payment into an amount subtracted from what is owed and an amount of interest paid, which will go into an expense account.
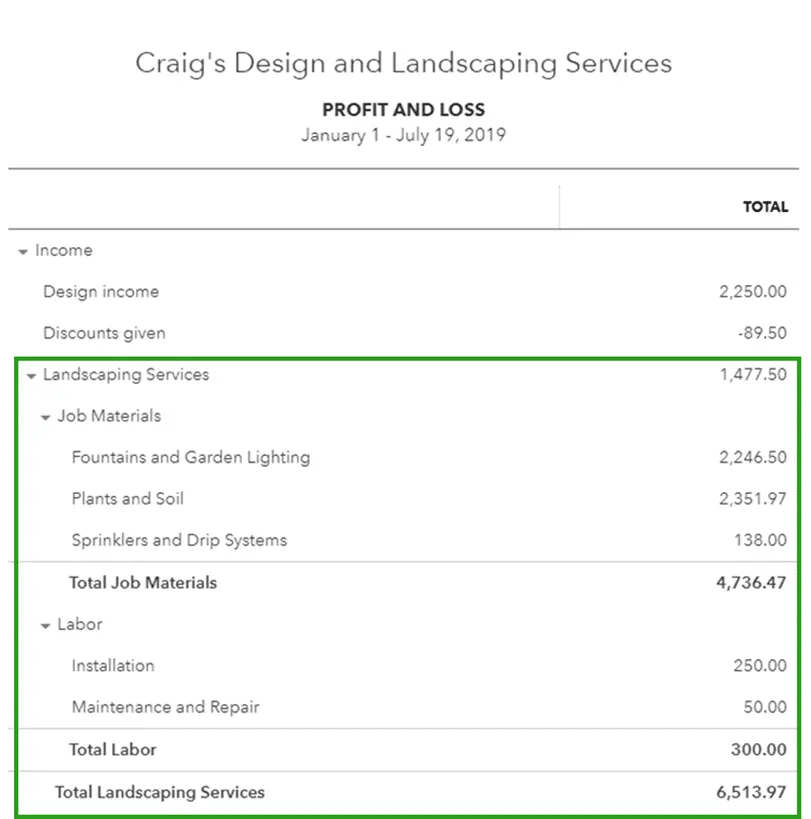
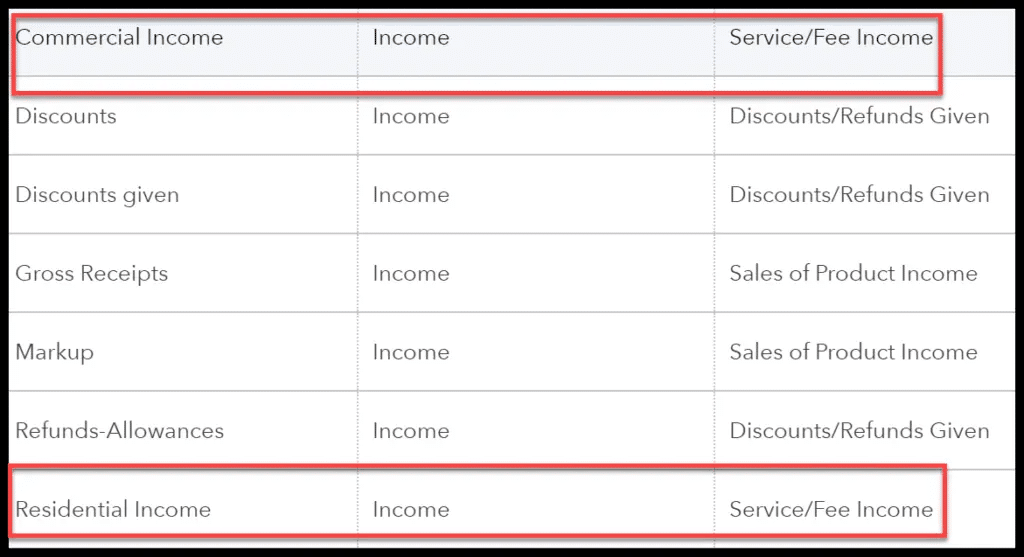
3. Income Accounts
Another type if the income Accounts. This encompasses expenses, revenues, additional incomes or expenses, and cost of sales. Some of the accounts are the same for all businesses, while some accounts are definite to a particular business type.
It is recommended to create a separate line item in the chart of accounts for different types of income. Make sure to consider what various profitable activities may be and sort them by income type instead of limping all the income into one account. After the user is able to identify the locations or events bringing the most cash flow, then it is possible to manage things more properly.
The last type of account is the expense account. It keeps users informed about the amount of money that they have spent. It further allows them to track the cash that is not with them.
Effective points to organize and set up chart of accounts in QuickBooks
Before you perform the steps discussed ahead, make sure to go through the below pointers:
It is recommended to keep the line items simple in the first go. Also, make sure that the line items have titles that are understandable to the accountant and also to them.
Majority of accounting systems are preset with a chart of accounts. The lines of preset accounts have numbered headers like 1430.2 and 530.8. And these numbers can be effective for large scale businesses but are usually a waste for entrepreneurs and small firms.
We recommend avoiding creation of a new line item for each transaction. This is to ensure that it doesn’t litter entire chart of accounts.
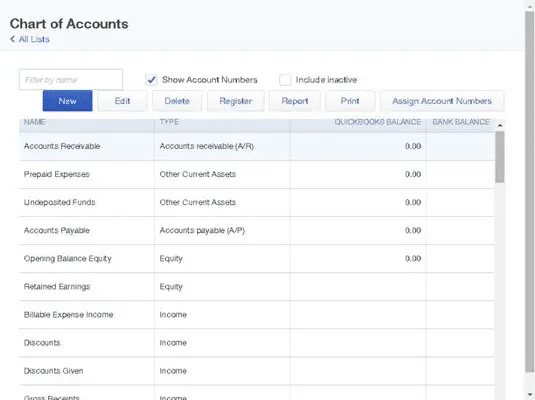
How to access the QuickBooks chart of accounts?
The steps to access the QuickBooks chart of accounts in QuickBooks desktop and online differ. So, make sure to perform the steps accordingly. The steps involved in the process are as follows:
On QuickBooks Desktop:
The user is supposed to pick up the Chart of accounts from any of the QuickBooks menus.
And then head to the company and click on lists or accounts.
Go to the Company and then click on Lists or Accountant.
On QuickBooks Online:
Under this software, you need to click on the settings icon and select chart of accounts directly.
You can perform the below set of steps to setup chart of accounts in QuickBooks. Let us explore the steps in detail:
Step 1: Go for the lists – Chart of Accounts Command
The QuickBooks software will display the Charts of Accounts window on the computer screen.
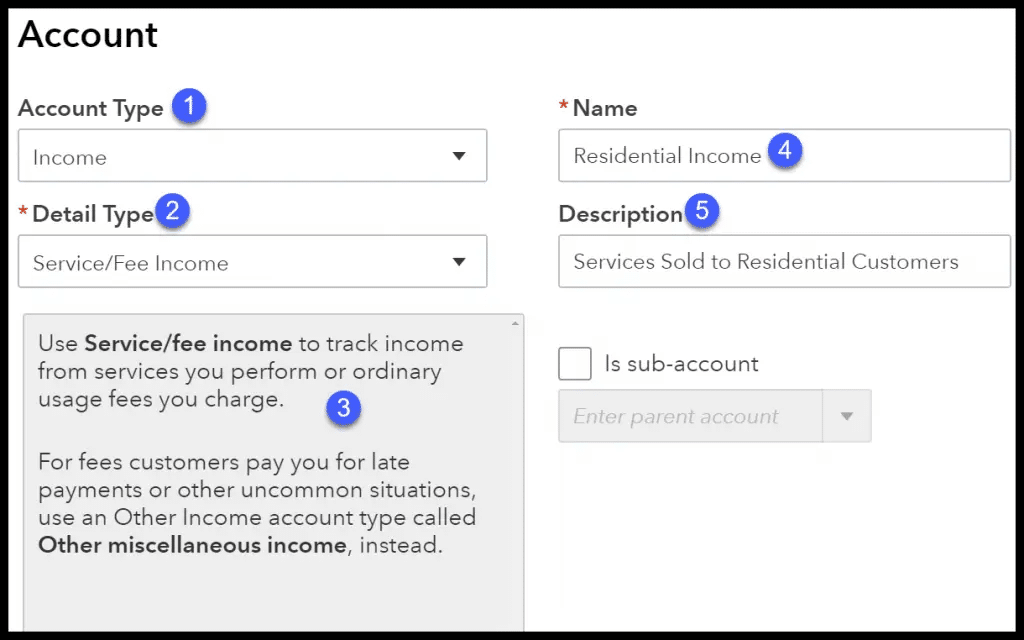
Step 2: Now, click on the Account Button
Furthermore, on the screen, QuickBooks will display the Account Menu. The user is required to click on the tab stating ‘Account menu option New’. And this will open up a window on the screen.
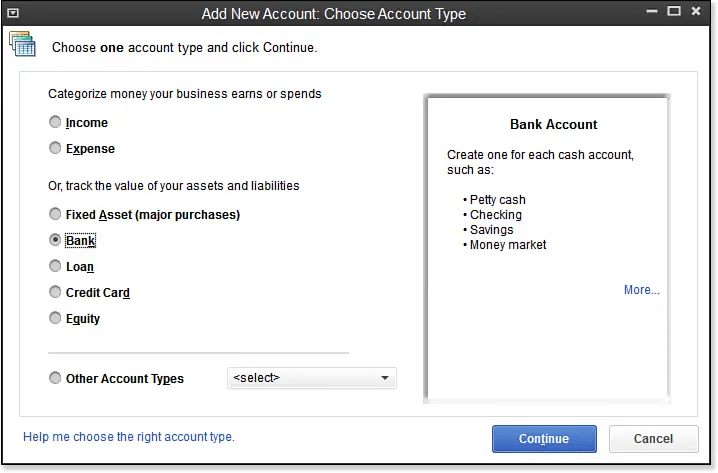
Step 3: Add New Account by opting for Account and then new tab
Note that the QuickBooks software will showcase the Add New Account window on the screen.
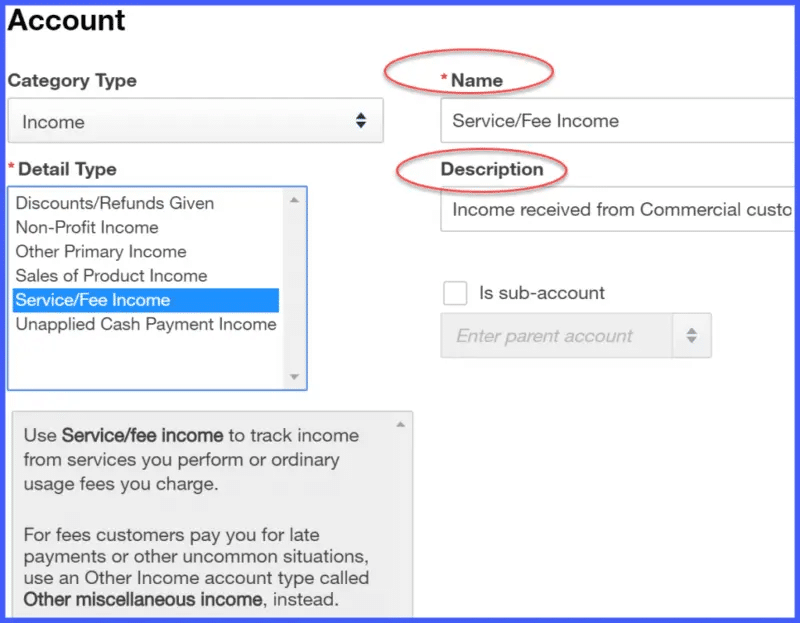
Step 4: Make use of the Account Type buttons
The QuickBooks accounting software offers different accounts types which include income, loan, fixed asset, Expenses, Credit Card, equity, Accounts Payable, Other Income, Costs of Good Sold, Accounts Receivable, Other Assets, Long Term Liability, Other Expenses, and more. Via the accounts, one can find the location where their data is getting reported.
Step 5: The next step is to click on continue
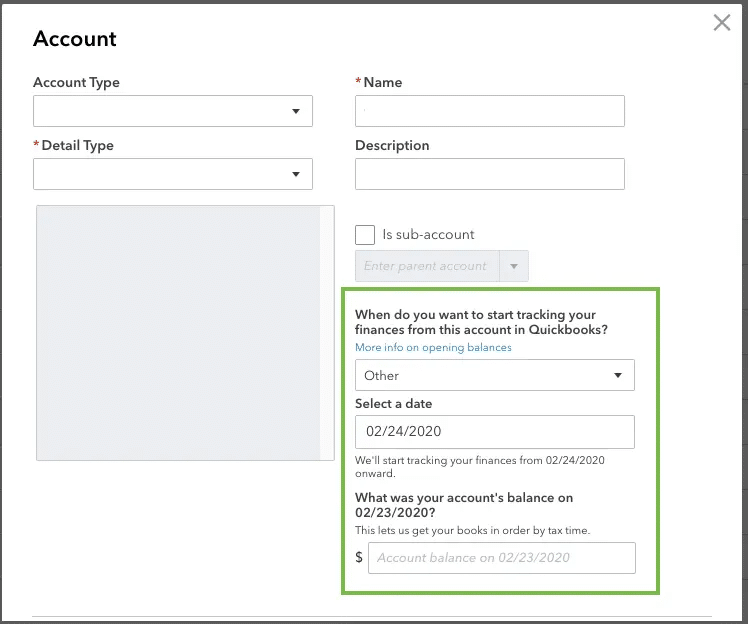
After the user clicks on the continue tab, the QuickBooks software will show the second Add Account window on the computer screen. It should be noted that the name of the account will appear in the financial statements. Thus, you would have to use the Account Name Box to give a distinctive name to the new account in order to setup chart of accounts in QuickBooks.
After you have opted for the sub-account checkbox, it is suggested to assign a name to the parent account.
Step 7: Head to the Bank Account
In case the QuickBooks software is compatible with working in different currencies, then it will prompt the users to look for all those customers, bank accounts, vendors, etc., who use different currencies.
Step 8: The next step involves the description of the new account
There is no need to describe the new account. QuickBooks software makes use of the account name in the financial statements and so no description is required as such.
Step 9: Get Account Info
Now, the user is supposed to get the info about the credit card account type version of the Add New Account window. This will help in storing all the card details.
Step 10: Recognize the Tax Line
On the corporation’s Tax return, the cash account balances will get recorded. In case the user wants to add a bank account, then using the Tax-Line Mapping drop-down list can help.
Lastly, the user is supposed to click on the next tab to save the account information and move to the add new account window. After both the accounts have been setup, the new accounts will appear on the chart of accounts list.
How to Modify an Account from the Chart of Accounts List?
One can try to modify an account from the chart of accounts list by performing the steps below:
Choose an account to setup chart of accounts in QuickBooks
At first, you need to choose the account that you wish to modify. Furthermore, you can modify the accounts regardless of the time. Now, from the chart of accounts, scroll down to the account that is to be modified. Click on the drop-down arrow next to run report.
Choose the edit option.
Make modifications to the account
This will now lead you to the window, where you can make changes to the account name and the account description fields. Note that the users should not change the category type in case they have already entered transactions using the account.
This can lay a serious impact on the financial statements.
Save and close
It is recommended to save the changes before exiting the account.
Conclusion!
Now that you know the steps that can be performed to set up a chart of accounts in QuickBooks, it is time to perform those steps. Whereas, if you get stuck at any point in time, or if you require any sort of technical assistance in performing those steps, then, in that case, consulting our tech support professionals is something that we suggest. We are a team of certified QuickBooks professionals who provide you with instant QuickBooks support services. Our experts have years of experience in helping QuickBooks users with issues related to the software. For more details, get in touch with us at +1-888-510-9198 and we will provide you with the best guidance possible.
What exactly is a Chart of Accounts in QuickBooks, and why is it important for my business?
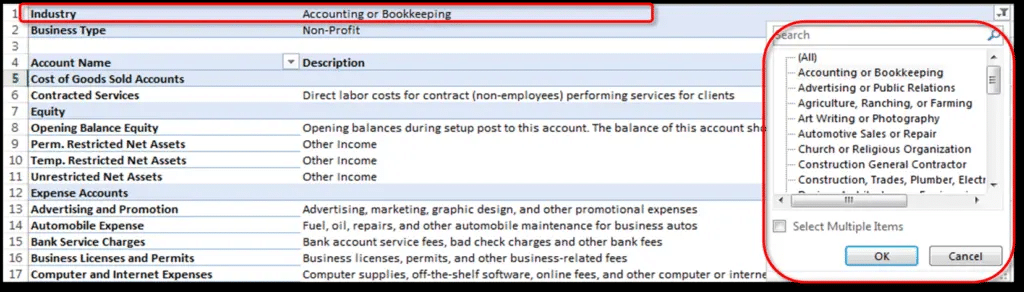
Setting up a Chart of Accounts in QuickBooks involves several steps. First of all, you’ll need to access the Chart of Accounts feature and add or edit accounts as per your requirements. QuickBooks allows you to customize your Chart of Accounts to match your business structure, industry, and reporting needs. You can add new accounts, edit existing ones, and even organize them hierarchically for better organization.
What are the steps for setting up a Chart of Accounts in QuickBooks, and can I customize it to suit my business needs?
Setting up a Chart of Accounts in QuickBooks involves several steps. First, you’ll need to access the Chart of Accounts feature and add or edit accounts as per your requirements. QuickBooks allows you to customize your Chart of Accounts to match your business structure, industry, and reporting needs. You can add new accounts, edit existing ones, and even organize them hierarchically for better organization.
Can I import a Chart of Accounts into QuickBooks?
Yes, QuickBooks provides the option to import a Chart of Accounts from an external source like a spreadsheet or another accounting system. To do this, you’ll need to format your data according to QuickBooks’ import requirements, which typically involve preparing a CSV or Excel file. Then, you can use the import feature within QuickBooks to bring in your Chart of Accounts, saving you time and reducing the risk of errors during manual entry.
Made up your mind to download QuickBooks Desktop? Well, QuickBooks is a feature-loaded software that is helpful to any sized business, regardless of the industry they belong to. If you have decided to incorporate this accounting software in your business process, then it is definitely a great decision. QuickBooks downloads desktop is an easy process that you can perform without any issue. All you need is to perform the right set of steps that are required to install and set up this software.
In this article, we will be discussing the steps that you need to follow to get your accounting software and start using it. Thus, if you are interested in knowing more about QuickBooks and the steps involved in its setup, make sure to read the article till the end. However, if you are a newbie and don’t want to perform the steps manually, then you can take assistance from our tech geeks at +1-888-510-9198 and they will provide you with instant support services.
An accounting software is something that eliminates the hassle to perform various accounting and bookkeeping activities. And when it comes to QuickBooks accounting software it is a feature-packed software that is easy to use and can be easily accessible. QuickBooks Desktop also offers a cloud-based subscription service that lets you access the entire database from anywhere and anytime. It is a subscription-based accounting software, and is highly productive. There are different versions and editions available that can be downloaded using some basic set of steps.
Download QuickBooks Desktop 2023 Pro, Premier, Accountant, Enterprise, for Mac and POS
QuickBooks Desktop Plus (Pro & Premier), QuickBooks Enterprise 23.0 users will have access to four new or improved features with QuickBooks Desktop 2023. The features of this software include a new cash flow hub, reporting optimization, updated track vehicle mileage capabilities, and improved banking connectivity. Not only that, but two additional payment subscriptions are available to all 2023 QuickBooks desktop users with active subscriptions. Both payment links and the Node card reader have received changes. Moreover, there are new payroll functionalities available for different subscriptions.
What do the New Features of QuickBooks Desktop Version have?
Intercompany Transactions- Managing many business units more properly and transparently can be easily tracking intercompany transactions.
Expiration Dates – This feature is a must-have for businesses dealing with perishable inventory, in order to sell items before expiry.
Inventory Categorization- The inventory categorization feature provides you the ability to sort and categorize item lists making it easier to search for things.
Cash Flow Hub- This feature lets you track the financial health of the business to maximize profits.
Business Mileage Tracking – This feature tracks and calculates miles between the trip’s start and end locations.
Improved Bank Connections- You can simply download and categorize transactions or credit card accounts and link external banks with this new and improved feature.
Node Card Reader- Another extremely helpful featureis a node card reader that lets you make contactless payments.
QuickBooks Downloads Desktop 2022 (Pro Plus 2022, Pro Plus 2022 Payroll, Premier, Accountant, Mac, and Enterprise 22.0)
Well, all the versions of QuickBooks Desktop 2022 such as Pro Plus 2022, Pro Plus 2022 payroll, Premier Plus 2022, Premier Plus 2022 payroll, Accountant, Mac Plus 2022, and Enterprise 22 are now available for download.
What is included in QuickBooks Desktop 2022?
In comparison with the previous versions, you can expect the 2022 desktop version of QuickBooks faster by 38%.
It further supports processing in 64 bits.
Moreover, you can use QuickBooks downloads to track business performance, backup data, and improve overall productivity with the mobile application.
You can set up your company’s finances and payroll services much faster.
You can download any of the versions of QuickBooks Desktop 2021 and avail new features, better performance, and other improvements that come along with it. What’s different about QuickBooks Desktop 2021 version:
It offers a basic user interface and a bunch of features like tracking invoices, making payments, keeping an eye on sales, and much more.
Moreover, you get access to tools like simple bank feeds, receipt management, automatic statements, payroll liabilities, etc.
Also, users that download the QuickBooks Enterprise 2021 version will get all the features required for business financial requirements.
You can easily download QuickBooks 2020 and all its editions easily and get access to the following features:
You get access to tools for financing your business through QuickBooks.
Another feature that you can avail of in QuickBooks Enterprise is additionally manage several emails, add client PO numbers, add customer payment reminders, and much more.
In addition to that, the premier edition will let up to 5 people and further automatically classifieds the transactions before requesting for approval.
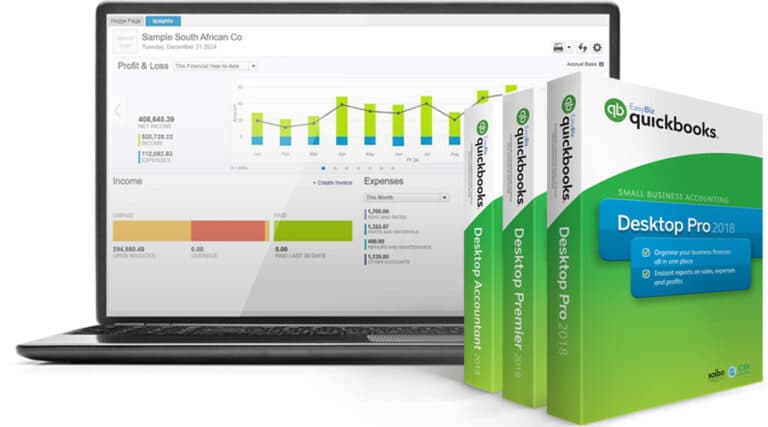
You can enjoy the following features in QuickBooks Desktop 2018 Pro, Premier, Mac, and Enterprise. Features that an ideal software should have for accounting purposes are accessible in QuickBooks Desktop 2018.
You can get access to features like support for multiple monitors.
Salary reminders, vendor record merging, and other helpful functionalities.
You further get tools for payroll, reporting, cost management, quick and easy invoicing, along with time and money savings.
You can download QuickBooks 2010 and 2009 versions and get access to the features like keeping track of income and expenses, enabling users, enabling report center, managing documents, and adding further list entries.
QuickBooks desktop offers some of the best features, which include the below stated ones:
Cash toggle on reports: This particular feature permits the user to toggle displayed reports between cash or accrual basis.
Search chart of accounts: This particular feature allows you to find and select a chart of account or sub account by simply typing an account number and the account name or partial words of an account name.
Merge Vendor record: This feature provides a consolidated window to identify and combine duplicated vendor records efficiently.
Past due stamps on QuickBooks: This feature provides a visual confirmation that a customer’s invoice is past due displays on the screen when an invoice has a past due balance.
Payroll liability and payment reminder: Another feature that tops is the list the payroll liability and payment reminder. This particular feature ensures that the clients are reminded of the upcoming payroll liabilities payments.
Update email security: QuickBooks desktop furthermore includes securely sending emails from Gmail, outlook, and Windows live accounts using the feature of improved multi-factor authentication. This feature makes sending email extremely easy.
Inventory report customization: Reports like inventory valuation summary or detail, inventory stock status by item, and assembly shortage by item have an option to customize the display.
Mobile inventory scanning: It is now possible to pick quantities at warehouse using a barcode on a device or Android phone to record the inventory.
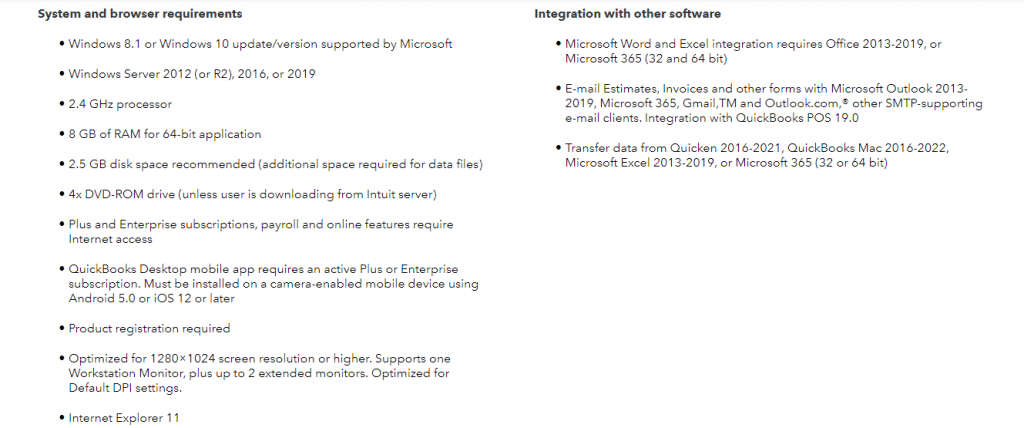
Check System Requirement of QuickBooks desktop
Simply downloading the software can lead to certain errors. Therefore, it is always recommended to install QuickBooks desktop after checking the minimum system requirements.
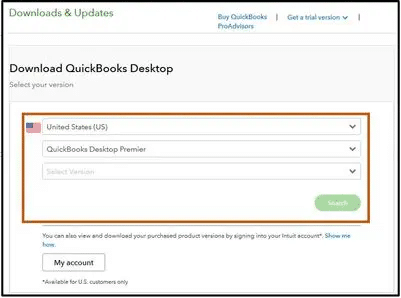
What is the Process for QuickBooks Download Desktop or MAC?
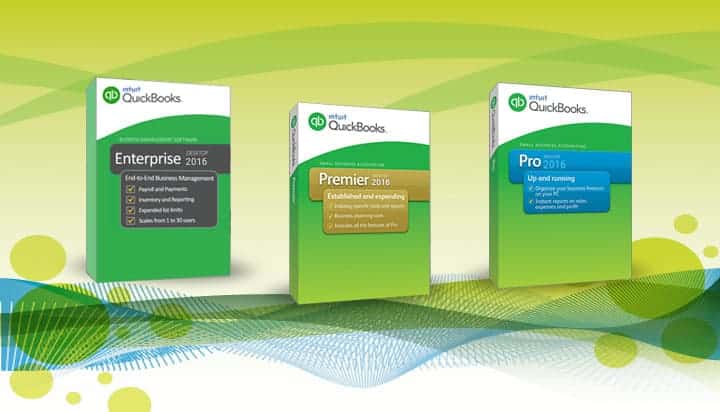
QuickBooks accounting software is available in three different editions, which include Pro, Premier, and Enterprise. Each version is having its own features and benefits. According to the business you own, you can go for a particular version. If you already have the QuickBooks software and want to download the latest version for it, then the below steps might help:
Initiate the process by downloading the product’s appropriate installation file and then head to the step ahead.
Process to Download QuickBooks Desktop for the first time (QuickBooks Download)
The steps to download QuickBooks for the first time are quite easy. However, as a user, you might have to keep certain things in mind, which we will be discussing later in this article. Note that, you can convert your QuickBooks desktop pro. This requires the following steps:
Step 1: Essential factors
Before you start with the installation and download QuickBooks procedure, make sure to check the following things:
Ascertain that the system meets the necessaryconfiguration
Ensure that your internet connection is stable
Always buy a legitimate version of QuickBooks
Step 2: Buy and Download QuickBooks
The very first step here is to head to the official intuit website
After that choose the version of QuickBooks you wish to download
You can compare the price of QuickBooks Desktop, Enterprise, Pro, and Premier on the website itself
And then click on the product your wish to download QuickBooks and purchase
Once done with that complete the payment process by entering the payment details
Furthermore, you will get your license and product code
Moreover, a confirmation will be sent to your email
You will also be able to see the download QuickBooks tab
Now, click on the tab
In addition to that, select the location where you wish to save the file
Once done with that, click on save and your QuickBooks download will start
Let the process end and then it will direct you to the installation process
Step 1: Make sure QuickBooks Mac Desktop will run on your system
In order to ensure that your QuickBooks installation is successful, make sure that your system meets the minimum requirements for QuickBooks for Mac.
System Requirements
Supported by macOS 10.13 (High Sierra), macOS 10.14, and at least macOS 10.12 (Sierra) (Mojave).
Intel Core 2 Duo or better processor.
An Intel Core 2 Duo or better processor is required to run a multiuser server.
2GB RAM (4GB RAM suggested)
250 MB of Disc Space in available
An Internet connection or CD/DVD drive is needed for downloaded installation.
Whether you wish to print receipts, checks, deposit slips, lists, purchase orders, mailing labels, reports or graphs, you would require a printer which is compatible with Macintosh.
To print checks, use Intuit checks.
Check for Canadian Image Ready are not supported.
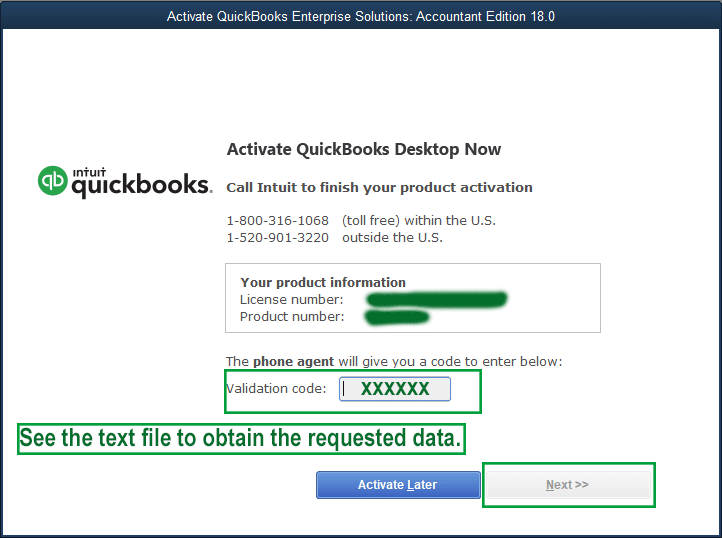
Need product registration.
Software Compatibility – Note that the program should be transferred to a supported ecosystem for extra support if the issue is not fixed. Intuit won’t support the above-discussed items if Microsoft doesn’t.
Step 2: Get License and Product Numbers
Download the Product: You will get a confirmation email, which includes the product number and license. In case you do not get the license number, then you might get it back, or might have to speak to the support team.
Download with CD: The package’s scratch-off label shows the details regarding product and license numbers.
Step 3: Download and Install QuickBooks Mac Desktop
The very first step is to download QuickBooks Desktop for Mac.
In case you are having any sort of issue with the downloading process, you can try clearing your browser’s cache and cookies.
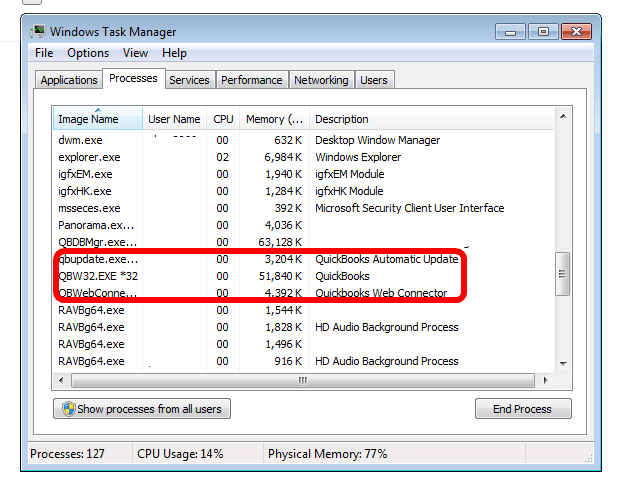
Now, close any background processes.
Further, insert the QuickBooks CD into the CD-ROM and further double click the installer. The window will open on its own.
Now, place the application folder’s QuickBooks icon there and the program folder will open.
You now have to open QuickBooks by double-clicking on it.
Step 4: Update and convert your company file
You must update your company file to work with the latest version. The steps involved in here are:
You need to first launch the latest version of the company file.
Further, go for upgrade option in case QuickBooks asks you to update or convert the company file.
Once done with that, click on ok tab.
You now have to verify your accounts, reports, and balances to ensure that the right company file was converted.
Step 5: Set up multi user (Not mandatory)
Just in case, you have more than one user license, then make sure to configure QuickBooks for multi user mode. The steps involved here are:
At first, open multi-user folder.
Furthermore, the program folder should now have the QuickBooks server icon.
You now have to insert the admin username and password.
Also, choose authenticate to mitigate the applications folder and further click on ok tab.
You can now launch QuickBooks and open the company file.
In order to share a company file, click on file and hit activate multi-user mode.
What does a User have to do after downloading QuickBooks Desktop Software?
It is important that the user downloads QuickBooks correctly and saves it in the default or desired location. Once done with that, it is essential to install and configure QuickBooks Desktop. Also, ascertain to choose appropriate installation option and further set up accounts after the install process ends.
How can an existing user get QuickBooks Desktop?
For an existing user, it is essential to first take a backup of the company file to recover them in the event of the data being damaged somehow. You are then required to download and install the new version of the program using the same procedure as above. This method works for the current users who want to remove the QuickBooks desktop version before downloading the latest version. Those who don’t want to update the software by removing the old version must use the update process within the software itself.
What are the features that you get in QuickBooks Desktop Software?
You can avail of the following features in QuickBooks Desktop:
PDF Invoice and Attachment Review: Well, with this feature, there is no need to manually open each and every attachment to verify the accuracy of the email’s content. You can further preview invoices and attachments using this feature.
Streamlined Bank Feeds: You can automatically categorize your bank transactions with additional information using improved matching, enhanced rules, and batch editing. In order to increase flexibility and efficiency, you might easily search, categorize, and define using enhanced rules.
QuickBooks tool hub: This tool can let you eliminated a bunch of errors and glitches in QuickBooks and further gives access to multiple tools.
QuickBooks Desktop Manager: With this, you can quickly find and install all of your QuickBooks Desktop products. And further install and upgrade the QuickBooks Desktop software with only a few clicks.
Customize and format payments receipts: By personalizing the payment receipt format and further including a logo, you can now make your customer communication a bit more formal and professional. You will further get a simple layout designer tool that will let you generate a variety of formats to use with your specific customers.
RFA Improvements: You can easily request a second admin for QuickBooks.
Changes to online banking: You can easily store the customizations made to the column. Further, create guidelines for conducting money-in or money-out transactions.
Advanced user management feature: It is now easy to control the roles of the users and their permissions using the advanced user management function. You can further limit the activity, especially for user access, so that you can further provide each user with a set of permissions.
Inventory Aging report: You get the detailed overview of stocks, age, age of acquisition, and quality with this report.
NEC and MISC tax forms 109: The 1099 MISC and 1099 NEC forms are now supported by QuickBooks and are easy to e-file and print.
Receipt Management: These features can easily let you create and categorize QuickBooks receipt expense transactions. Now, record, review, and import receipt data using the mobile QuickBooks app.
Now that you know what are the steps that you can carry out to download and set up QuickBooks successfully, it is time to implement those steps and make the most out of this software. However, in case of any queries or if you are stuck at any point of time, then our tech support professionals can help you with the process ahead. You simply have to contact our team at +1(844)405-0907 and let them perform the procedure for you. We are a team of technically sound QuickBooks professionals who work around the clock to provide immediate support and assistance.
How to move your QuickBooks Company data file from QuickBooks online to QuickBooks Desktop:
Opting for QuickBooks desktop or QuickBooks online depends upon the requirements of a business. At times, in order to meet those requirements, it becomes essential for a business to migrate from QuickBooks Desktop to QuickBooks Online. And this migration process requires you individually move QuickBooks Company file to QuickBooks online as well. To help you out with this, we have come up with this segment right here sharing the complete details about transferring QuickBooks company files data to QuickBooks online successfully. Thus, to explore further, make sure you stick around till the end, or if you are someone from a non-technical background or if you are skeptical about performing the steps manually, then feel free to reach out to our tech support professionals at+1-888-510-9198 and ask them to perform the required steps to migrate the file successfully.
Are you Sure about Migrating to QuickBooks Online?
Before you proceed with the migration, it is essential that you are sure whether this migration will turn out to be compatible for your business and its current requirements. There are certain situations that will help you in deciding whether this migration is ideal for you or not. The complexity of the company file plays a vital role in the success of the migration process. The company file stores the complete details about the company from inventory to accounting records. And when the company files are large, they are usually companies with extension histories, large inventories, and large sizes on the whole. And if such a company is using QuickBooks enterprise for the time being, then converting to QuickBooks online isn’t an ideal decision.
That simply doesn’t mean that QuickBooks enterprise users cannot migrate to QuickBooks online, but you might require some additional setup. In case you are a small or medium-sized company using QuickBooks desktop pro, premier, or premier accountant, then you can easily opt for migration.
Essential tips before moving ahead with the conversion
The process of converting the company file from QuickBooks online to the desktop can be a little tricky. However, there are certain pointers that need extra attention to avoid any kind of further mess. Here is a list of essential points that you need to focus on before implementing the steps for migration or conversion.
Often users miss out to keep a check on their internet explorer version, which can create certain issues later, especially compatibility issues. Thus, it is suggested to perform the necessary steps and check the version of the internet explorer being used. Note that the internet explorer should be windows version 10 or higher to perform the conversion smoothly. If not, then the user might need to perform the steps to upgrade to the latest version.
Another point that you can’t afford to miss out on is that the desktop software must be the 2004 edition or the latter one in the case of windows. The reason behind this can be that conversion is only possible with 2004 and later versions.
Note that the QuickBooks desktop software should be compatible with internet explorer. And internet explorer should be 32-bit. This is because the 64-bit version tends to show up an error and hinders the process.
In case you are making use of Mac version of QuickBooks, then direct conversion is not possible. And also, the process for this conversion might be different from the normal one.
Also, the user should have access to at least an invited accountant account if you are already a master or a company administrator, to avoid any kind of mess later.
The user might need an ActiveX to carry out the conversion. Thus, before performing the steps, make sure to get ActiveX.
Steps involved in transferring, migrating, or moving company file from QuickBooks Online to QuickBooks desktop
Now that the user is ready with to migrate the company file, he/she is required to perform the below steps to successfully move the company file from QuickBooks Online to QuickBooks desktop. Thus, make sure to implement the below-listed steps wisely:
Step 1: Setting up security settings in Internet explorer
The process starts with setting up the security settings in internet explorer or Microsoft Edge. The steps below are to be performed to carry out this process. Let us have a look:
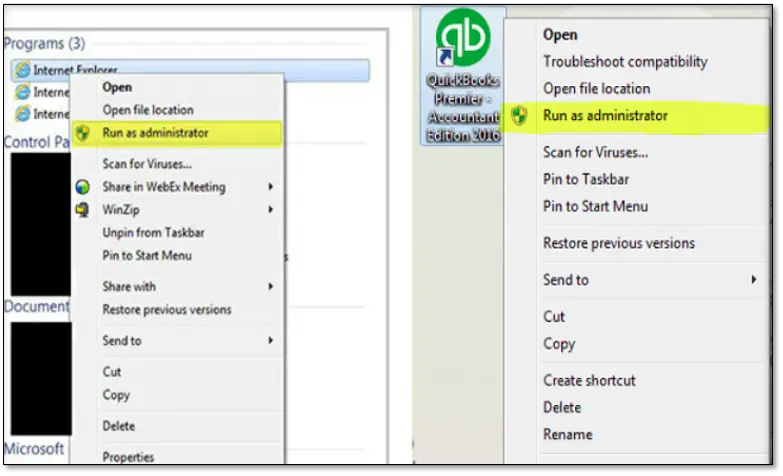
The process starts with right-clicking the Internet Explorer icon on the Run as admin option.
Once done with that, the user is supposed to click.
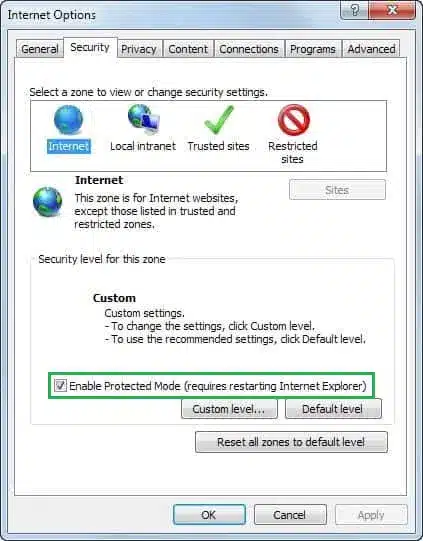
The user is then required to go for the Tools icon
Followed by selecting the Internet options.
Once done with that, the user needs to go for the Security and trusted sites option.
Here, one must click on the Sites tab.
After that, in Add this website to the zone field, the user is supposed to enter: *.intuit.com and *.qbo.intuit.com
The next step is to uncheck the “Require server verification for all sites in this zone “.
And also, close the trusted sites window.
Later, go for the Apply option
After that uncheck Enable protected mode.
After that click on the Okay tab
And close and re-open Internet explorer to Disable the protected mode.
To end the process, one must leave internet explorer open.
Step 2: Setting up QuickBooks desktop for Export
The second step is to set up the QuickBooks desktop for export. This process involved the below sub-steps:
At first, the user is supposed to right-click the QuickBooks desktop icon
Once done with that go for the Run as admin tab
In case the user hasn’t downloaded the QuickBooks desktop already, then it is suggested to download the trial version.
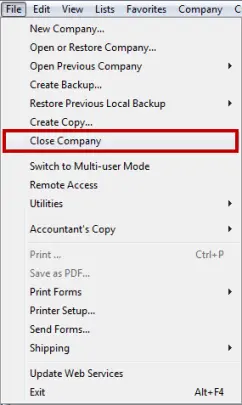
Once done with that, the user is supposed to move to the File and then go for the Close company option.
After that leave the QuickBooks desktop open at the time of completing the rest of the steps.
Step 3: Getting ready to export QuickBooks online data
After the above steps, the user will have to prepare for the export. This involves the steps below:
The very first step here is to open the version of QuickBooks that the company file will be converted to.
Note that the experts recommend to avoid opening the company file and also don’t go for no company open window.
Once done with that, the user is supposed to log in to the QuickBooks Online account.
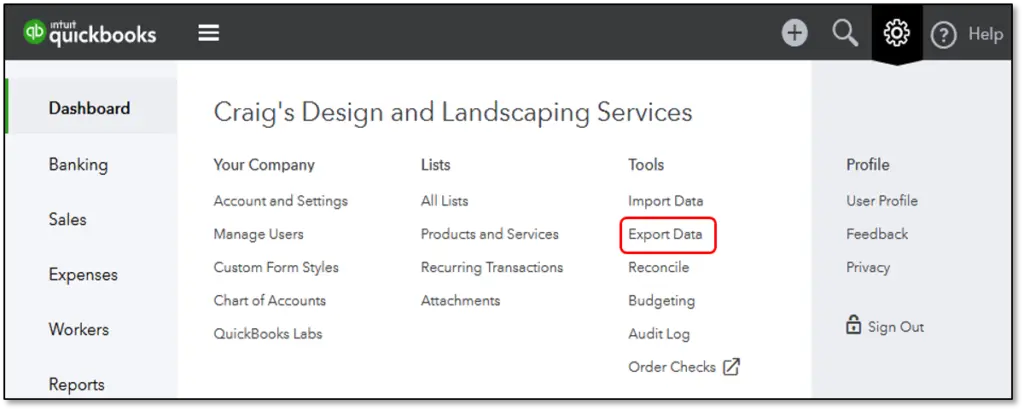
After that, opt for the Gear icon
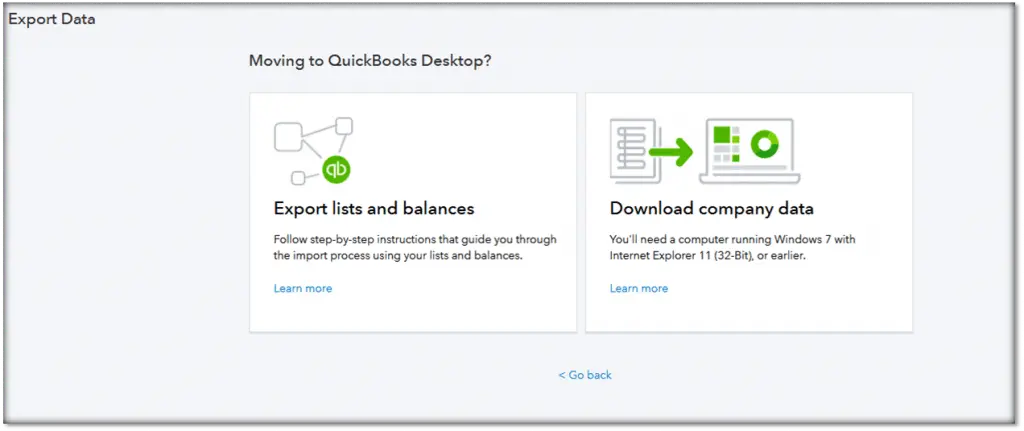
Now, under the Tools tab go for Export data.
And opt for the reason from the pop-up window
Also, click on continue tab
And then, select Learn more under the download company data.
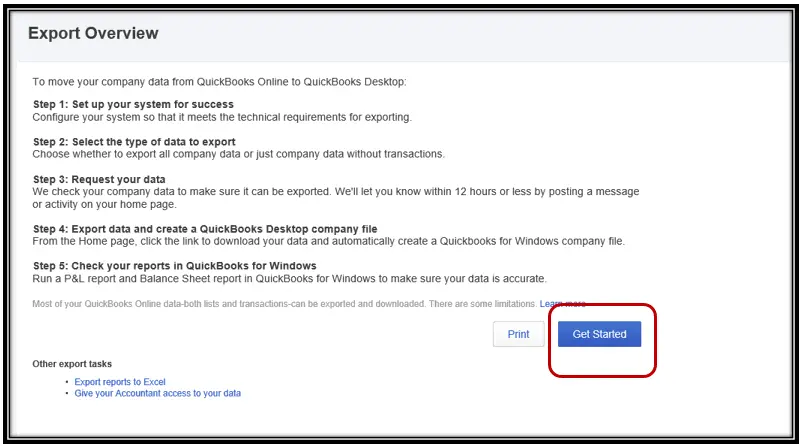
The next step is to review the Export overview.
And choose the get started tab
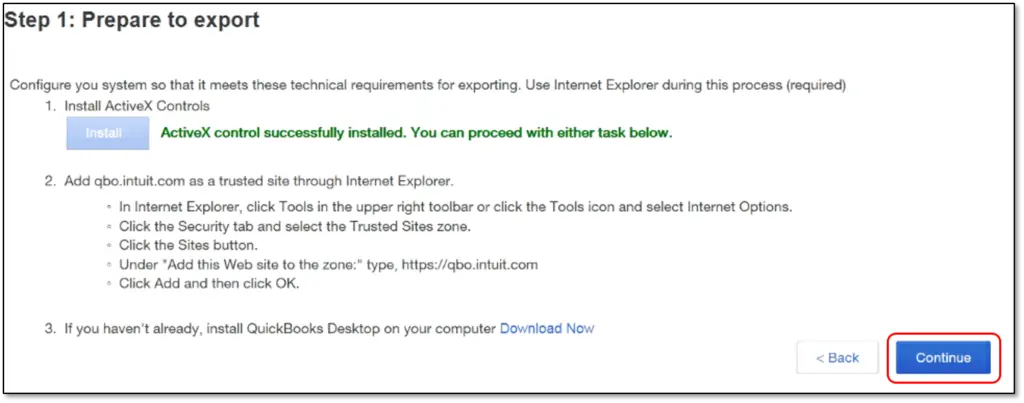
After that go for Install for ActiveX control
Pick to Install ActiveX Control Now to confirm the installation.
And also select to Continue after the installation comes to an end.
Now, pick the Data to export
Hit the Continue tab
Review the limitations of the data to export.
And click on the Continue tab respectively
The last step is to enter all the contact information and then choose the Continue option.
It should be noted here that the user might receive an email with steps to end the export conversion within a few minutes to hours. This depends upon the amount of data prepared.
Step 4: End exporting the data
This is the last set of steps to be performed to complete the process.
At first, get back to the export page
And then, head to the setting tab
The user is then required to select the Export data in QuickBooks Online.
Once done with that, the user should perform the same steps and prepare to export the QuickBooks online data.
After that go for the Continue tab to download on the exporting from QBO page.
And switch to QuickBooks desktop.
The user needs to ascertain that No company open screen appears and also check if the company file is open
We suggest the user to visit the file and choose the Close company option.
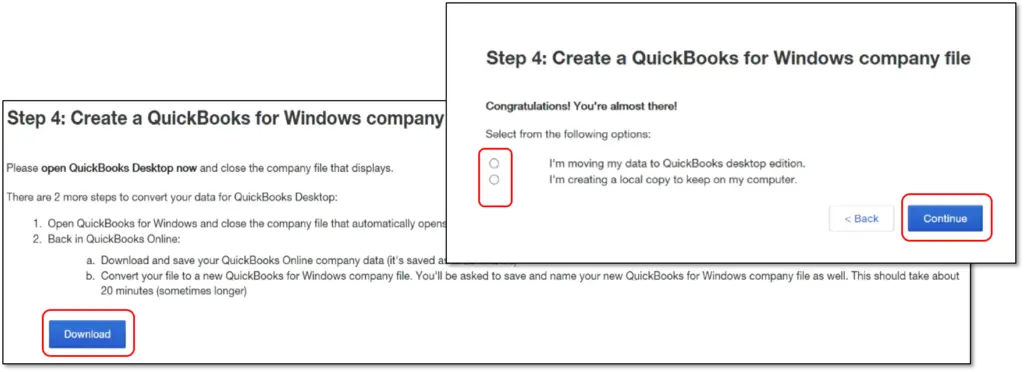
Also, go for the preferred option
The next step is to choose the Continue option.
And click on the Download option.
Once done with that the save the company file window will appear on the screen
And the user will be required to pick a location to save the file.
After that a pop-up window will appear asking where to save the file
After which the user will have to go for the Convert now option.
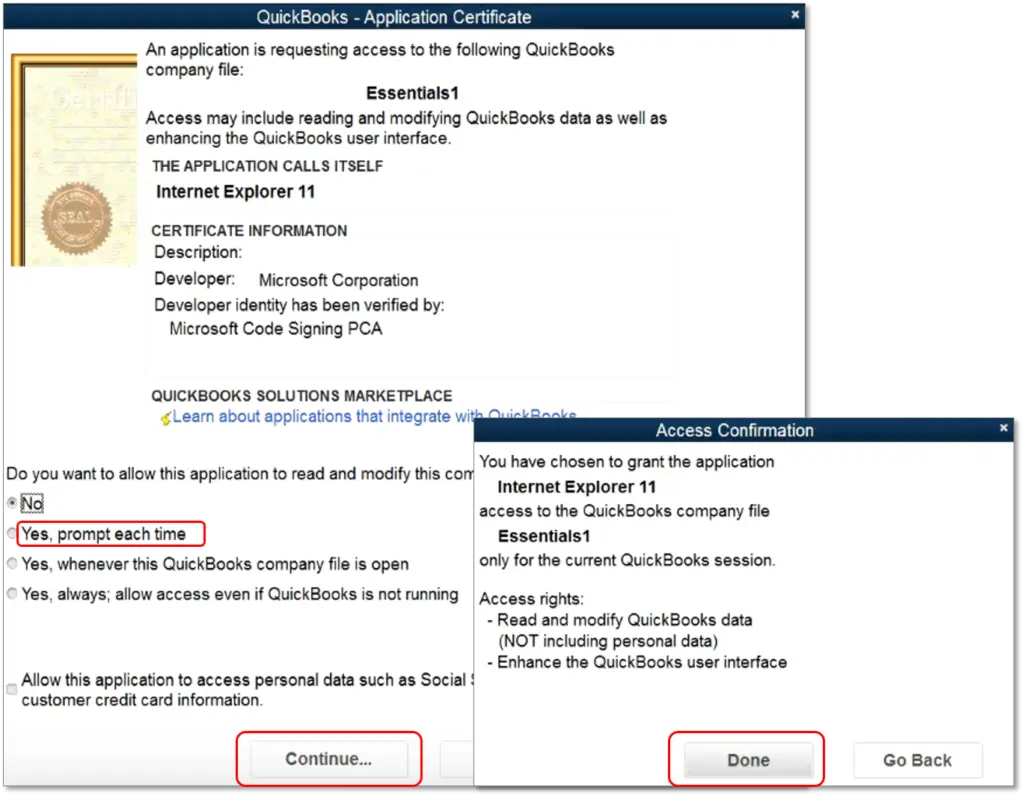
And hit the yes tab each time in the application certificate.
Now, choose Continue and then select Done.
Go for the Finished tab and then Run reports to end the process right here
This brings us to the end of the article, and we expect the reader to successfully move the company file from QuickBooks online to desktop making the best use of the steps listed above. On the contrary, if the user ends up in some or the other error or if the user gets stuck at any point in time, then contacting our tech personnel at +1-888-510-9198 is suggested. We are a team of certified QuickBooks professionals who work round the clock in providing the best support for QuickBooks-related issues. Thus, feel free to share your queries with our team and let them help you with the issue.