Voucher checks are basically kept to keep a record of payroll deductions. QuickBooks voucher checks automatically capture payroll deductions and invoice payment details, which saves a lot of time and reduces data entry errors. You can print voucher checks easily in QuickBooks online using basic steps. To help you with the process to print voucher checks, here we are with this piece of writing sharing the complete steps to print voucher checks in QuickBooks online.
However, if you need any sort of technical assistance at any point in time, then feel free to give us a call at +1-888-510-9198, and we will provide you with immediate support and assistance.
Different types of voucher checks in QuickBooks Online
QuickBooks offers three different ranges of voucher checks. Let us evaluate each one of them one by one:
Secure plus voucher checks – The price range of secure plus voucher checks is $71.68 for 5. You get a built-in alarm system for your checks and by far it is one of the most preferred voucher checks that provide exclusive tamper-resistant security coating. If the addressee or payment amount is tampered with, then it produces a visible stain on the secure plus check. These checks are advanced protection against fraud with 23 security features.
Secure premier voucher checks – The starting range for secure premier voucher checks is $78.10 for 50. These maximize your protection against fraud and counterfeit activity with QuickBooks. These checks have a security hologram embedded in the check that makes verification fast and simple.
Basic voucher checks – The basic voucher checks start at $46.24 for 50. It saves time and maintains accuracy. They are designed to work specifically with QuickBooks on laser printers. The payroll stubs present on a voucher check track deductions and payment details that further help in easy recording keeping.
Reasons for printing voucher checks in QuickBooks
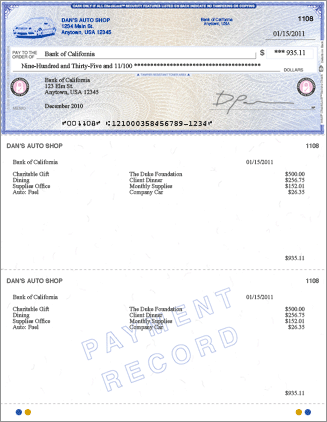
The need to print a voucher check might occur for a type of payment. This form of payment is official and aids in creating audit trails from the data entered. One can print this check to keep it on file and it has the following dimensions: 8.5 x 11.5. Other than this, you might need to print a voucher check in the following cases:
For keeping a record of the deductions that you made on the payroll, printing voucher checks is a quick solution.
Furthermore, you can get the invoice payment data using the printer voucher checks.
Also, to save time and minimize data input errors you can automatically print these checks
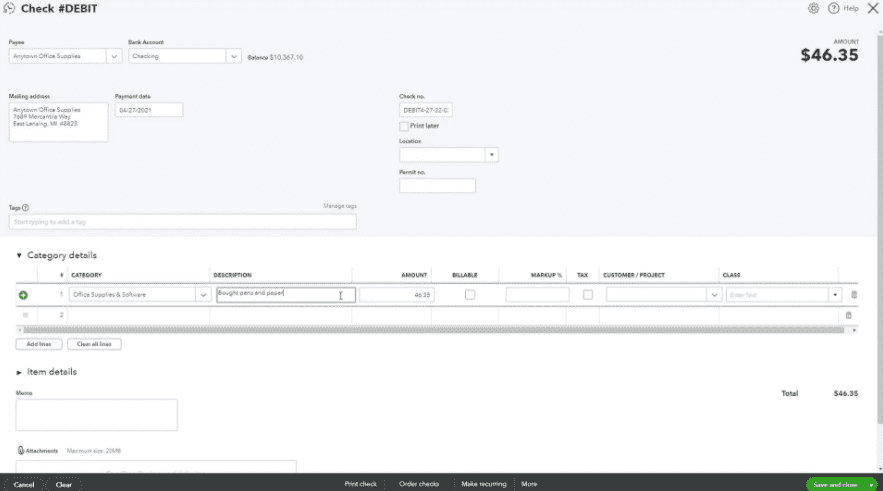
You might find printing check vouchers in QuickBooks online helpful for accounting tasks or any record in QBO. With the help of this software, you can head to the banking tab before opting for the write checks option. Later on, you need to head to the write checks page and also click on the print tab. In case you want to print just one check, select the check option. On the other hand, if you are printing several checks, then choose batch.
Let us check out the steps to print voucher check in detail:
You need to first log in to QuickBooks online
Once done with that, click on the banking option from the menu.
Then, choose write checks from the menu.
And enter in necessary data.
After that, head to the write checks window.
Click on the print icon.
In case you have to print a single check, then click on check.
Now, enter the printed check number
If more than one check is to be printed, you need to click on batch.
This will redirect you to the select checks to print page.
After that, opt for the checks you want to print.
Opt for the printer’s name and type from the print checks window.
Now, from the list of available check styles, choose a voucher.
Also, check your company’s name and address printed on the pre-printed checks.
After verifying all the information, you simply need to uncheck the print company name and address. Review the decisions you made and proceed further.
Make sure that the details on the check have been precisely aligned, and the check stock paper must be oriented properly.
The next step is to click on print.
And furthermore, your voucher checks will print in QBO.
Towards the end of this segment, we believe that the information shared above might be of some help in printing voucher checks successfully. However, if you have any queries or if you need any sort of technical assistance at any point in time, then in that case give us a call at +1-888-510-9198, and we will provide you with instant support and assistance.
FAQs related to Print voucher checks in QuickBooks Online
Is a voucher check a payroll check?
Even though one can use voucher checks for any type of payment, voucher checks that come with one check and two pay stubs on a single sheet of perforated paper, make an ideal solution for paychecks and vendor payments.
Do I need secure checks if banks cover check fraud?
Well, banks don’t treat losses for business check fraud the same way they treat personal checking account fraud.
Will voucher checks work with QuickBooks payroll?
QuickBooks voucher checks are designed in a way to work with QuickBooks software and services, including payroll.
Which voucher check is right for my business?
You can choose the voucher check that provides the level of security that you require to help protect your business from counterfeiting and fraud.
Can I add my company logo to voucher checks?
Along with other customizations, one can add the company’s logo to voucher checks for a more professional look.
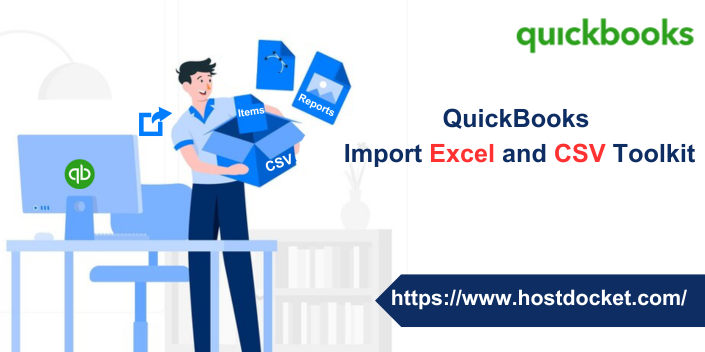
When you use online banking, the transactions are recorded. And to download these transactions, a CSV file is required. A CSV file is basically used to import online banking transactions into QuickBooks. You can import CSV files that include bank transactions, general journal entries, accountant’s changes, and batch transactions in QuickBooks. In order to import CSV files, you need to start installing QuickBooks Import Excel and CSV toolkit. To make the import process easier for you, here we are with this segment sharing the complete details as to how to install QuickBooks import Excel and CSV toolkit and how to import CSV files.
Thus, to learn further, stick around till segment till the end. You can also connect with our technical support team at +1-888-510-9198, and we will provide you with immediate support and assistance.
CSV files are basically simple text files that contain tabular data. A comma separates each field in the file from the next in a CSV file. The majority of spreadsheets support this format including Microsoft Excel and Google Spreadsheets. Also, you can create and edit CSV files with any text editor like Notepad. You can also import files related to some of your vendors and customers. CSV files are also termed as Comma Separated Values.
Why import CSV into QuickBooks?
In order to track finances, it is essential to maintain records of all the data. The CSV file is already in a tabular format and is further supported by spreadsheets. In the case of online banking, there are so many QuickBooks transactions and manually Creating transactions in QuickBooks desktop involves a lot of effort and takes time. Moreover, recording manually can lead to inaccuracy. The concept of importing CSV files eliminates the chances of errors due to inaccuracy and saves a lot of time.
Import CSV files
In order to import a list in the CSV format, you simply have to install QuickBooks import Excel and CSV toolkit. This toolkit includes:
Import from Excel and CSV manual – A PDF document with instructions, best practices, and notes.
CSV Example Folder – 4 Sample CSV files, one for each type of list
XLS Example Folder – A sample Excel file that contains 4 worksheets, one for each type of list.
Allowed fields – A reference guide explaining what fields are available for Excel and CSV import.
Steps to install QuickBooks Import Excel and CSV ToolKit
You can try to install QuickBooks Import Excel and CSV toolkit using the set of steps enumerated below.
Initially, open the file download window for the toolkit and then choose the save tab.
The next step is to head to the Windows desktop and choose Save.
Double-click the QuickBooks_Import_Excel_and_CSV.exe on the Windows desktop. This will open the WinZip Self-Extractor window.
After that, choose browse and select the folder where you want to install the toolkit.
Also click on the ok tab.
The next step is to choose Unzip to extract the contents and choose Close to close the WinZip self-extractor window.
You now have to open QuickBooks Import Excel and CSV folder from the location you opted for.
One can try to export a list as a CSV file, in case you do not have MS Excel installed on the system or if you want to view and edit the data using a different format.
Customer and Vendors
The very first step is to open a Customer/vendor Center
After that, choose the Excel drop-down and select
Export customer/vendor list, in case you want to export customer/vendor data such as name, balances, and contact information.
Export transactions, if you wish to export transactions (either by name or transaction type)
Now, in the export window, you are supposed to create a comma separated values file i.e., .csv file.
Furthermore, choose export.
After that, assign a file name, and select the location where you wish to save the file.
The process of setting up QuickBooks Import Excel and CSV toolkit is easy and involves a few basic steps. Hopefully, performing the above steps carefully might be of some help to you in successfully importing QuickBooks Excel and CSV toolkit. However, if you have any queries even after performing the steps above, or if you need any sort of technical assistance, then, in that case, feel free to consult our technical support team at +1-888-510-9198, and our certified QuickBooks ProAdvisors will answer all your queries immediately.
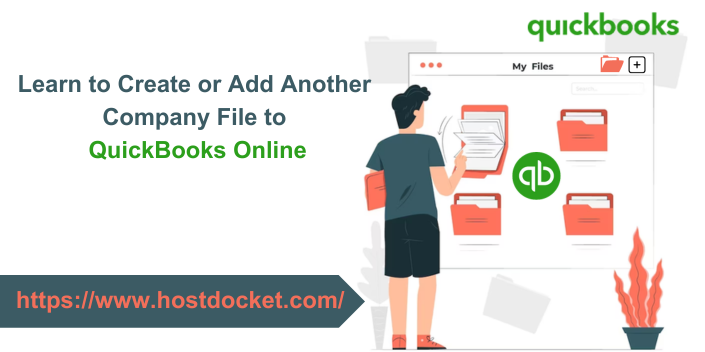
QuickBooks lets you have multiple companies under the same QuickBooks online account. However, each of the company files is its own paid subscription but can be accessed easily with the same sign-in info. This simply lets you manage and switch between the companies more efficiently and without any hassle. However, merging two companies in QuickBooks online is not possible. But it lets you consolidate and compare QuickBooks companies easily. This article will help you create or add another company file to QuickBooks online. Let us check out the steps involved in the procedure later in this segment. However, for any queries related to QuickBooks online or QuickBooks desktop, you can give us a call at +1-888-510-9198, and connect with our technical support professionals.
In case you have various companies under separate accounts in QuickBooks online, you can move them all into one account by performing a simple set of steps.
Send an invite
You can send an invite to the email address, you wish to access all your companies with. Note that only the company admin can send invites and also ensure that you already have the Intuit account with this email.
Sign in to one of your QuickBooks online companies that can be accessed with the email you do not use now.
Further, Invite the new email to the company file. In case you see a user limit message, then you will have to add a license.
Now, select a user type and if you want the new email to manage other users and the company info, then you will have to choose Company Admin.
Navigate to the inbox for the new email and choose the link you might have got for the invite.
You will now be able to sign in to the company file using the new email.
For this, you need to visit the QuickBooks pricing page and choose the subscription option you want. This further opens one of two experiences. Let us evaluate:
In case you are signed in to QuickBooks, you will be asked to confirm the account you wish to sign in with. However, if the account displayed is one you want to use for the new company file, then simply choose Yes, that’s correct.
If you haven’t signed in recently, then you will be asked to create an Intuit account. Don’t fill this out unless you want to connect your new company file to a new account. Or else, look for adding a company to an existing account section and choose the sign-in link. You can sign in with the user ID password you use for QuickBooks.
Later on, carry out the onscreen prompts to create a new company file.
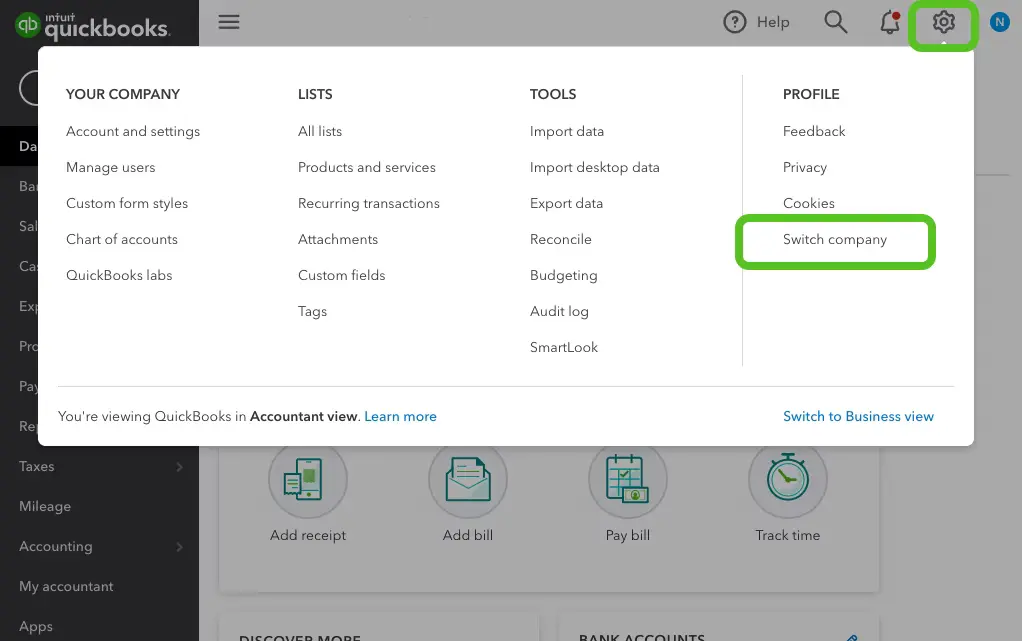
When you sign in, QuickBooks asks which company file you want to open. In order to switch between companies, you can choose the settings tab and further select switch company.
Manage Multiple companies in QuickBooks Online
When you quickly switch between multiple companies you have set up, they are still separate. Here are a couple of things that can be done to manage all data in your company files.
Users
Note that, users you set up for one company aren’t automatically granted access to the other. In case you want to give them access, then you can simply invite them.
Online Banking
In case you connect a bank or credit card account to one company, then it isn’t added or visible from the second one. This requires you to connect it separately for each company.
Lists
You can simply move your lists (vendors, customers, inventory, or chart of accounts) to the new company, so you do not have to start from scratch. Note that, your companies are kept separate for a reason and any changes you make in the future in one company won’t be updated in the other’s list.
Hopefully, the set of steps above might help you create or add a company file to QuickBooks online. However, if you aren’t sure about performing the process manually, you can simply reach out to our technical support team at +1-888-510-9198, and they will provide you with instant support and guidance related to all sorts of QuickBooks queries.
FAQs Related to Create Another QuickBooks Company in QBO?
How do I add another company file in QuickBooks Online?
You can add another company file in QuickBooks online using the steps below: 1. Select Buy Now or Free 30-day trial. 2. Select again from the same buttons under the subscription you want to avail. 3. On the Sign-up page, click the Add another company hyperlink. 4. Enter the login credentials you always use and select Add new company.
How do I import a company file into QuickBooks Online?
Log in as an admin to the company file you need to import. Go to the Company menu, then select Export Company File to QuickBooks Online. Select Get Started. Click Select Destination, then sign in to your QuickBooks Online account.
Can you have 2 company files in QuickBooks?
It is possible to have multiple companies under the same QuickBooks online account. Every company file is its own paid subscription, but you can access them with the same credentials.
How do I open two companies in QuickBooks Online?
On the login page, select the Subscribe here link next to Already have an Intuit account? With the same credentials you have for your current company. If you want to have two separate sets of credentials, enter a new user ID. Follow the on-screen instructions to create a new company file.
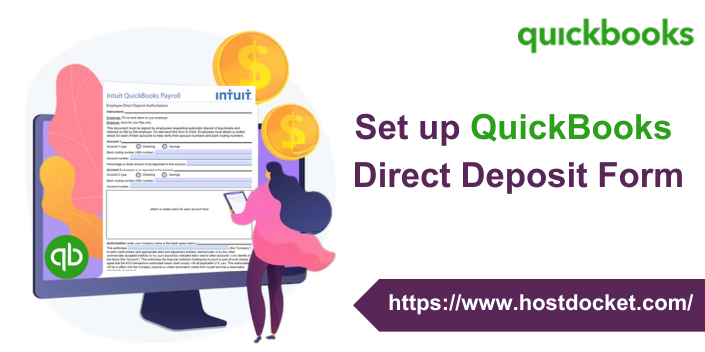
Struggling with making payments to employees and contractors? Well, the QuickBooks direct deposit form is one of the most convenient ways to pay your employees and contractors. This eliminates the hassle of handwriting or printing paychecks each payday. It further helps employers collect relevant employee information to manage payroll. Moreover, the employer can collect employee bank details and essential authorization to pay salary with a standard direct deposit form. In case the employer wants the employees to enter their own personal, tax, and banking info, ensure employee self-setup is on. QuickBooks will automatically email them an invite through QuickBooks workforce.
To brief you with the entire procedure to fill direct deposit forms, here we are with this piece writing sharing the complete set of steps and information. For more details, make sure to scroll through this piece of writing, or you can connect with our technical support team at +1-888-510-9198, and we will provide you with the right guidance instantly.
The direct deposit form gives authority to a third party i.e., often the employer for payroll to send money to a bank account by simply making use of the account details. An employer might require a canceled check to verify the accounting information. After the form is completed by the account holder, it must be signed and returned to the employer.
Note that, in order to make payments to your employees and contractors through direct deposit, you will be required to have a U.S. bank account that’s set up for ACH transactions. Also, there are fees to use direct deposit. You can check your payroll subscription for further related information.
Steps to set up direct deposit for employees
You can try performing the below set of steps to set up direct deposit for employees. Let us explore the steps one by one:
Step 1: Setting up company payroll for direct deposit
Identify and get access to your business, bank, and principal officer info
Connect your bank account
Verify your bank account
Set up your employee’s direct deposit
Step 2: Get a direct deposit authorization form
If your employees have filled out, signed, and dated a Direct Deposit Authorization Formand attached a voided check from the employee’s bank account, then choose your payroll for the next steps.
QuickBooks Online Payroll
You need to first head to taxes and further choose payroll tax.
Once done with that, choose filings and further opt for employee setup.
Heading forward, you need to choose bank verification next to authorization for direct deposit.
The last step is to choose the view option.
QuickBooks Desktop Payroll
You need to obtain a completed direct deposit authorization form and a voided check from the employee’s bank account. It should be noted that there is no need to submit the authorization form and void check to QuickBooks, as they are just for recording purposes.
In case the employee’s bank shows that the account should be tagged as money market, then inform the employee that QuickBooks desktop only accepts checking or savings accounts, so they should choose the checking option.
Here, you need to first choose employees and then opt for the employee center to open your employee list.
Once done with that, choose the employee’s name.
And further, opt for the payroll info tab.
You now need to choose the direct deposit tab.
In the direct deposit window, choose use direct deposit for the employee’s name.
Moving ahead, choose whether to deposit a paycheck into one or two accounts.
Followed by entering the employee’s financial institution information such as bank name, routing no., account no., and account type.
Now, if you are opting to deposit to two accounts, then you need to simply enter the amount or percentage that the employee wants to deposit to the first account in the amount to deposit field.
The remaining goes to the second account.
Further, you need to choose the OK tab to save the information.
And lastly, enter the direct deposit PIN when asked to.
Steps to get employee direct deposit authorization form
In order to get to the employee direct deposit authorization form in QuickBooks online, you need to first navigate to the filing resources window and further set up employees’ direct deposits in payroll. Note that the employees or contractors who will be paid by direct deposit should complete the employee direct deposit authorization form. To get this, you need to continue with the steps below:
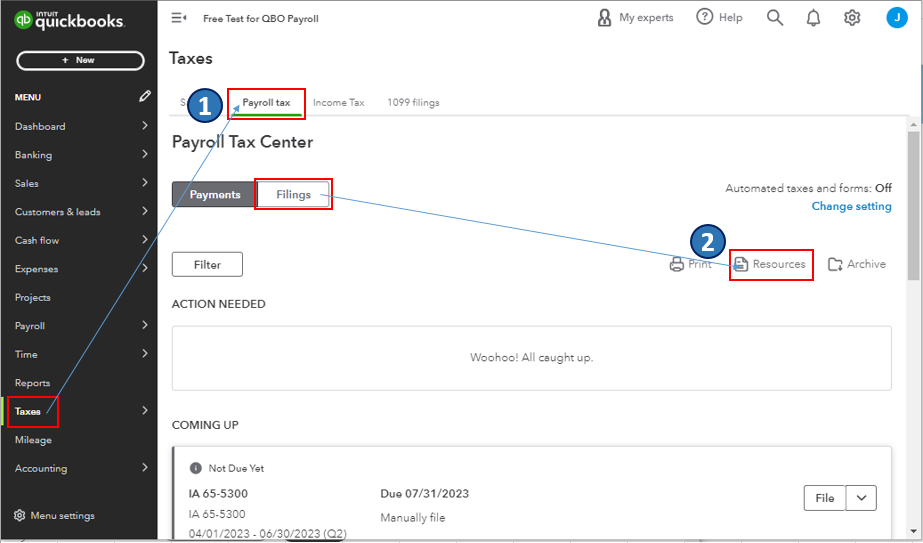
Initially, head to the taxes menu.
Further, opt for payroll tax.
You now have to choose the filings tab, and also click on resources
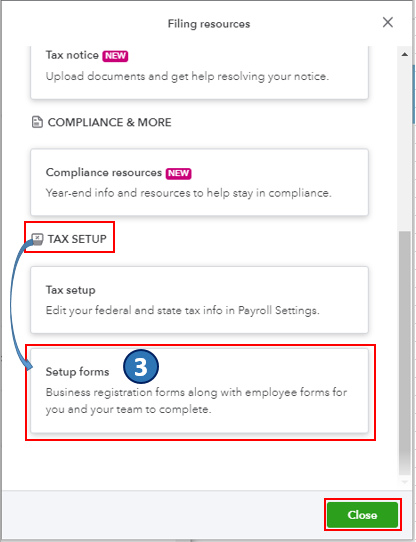
Heading forward, in the filing resources window, you need to scroll down to the tax setup section.
And later on, choose setup forms.
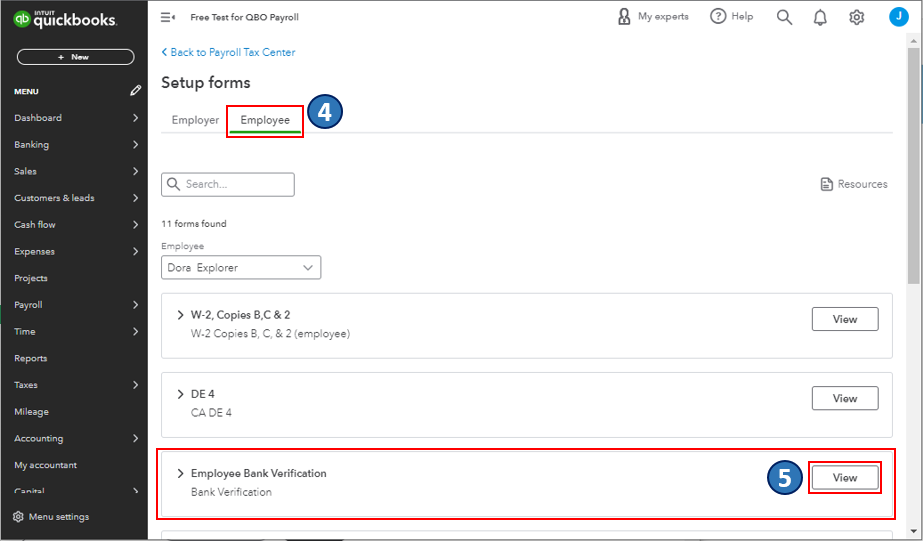
Now, navigate to the employees tab.
Also, find the employee bank verification section and hit the view tab.
Now, you will be routed to the form’s PDF file.
From there, download and print the employee direct deposit authorization form.
After you are done with this, carry out the necessary steps to set up and manage employee direct deposit in the payroll listed above. Moreover, there are a variety of payroll reports that you can make use of to view information about the business finances and employees.
QuickBooks Online payroll gives you increased flexibility with employee self-onboarding by letting you enter some of their info. Moreover, you can further invite them to add the rest. Not just that, you can still print a direct deposit authorization form in case you want.
With this segment, we have tried to summarize the complete procedure to set up the QuickBooks direct deposit form. However, if you are doubtful regarding any step, or if you are stuck at any point in time, do not hesitate to connect with our technical support team at +1-888-510-9198, and let them help you with the procedure.
FAQs Related to QuickBooks direct deposit form
Does QuickBooks have a direct deposit form?
Yes, QuickBooks offers a direct deposit form that helps employers collect relevant information related to the employee and further manage payroll.
Where is the direct deposit form in QuickBooks?
You can find the direct deposit form in QuickBooks using the steps below: 1. Navigate to the payroll tab. 2. Further, choose employees. 3. Now, from the payment method, select Start or Edit. 4. Heading forward, from the payment method dropdown ▼, choose direct deposit.
How do I verify direct deposit in QuickBooks?
You can verify direct deposit in QuickBooks using the set of steps below: 1. Sign in using your Intuit Account login. 2. Now, move to the payroll info section under the direct deposit bank account. 3. After that choose verify. 4. Enter the payroll PIN and confirm. 5. Lastly hit submit to complete the procedure.
What is a direct deposit form?
A direct deposit authorization form is a form that employees fill out, in order to authorize the employer to deposit money straight into the bank account. Many businesses pay their employees using the direct deposit option.
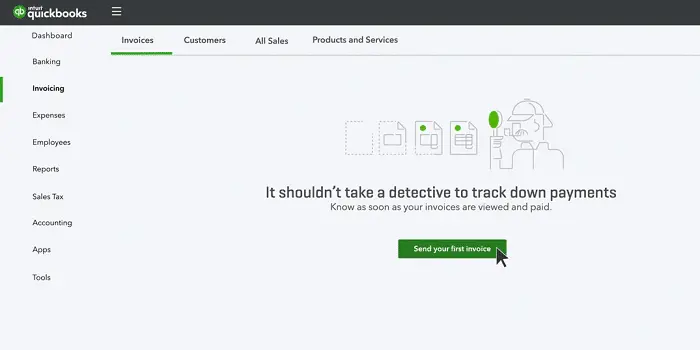
Creating invoices in a few clicks is one of the best features offered by QuickBooks. In case you plan to get paid in the future for products and services you sell, you can send your customers an invoice. Not just that, you can add the product or service you are selling to an invoice and email it to your customers. Creating and sending invoices in QuickBooks online is now easier with the set of steps scribbled in this piece of writing. We have tried to cover the steps to create an invoice in QuickBooks Online and also how to review unpaid invoices. Thus, scroll down to unleash the complete information.
You can also speak to our technical support team in case you need our assistance in creating invoices in QBO or for any sort of QuickBooks-related queries. Ring us at +1-888-510-9198, and we will surely answer all your queries immediately.
Creating invoices involves a few simple steps. Your customers can pay their invoices online if you have QuickBooks payments. You can also handle the invoice and payment activities when you use an external payment processing platform. Note that your estimates or invoices will look different depending on whether you have the old or new estimate and invoice experience. Let us now explore the steps involved in creating an invoice in QuickBooks online.
Step 1: Create and send an invoice
Note that the steps for the new layout and the old layout differ. Let us explore the steps in both scenarios:
Condition 1: In case you are using the new layout
Well, there are multiple ways to create an invoice in QuickBooks. When you send an estimate to your customer, there are chances that the customer might approve it, in such case, you can convert your estimate to an invoice. Also, there is an option to create a new invoice from scratch.
The very first step is to choose + New
Now, opt for an invoice
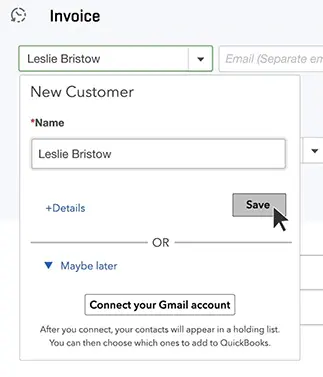
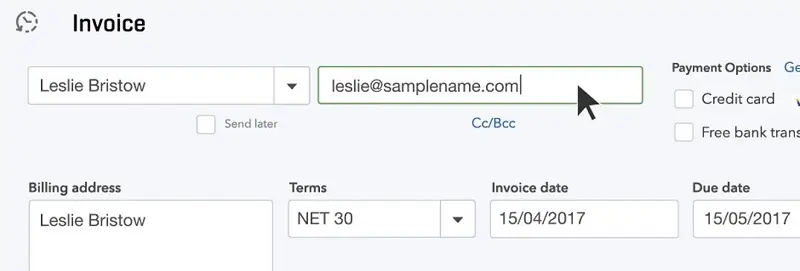
The next step is to choose add customer and pick a customer from the ▼dropdown menu.
Ensure that all of the info entered is correct, especially the email address.
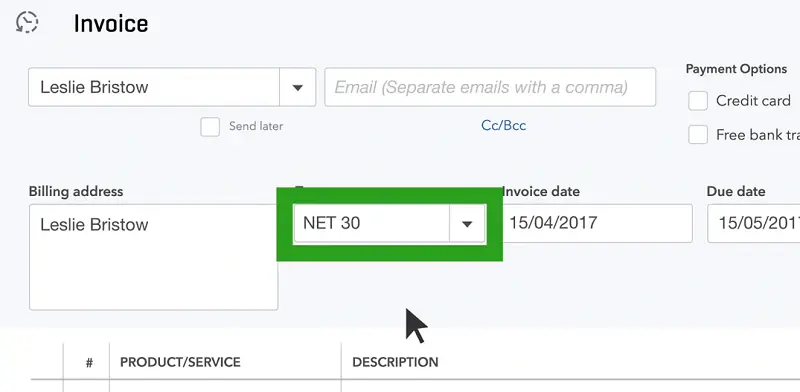
Now, review the invoice date, due date, and terms.
Enter the new dates or terms, if you need to.
The terms field contains the word net, which refers to the number of days until the payment is due.
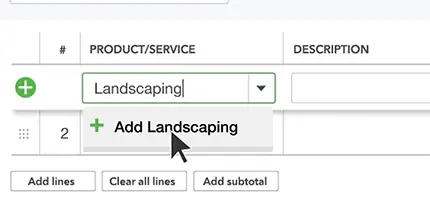
You will then have to choose to add a product or service and go for a product or service from the ▼ dropdown.
Once done with that, choose how you want to calculate the charge amount- flat rate, by hour, or by item.
You will then be required to enter a quantity and rate if asked to.
To customize the info or design of the invoices, choose ⚙ manage tab.
Also, go for the options from the side panel.
QuickBooks keeps a check on your choices and further applies them to all existing and future invoices.
After you are done, there are various options for saving or sharing the invoice.
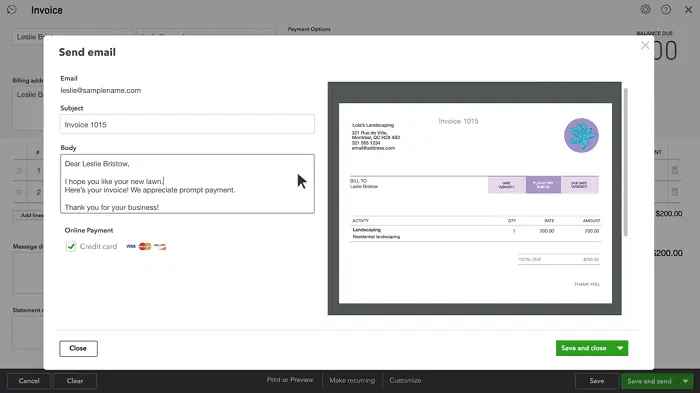
In case you are ready to send the invoice, choose review and send, to email the invoice to your customer.
Further, adjust the email if required.
Once done with that, choose send invoice.
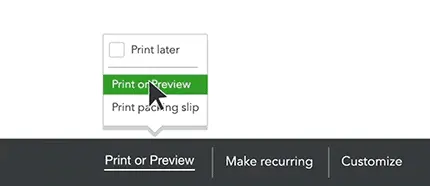
To send the invoice later, choose save and close tabs.
In order to print a paper invoice, choose print and download.
Or if you have received a payment from the customer, then choose receive payment.
Now, in order to send your customer a link to the invoice through text message, choose the share link.
QuickBooks usually marks unpaid invoices in the accounts receivable account, which is visible on the balance sheet and other financial reports.
To review the invoices, you need to head to sales and choose invoices. Now, check the status column to see the status of the invoices in the sales process. There are a bunch of statuses that can show up. Let us evaluate each of the scenarios one by one:
Due in [days]: This means that you haven’t emailed the invoice yet.
Due in [days] sent: This indicates that you have emailed the invoice to the customer
Due in [days] viewed: This message shows up when your customer opens the invoice.
Deposited: It simply means that the customer has paid the invoice
Overdue [days]: This status indicates that the invoice is past due and unpaid.
Overdue [days] viewed: This appears when the customer has opened but didn’t pay the past due invoice.
Delivery issue: In such a case the invoice would be undelivered. You will have to check the email address and resend.
Voided: The invoice was voided in QuickBooks.
You can notify your customers about the upcoming invoice due dates. You can send them a reminder message.
Step 3: Receive payments for invoices
In case you use QuickBooks payments, then your customers can pay the invoices directly by credit card, PayPal, Venmo, or ACH transfer. Intuit processes and handles everything for the user. Once the payment is made, QuickBooks will put the transaction into the correct accounts.
However, just in case you make use of an external platform to process payments, then you can simply keep track of those payments in QuickBooks.
The set of steps enumerated above is enough to create an invoice in QuickBooks online successfully. However, if you have any queries at any point in time, or if you need our technical assistance in creating invoices in QBO, then feel free to ring us up at +1-888-510-9198,, and our technically sound certified QuickBooks ProAdvisors will ensure that all your queries are addressed immediately.
FAQs Related to Creating Invoices in QuickBooks Online
How do I create an invoice in QuickBooks Online?
You need to perform a handful of steps: 1. Choose + New 2. Select the invoice and add customer 3. Review the invoice date, terms, etc. 4. Choose add product or service 5. Select the process to calculate the charge amount 6. Customer the info or design of your invoices. 7. Choose Manage. 8. Select the options from the side panel. 9. Save and share the invoice
Does QuickBooks Online have invoicing?
Yes, using QuickBooks online you can minimize missed payments, and reduce administrative hassle by sending recurring invoices on a schedule. Even let your customers set up autopay.
How do QuickBooks invoices work?
In QuickBooks Online, users can simply create invoices when they sell products and services but expect customers to pay for them in the future. These forms key details about the sale and further lets you track the open and completed sales.
Are QuickBooks invoices free?
Yes, you can use the invoice generator for free in QuickBooks.
Can I make changes to an invoice once I have created it?
Well, you can make necessary changes to an invoice after you have created it. However, it might show some exceptions and errors when reconciling, especially if the invoice has been filed already.
Can you batch change VAT codes, classes, or locations on invoices?
No, only an accountant can batch change VAT codes on invoices.