This article describes how to Export or Import .IIF files and what transactions can do it
Limitations for Export & Import IIF Files In QuickBooks
A user can easily import transactions, but not export any other transactions from their QB software app.
A large number of entries as maximum through which QB software can do in process in a nice way.
Imported IIF files do not create links between transactions.
When a user will import an invoice or any bill along with its payment, thus, it will not link after importing.
You must link them, and all other pairs, into the receive payments windows or Pay Bills window. Thus, if a user require to import then linked it with your transactions as located under the .IIF file.
A user can easily now import assembly items but this will not able to import the database into the item’s custom fields.
Thus, end user will unable to import or export payroll data from a QB desktop accounting files related to any other products. However, this can be used by exporting payroll data through Online Payroll & their Intuit Payroll Full Services.
Therefore, a user can’t able to export from its U.S. version of a QB accounting software. It imports into your Canadian variant of a QuickBooks or as Vice Versa.
This will not required to type numbers with leading zeros in MS Excel spreadsheet, when ready to create & IIF import files.
For this importing or exporting IIF files, an Intuit will not responsible or not rendering any technical assistance to our QB clients. There are other resources which provide an instant help.
Hopefully, above information will help you to import and export IIF files in QuickBooks Desktop rapidly without any delays. If needed expert help, reach us at QuickBooks Technical Support Number+1-844-499-6700. Feel free to connect with us for any type of query related to QuickBooks Integration.
Simple Steps to Setup Microsoft Outlook Email Integration in QuickBooks
One of the most advantageous features of QuickBooks software is that – a QB user can integrate a wide array of applications in QuickBooks such as PayPal, Microsoft Office, etc. QuickBooks accounting software is highly compatible with such an application. Hence, a QB user can operate the desired application in the QuickBooks altogether.
Possibly, you would like to use the Microsoft Outlook Email along with QuickBooks. To do so, a QB user recommended using the QB Contact Sync application that is available in the QuickBooks Online.
The QB users suppose to download & install the application first. Once the download & installation completed, the user is allowed to adjust the contact list quickly and swiftly. QuickBooks Desktop features some of the web-based services that include – Electronic Payments, Remote Access Ability, Online Banking, etc. Businessmen & corporate sectors widely use the Microsoft Outlooks as an email exchange Server globally.
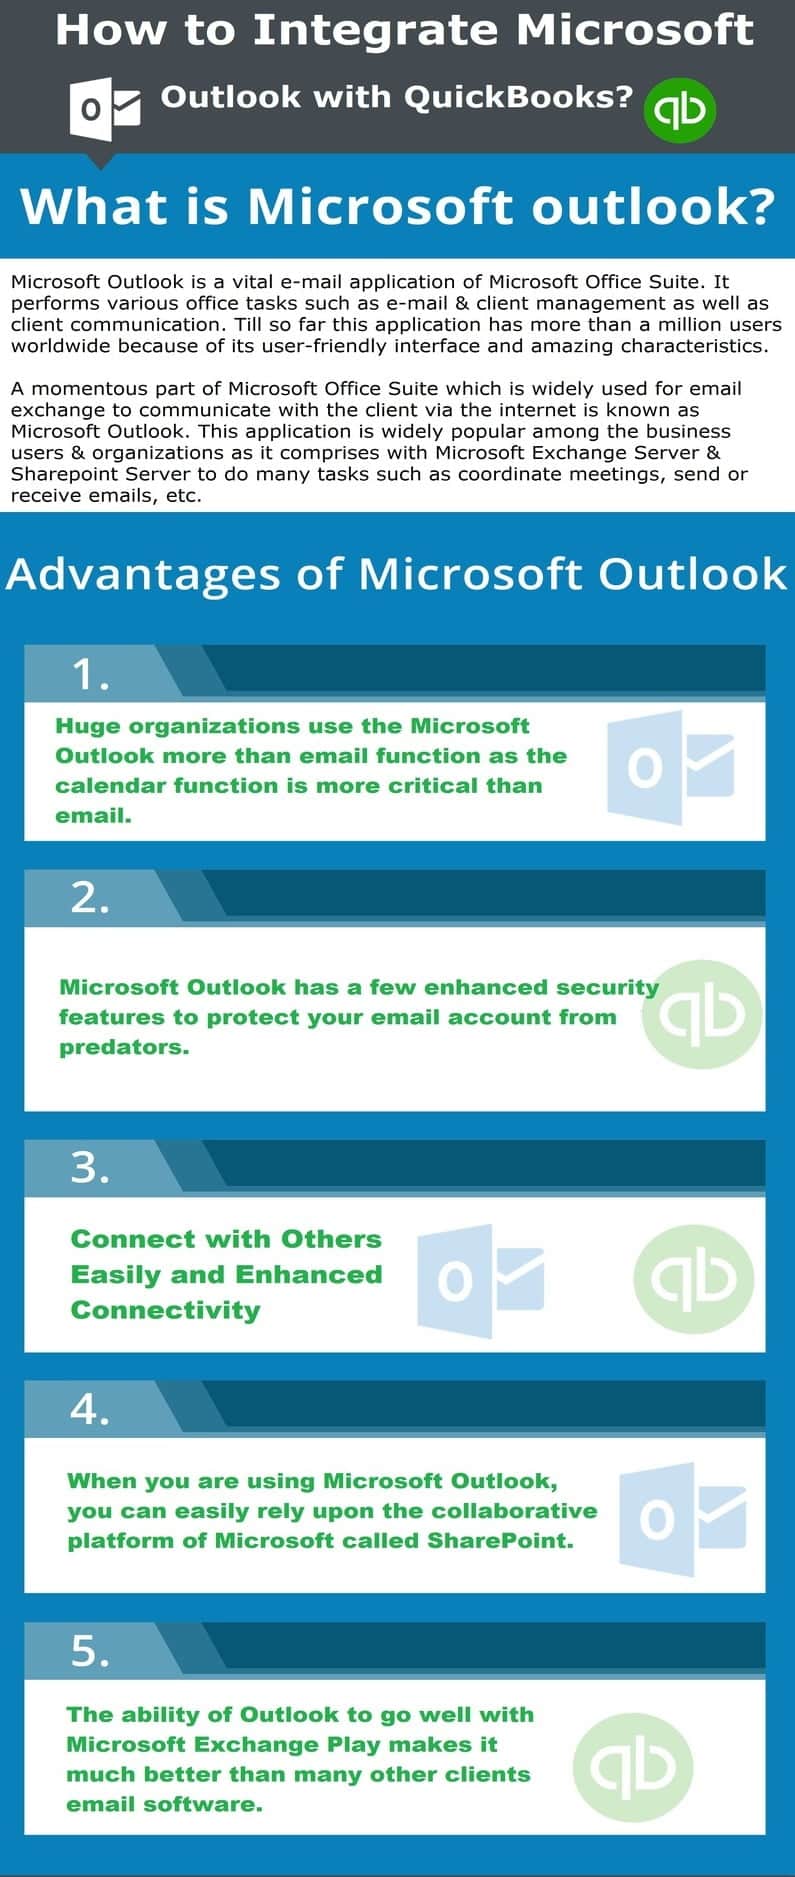
A momentous part of Microsoft Office Suite which is widely used for email exchange to communicate with the client via the internet is known as Microsoft Outlook. This application is widely popular among the business users & organizations as it comprises with Microsoft Exchange Server & SharePoint Server to do many tasks such as coordinate meetings, send or receive emails, etc.
Microsoft Outlook Functions:
Email confirmation
Coordinate & Communicate
Co-operation
Co-ordination and constitution
Significance of Microsoft Outlook Integration in QuickBooks
Microsoft Outlook is a vital e-mail application of Microsoft Office Suite. It performs various office tasks such as e-mail & client management as well as client communication. Till so far this application has more than a million users worldwide because of its user-friendly interface and amazing characteristics.
Check out the list of characteristics which makes Microsoft Outlook different from other email client applications.
Work Offline
Ribbons & Navigation Bar
Inter-Communication
Inbox Clean Up Tool
Customized Calendar
Support Microsoft Exchange Server
Altered Contacts
Tracking Feature
Social Connectivity
Faster Email Processing
Manage Rules and Alerts
Free Import & Export Facility
Shortcut Keys
Email Attachment Reminder
To know more insight about the Microsoft Outlook Integration in QuickBooks, contact the QuickBooks Integration Support. Our Intuit Certified ProAdvisors are highly knowledgeable and has decades of experience in accounting field.
Pros:
Huge organizations use the Microsoft Outlook more than email function as the calendar function is more critical than email.
Cons:
The task management job is quite basic but still cumbersome to use.
No special support for the vacation in calendar feature.
No customization in the dashboard so that the user can fuse the elements such as email, calendar or task to bring the desired outcome.
Booking meetings with the client on the calendar is not possible. There is no support to book a meeting on the calendar.
Tips to Integrate Outlook Email Integration in QuickBooks
There are too many users who are encountering problem in QuickBooks Outlook 2016 and 2015, if you are also facing the same issue, follow listed below action as well as integrate your Outlook with QuickBooks very easily.
Download and Install QuickBooks Desktop Contact Sync for Outlook from official website
Here’s how
Type the correct email address for QuickBooks registration
Choose the “Continue” tab to Download
Save the “QuickBooksContactSync.exe” file in the computer
Perform double – click on the “QuickBooksContactSync.exe” file
Hit the “Next” tab to start the installation
Once the download is completed, choose the desired company file you want to sync with Outlook
Choose “Accept” in the agreement form
Next, Click on to the “Next” tab
Hit the “Get Started” tab, once the sync is complete.
Hit the “Finish” tab
QuickBooks Integration with Microsoft Outlook For Mac
The QuickBooks integration with Outlook for Mac is quite simple. Follow the steps below to integrate the Outlook with QuickBooks:
Navigate to Edit => Preferences => Send Forms
A webmail, email, or outlook option will appear. However, if the option does not appear then follow the below steps
Go to the C:\Windows\win.ini
Select & open the C:\Windows\win.ini Add the line at the bottom of the file i.e.
[MAIL], MAPI=1, MAPIX=1
Open the Registry Editor & key. [HKEY_LOCAL_MACHINE\SOFTWARE\Microsoft\WindowsNT\CurrentVersion\MAIL] String Value: “MAPIX”=”1]
Frequently Asked Questions Related to Outlook Email Integration in QuickBooks
Query- What is the procedure to import excel into QuickBooks?
Ans: Excel can be imported into QuickBooks by following simple steps enlisted below:
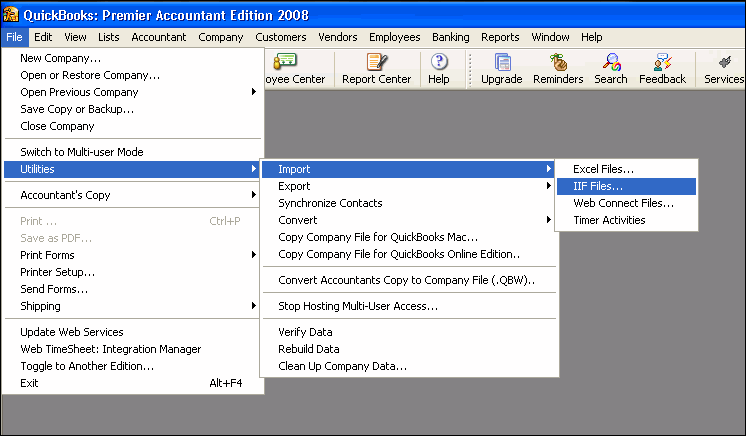
The first step is to visit the file menu, after that select Utilities
After that, choose the import option, followed by selecting the excel files option
In case the user gets the Add/Edit Multiple List Entries Window, then he/she is required to click on No
Lastly, follow the wizard in importing the files:
First, select the type of data.
Then, the QuickBooks software will open a formatted excel spreadsheet. Once the user has entered the necessary information, he/she is required to save and close the file.
Also, the user will be given the option to Add My Data Now.
Now, review the results and then view the data in the QuickBooks.
Once done with the procedure, the user is required to click on Close.
Query- How can I send invoice from QuickBooks to Outlook?
Ans: Well,
sending invoice from QuickBooks to Outlook is not as difficult as it seems to
be to many of the QuickBooks users. All they need to do is follow some simple
steps:
First of all, mark the invoice as “Email Later”.
Now, click on “Save & Close” or “Save
& New”.
After that, visit the “File”.
Select the “Send
Forms” option.
Lastly, select the invoice, send the mail and
you are good to go.
A quick solution can be getting in touch with our consulting team.
Query- Is there any difference between sales order and invoice in QuickBooks?
Ans: Majority of the times, QuickBooks users think sales order and invoices can be used interchangeably, but in actual they differ from each other. Sales order generally originates with the customer, at the time when they are making a purchase. Whereas, an invoice acts as a bill that is provided to the customer, when the product is delivered or a task is completed. They both widely differ from each other, but both serve as accounting documents post-completion.
Query- Why the error occurs in QuickBooks while sending emails to Outlook?
Ans: Sending mails directly from QuickBooks to Outlook is one of the most convenient features, also it saves time and efforts. But at times, QuickBooks is unable to send the emails to Outlook and this error might occur due to various reasons:
Maybe the user might have set up incorrect email.
Or the user might have updated the QuickBooks .
The file that the user is sending is damaged MAP132.dll file.
Also, it can happen in case the QuickBooks is running as administrator.
Damaged outlook may also be a reason for such error.
Also, in case if the Outlook is open in the background while sending the email.
Conclusion!
It might be possible that you would experience in following the steps accurately or might be missing any step while integrating QuickBooks with Outlook. In that instance, you can simply dial our QuickBooks online support number .i.e. +1-844-499-6700.
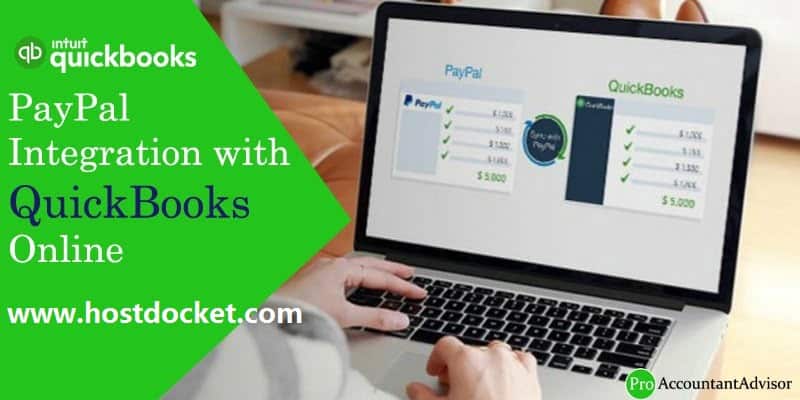
As we all know that PayPal is a popular payment gateway application for millions of users around the globe use it almost every day. It is the best way to send or receive money nationally & even globally from clients, merchants, customers, and family members. But PayPal is important for the merchants who operate business or businesses overseas. It has been observed that PayPal have more than 100+ millions of active & registered user accounts. Moreover, it allows the users to send or receive payments in more than 200 currencies in 200 marketplaces worldwide.Lets Talk about paypal integration with QuickBooks how can we do it.
QuickBooks is a package of accounting services in the form of software & endows numerous other online solutions. This software can establish connectivity to integrate with tones of web-based applications. To know more insight about the PayPal integration with the QuickBooks, you can contact the QuickBooks Integration support team. In this article, we are going to discuss the PayPal integration with QuickBooks. PayPal has privileged users with easy, quick, and flexible payments mode.
How to Sync & Integrate PayPal with the QuickBooks Online?
There are many benefits of PayPal like pay with flexibility and it’s quick and easy. Simply follow the step-by-step procedure to sync & integrate the PayPal with QuickBooks:
First of all, Open the ‘QuickBooks Online‘ application.
Sign in the QuickBooks Online account.
Go to the “Apps” tab
Click on the “Apps” tab
Enter & search PayPal in the search bar.
Select the “PayPal” app
Choose the “Get App Now” button
Choose the ‘QuickBooks Online company‘
Click on the “Allow/Authorize” tab to connect the app with the QuickBooks
After doing above step and Once setup done, QB Sync with PayPal every 15 minute and also update new transaction from PayPal to QuickBooks Online. One more advantage, You will get everyday summery detail of integration.
Keep in mind: Not connect multiple PayPal account to your QuickBooks Online If connect, you will certainly not able to get information of sales transaction.
Procedure to Import the PayPal Transactions to QuickBooks Online
There are 3 simple & easy ways to import the PayPal transaction to QuickBooks:
With IFF or CSV file, the user can import the accounting product transactions to the QuickBooks.
Use the new PayPal API with drag & drop option. With the help of this new PayPal API, you can simply drag the information to QuickBooks from PayPal.
Use the PayPal Bank Feed machine to import transactions to QuickBooks swiftly.
Mapping and Settings
In the program settings, you will be required to edit or see the loan from PayPal to ensure it can be mapped to the correct account of QuickBooks Online. Smart mapping technology is chosen by default for categories so they can choose how to create PayPal account mapping using the QuickBooks Online. Advanced QB users can alter those settings with no difficulty in the entire setup.
Review your transactions after importing
You’ll have the ability to assess your transactions as soon as they import by subsequent tabs at QuickBooks Online.
Sales Transaction
Transactions > Sales
Expenses
Transactions > Expenses
Bank Transfers
Transactions > Chart of Accounts > Select your preferred bank account
Once the installation process is done, QuickBooks Sync with PayPal in every 15 minute and update the new transaction from PayPal into QuickBooks Online. Also you will also receive a daily summary detail of integration process.
We regularly post how to’s articles on all the versions of QuickBooks such as Pro, Premier, and Enterprise. If any QB users have problems related to QuickBooks Integration, they can contact the Intuit certified QuickBooks ProAdvisors at +1-844-499-6700. We assure the best QuickBooks solutions whether it’s related to QuickBooks error codes, QuickBooks installation issues, or anything.
What is the process for integrating PayPal with QuickBooks?
To integrate PayPal with QuickBooks, you’ll need to connect your PayPal account to QuickBooks and then import your PayPal transactions into QuickBooks. This will allow you to see all of your PayPal sales and fees in QuickBooks, and to match and categorize them with your other financial data.
I’m having trouble integrating PayPal with QuickBooks, who can I call for help?
If you’re having trouble integrating PayPal with QuickBooks, you can call our toll-free number for assistance: +1-844-499-6700. Our support team will be happy to help you troubleshoot any issues and get your integration up and running.
Can I still use QuickBooks if I don’t have a PayPal account?
Yes, you can still use QuickBooks even if you don’t have a PayPal account. QuickBooks is a standalone accounting software that can be used to manage your finances, create invoices, and track expenses. However, if you do use PayPal to process payments, integrating it with QuickBooks can help you keep your financial data organized and up-to-date.
Can I import my PayPal transactions into QuickBooks in real-time?
No, currently PayPal transactions are not imported into QuickBooks in real-time. However, you can set up automatic imports of your PayPal transactions into QuickBooks on a daily, weekly, or monthly basis. This will help you stay on top of your finances and avoid manual data entry.
What information do I need to get started with the PayPal integration for QuickBooks?
To get started with the PayPal integration for QuickBooks, you’ll need the following information: your PayPal login credentials, the email address associated with your PayPal account, and your QuickBooks account information. You’ll also need to have administrative access to your QuickBooks account in order to set up the integration. If you need help, you can always call our toll-free number for assistance: +1-844-499-6700.
Do you know any possible way or process to combine the QuickBooks Reports? Imagine if it’s exciting & obliging to combine QuickBooks reports. Here we are discussing that this is the mode to amalgamate reports of manifold data files of the diverse company.
It is much trustworthy to combine reports via Multiple companies features that make you able to generate reports for combining manifold balance sheets-all these processes you can transport to a Microsoft Excel spreadsheets file.
Various fundamental parts for basic details about the reports in QuickBooks are:
An understanding between two or more account:
One of the key tasks is combining the QuickBooks reports is comprehensible. However, If you have adequate awareness about this topic or you are able to know the different data then you can effortlessly scrutinize the essential details to complete the task.
Arrange QuickBooks report for orientation:
Once you visualize the information, the next step is to organize the data as per required.
Modify QuickBooks reports:
If you want to compose some alterations in their details/information according to the necessity then it’s a compulsory part.
Mark the Comment:
You can also comment on the alteration after making the details/information effectual & favorite.
Organize & built the customary QB reports:
One of the most significant tasks to do so is classifying the QB data & must be planned.
To combine QB reports just consider these points:
The QuickBooks reports must be uncomplicated and easy in reading & build a profile in the different QB company files that suppose to be identical.
QB reports should be combining if they have approximately proper data in alike pattern as type, gradable level and also same name. (Not necessitate case sensitive)
One of the imperative points – accounts will not be amalgamated/combine if:
If it has diverse properties.
In case, it differs in the Alphabetic character.
When the Account numbers don’t match.
Assume one user posses different QB report & the other one is having different data.
Reports demonstrated type wise. Every detail/ information have to be chosen in the pattern of what suppose to be done in the first preferred company file. If the account added by the other account in the progression they are encountered.
If the choice logged into the QB files & desire to change them to numerous users to accommodate the combination routine.
What data is not allowed to be merged?
There are certain data that you cannot merge even after performing the steps. Let us have a look at what data falls under this category.
Payroll Checks: Payroll checks are combined as regular checks and so do not display in payroll reports.
Memorized Transactions: Memorized Transactions cannot be transferred from the secondary files.
Bank Reconciliations: Bank Reconciliations are unsupported on QuickBooks.
Negative Inventory Data Files: The QuickBooks data files that contain negative inventory and assembly builds are difficult to merge.
Sales Tax Data Files: The data files that have sales tax groups and items cannot be merged due to certain modifications.
Customer Notes and To-Do Lists: Customer Notes and To-Do Lists cannot be merged.
Customer Fields: Customer Fields that are fetched from transactions cannot be merged
Some Useful features – Built-in Combined reports in QuickBooks Enterprise
As you know, if you have built-in features in any sphere then you can execute the various multifaceted task in a trouble-free approach. Similarly, QuickBooks Enterprise solutions also endows a Built-in functionality to combine many QB company files.
Record the standard.
The result of the Balance Sheet.
Margin & financial amount loss.
Profit & loss by the category.
Comments on the cash flow.
Attempt on the balance.
To Merge the QuickBooks reports:
First of all, go to the QuickBooks “Report” menu.
In the “multiple company” tab, hit onto the combine reports.
Now Choose the “add files” icon & identify the other corporate investor.
In the reports for combining section, click on the information/details for which you desire to see combined data.
Finish the form & to date range fields to set the data date view.
Selection procedure of the details/information depends upon the reports.
Click on the “Combine reports” tab in Excel format.
Option 1. If you desire to use a 3rd Party software, you can point out many applications that work along with QuickBooks software. In these, some deliver valuable details/information to create the supplementary data from numerous corporate data files.
Option 2. You can effortlessly transport the reports from each other by following several directions & can merge using Microsoft Excel.
Hopefully, this technical blog helped you out in the method for how to combine QuickBooks reports. In case, you still find any hassle related to this or any other problem associated with the QuickBooks – you can take help and support from our QuickBooks certified experts.
Dial toll-free helpline number right now .i.e. ++1-844-499-6700. We will be more happy to help you out for all your troubles.
FAQs
What reports can be merged in QuickBooks Built-in Feature?
With QuickBooks built-in feature, one can merge the following types of reports: · Balance Sheet Standard · Balance Sheet Summary · Profit & Loss Standard · Profit & Loss by Class · Statement of Cash Flows · Trial Balance
Does the built-in file Merge Feature available on QuickBooks Desktop Enterprise?
The merging company files feature is pre-loaded on QuickBooks Desktop Enterprise. One can try performing some basic steps to merge in QuickBooks enterprise. However, it should be noted that the steps might vary for the enterprise version of QuickBooks.
What third-party Software is recommended for method 2 of Merging Company Files?
QuickBooks Pro or Premier are excellent choices for method 2 of merging company files. The reason being it comes with many other additional features.
What is QuickBooks company file?
A company file in QuickBooks is basically a core file that contains all the necessary information and also the sensitive data of the company. It is always recommended to keep a backup of the company file to ensure that the data is not lost in case of any discrepancy.