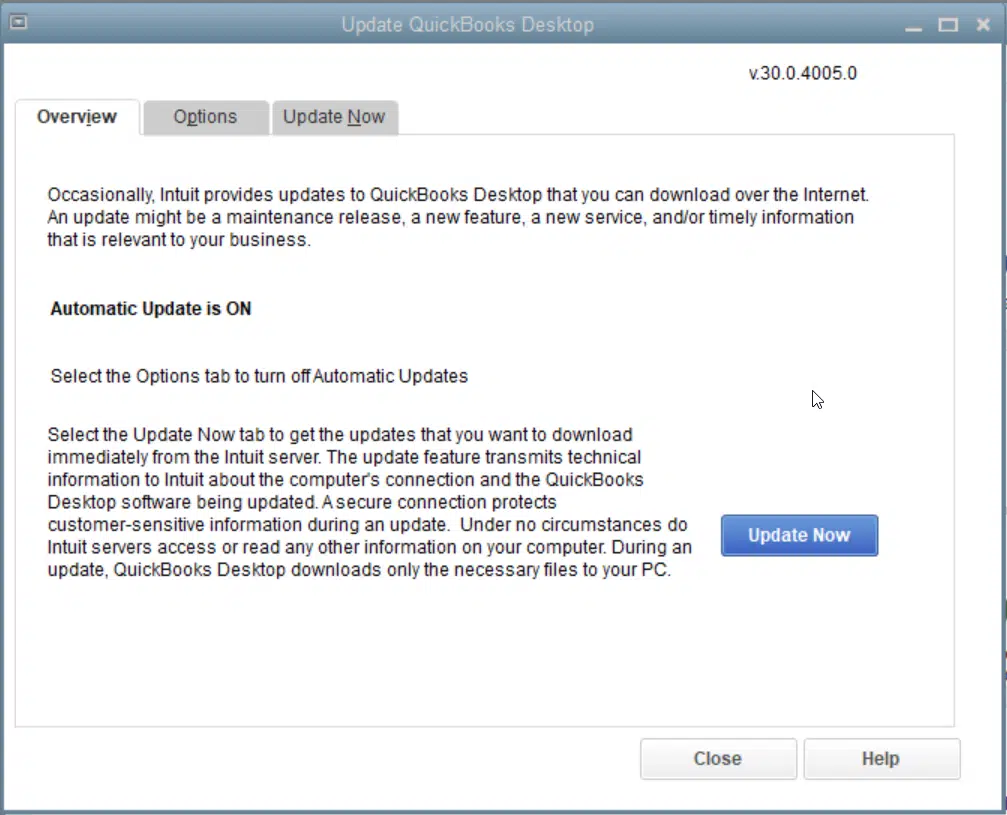
QuickBooks error code 1911 is usually seen when you try to install QuickBooks pro 2016 on a windows server 2012 R2 system. Such sort of errors might make upgrading the accounting software a little difficult. QB error 1911 can be seen due to a bunch of reasons such as error in registry driver and many more. To help you in dealing with this issue easily, we have come up with this piece of writing, where we are going to talk about the complete procedure to deal with the QuickBooks error code 1911.
To learn further about this issue, make sure you look through this piece of writing carefully. Having said that, if you require professional assistance at some point in time, then do not hesitate in contacting our team professionals at +1-888-510-9198 , and our certified QuickBooks professionals with sound knowledge will help you get rid of all sorts of errors permanently.
Before we jump onto the actual steps to eliminate the error, it is better to understand a little about what this error is all about. Talking about QuickBooks error code 1911, it is basically an error that can be experienced when you install or upgrade the software. It often occurs on the screen with a warning message that states:
“We’re Sorry! Something went wrong with your installation.” Or “Error 1911. Could not register type library for file C:\program files(x86)\Common File\intuit\QBPOSSDKRuntime\QBPOSXMLRPLib.dll. Contact your support personnel.”
When such an error occurs, the system might not be functioning properly and one might not be able to perform the upgradation of the software. There are a bunch of factors triggering this issue, also there are a bunch of steps that can be performed to eliminate this error permanently. Continue reading, to understand those factors and fixes better.
What lands you in QuickBooks error code 1911?
There can be a bunch of factors triggering this particular error in QuickBooks. Let us find it out:
One of the basic triggers can be if the registry driver error occurs
Another possible factor can be damaged installation of the QBs software
You can further land into similar issue if you aren’t having proper admin rights
Moreover, when the PsEXec file faces some issues, then this particular error might appear on the screen
Possible indicators of QuickBooks error 1911
Identifying the error becomes easy, once you go through the below signs and symptoms:
Just in case, the windows OS becomes unresponsive, then you can expect this error
Another indication can be if the software starts working sluggishly
Or if the software doesn’t respond to the inputs
Or if the system gets shut down frequently, then you might land into similar error.
Procedures to fix QuickBooks error code 1911
Now that you know the factors triggering the issue and its indicators, it is time to implement some quick steps to get rid of the issue. Let us have a look:
Procedure 1: Modifying the setup editor settings
This method requires you to perform the steps to configure setup editor settings. The steps to be performed here are as follows:
To start off with, choose the tables when you do not have to register your type library file.
Furthermore, click on the type Lib table.
Followed by, putting the row along with the file specified particularly.
Procedure 4: Download and review the PESxec directory
If none of the above steps helped in eliminating the error, then check out the steps below for downloading and reviewing the PESex directory.
Initially, download and install the PESxec directory.
Followed by looking for the QuickBooks installer in the installed directory.
The user is then needs to open the command prompt CMD.
And then, run PSExec. This is basically the QuickBooks installer to install QuickBooks on the system.
QuickBooks install diagnostic tool is stored in the downloads folder and will be titles 1.exe
Conclude the procedure by accessing the installer as normal.
To Summarize!
Reading this segment might help you in dealing with the QuickBooks error code 1911. However, if you land into the same glitch again and again even after performing the set of steps displayed above, you simply need to get on a call with our technical team at +1-888-510-9198 . Our team consists of a bunch of technically sound experts having proper knowledge related to QuickBooks and provide QuickBooks error support. We work round the clock to answer all sorts of queries related to QuickBooks.
QuickBooks error code 1911 often occurs when you try to install specific versions of QuickBooks. This is basically an installation error that arise while updating the software to the newer versions.
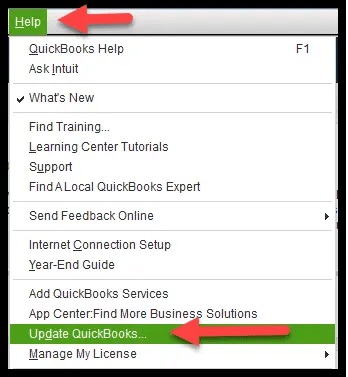
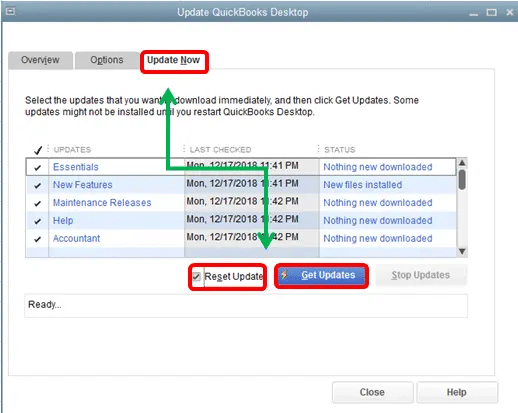
How do I fix error code in QuickBooks desktop?
You can try eliminating the QuickBooks desktop errors by running the QuickBooks install diagnostic tool. The steps involved are as follows: Start by opening QuickBooks tool hub and the chose installation issues. Followed by, selecting QuickBooks install diagnostic tool. When the tool finishes, restart your computer and start QuickBooks desktop and then open the data file.
What is a QuickBooks unrecoverable error?
Experiencing QuickBooks unrecoverable error indicates that the software closed unexpectedly due to some technical glitches. You can see this issue when opening or close a file, or saving a portable copy, and selecting any menu option, or clicking on the link in QuickBooks.
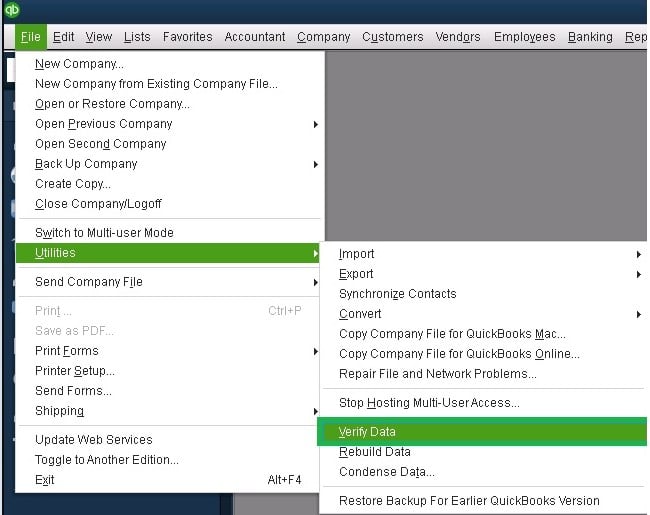
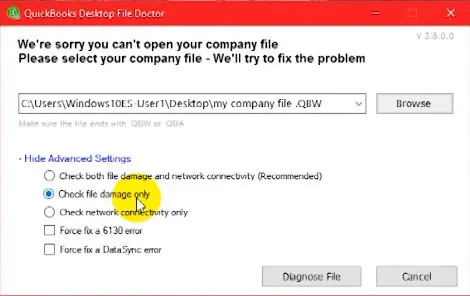
How do I fix a corrupted file in QuickBooks?
The rebuild data tool is built-in to QuickBooks desktop and fix the company file data issues. The steps involved are: Head to the file menu and hover over utilities tab and choose rebuild data On QuickBooks information window, choose ok tab. Let the tool repair the file When the tool finishes, choose ok tab Head to the file menu and check if the issue still persists
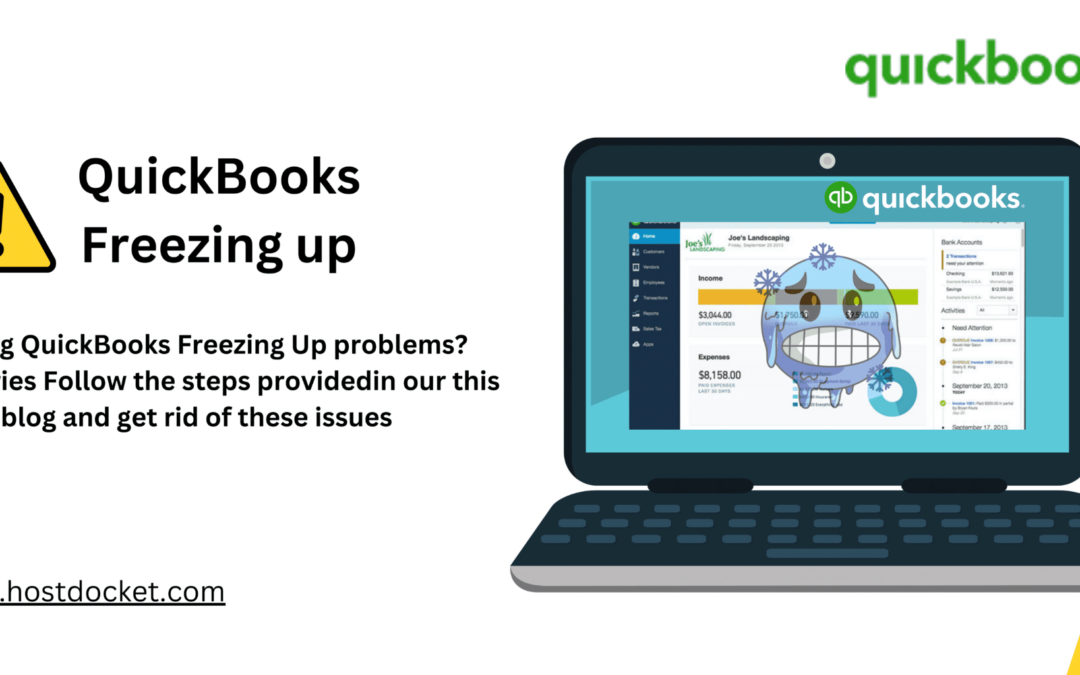
Recurring glitches and technical snags are quite common in QuickBooks, which might further lead to frequent freezing or even crashing of the software. In this segment, we are going to discuss the QuickBooks Freezing Problem. This simply means that the software hangs and doesn’t take any commands for some time. It rather creates a new off-screen window running in the background, and when the user tries to close the software, the window doesn’t shut down, ultimately leading to the freeze issue.
Freezing errors in QuickBooks can be quite annoying, as they might interrupt the smooth working of the software and would further end up in losing the unsaved data. To learn more about this error, you can simply scroll through this segment carefully. Or can also consult our QuickBooks tech support professionals at +1-888-510-9198, and let them help you with the issue ahead.
What is QuickBooks Freezing up Error?
QuickBooks freezing issue usually stops the overall functionality of the software, as it might start showing random glitches and pauses. When the QuickBooks is showing a freezing issue, then it isn’t possible to work on it. QuickBooks freezing up error is usually seen when the company file exceeds the limit of storage and cannot work properly due to storage issues. In case the system is outdated or corrupted, or if the user is having damaged company files, then experience such an error is most probable.
What instigates the QuickBooks freezing error?
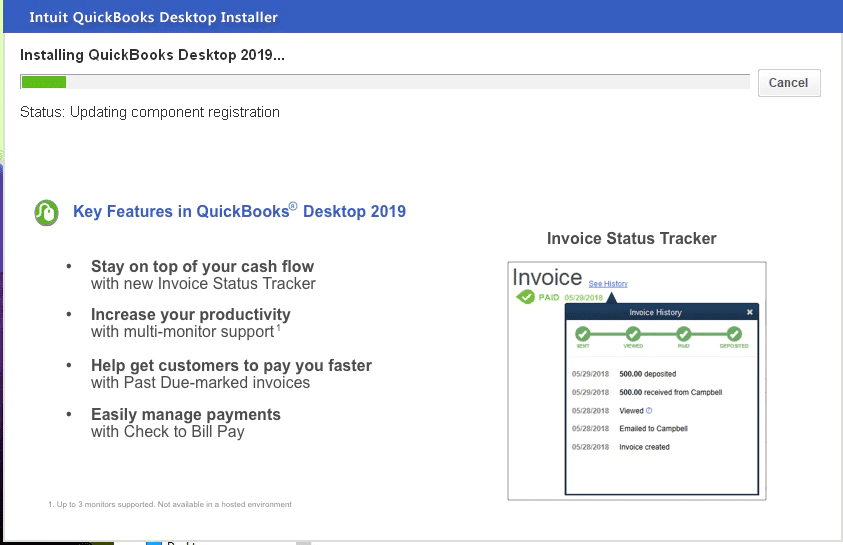
Coming across this issue is possible when the installer freezes while installing the QuickBooks software. Usually, it might get stuck on the installing ABS PDF driver window. Other than that, there can be a bunch of other factors triggering this issue. Let us have a look:
One of the basic factors causing this issue can be if the windows OS is out of date.
Furthermore, in case the company name is too long, then you might end up in such an error.
The user can also experience this issue if the PDF and preference files get damaged.
Moreover, if the file doesn’t permit the user to operate the window, then such an error can be seen.
Another possible reason can be, a damaged Windows operating system or a missing QBWUSER.INI file
You can also face similar issues if there are applications running in the background.
Possible Symptoms Indicating the QuickBooks Freezing Problem
Identifying the error becomes easy with the following signs and symptoms. Let us have a look:
In case the system slows down or freezes for a few seconds.
Or if processing operations in QuickBooks becomes much more difficult.
Also, in case the QuickBooks slows down and doesn’t respond to the inputs.
Effective Fixes for QuickBooks Freezing Problem
There are a bunch of solutions that you can perform to get rid of the QuickBooks freeze error. Let us check out each of the solutions one by one:
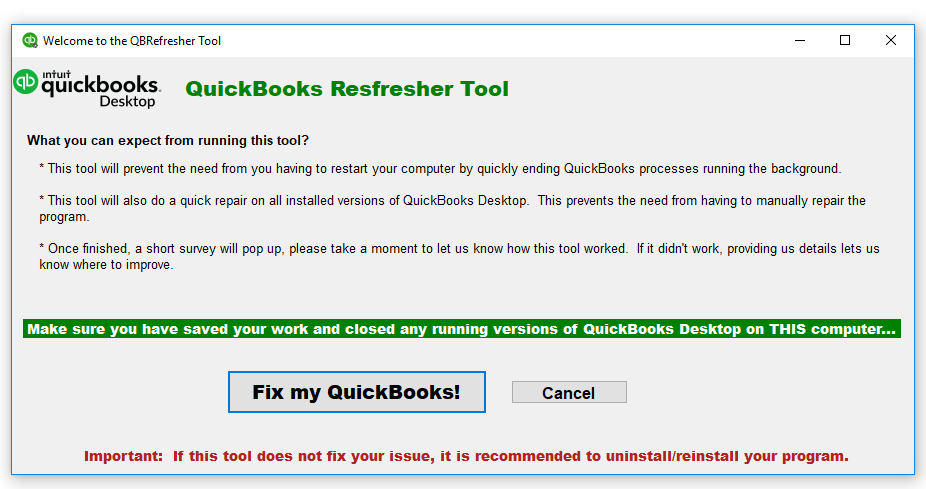
Method 1: Use the QuickBooks refresher tool
Under this process, you are required to close the QuickBooks desktop.
After that, download QuickBooks refresher tool.
Now, save the file on the desktop.
Post that, run the QBRefresher tool.
Re-open the QuickBooks desktop.
And this would fix the issue up to a certain extent.
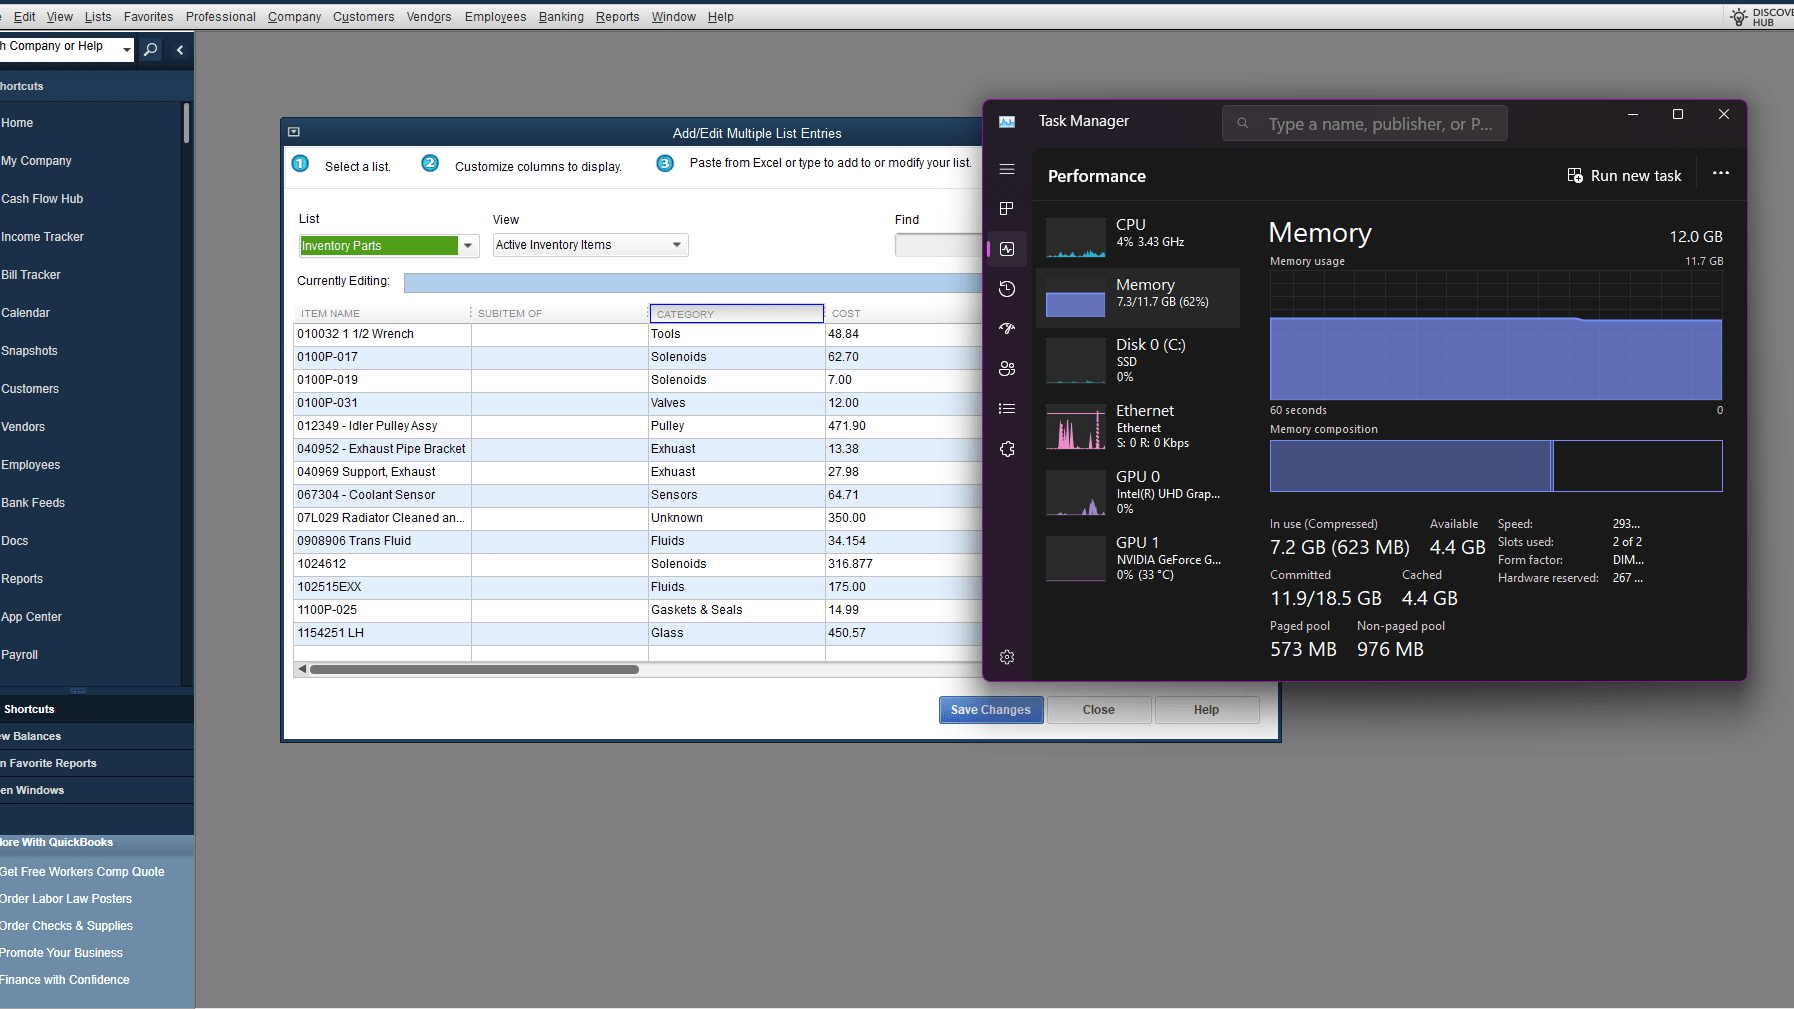
Method 2: Use the Task Manager to close QB-related programs
This process requires you to sail to the task manager and then click on ctrl + Alt + delete.
After that, select any open QuickBooks program that initiates with the letter QuickBooks or intuit.
Now, click on end task to end the process.
And lastly, shut down the task manager and reboot the software to see if the error gets fixed or not.
Method 3: Restore the Portable Company File
In case you are experiencing any data issues, then the software allows you to create a portable file in QuickBooks that can be used to address the issue. This can be done using the steps below:
The very first step is to access/open the QuickBooks file and opt for File.
Now, select the Create Copy option.
Also, click on the Portable Company File and then click on Next.
You are now required to select the location to save the portable file and then click on save and hit ok tab.
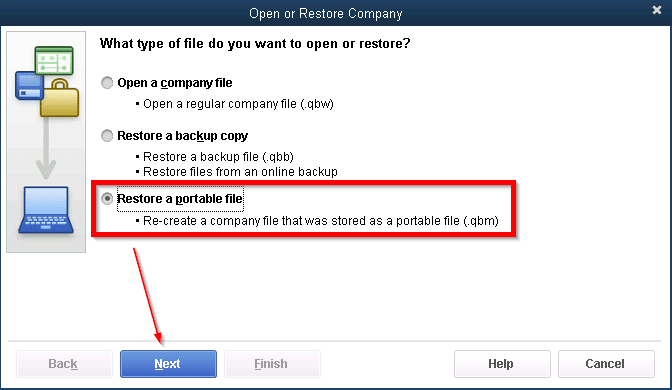
To restore the portable file, you can move to the file menu and select open or restore company option.
Now, click on next and select restore a portable file option.
The next step is to look for a portable file and select it.
Also, click on open and next respectively.
The last step is to click on save after changing the location of the company file.
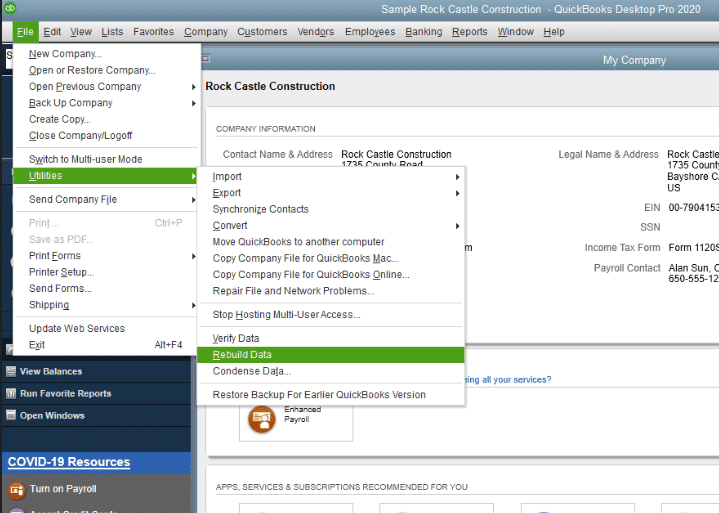
Method 4: Use the Rebuild Data tool
Here, you simply need to open the file menu and head to the utilities tab.
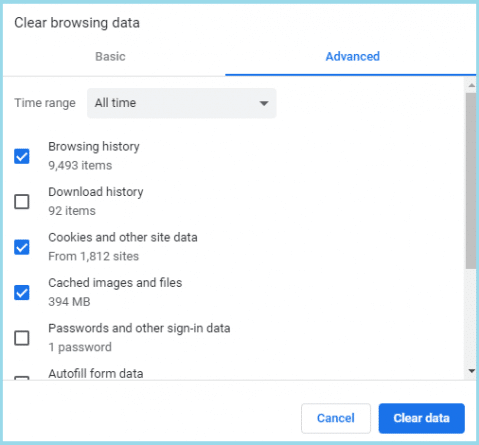
Method 6: Clear the browser cache and temporary files
Often the cache files might create issues in QuickBooks, especially slow and QuickBooks Freezing Problem. Thus, the user should try to clear browser cache and remove the access data which slow down the system.
After that perform the onscreen steps and let the tool fix the issue.
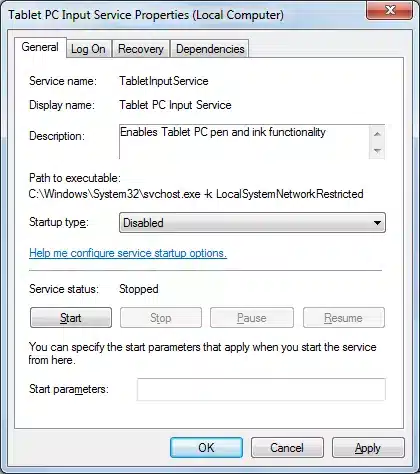
Method 8: Disable the input services
Under this process, press Windows + R and enter in MSC.
After that, click on ok tab.
Now, double-click the system input service.
And then, click on the stop the service option.
Now, double-click the input services and select the properties tab.
Disable the start-up type and hit on the OK button.
Lastly, shut down the services menu and then reopen QuickBooks.
Method 9: Edit the DAT and DDF files
Here, firstly close the company files
After that, search for the company directory and rename ‘DAT’ to ‘OldUserPRef.DAT.’
Now, delete each file with the DDF extension.
Open the company and click on confirm to save the payments from the same directory.
After that click on print to print successfully
To Conclude!
We end this segment right here, with the hope that the information discussed above might be of some help in dealing with the QuickBooks Freezing Problem. On the contrary, if you are facing some issue in getting rid of the error or if you are getting the same error again and again even after performing the steps discussed above, then in that scenario, we recommend you connect with our QuickBooks Desktop tech support professionals. Give us a call at +1-888-510-9198 and we will provide you with instant support services.
FAQs- QuickBooks Freezing Problem
What to do when QuickBooks Freezes?
When your QuickBooks software freezes try to check the internet connection. If there is any issue with the internet, then you can try restarting and fixing the issue. You can also disable other programs to fix the issue, if it is caused due to hindrance of any other program.
Why does QuickBooks keep freezing?
There are a couple of reasons due to which you can experience this issue:
QuickBooks trying to open too many files together.
You have a lot of applications open at the same time.
The system might not have enough memory to handle all the information.
Compatibility issue with other programs on the system can also cause such an error.
How do you unfreeze QuickBooks?
You can unfreeze QuickBooks using the steps below:
Head to utilities from file menu
Click on rebuild data and click on ok tab.
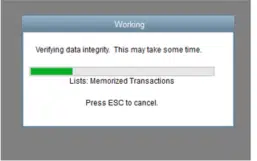
Move to file menu and head to utilities and select verify data
In the next step, you will be asked to rebuild now or view errors.
Click on ok tab and QuickBooks freezing issue will not show up anymore.
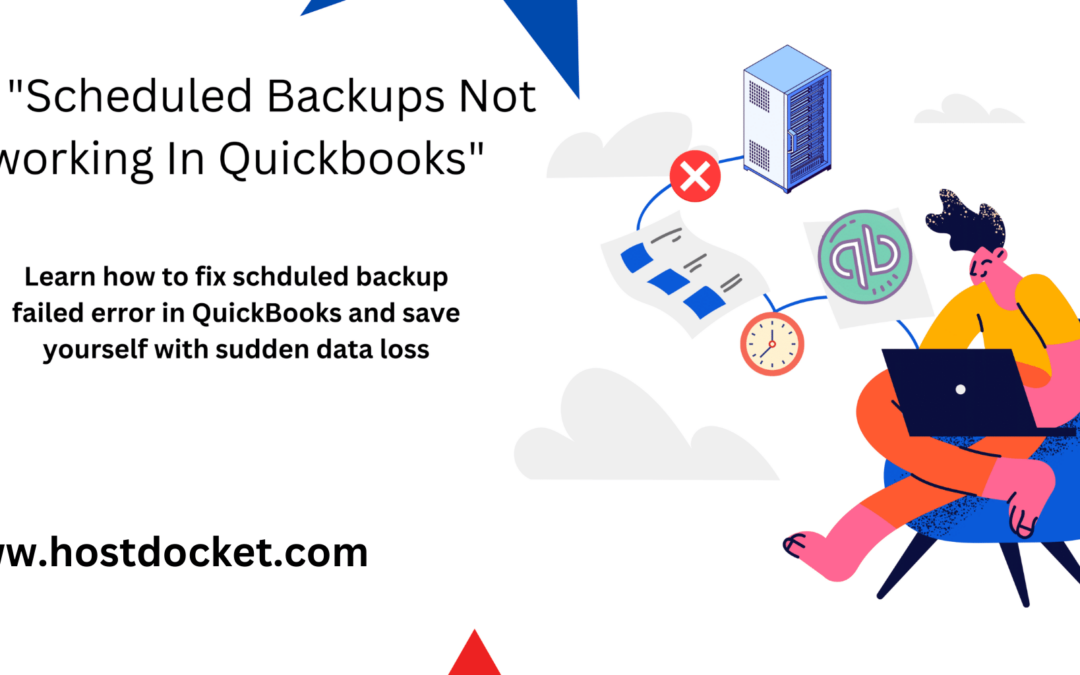
Trying to schedule automatic backup but failed? Well, these days many QuickBooks users are facing issues when scheduling backups. Though the feature of scheduled backups in QuickBooks is one of most the easy ways to prevent data loss, at times, due to certain reasons the software might fail to do so. You might come across an error message that might state: ‘QuickBooks scheduled backup not working’ or Schedule backup does not run. There are a few fixes for this error, let us evaluate them one by one.
As this issue is associated with your company file, you can seek for professional guidance, to avoid any sort of data loss. Reach out to our QuickBooks ProAdvisor at +1-888-510-9198 and get instant and effective troubleshooting guidance without hampering your company file.
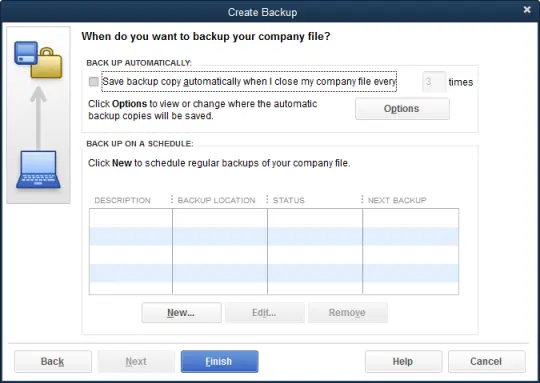
Method 3: Check Automatic Scheduled Backup Settings in QuickBooks
At first open the QuickBooks and Choose File menu.
Select Save Copy or Backup windows to open the workflow.
Go for the Backup option and hit the NEXT button.
If you haven’t set up the backup defaults, then click on Options to set the backup defaults (where you want to keep your local backup), Hit on the Next tab.
After that choose Change Location option or Use this location (as per your choice)
Click on the Next tab.
Then hit the Save it now and schedule future backups options or only schedule future backups. And again, click on Next tab.
Now select ‘Save backup copy automatically when I close my company file every (number) times’ box.
At last fill the number in the field provided and click Finish button.
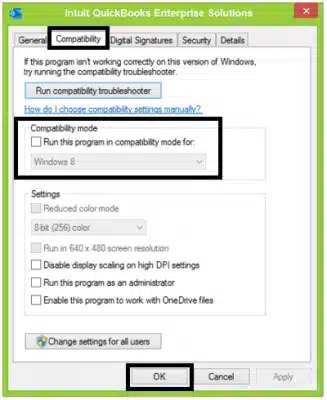
Method 4: Run QuickBooks in Compatibility Mode for Windows version
In this process, you need to open the system and right click the QuickBooks icon on the desktop.
Click on properties tab
Look for the Compatibility tab and check and tick mark the Run this program in compatibility mode option.
Now select your Windows version by clicking on the drop-down list.
Simply, click on Apply and then hit the OK tab.
Now, check if the problem still persists, hopefully, it’s not there.
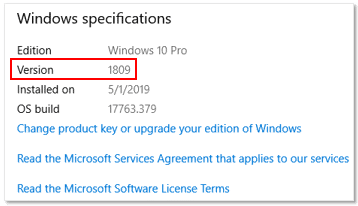
IMPORTANT NOTE: Before running QuickBooks in Compatibility mode first you need to check the version of windows. So, to check the version of your Windows, press Windows + R at the same time on your keyboard, type Winver command in the Run box, and press Enter. This will show a popup with your windows version-related information. With the help of this process, it will make QuickBooks suitable to run for your Windows. Even After performing all the above solutions, if in case QuickBooks automatic backup is still not working then you would want to reinstall the QuickBooks Desktop application using the QuickBooks Clean Install Tool.
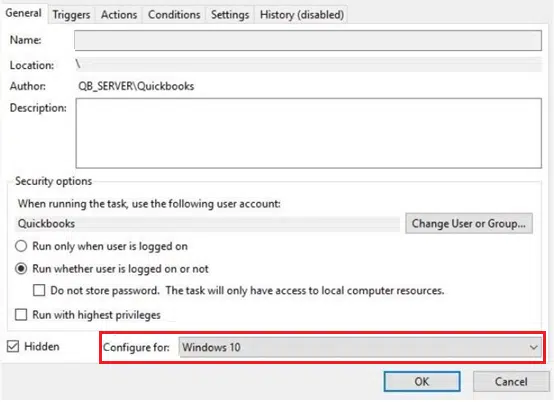
If automatic backup is not working, then you can change Configure to field to Windows 10. For this, you need to perform the steps below:
The very first step is to open the Task Scheduler in Windows 10.
Once done with that, click on Task Scheduler Library, in the Task Manager dialog box.
After that scroll down until you reach QuickBooks backup task and further right click on to choose the properties tab.
Access the task properties.
Search for the Configure for option in the section general.
Also, in the configure for: drop down list, pick Windows 10
Note that after changing Configure to setting to Windows 10 some users experience backup failure. Also, they might come across a message QBBackup.log file: QuickBooks encountered a problem attempting to backup C:\DATABASES\QB_XXXXXXX\XXXXXXX.qbw – Drive specified could not be accessed. Error ID 202: Last System Error: The computer cannot locate the specified path. This error can be fixed using Run Only When User is Logged in option under QuickBooks.
So, now we hope that you got to know what to do whenever the ‘QuickBooks Scheduled Backup not working’ issue occurs on your system. Also, all the above-mentioned solutions are quite informative and this article has a complete guide for resolving this error. But if in case your issue is still not resolved after following the above solutions, we advise you to reach out to an expert at QuickBooks error support center by simply dialing our helpline Number +1-888-510-9198 and they can provide you further assistance.
FAQs Related to scheduled backup not working issue in QuickBooks
Why is QuickBooks not backing up?
You can experience QuickBooks not backing up error due to the unavailability of the storage device storing the backup file. This means that the external storage device creating backups for QuickBooks is no longer connected to the computer.
How do I schedule a QuickBooks backup?
You can automatically backup file in QuickBooks using the steps below: 1. Choose backup from the file menu. 2. Click on Schedule a backup tab. 3. Also, click on automatically backup when closing data file every box. 4. Once done with that enter the appropriate backup frequency. 5. Make proper selections in the QuickBooks backup windows 6. Lastly, click on ok tab.
How do I change backup settings in QuickBooks?
For this, you need to choose QuickBooks, and further opt for settings. You then have to click on backup and opt for backup preferences. Automatically backup company files.
How do I activate online backup in QuickBooks desktop?
You need to choose file menu and also hover over backup company and choose setup/activate online backup. Also, sign out in the intuit data protect window. Ensure that you sign in to IDP using the same credentials displayed like the email ID. Also click on ok tab.
Did you see QuickBooks unexpected error 5 and don’t know what can be done? QuickBooks unexpected error 5 is often seen when the QuickBooks database service user is restricted from accessing the file location. It appears on the screen with a warning message QBW Error: “Got unexpected error 5 in call to NetShareGetInfo for Path“. You can experience such issues due to invalid entries in the Windows registry or if there are system configuration issues. Other warning message associated with this error can be:
Message
Description
Error:
Encountered Unexpected Error 5 in call to NetShareGetInfo for path\\server\file.QBW
This error basically means that the software has experienced a severe application issue, and you can come across this issue when trying to save the company file. There can also be a bunch of factors triggering such errors, to learn what those are, along with the set of steps that can be performed to eliminate them, all you need to read this segment with much care. Or you can also get in touch with our QuickBooks Desktop tech support professionals at +1-888-510-9198 and take their assistance in eliminating the issue from its root cause.
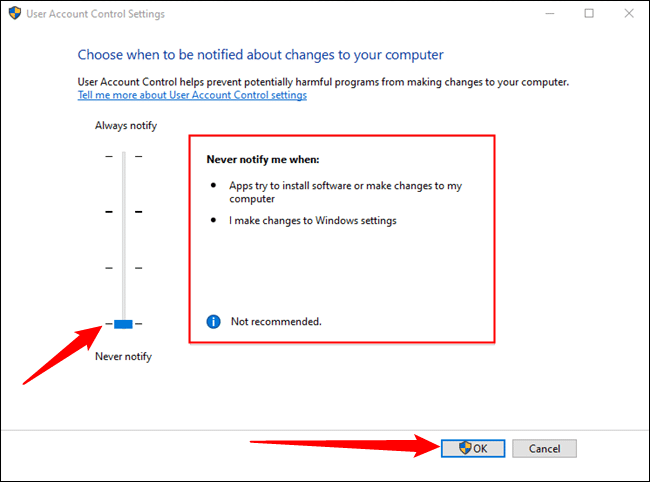
Method 3: Turn off the user account control in Windows
Turning off UAC in windows can help in fixing the issue to a certain extent. Let us go through the steps involved in the process:
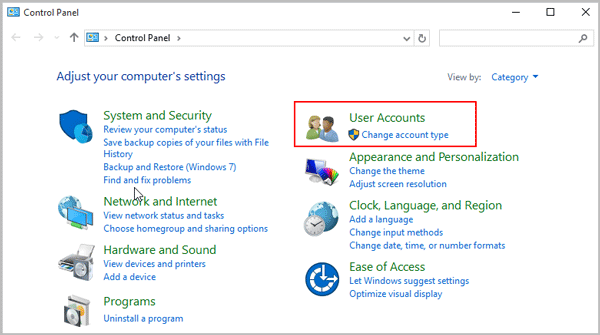
Under this process, press the Windows + R keys to open the run Window.
And then, enter the control panel and hit the OK button.
Choose the user accounts and go for user accounts (classic view).
After that choose the change user account control settings.
In case you see any prompts by UAC, choose Yes to continue.
After that, move the slider to set it to never notify.
And click on OK to turn UAC OFF.
You can also set to always notify and go for OK to turn UAC ON (If prompted, select Yes to continue).
The last step is to choose to reboot the system.
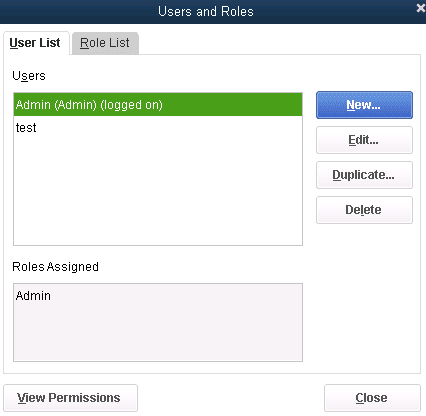
Method 4: Remove the user to fix Unexpected error 5 in call to NetShareGetInfofor path
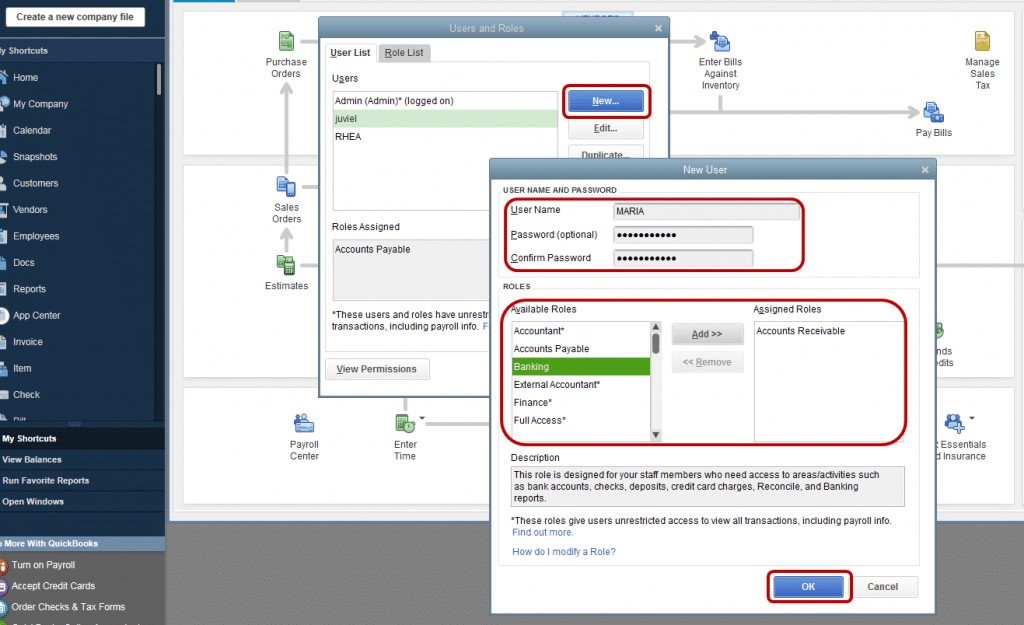
Start with launching the company tab on the QuickBooks desktop and choose the users.
Go for the set-up users and roles.
And select the user in the user list.
The user now needs to select OK for confirmation.
Method 5: Update QuickBooks point of sale (POS)
Updating QuickBooks POS can help you terminate Got unexpected error 5 in call to NetShareGetInfo for path error successfully. The steps you need to perform are:
Here, you need to sign into the point-of-sale system as an admin.
After that, navigate to the help menu and then hover over software update.
Now, choose updater preference.
And go for the general tab.
Also, select automatically download updates.
And hit on notify me to get the notification related to new updates when they are available.
Lastly, choose OK when done.
The software will automatically download and install the latest updates when they’re available.
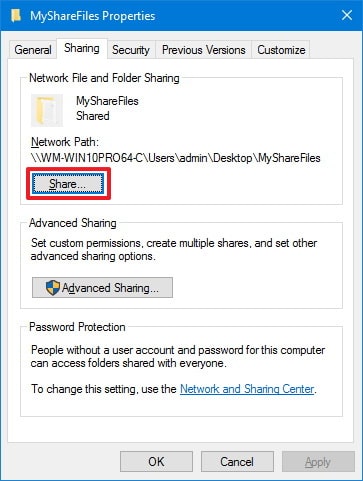
Got unexpected error 5 in call to NetShareGetInfo for path? This is possible, due to disabled file sharing for the company files. The user needs to perform the below steps to fix this issue successfully:
For this process, you need to launch the file explorer and right-click on the folder having the file.
Now, go for the properties and sharing tab.
And, opt for partial or full sharing according to the business requirements.
Lastly, choose to apply and hit the OK button.
Method 7: Install the Reimage Repair Tool
You can make use of the reimage repair tool to eliminate “got unexpected error 5 in call to NetShareGetInfo” if none of the above steps helped. The procedure to install and use reimage repair tool is as follows:
For this, you need to download the reimage repair tool.
After that save this tool on the desktop.
Head to the file location.
And press yes when the prompt displays on the screen.
Start the automatic scan, and unmark the checkbox.
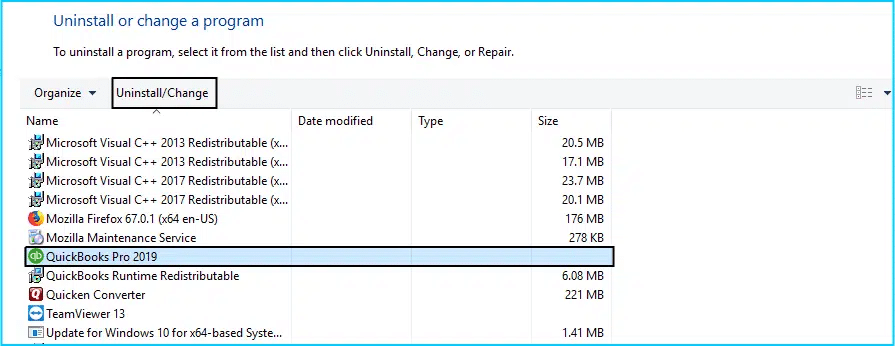
In case an unexpected error has occurred in QuickBooks, you can try fixing it by reinstalling QuickBooks. The steps involved in the reinstallation process are as follows:
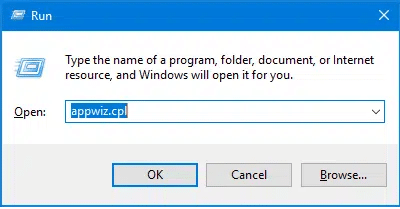
The below process requires you to press the Windows tab and R tab to open run box and look for appwiz.cpl
And then, locate and double-click on QuickBooks to remove it and all of its features from the device.
After that, return to the QuickBooks website to download the desktop application again.
Make sure you are downloading the correct version of the application and perform the steps to reinstall the application.
Towards the end of this segment, we believe that the information shared in above might be of great assistance in eliminating the Status code 5 or system error 5 access denied from its root cause. However, if you continue to face the unexpected error, then in that scenario consulting our QuickBooks tech support team at +1-888-510-9198 is recommended. We are a team of certified QuickBooks professionals who work round the clock in providing immediate support and assistance. Feel free to share your queries and requirements with our team.
FAQs Related to QuickBooks got unexpected error 5 in call to NetShareGetInfo for path
Got unexpected error 5 in call to NetShareGetInfo for path. What to do?
System error 5 occur if the installation of QuickBooks is incorrect. Or the system shuts down forcibly. You can fix it using the steps below: 1. Recreating user file. 2. Also, creating new user. 3. Using QuickBooks file doctor tool. 4. Further, giving file share access
What is error code 5 in NetShareGetInfo?
This error is basically an unexpected error that can be seen when the installation of QuickBooks itself is incorrect. Or if there are invalid entries in Windows registry.
How do I fix QuickBooks Unexpected error 5?
You can try fixing QuickBooks got unexpected error 5 in call to NetShareGetInfo for path by updating QuickBooks point of sale to the latest release or turning off User account control in windows. Moreover, another fixation for the same can be to run QuickBooks file doctor tool.
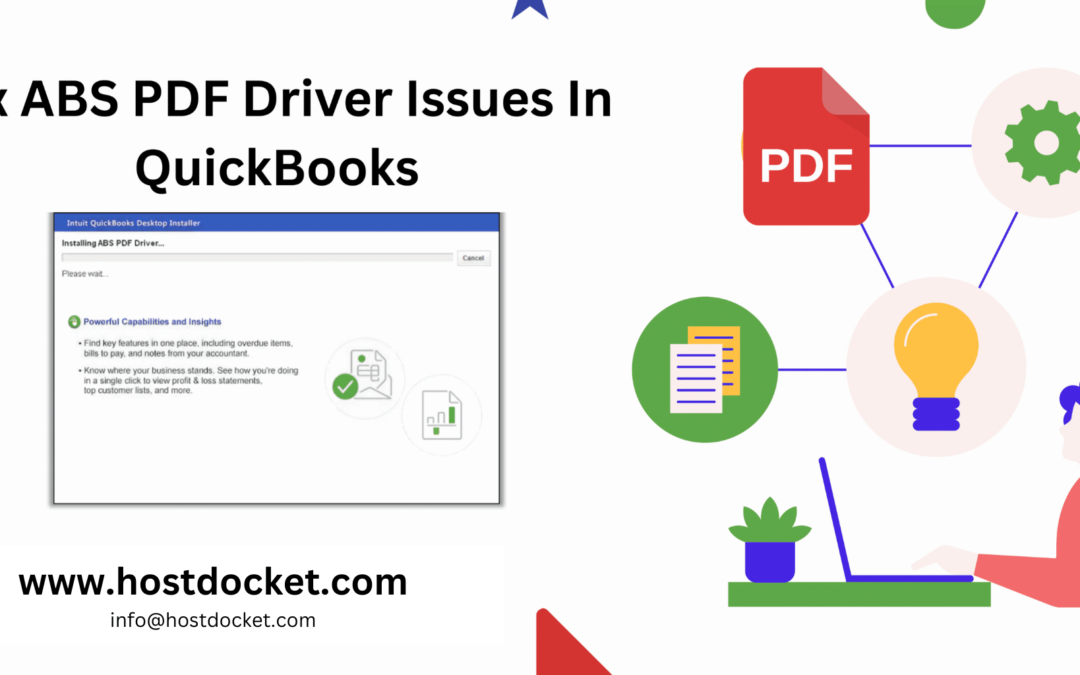
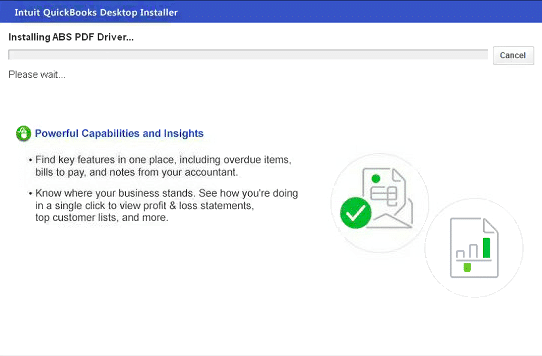
Ever came across an error when installing the ABS PDF driver? Well, this error might freeze your process when installing QuickBooks desktop. Or it might stop responding when installing QuickBooks desktop. This error can be experienced if there is any system issue or a slow internet connection. The QuickBooks accounting software uses the ABS PDF to print transactions, which makes it important for the component to be installed. Though the error isn’t a common one, can be fixed using some basic set of steps. To understand how to install ABS PDF driver in QuickBooks, make sure to read this segment carefully. Or you also have the option to consult our technically sound QuickBooks professionals who might help you with the fixation of the error permanently. Get on a call with our team at +1-888-510-9198, and we will help you with the process further.
What causes QuickBooks installation stuck on installing ABS PDF drive?
Well, there are certain factors triggering the QuickBooks freezing while Installing ABS PDF driver message or the installer being frozen. Let us have a look: One of the basic factors can be a slow internet connection. Another trigger can be if there is any problem with the device itself.
Steps to fix Error: Stuck on “Installing ABS PDF driver issue…” while installing QuickBooks Desktop
As the error isn’t a common one, there are only a few defined steps that can be followed to install ABS PDF Driver in QuickBooks. In case of any queries, it is suggested to consult a QuickBooks professional. Let us check out the steps involved one by one:
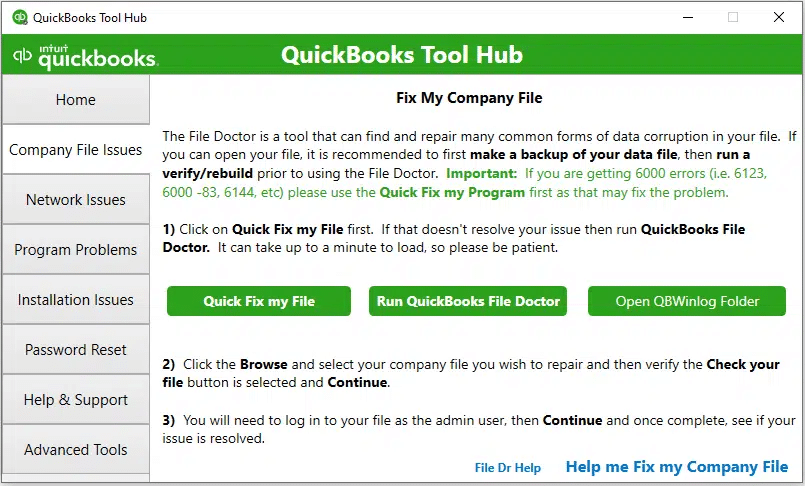
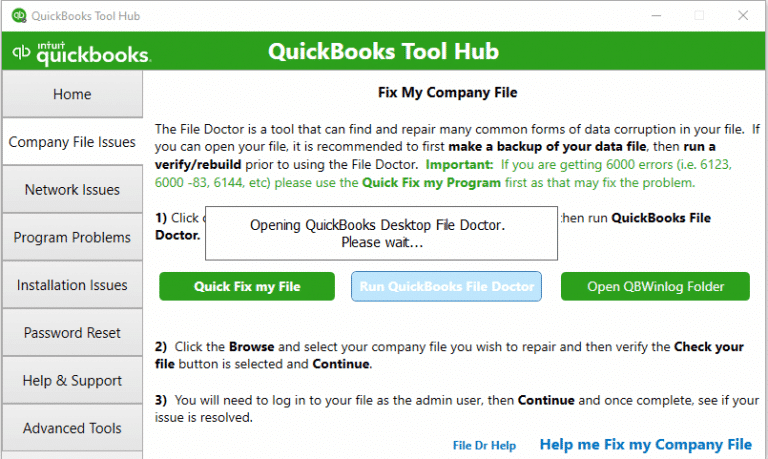
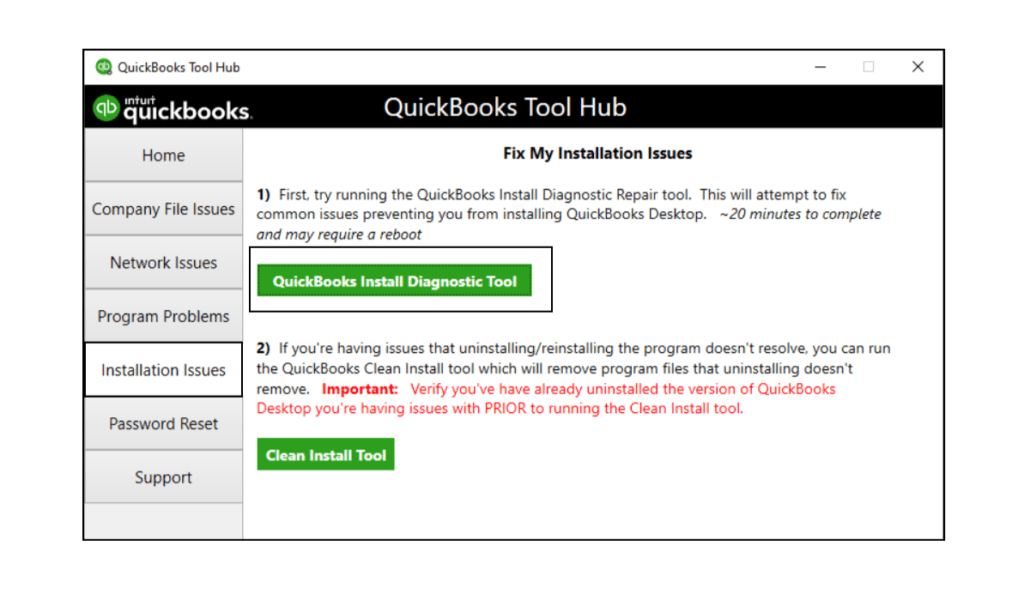
Step 1: Download and install the QuickBooks tool hub
Tool hub can fix some of the major issues in QuickBooks and can be used in this case as well. You are recommended to perform the steps below to download and install QuickBooks tool hub. Let us check it out:
The very first step is to close QuickBooks.
Once done with that, you need to download the QuickBooks tool hub latest version.
Now, save the file where you can spot it easily.
After that, open the file that was downloaded earlier.
The file should look like QuickBooksToolHub.exe
Now, perform the onscreen steps to install the tool hub.
Also, make sure to agree to the terms and conditions.
Once the install process ends, double click the Icon on the windows desktop for opening the QuickBooks tool hub.
Note that, in you are unable to spot the icon, then make sure to search for the same in windows for QuickBooks tool hub and go for the Program.
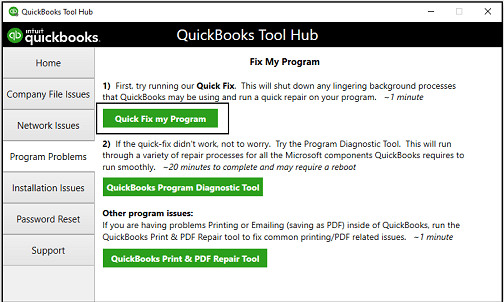
Step 2: Run Quick fix my program from the QuickBooks tool hub
The very first step here is to go for the Program problems in tool hub downloaded earlier.
And then, pick the Quick fix my program.
Now, open the Run command.
And then press Windows + R keys.
The user will now have to enter %TEMP% and hit Enter key.
Select the TEMP Folder
Search for the Prx_usXXrX or Enterprise_usXXrX folder Note: that the X’s on this folder indicates the version, year, and release of the QuickBooks.
Moving ahead, open the Third-party folder and also go for ABS.
The user is now required to double-click ABSPDF412Setup for running the file.
Once you are done with the install process, make sure to open and register QuickBooks.
If the ABS PDF installer continues to freeze or stops responding, then make sure to connect with an IT expert and let the professionals check for the issue in your system.
Now that you know what steps can be performed in fixing the stuck ABS PDF driver error when installing QuickBooks, it is the right time to perform those steps and get rid of the issue permanently. On the contrary, if you are unable to deal with the issue even after performing the set of steps discussed above, then connecting with a bunch of professionals is the only key to success. You can simply get in touch with QuickBooks support professionals at +1-888-510-9198 and ask them to perform the necessary steps for you in eliminating the issue. We are a team of certified QuickBooks professionals who work round the clock in providing instant QuickBooks Support Services.
Some FAQs on How to Install ABS PDF Driver issue in QuickBooks
What is ABS PDF Driver and how to install it?
ABS PDF Driver is a software component that helps in creating and managing PDF files. It is important because it enables users to convert any document or image into a portable document format (PDF), which is widely used for its universal compatibility and security features.
What are some common ABS PDF Driver issues and how can I resolve them?
Some common ABS PDF Driver issues include compatibility problems with newer operating systems, outdated software, and conflicts with other PDF software. To resolve these issues, you can try updating the ABS PDF Driver software to the latest version or uninstalling and reinstalling it.
What if I still face ABS PDF Driver issues even after trying to resolve them?
If you are still confused about how to install ABS PDF Driver issues even after trying to resolve them, you can contact our toll-free support number +1-888-510-9198 for assistance. Our expert technicians will be happy to help you resolve the issue.
How do I update ABS PDF Driver to the latest version?
To update ABS PDF Driver to the latest version, you can go to the software’s official website and download the latest version. Alternatively, you can also contact our toll-free support number +1-888-510-9198 for assistance in updating the software.
Can ABS PDF Driver issues affect the performance of my computer or the security of my data?
ABS PDF Driver issues can sometimes affect the performance of your computer, but they generally do not pose a threat to the security of your data. However, it’s always a good idea to keep your software updated to ensure optimal performance and security. If you have any concerns about the security of your data, you can contact our toll-free support number +1-888-510-9198 for assistance.
![QuickBooks Error 1911: Couldn’t Register Library File [Fixed]](https://www.hostdocket.com/wp-content/uploads/2023/07/QuickBooks-error-code-1911.png)