Just like every other accounting software, even QuickBooks is prone to technical glitches. Some glitches should resolve by a simple reboot, while others might need to perform certain other steps. One such error that we are going to highlight in today’s article is QuickBooks error OL-334. Well, this error is basically a banking error or can also be termed as a banking setup and connection error. One might come across such an error when there is an interruption in the internet connection or if the internet connection is poor. This error basically highlights that there is some sort of issue with the bank. This can be either any sort of improvement offered by the bank related to the admin or related to the web connector. Tackling errors in QuickBooks Software is easy, as every error can be resolved using some steps and even the banking errors are no exceptions.
The QuickBooks Banking error OL-334 can be resolved easily using the steps that we will be mentioning later in this article. Thus, we recommend you stick around till the end and understand every method properly. But if you are a newbie or have zero technical knowledge, then you should consult a professional for eliminating the issue. You can contact our experts at +1-888-510-9198 and ask them to help you out in fixing the error permanently.
What lands you in QuickBooks banking error OL-334?
As mentioned earlier, there can be a couple of factors leading to QuickBooks banking error OL-334. Find out what those reasons are below:
One of the basic reasons can be an inactive bank account empowered for online banking in QuickBooks.
Performing download or import incorrectly can fix QuickBooks banking error OL-334.
Bank servers or internet service providers can also be a common reason behind the occurrence of such an error.
A discontinued adaptation of Windows or QuickBooks desktop can trigger error OL 334.
Important points
Before you jump on to the procedures to eliminate such an error, it is very much essential to perform certain activities or keep certain things in mind. Let us have a look:
Ascertaining that QuickBooks desktop is up to date to the latest release is a must to resolve QuickBooks banking error OL-334
Reaching out to the bank to verify the account information and that the bank is not experiencing any outages at that moment.
One has to re-check if there is an active internet connection. If yes, then verify the firewall and internet security settings to continue.
The next step is to Add a Bank account, in the newly created test company
After that set up the account for Bank feeds.
Now, download bank feed transactions to test the account.
Process 2: Running the account set up with the ctrl key
This process demands creating a backup of QuickBooks company file.
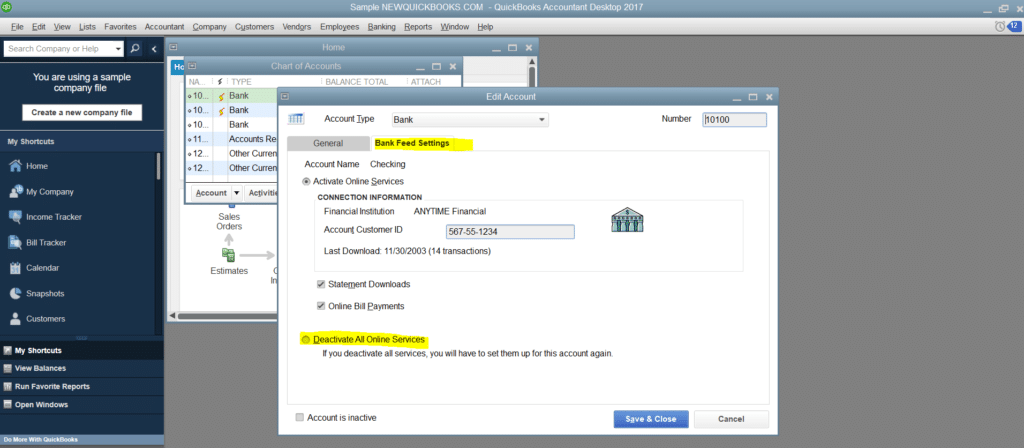
Once done with that, look for the Inactive account in QuickBooks file.
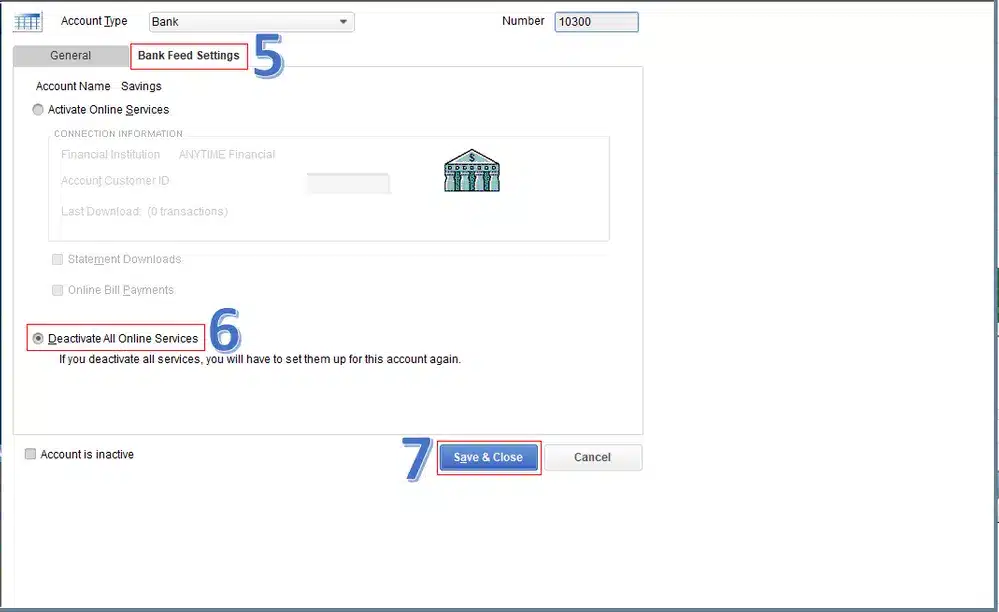
After that, deactivate the account for Online services.
End the process by running Bank feeds setup again and pressing the Ctrl key.
Process 3: Deactivating all accounts
Towards the end, the user will get an option stating chart of accounts, where one has to select the include in active checkbox and further click on deactivate bank feeds.
Eliminating the QuickBooks banking error OL-334 becomes a cakewalk once you are thorough with the steps that can be performed to get rid of the error. In case the error continues to trouble the user, even after implementing the steps discussed above, then contacting our tech personnel at +1-888-510-9198 will help. Our technically sound professionals will be able to help you in removing the error from its root cause successfully. Thus, do not hesitate in sharing your queries with our professionals.
Frequently Asked Questions
What is QuickBooks Banking error OL 334?
QuickBooks Banking error OL 334 is basically an error code that occurs when there is an issue with downloading transactions or connecting to the bank when using online banking services in QuickBooks.
Is there a way to prevent QuickBooks banking error from occuring?
Note the below options to prevent QuickBooks banking error from occurring: 1. Make sure to correct and update bank login credentials entered in QuickBooks 2. Update QuickBooks to the latest release 3. Maintain a stable and reliable internet connection for online banking activities. 4. Review and update the bank accounting settings in QuickBooks periodically to ensure they are accurate and properly configured 5. Keep your system and network security measures up to date, and be cautious when accessing online banking services.
Can using a different browser help resolve QuickBooks banking error OL 334?
Well, yes in many cases, switching to a different browser or clearing the cache and temporary internet files of the current browser can resolve connectivity issues and therefore, fix the error.
How to Resolve Error 1723 while installing and uninstalling QuickBooks Desktop:
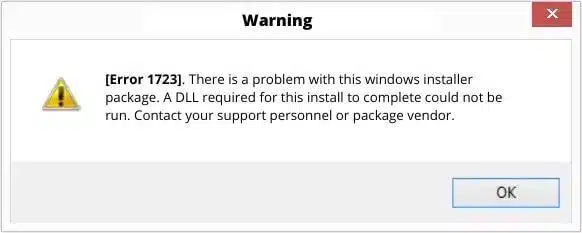
Errors in QuickBooks are common and every error in QuickBooks can be resolved by performing some or the other steps. One such error that any QuickBooks user can experience in QuickBooks is the QuickBooks error 1723. Not known to many, but there are a few components including the windows installer engine that are needed to install and update the software on windows. Any kind of damage to the installer can hamper the process and result in QuickBooks error code 1723. This error appears on the screen with a warning message that states: Error 1723: There is a problem with this Windows installer package.” This error indicates improper functionality of the QuickBooks application due to misconfiguration or missing windows components. One might come across this error due to a handful of reasons, which we will be depicting later in this article.
Thus, if you are interested in learning more about this issue, then scroll through the article with full concentration. However, if you are looking for a team of professionals who can help you with eliminating this issue, then feel free to reach out to our tech personnel at +1-888-510-9198 and they will provide the user with instant support and assistance.
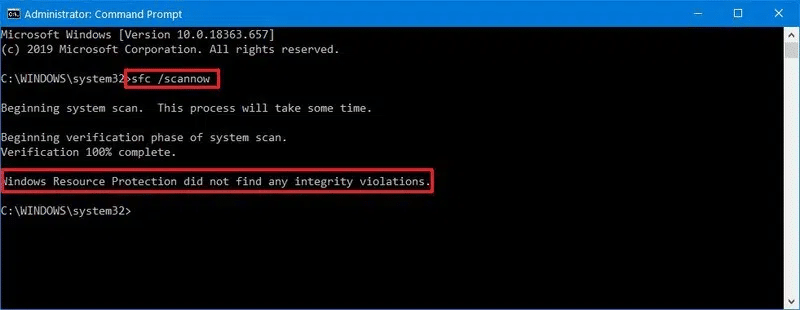
Go for Run as admin. In case prompted, Enter the password.
Enter in SFC/scannow in the command prompt window
Hit the Enter key.
The system file checker tool will scan and repair the corrupted files.
Wait for the tool complete the scan and reboot the system after the process ends
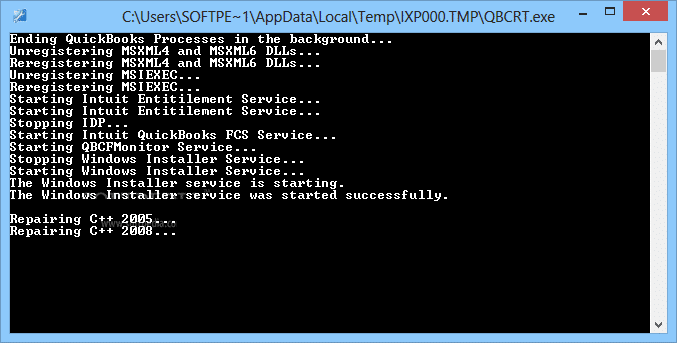
Process 5: Run QuickBooks component repair tool
Just in case you are unable to eliminate the error even after performing the methods above, then you can run the QuickBooks component repair tool. The steps involved in this process are as follows:
Start the procedure by rebuilding the .NET framework
Reconstruct the microsoft msxml manually
try the tasks with the help or under the guidance of the IT professionals
Process 6: Reinstall Java Program
Other than the above stated methods, one can also try to uninstall and reinstall Java on your computer. The steps involved in this process are as follows:
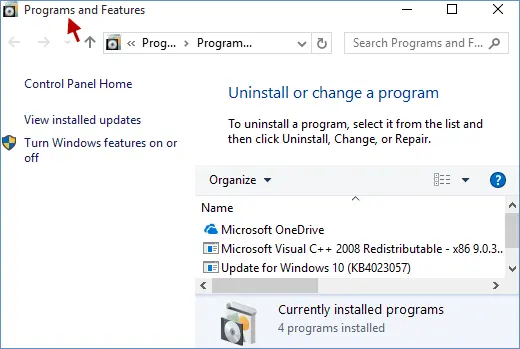
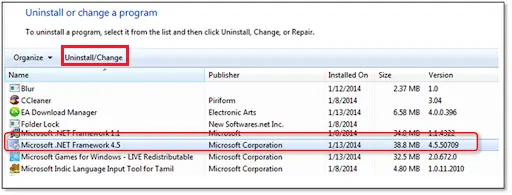
Start with heading to the control panel and choose Programs and Features
Find Java in the list programs and choose Uninstall
Perform the onscreen steps to complete the uninstallation process
Also, download and install the latest version of Java from the official Java website
Now that you are versed with the steps that you can try to implement to tackle the QuickBooks error code 1723, it is time to make use of those steps and try eliminating the issue from its root cause. However, if you are stuck at any point in time, or if you need our assistance in tackling the issue, then do not think much about contacting our support professionals at +1(844)405-0907 and they will instantly provide you with the right support and assistance.
QuickBooks error code 1723 is basically an installation error that often appears while installing QuickBooks desktop. It also occurs when the source of installation is damaged or corrupted or if the installer files are corrupted.
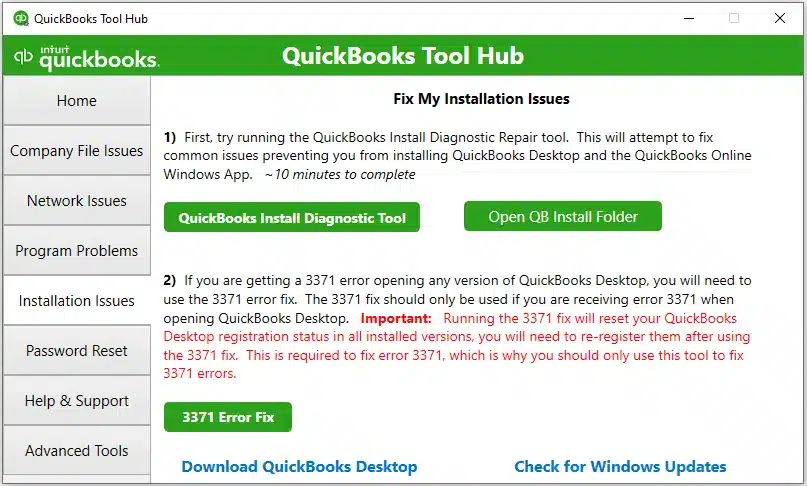
What is QuickBooks install diagnostic tool?
QuickBooks install diagnostic tool is an inbuilt feature accessible within QuickBooks tool hub. The install diagnostic tool can diagnose and fix a bunch of installation related errors. It further lets the user to eliminate errors related to the Microsoft Components.
How does QuickBooks error 1723 appears?
Error 1723 typically occurs in the form of the following message “There is a problem with this Windows installer package. A DLL required for this install to complete could not be run.”
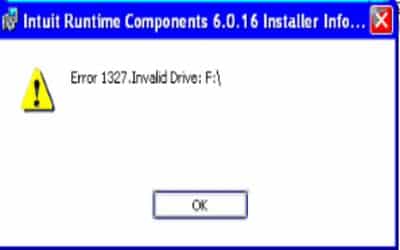
Experiencing QuickBooks error 1327? Well, such an error shows up when installing the program that refers invalid drive number. In case the USB device is disconnected from the computer system, then such an error is most likely to occur. This is basically an installation error i.e. an error that pops up while installing QuickBooks on your computer that appears on the screen with a warning message that states: “The drive [drive letter] is invalid. OR Invalid drive [drive letter]”. The message indicates that the QuickBooks is not able to find the destination drive, hence, blocking the installation process.
The drive [drive letter] is invalid. OR Invalid drive [drive letter]
If you are also facing QB error 1327, then read this article carefully. Whereas, if you are a newbie and aren’t aware of the technicalities of QuickBooks, then feel free to reach out to our QuickBooks technical support team at +1-888-510-9198 and they will ensure to help you get rid of such an error as soon as possible and that too permanently.
QuickBooks Error 1327 is usually an installation error that shows up when installing QuickBooks on the system. When you insert the installation media and try installing, then this error shows up with the following warning messages:
Error 1327
The Drive is Invalid.
Error 1327
Invalid Drive: letter.
The installed programs and their components are stored in the system in drives. In Windows, your system files and folders usually are stored in a C drive. You can check the list of drives available on the system by checking in My Computer or This PC. Such an error can be seen when the drive isn’t working properly. To help you deal with this issue, we have described the reasons behind the occurrence of such an error in detail below.
What instigates QuickBooks Error Code 1327 when installing QuickBooks?
One can land into such an error due to the following reasons:
Corrupted or moved storage devices- In case the user is trying to install QuickBooks into an external memory device, and suddenly loses connection, then he/she can see such an error.
Corrupt Microsoft .NET Framework- Microsoft .Net framework is component needed by QuickBooks to run smoothly and if this component gets corrupted for some reason, then the occurrence of such an error is quite possible.
Incorrect Registry Settings– If the entry for QuickBooks installation in your computer has the wrong drive name or location, QuickBooks Error 1327 occurs.
System-Specific Error– Other than the above causes, there might be some system-specific errors that can be solved only by a professional.
What are the symptoms of QuickBooks error 1327?
You can identify the error using the below signs and symptoms:
Windows operating system is not responding.
Or the QuickBooks program got crashed or froze.
QuickBooks desktop is frozen and not responding.
The Windows operating system got crashed.
Steps to Fix QuickBooks Error 1327
The user can try performing the below stated steps to fix the QuickBooks update error 1327 successfully:
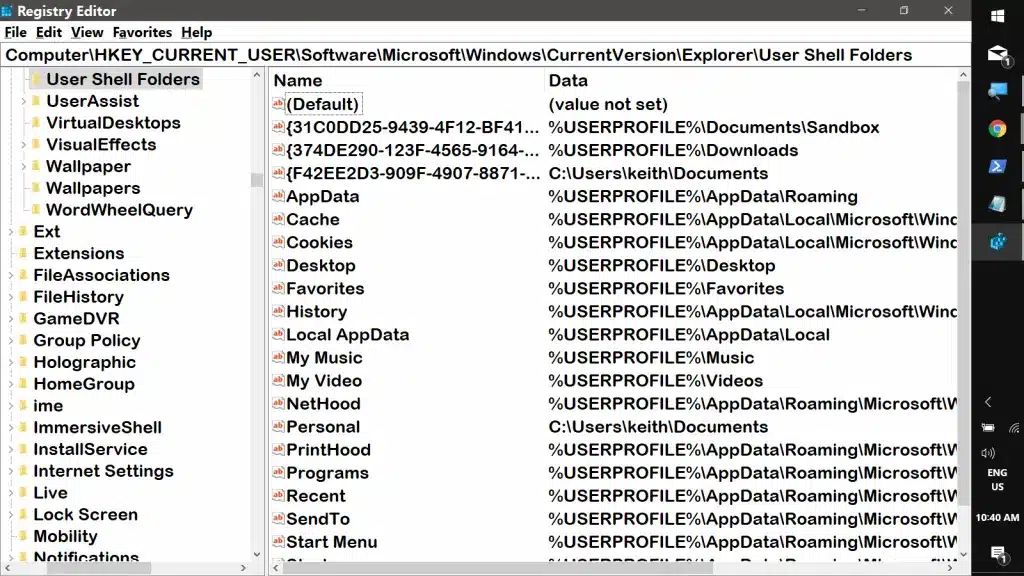
Moving ahead, head to the specific key: HKEY_CURRENT_USER\Software\Microsoft\CurrentVersion\Explorer\Shell Folders.
Once done with that spot the entries that list the drive letter mentioned in the message.
Moreover, configure the incorrect drive names to C:\
Conclude the process by saving the settings and restarting the system and try reinstalling. When the installation process comes to an end, revert the changes that were made to the registry earlier.
Also, make sure that shell folder unchecks reconnect at logon and write the path.
Hit OK tab.
Complete the process by rebooting Windows and installing the applications.
Method 3: Make sure that storage devices have a proper connection
Sometimes, connection problems can also lead to such an error. In that situation, it is recommended to ascertain that the cables and other related things are properly connected to the computer. Verify if the USBs or Flash devices that are being used to install QuickBooks desktop are functioning properly and are also connected properly.
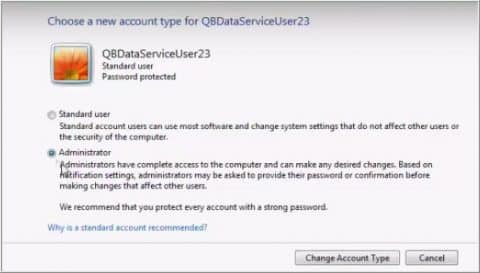
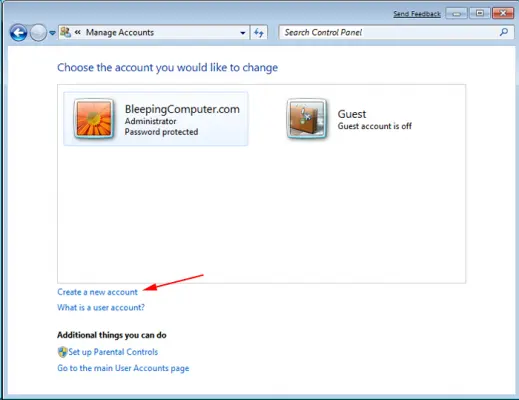
Method 4: Create a new window user and install windows
Creating a new windows user can help in fixing the issue up to a certain extent. However, the steps might differ for every version.
On Windows 10
Begin with hitting the start tab
Furthermore, click on the settings tab.
Hit accounts tab and choose family and other people.
Choose add someone else to this PC tab.
Now, enter a new password, name, password hint and
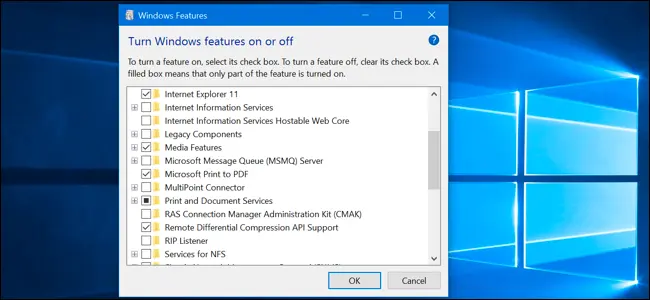
Conclude the process by opening programs and performing the same steps and also checking the box next to the Microsoft .net framework.
Method 6: Install when not connected to the network
Windows 10
The user needs to first press the particular windows + r on the given keyboard.
After that, open the particular run window.
Press the control panel.
Hit ok.
In the drop-down arrow, press view by and select small icons.
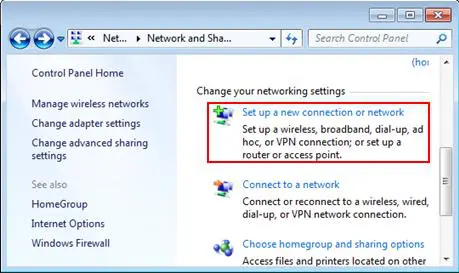
The next step is to open the particular network and sharing center.
Choose change adapter settings.
Press right-click on every adapter.
Also, press on disable where is available.
A message stating: the connection is lost. Make sure you do not reconnect with your network will appear on the screen.
Leave the window open.
Install QuickBooks once more.
Go back to the network connections window.
Now activate your network connections.
Windows 7 and Windows 8
Press the Windows start button, and then select the particular control panel.
In the drop-down of view by, go for small icons.
Now, open the network and sharing centre option.
Press change adapter settings.
After that, press right-click on every adapter.
Press disable wherever there is any opportunity.
The connection has been lost message appears.
Make sure you do not reconnect the network after getting this message.
Leave the window open.
Try installing QuickBooks desktop again.
Head to the network connections screen.
After the installation is complete, you must enable the network connections.
Method 7: Assign the drive letter again
The user needs to press start.
Then press on settings.
Choose the control panel.
And then, press the administrator tool two times.
After that press on computer management.
Right-click on the cd rom drive or the hard drive you wish to edit the letter of.
Choose the change drive letter.
Click on edit and then select the drive letter that is original.
Hit ok.
Conclusion!
Eliminating the QuickBooks error code 1327 invalid drive becomes a lot easier once you perform the set of steps we have scribbled in above. However, there can be situations when the user might not be able to rectify the issue even after performing the set of steps listed above, in that scenario, all you need to do is to get in touch with our team professionals using our support number i.e., +1-888-510-9198 and our technically sound experts will ensure to answer all your queries immediately. We are a team of technically sound experts who work round the clock to provide instant support and assistance. Feel free to discuss your queries with our experts and let them handle the issue for you.
QuickBooks Error 1327 generally appears when the QuickBooks program cannot locate the drive or the Network location as indicated in the error notification.
How to fix the QuickBooks Error 1327?
There can be various errors in QuickBooks and every error can be resolved using a different set of steps. Here are common set of steps that can fix the issue: 1. Fix registry settings 2. Remove the network drive to solve QuickBooks Error 1327. 3. Make sure that storage devices have a proper connection 4. Create a new window user and install windows 5. Configure Microsoft .Net framework 6. Install when not connected to the network 7. Assign the drive letter again
How do I fix error 1328 in QuickBooks?
You can try to fix QuickBooks error 1328 using the steps below: 1. Check for windows updates 2. Rename hidden files and folders 3. Run SFC tool 4. Run QuickBooks install diagnostic tool 5. Perform clean installation
Experiencing QuickBooks error code 12002 and can’t find the right way to rectify it? Well, to help you out in tackling such an error in QuickBooks, here we are with a comprehensive guide sharing the complete details. Talking about QuickBooks error code 12002, it is an error that usually occurs due to network timeout, slow internet connection, or any other internet connectivity issue preventing QuickBooks from connecting to the internet. To learn what fixes this error in QuickBooks, make sure to stick around this piece of writing till the end. Or you can further dial our technical support number i.e., +1-888-510-9198, and our certified QuickBooks ProAdvisors will answer your queries immediately.
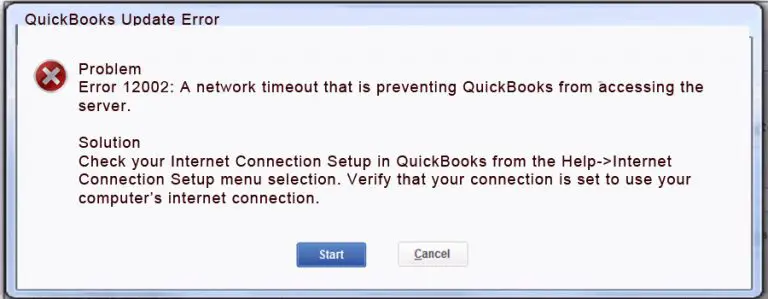
QuickBooks error code 12002 occurs when the QuickBooks software is unable to access the internet connection. At times due to some basic reasons, QuickBooks is unable to connect to the internet, which can further cause issues while updating the software. This can be due to incorrect browser and security settings, or an application like an antivirus or firewall program interfering with the update. There are a few other reasons behind the occurrence of such errors, we have tried to elaborate on them later. Here is what error message you see when error 12002 in QuickBooks occurs.
“A network timeout that is preventing QuickBooks from accessing the server”
What triggers the QuickBooks error code 12002?
Certain factors might trigger such an error, of which the common ones are stated below:
In case the QuickBooks software is unable to access the server as there is a network timeout
Moreover, if the internet connection is poor
The user can also experience a similar issue if the SSL setting is incorrect
Or if the internet security or firewall is leading to some or the other issue
Moreover, if the internet explorer isn’t set as default, then experiencing such an error is probable
Important steps before troubleshooting 12002
Before you proceed with the steps to eliminate the QuickBooks error code 12002, it is essential to perform the steps listed below:
Step 1: Create a Company File Backup
It is important to back up the company file before performing any necessary set of steps to get rid of the issue.
The very first step is to open QuickBooks on the system.
After that, head to the file menu and select the backup company file option.
The user will then have to make a local backup of the data.
Here are a few quick methods that can be performed to eliminate QuickBooks error code 12002 successfully.
Method 1: Verify the Internet Explorer Settings
The user needs to first close QuickBooks and open Internet Explorer.
And then choose the Tools and then select the Internet Option.
After that, select the Security Setting and ensure that the security setting is set to Medium High.
The next step is to click on the Globe icon and then choose the Content tab.
After that ensure that the content advisor tab is enabled
Moreover, click on the connection tab and perform the steps ahead:
The user needs to choose Never a Dial connection.
Also, ascertain that you choose the right ISP and hit ok tab
Select the LAN setting tab
Also, verify if the automatically detected settings checkbox is enabled
Now, check if the use of a proxy server is disabled
In case, you come across port 80 uncheck the box.
Now, hit ok tab
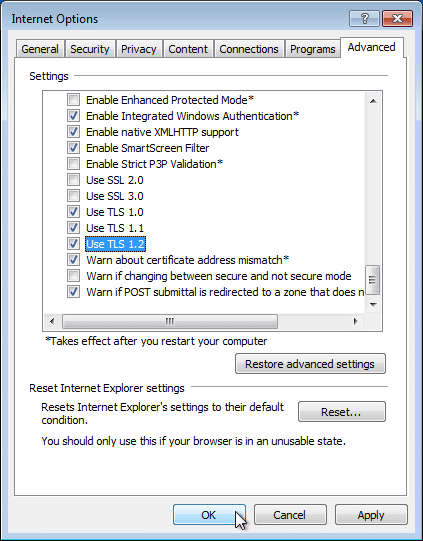
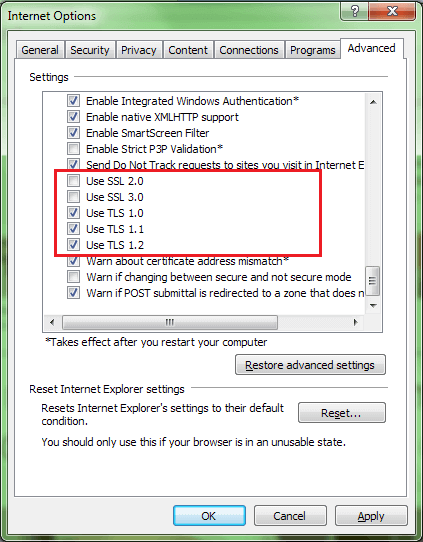
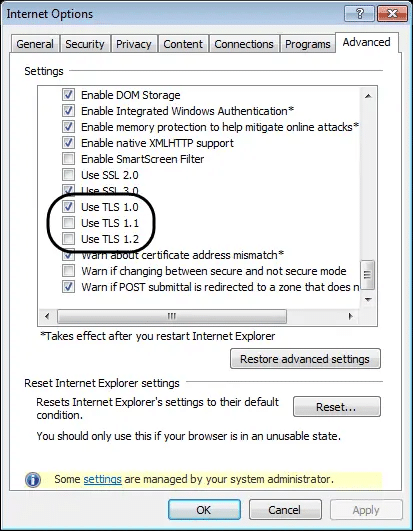
Go for the Advanced Tab:
Click on the Restore Advanced Setting option.
Look for Use TLS 1.0, Use TLS 1.1, and Use TLS 1.2 options.
Ensure that the Use TLS 1.0 is checked and the other two are unchecked.
Close the Internet Option and then click on OK button.
Shut down the Internet Explorer and restart the system.
The next step is to open QuickBooks and update it again.
Method 2: Install/Uninstall QuickBooks in Selective Startup Mode
Hopefully have already created a backup of the data. Keep your QuickBooks desktop license and product details before you continue with the steps below:
Step 1: Start the System in Selective startup mode
You can stop all the applications from restricting your repair process. It is suggested to switch to selective startup mode.
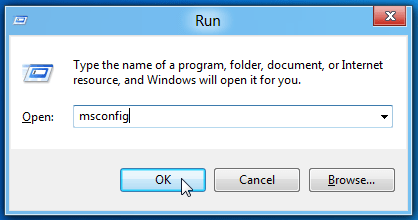
The user needs to first press the Windows and R tab to open the run command box on the bottom left of the system screen
Then type msconfig and choose the ok tab
Once done with that hit Windows + R and open the run command
Enter in msconfig and hit the ok tab
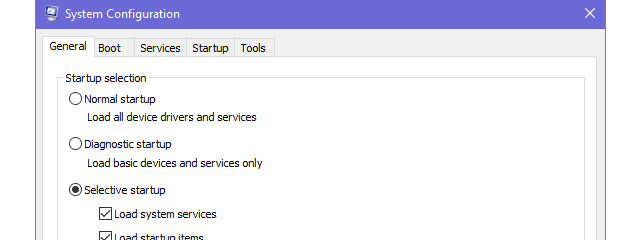
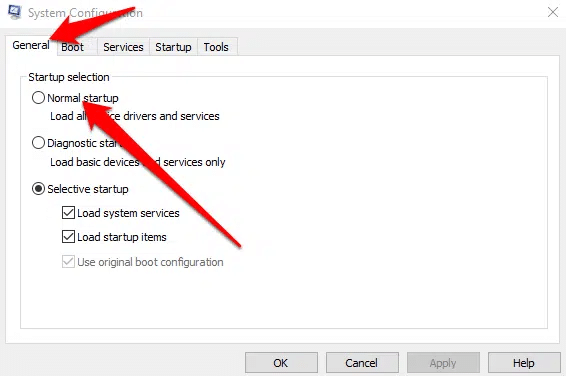
Also, head to the general tab and choose selective startup and load system services
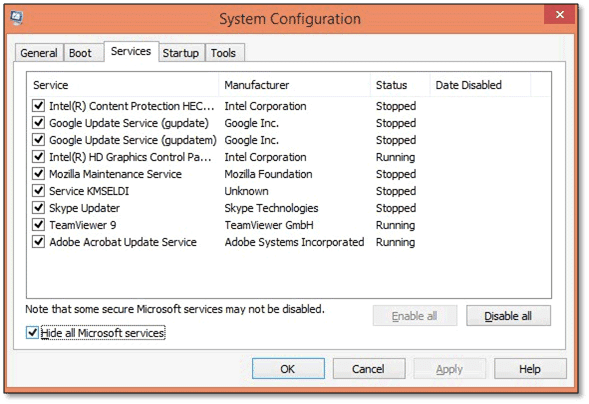
Click on the services tab and choose Hide all Microsoft services
Choose disable all option
Uncheck the checkbox for Hide all Microsoft services.
The user should check and ensure that the Windows Installer checkbox is selected from the list of services
Hit ok tab
And then choose the reboot option on the system configuration window
Method 6: Reset Update settings in Internet options
The user should first click on the Update Now tab.
The next step is to select the Reset Update Checkbox.
Now, hit the get updates tab and if the updates fail, then the user can continue with the steps below:
At first, one has to click on the advanced settings tab.
After that look for the Use TLS 1.0, USE TLS 1.1, and Use TLS 1.2 options.
Also, ascertain that the Use TLS 1.0 is checked and the other two are unchecked.
This would reset the update settings in the internet options fixing the issue up to a certain extent
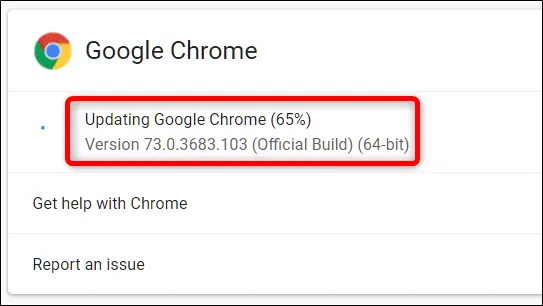
Method 7: Update your Chrome browser
Installing the latest version of Chrome can help in fixing the issue up to a certain extent, as often an outdated Chrome browser can trigger issues in QuickBooks. The steps involved in fixing such errors are as follows:
The very first step is to open the Chrome browser on the system.
After that, click on the More tab.
The user is required to select the updated Google Chrome.
Once done with that wait for a while to update the browser.
After the process is over, click on relaunch. If the user is unable to find the update option, then it indicates that he/she is using the latest version of Chrome.
Now that you know what it takes to get rid of the QuickBooks error code 12002, it is time to implement these steps carefully and check if the error gets resolved or not. However, if for some reason the user continues to end up in a similar issue again and again, then in that scenario, talking to our QuickBooks Support professional at +1-888-510-9198 is suggested. We are a team of technically sound experts who work round the clock to provide you with immediate tech assistance.
FAQs
How many 12000 Series Error Codes are There?
Here is the list of 12000 series error codes that users experience: · QuickBooks Error 12007 · QuickBooks Error 12031 · QuickBooks Error 12152 · Error 12002 · Error Code 12009 · Error 12029 · Error Code 12057 · Error 12157
How to repair the corrupted company file in QuickBooks?
To repair the company file using the rebuild data tool, the below set of steps will help: 1. The first step is to open the file menu. 2. Click on the utilities and choose the rebuilt data. 3. Go for the OK tab on the QuickBooks information window. 4. Search for the tool to repair your file. 5. Choose the OK tab. 6. Head to the file menu from the top of the screen. 7. Go for the tool in order to check your file for data issues.
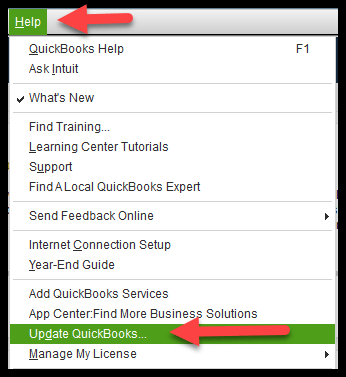
How to Reset the QuickBooks?
Carry out the below steps to reset QuickBooks. · The very first step is to head to the help menu in QuickBooks. · After that, select the search tab and click on contact us option. · Sign in to your QuickBooks online account with your admin log in ID and Password. · Now, confirm the action by clicking on the yes button. · Choose the wipe data option from the next page.
Mapped drives in QuickBooks help the user in accessing the QuickBooks files on another server, system, or drive over the network. It further makes it easy for the user to access the company file from the shared storage. However, sometimes, the QuickBooks user might come across certain issues with the mapped drive. These issues can be pretty much annoying for the user, and thus should be fixed instantly. In this article, we are going to talk about all possible fixes to this issue. Thus, if you are interested, make sure that you read the article carefully till the end. Or you also have an option to get in touch with our QuickBooks support team at our toll free +1-888-510-9198 for any sort of further tech assistance.
Points you can’t afford to miss
There are certain pointers that need your attention. Note that the user can guide a particular shared folder. If the client on PC 2 has shared the C: drive with the PC, then the user can easily guide that particular C: drive, but not the subfolders. The user will further have to right-click the company file folder and if the user is unable to discover the mapped network drive alternative, then the user should scroll upwards and find more significant level folders. In case the user is making use of QuickBooks hosting, then he/she is recommended to check with the cloud admin of the mapped drive.
In case the company file is available on a similar PC where QuickBooks is being used, then it is suggested to open the record from the information document’s drive.
Effective measures that can be taken to get fix QuickBooks not showing mapped drives
The user can try performing the below set of steps to successfully fix the mapped network drive error in QuickBooks.
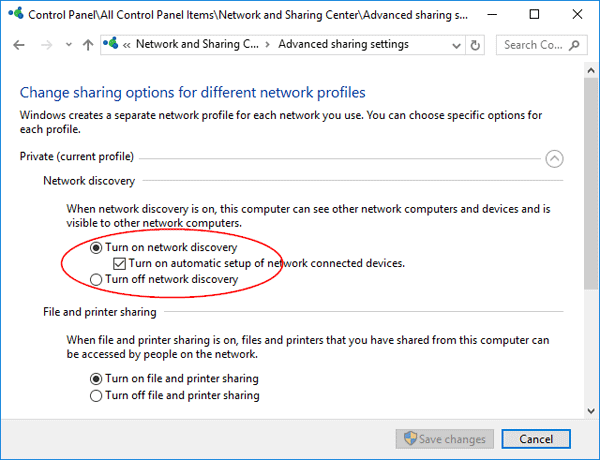
Method 1: Check the mapping drives and turn on network discovery
The very first step is to move to the search bar and enter in settings tab
Now, select the sharing tab
The user should then click on private network.
Once done with that, the user is suggested to make sure that the choices that he/she has made from turn on network discovery are correct and then turn on automatic set up.
The last step in the process is to click on save changes and hit next tab
Method 2: Fix the issue by obtaining IP and DNS address
It should be noted that at times, the user might try to obtain the IP address and DNS manually, due to which the outcomes in the QuickBooks do not show mapped drives. The steps involved in here are:
The user is recommended to first open the settings tab and then choose change adapter option.
After that open the network connection window.
The next step is to enter the next tab and right click the ethernet and choose properties form the available list.
After that click on the networking tab.
And then click on the internet protocol version 4. If the user finds it tick marked, then uncheck and recheck the box.
The next step is to click on properties tab.
After that from the IPV 4 properties window, go for the options Obtain an IP address automatically and obtain DNS server address automatically.
This brings us to the end of the article, where we hope that the information, we shared in above might have helped you in dealing with the mapped network drive issues in QuickBooks. However, if the error continues to trouble you even after performing the right set of steps, then feel free to contact us at +1-888-510-9198, and let our experts handle the complete situation for you.
FAQs related to QuickBooks Mapped Drives
What is QuickBooks not showing mapped drives problem?
QuickBooks does not show mapped drives error occur when the QuickBooks program is unable to recognize the mapped drives. This further prevents users from getting access to the company files.
What causes QuickBooks not showing mapped drives issue?
A few of the common factors causing such an error are as follows: 1. The firewall or antivirus is blocking the network 2. QuickBooks installation files is corrupt 3. Misconfigured network settings
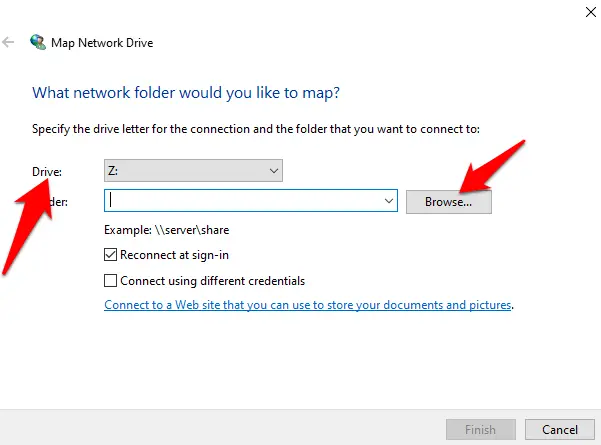
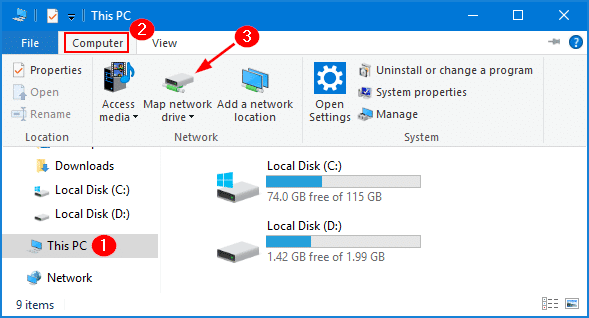
How to map a network drive in Windows
You can map a network drive in windows using the steps below: 1. Press windows icon 2. Type this PC in the search bar 3. After that, select a map a network drive 4. Choose any unused drive letter then choose browse 5. Head to the network location where the company file is available 6. Click on ok tab and then hit finish tab as well.
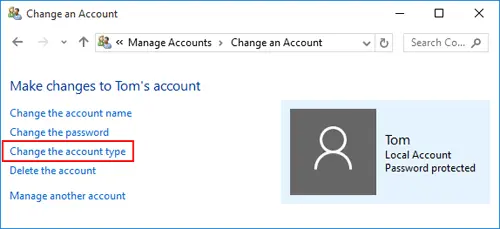
Why is my mapped drive not showing up?
It can be possible if you use UAC (User Account Control). Whenever you login onto any window as an admin, there’re two options available on the screen. One admin is provided with the rights, and the other one is without any rights.