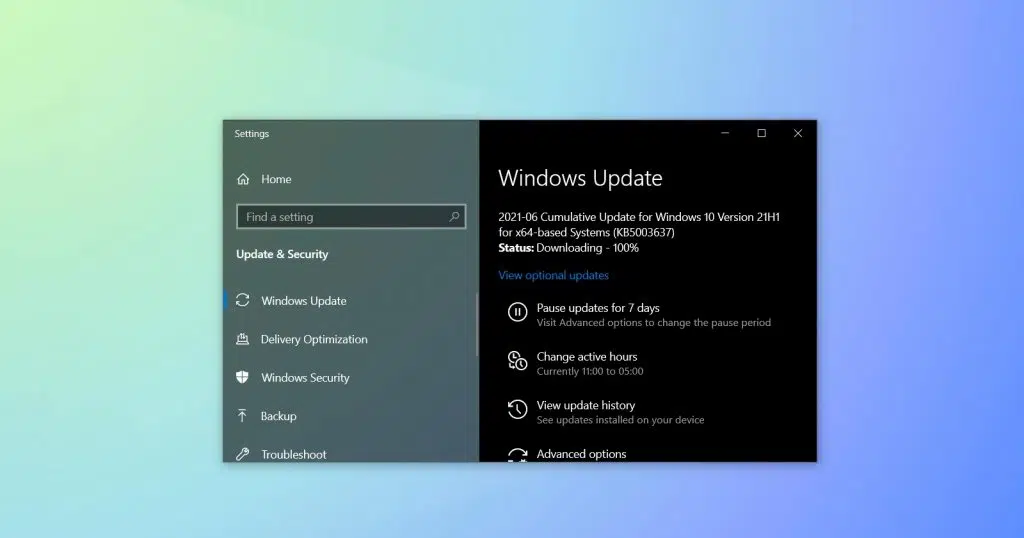
Coming across QuickBooks 15xxx series errors has been a common affair lately. One such error that can be experienced by QuickBooks users is the QuickBooks error 15225. This has been commonly encountered, especially at the time of installing QuickBooks updates. Such an error often restricts the software access and shows some random error message on the screen indicating QuickBooks error 15225.
There are a few factors that can trigger such an error in QuickBooks, which we will be addressing in this segment right here, along with the fixes for the same. To unleash those measures, simply stick around this piece of writing carefully, or you can also connect with our technical team at +1-888-510-9198, and let our certified ProAdvisors help you with your QuickBooks software and issues.
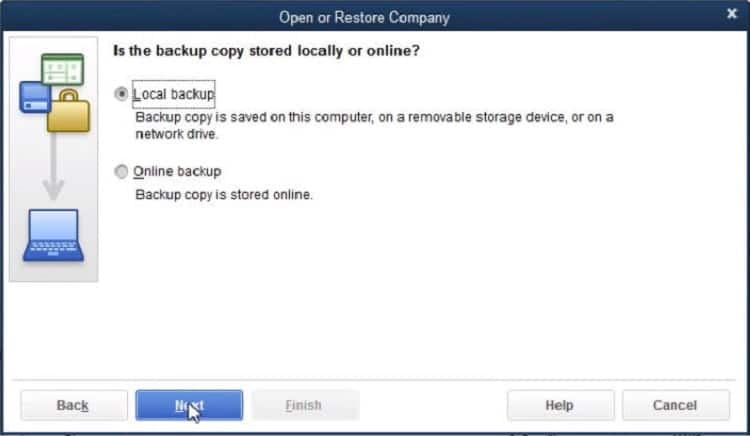
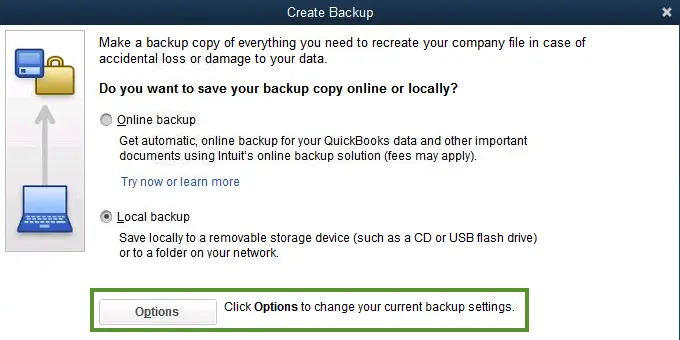
Now that you know what factors can land you into QB error 15225, it is time to perform the necessary measures that can eliminate the error permanently. However, before proceeding, do not forget to backup QuickBooks company file. The steps involved in creating a company file backup are as follows:
Start by running QuickBooks
After that launch QuickBooks, head to the file, and click on the backup company option.
Lastly, click on the Create Local Backup.
Now, let us explore the methods to fix QuickBooks error 15225.
Method 1: Clear SSL State
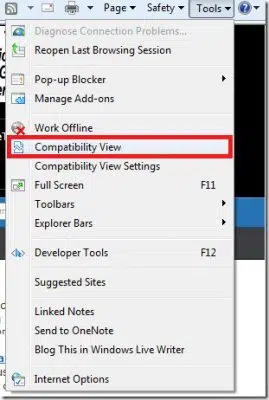
It is essential to clear the SSL state in Internet Explorer, as it can help you fix the issue up to a certain extent. This can be done using the steps below:
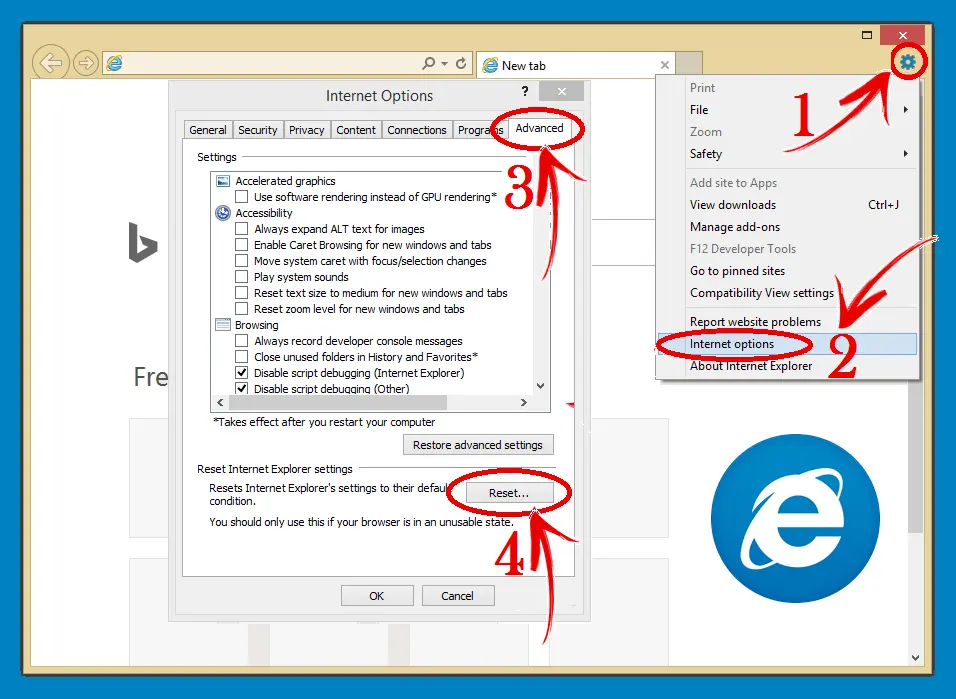
Open the Internet Explorer at first and click on the gear icon ⚙.
After that, choose Internet options from the dropdown menu.
Click on the content tab.
You now have to click on clear SSL state in the certificates section.
A confirmation window will appear on the screen, where you need to click on ok tab.
The last step is to close and reboot Internet Explorer.
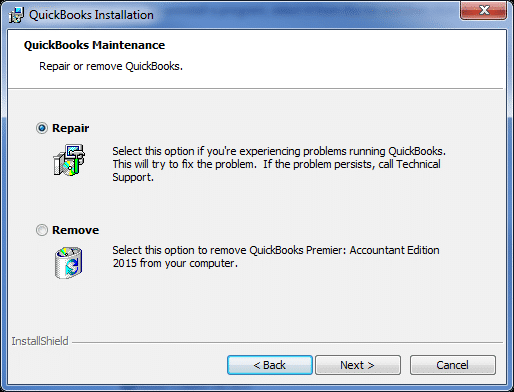
Method 2: Repair QuickBooks to Fix QuickBooks Error 15225
At times simply repairing QuickBooks can fix a bunch of errors. Thus, you can try to repair QuickBooks using the steps listed down:
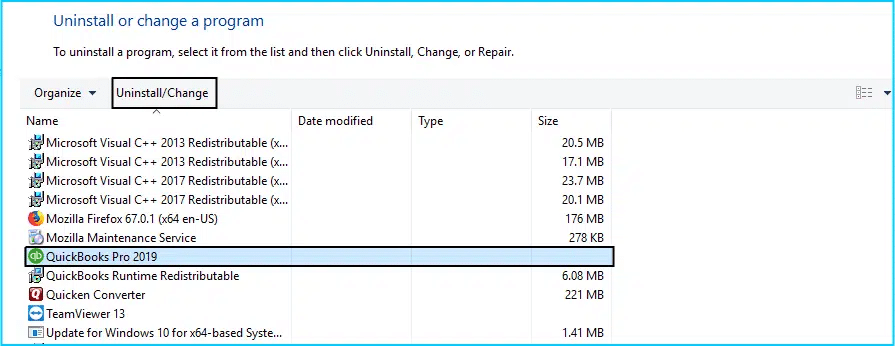
Start by heading to the control panel
Then, move to the programs and features tab.
You now have to click on QuickBooks and also click on uninstall/change
Also, click on the repair option to start the repair process.
After that reboot system and try using QuickBooks
Method 3: Clean Installation of QuickBooks
In certain cases, a mere reinstall of QuickBooks works. However, a more advanced solution to this is to clean install QuickBooks. This can be as follows:
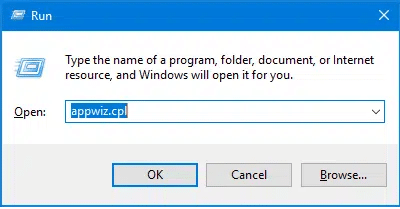
Click on the start tab and double-click on the control panel
After that, click on Windows + R and enter appwiz.cpl
Hit ok tab.
Go for QuickBooks in the Programs and features
Uninstall or remove QuickBooks
Perform the onscreen prompts to complete this process.
Method 5: Install Digital Signature Certificate to Fix QuickBooks Error 15225
An outdated digital signature certificate is one of the causes behind the occurrence of such an error. Thus, it is essential to install digital signature certificate. You can do this using the steps below:
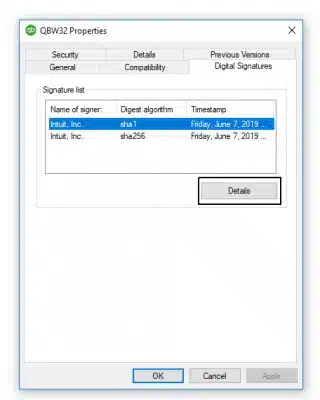
Start by right-clicking QuickBooks and selecting properties.
Click on the open file location.
Search for QBW32.exe file.
You now have to right-click on the same and opt for properties.
Opt for Intuit INC. from the list after clicking on digital signature.
Click on the details tab.
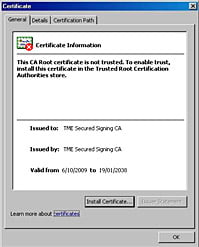
Also, go for view certificate within the digital signature details window.
Click on the install certificate.
And further, click on the next tab and finish tab respectively.
Reboot the system and open QuickBooks to check if the issue continues.
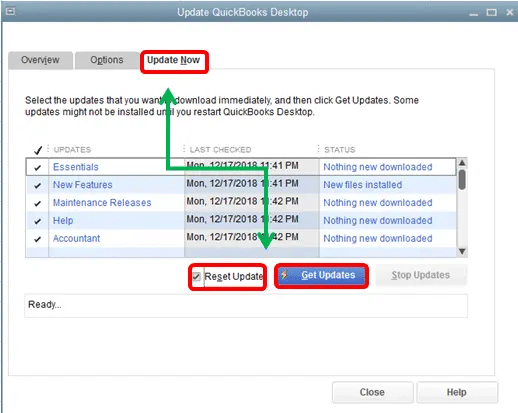
Method 6: Update QuickBooks in safe mode
Updating QuickBooks can fix many issues successfully. In this method, you can try to run your system in safe mode and then try to update QuickBooks. This involves the following steps:
Start with restarting the computer and pressing the F2 key till the advanced boot option window shows up.
Now, select safe mode with the networking tab and click on the enter tab.
You now have to run QuickBooks by double-clicking on the desktop icon.
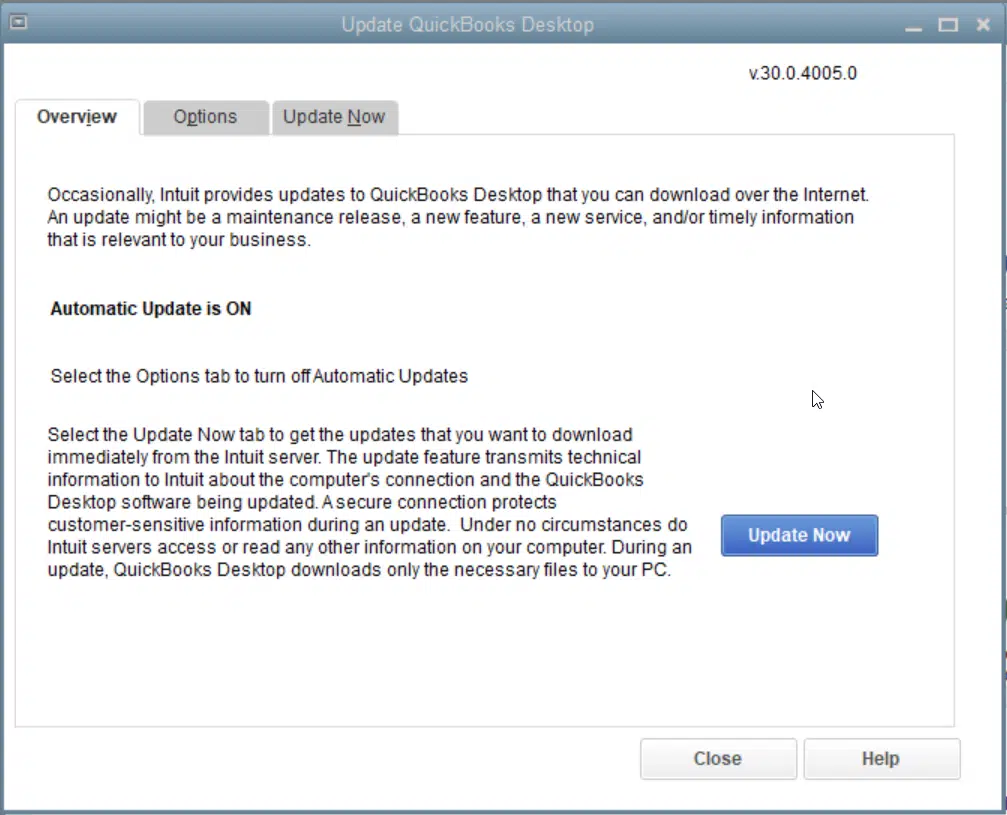
Furthermore, head to the help tab and go for update QuickBooks.
Click on the Update Now tab.
And also click on the get updates tab.
After all the updates are downloaded, reboot the system.
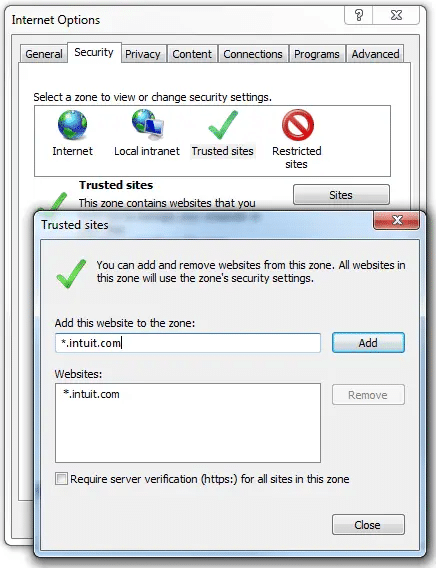
Method 7: Include Intuit as Trusted Site
After you have performed all the above measures, if you still face the same error, try including Intuit as the trusted site. This can be done as follows:
Getting rid of errors in QuickBooks isn’t that difficult. Implementing a certain set of steps can surely assist in successfully eliminating the error from its root cause. Thus, we believe that the steps and procedures discussed above might be of some help in eliminating QuickBooks error code 15225. On the contrary, if you have any queries, or if you require any sort of technical guidance at any point in time-related to QuickBooks, then in that case, feel free to connect with our technical support professionals at +1-888-510-9198, and they will provide you with instant support and assistance related to QuickBooks.
FAQs related to QuickBooks error 15225
What is QuickBooks error 15225?
QuickBooks error 15225 is usually seen when user installs QuickBooks or updates the software to the latest release.
How to fix QuickBooks error 15225?
You can try fixing the QuickBooks error 15225 using the steps below:
At first, update QuickBooks in safe mode.
You can also add Intuit to the trusted sites list.
Another option is to install digital signature certificate
Temporarily disable the firewall
Another method that can be implemented is to clean install QuickBooks desktop
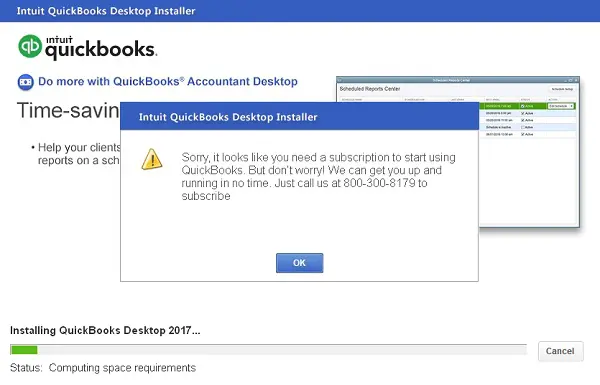
Did you see a warning message appearing on the screen stating: Your QuickBooks Subscription has lapsed? Well, we all know that QuickBooks works on a subscription basis. However, at times due to some unexpected reasons, the software might show your subscription lapsed even when it hasn’t. This is basically an indication that you are unable to charge the billing account for the subscription. QuickBooks Subscription has lapsed error can easily be fixed by updating the billing information in your customer account management portal. You can witness the following warning message:
Error:
Sorry, we need to verify your subscription before installing QuickBooks desktop
Error:
Sorry it looks like you need a subscription to install QuickBooks desktop
There can be a bunch of reasons behind the occurrence of QuickBooks desktop subscription errors, which we have elaborated on later in this segment. Just in case you land into such an error on one particular workstation and not on all workstations, then it usually indicates an issue with a Windows user or third-party application blocking the QuickBooks processes. To help you in dealing with such an error successfully, we have come up with this segment right here sharing the complete information related to the error along with the fixes for the same. To know more stick around this segment carefully, or you can also get in touch with our technical support team at +1-888-510-9198, and we will ensure that all your queries are addressed immediately.
What factors can cause QuickBooks subscription has lapsed error?
There are a bunch of factors that can land you in QuickBooks subscription has lapsed error. Let us evaluate each of the reasons causing QuickBooks desktop subscription error one by one:
The credit card on file was invalid or outdated
The card issuer declined the payment
The payroll update to the latest tax table failed
The subscription actually expired
The billing information is incorrect
Any issues related to connectivity when processing payment for renewal
Outdated version of QuickBooks
Intuit server that manages QuickBooks subscription is having some issue
How to fix QuickBooks subscription has lapsed error?
There are a bunch of measures that can be performed to ultimately eliminate the subscription lapsed error. Here are a few main ones. Let us have a look:
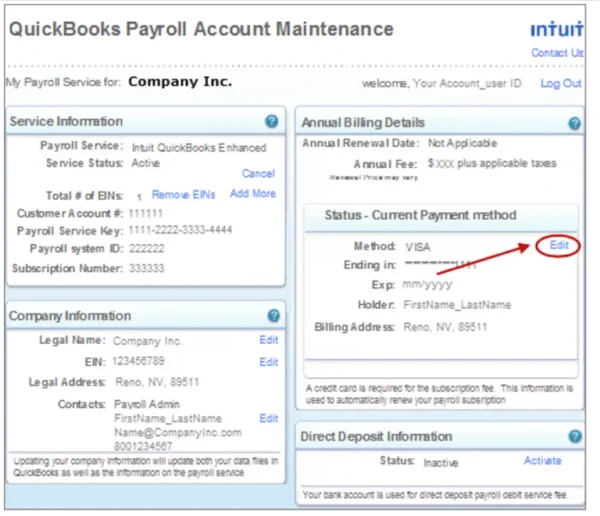
Solution 1: Update Billing Info
You can update your payment details for your subscription in the customer account management portal i.e., Intuit CAMPs. This can be done as follows:
Solution 2: Install QuickBooks Updates to Fix QuickBooks Subscription Has Lapsed Error
Updating QuickBooks software to the latest release can fix subscription error up to a certain extent. You can try performing the steps related to update QuickBooks to the latest release and check if the QuickBooks desktop subscription error continues.
Solution 3: Run QuickBooks Install Diagnostic tool from Tool Hub
At times, a damaged Windows file prevents QuickBooks from connecting to our online services. You can follow the steps below to download, install, and use QuickBooks Tool Hub.
Step 1: Download QuickBooks Tool hub
The QuickBooks tool hub is designed in a way to help you fix a bunch of errors. You will have to close QuickBooks to use the tool hub. It is suggested to use Tool hub on Windows 10, 64-bit.
Start by closing QuickBooks
Further, you need to download the most recent version of the QuickBooks tool hub and also save the file where it can be accessed easily. In case you have installed tool hub before, then you can find out which version you have.
Go for the home tab and you will see the version at the bottom.
The next step is to open the file you downloaded i.e., QuickBooksToolHub.exe
Now, perform the onscreen prompts to install and agree to the terms and conditions.
After the installation ends, you need to double-click the icon on the Windows desktop to open the tool hub.
Also note that, in case you are unable to find the tool hub, then you simply need to look for the same in the Windows search bar and choose the program.
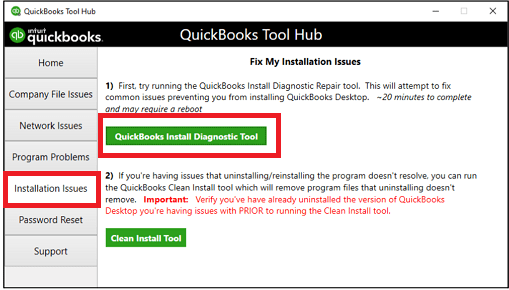
Step 2: From Tool hub, run QuickBooks Install diagnostic tool
Begin the process by opening QuickBooks tool hub and further opt for the installation issues.
Solution 4: Restore the product and license file to fix QuickBooks account has lapsed error
It should be noted that QuickBooks software saves a file having the license and product info to the hard drive. In case there is a problem with it, then the file is easy to restore.
You should get your product and license info at first.
Further, close QuickBooks.
After that, open the Windows start menu.
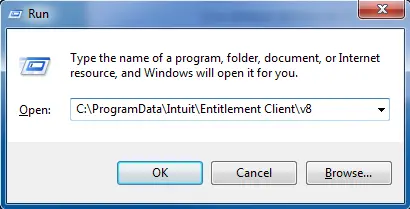
Further type run into the search box and hit the same.
You now have to enter C:\ProgramData\Intuit\Entitlement Client\v8 and then hit the enter tab.
In case this doesn’t open a folder, then you will have to enter C:\ProgramData\Intuit\Entitlement Client\v6 instead.
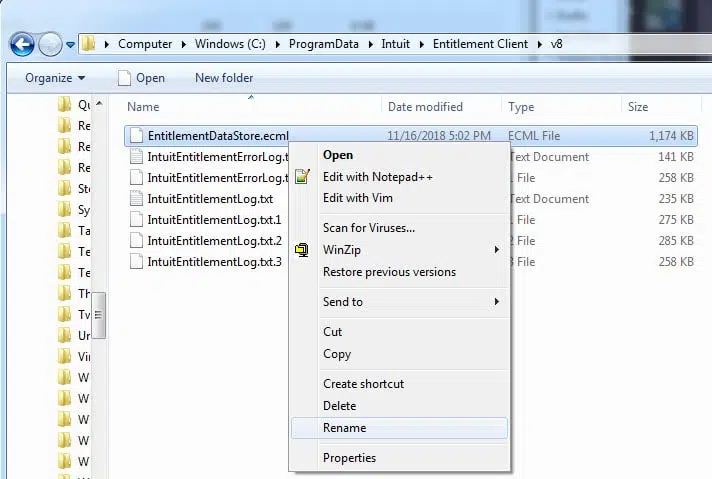
Now, look for the EntitlementDataStore.ecml and also right-click the same, and choose delete.
You also need to click on Yes.
The next step is to open the QuickBooks desktop and the company file.
Lastly, carry out the onscreen steps to register QuickBooks again with the product and license info.
Solution 5: Check the internet connection settings
In case you come across a subscription error even after performing the steps above, then make sure to confirm that you have a stable internet connection. And also configure the internet connection settings in QuickBooks.
Solution 6: Install digital signature certificate
You can perform the below steps to install certificates using Google Chrome:
Steps to install certificate using Internet Explorer
Perform the onscreen prompts to complete the installation and import. This can be done using the steps below:
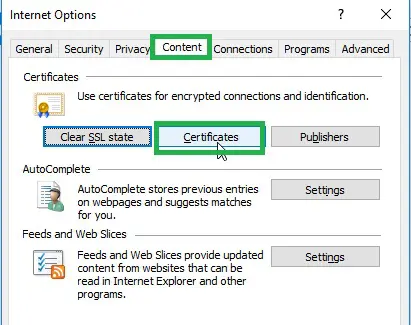
You need to first visit the tools menu and choose the internet option.
Once done with that, head to the content tab and choose the certificates option.
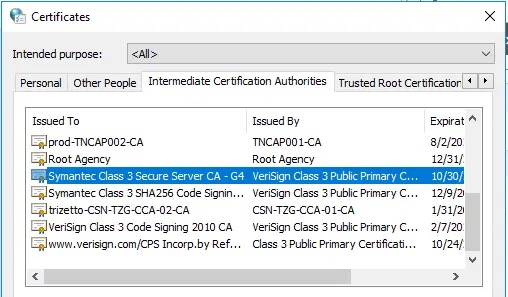
The next step is to head to the intermediate certification authorities tab.
Also, choose the Symantec class 3 server CA-G4.
Then, select the view certificate and click on the install tab.
Toward the end, retry installing or updating.
Solution 7: Reset the Internet Explorer settings
Under this method, you simply need to open the internet explorer
After that, head to the tools menu and select the Internet option.
Hit the Alt tab.
And choose the reset or restore defaults tab from the advanced tab.
And towards the end, you simply need to click on the Apply and ok tabs respectively.
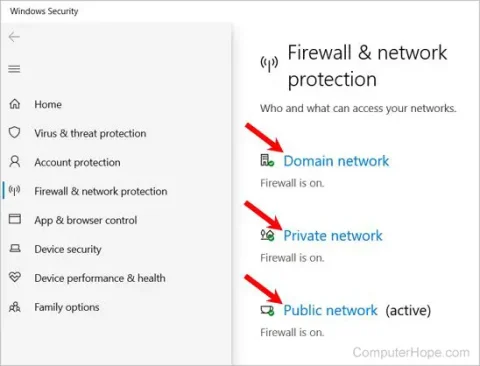
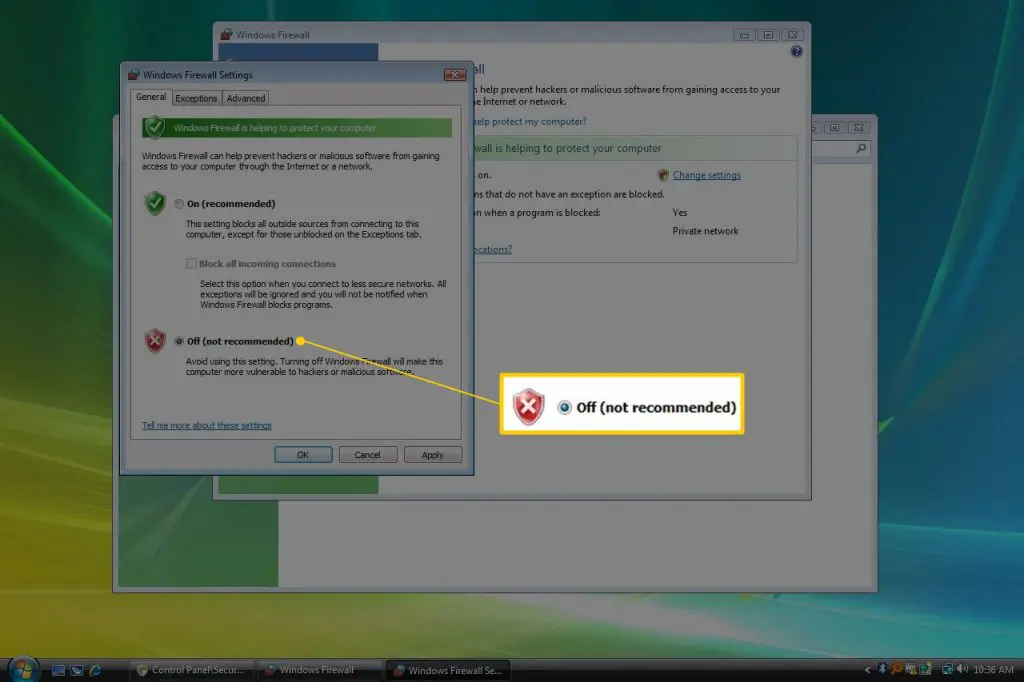
Solution 8: Disable the firewall
This process requires you to disable the firewall at first.
Furthermore, turn off the antivirus software and note that sometimes the antivirus software cannot be disabled, then in that case you might require some rights to make changes.
You will need to locate the con for the third-party antivirus in the system tray at the bottom right of the desktop.
After that, right-click the icon and opt for the disable option.
Toward the end of this post, you need to install QuickBooks desktop or run the update again.
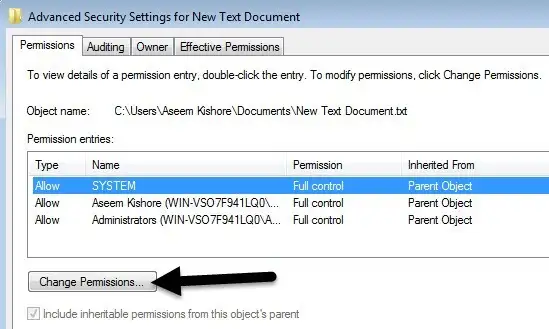
QuickBooks can also experience subscription issues in case the software fails to access the license and the product files during launch. This usually happens in case the file’s location is restricted for non-admin Windows account. The software won’t be able to verify the subscription, in case it can’t access the product and the license file and keeps displaying Subscription has lapsed in QuickBooks desktop. In order to deal with this issue, it is suggested to run QuickBooks using admin access. You can further make QB folder contents accessible by configuring Windows permissions.
You need to first head to the QuickBooks folder location using the file explorer and then right-click on it.
After that, choose the properties tab and head to the security option.
You now have to choose the Windows account from the pre-shared list and provide permissions like Read, write, modify, etc.
Also, click on full control.
And then, save the settings and close the properties.
Re-perform the task that performed the subscription lapsed issue earlier.
Solution 10: Change QB’s License Number and Product Code
QuickBooks can fail to verify subscription in case Intuit servers can’t process the software’s license number or product code. QuickBooks won’t run properly as the subscription lapsed message shows every time the license file is processed or Intuit servers try to authenticate subscription of the user account.
You will have to change the license number to access the company file and perform the tasks. This can be done with the help of the following steps:
QB Desktop for Windows
You need to first head to help menu and choose Manage my license.
Once done with that, click on change my license number and also enter the new license number.
Click on next and finish tabs respectively.
QB Desktop for MAC
Here, you need to head to Manage my license option in the QB menu and further click on deauthorize this computer
Now, click on the Deauthorize and quit option and also relaunch QuickBooks.
Complete the registration process to enter a different license number.
You can easily purchase or check license number by signing in to the Intuit account and visit the products and services section.
Change the product code in QB enterprise
In case you use QuickBooks pro, premier, or Enterprise in five or fewer systems, then you can simply change the product code by reinstalling the software. In case you are not comfortable reinstalling QuickBooks, then simply change the product code by editing the qbregistration.dat file in QuickBooks Enterprise.
You need to first press F2 and F3 keys to launch the tech help window.
Now, select the DAT in the open file tab and also click on open file to launch the file in notepad.
After that, move to the notepad’s file menu and save the file on the desktop from the Save as tab.
Reopen QBREGISTRATION.DAT file from the tech help window and close QuickBooks.
Now, press ctrl + H and enter your old product code in the find what
You need to enter the new product code in the replace with field and also click on replace all.
Once done with that, save changes and consider closing the file.
The product code will be updated in the product information window when you relaunch QB.
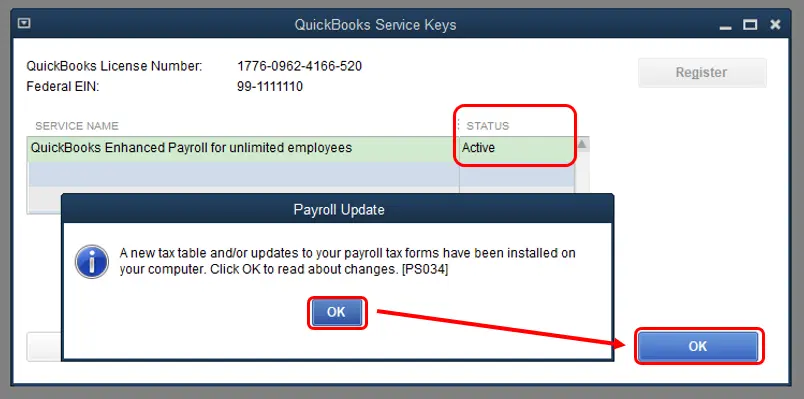
Issue in Verifying QuickBooks Payroll Subscription
An issue in verifying QuickBooks payroll subscription can be experienced when trying to update the payroll tax table. This issue can be experienced due to the following reasons:
One of the basic reasons can be an inactive payroll subscription.
Or if more than one active payroll agreement is present with an inactive direct deposit agreement.
Another possible reason can be if there is any sort of data damage in the company file.
In case the product is not updated, then such an error can be seen
Or if the employer identification number in the company file is incorrect.
Or if the PSID in the company file is incorrect.
You can also come across the same issue if the version of QuickBooks doesn’t support the version of Windows.
Or when the status of the payroll subscription in QuickBooks shows as an invalid number
You can try to rectify the issue by verifying the QuickBooks desktop payroll subscription using the steps below:
Begin with ensuring that you have the latest QuickBooks release downloaded and also the latest tax table.
You now have to open a payroll account management portal.
And then, close the page.
Once done with that, reboot the system.
Download the payroll update again.
And lastly, you need to reset the QuickBooks desktop update.
In case you are using the direct deposit for the company file having the issue, then you can contact professionals. You can also open the payroll account management portal and check if the issue payroll service is active or not. Another alternative can be to perform a clean installation of QuickBooks in selective startup mode.
QuickBooks subscription lapsed error can ultimately prohibit you from accessing the software and performing the necessary activities. Thus, it is crucial to deal with such an error as soon as possible. Hopefully, this segment might have helped you in finding out how to fix QuickBooks subscription has lapsed error. However, if you aren’t able to deal with this issue due to some reason or if you need our technical support and guidance at any point in time, then in that case, feel free to consult our technical support team at +1-888-510-9198, and we will ensure to answer all your queries immediately.
Errors associated with QuickBooks company files can be extremely annoying at times. One such error that have been recently reported by QuickBooks users is: QuickBooks update unable to add the item to the list. This error isn’t pretty common, but can further escalate issues, especially related to company files. This QB error generally arises when you try to convert QuickBooks for a Mac to QuickBooks for Windows. To help you out in dealing with this particular error, here we are with this write-up sharing the complete insights and practical solutions to address this error effectively.
However, if you need any sort of technical guidance at any point in time, then in that scenario, do not hesitate to connect with our technical support professionals right away at+1-888-510-9198. Having said that, let us further understand this complex error in detail.
Potential Methods to rectify New VAT code – ‘’unable to add items to the list error”
In order to settle this QuickBooks update unable to add item to list error, follow the procedure mentioned below. You will have to find the items that hampers the addition of the new items to the list which can be located easily with the help of the QBWIN.LOG file. Furthermore, you will have to prepare a backup for QuickBooks Desktop and later on convert the particular file.
METHOD I: Start the procedure by locating the file (QBWIN.LOG file) in the QB directory by opening the file in the notepad or in the MS Word. And the Steps are:
Right-click on the file, and go for Open with option, and then from the list of programs opt for the Notepad.
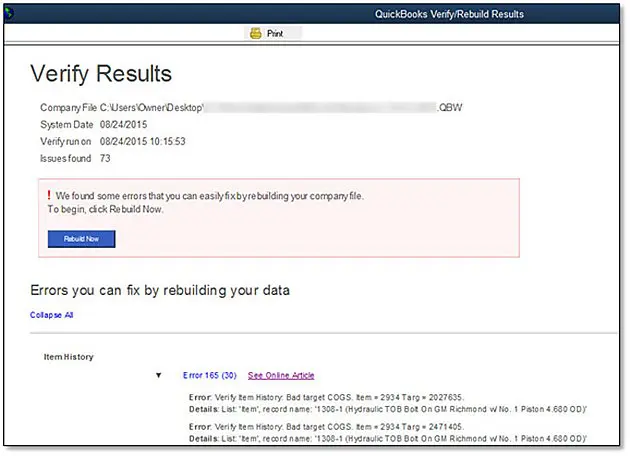
METHOD II: Now move ahead and find out the errors between verify a log and end verify log. If you cannot find the errors between these sections then you can search them in between: “rebuild log,
LVL_ERROR – QuickBooks has faced a problem and needs a shut down.”
METHOD III: To do this, go for the following: ‘’LVL-SEVERE-ERROR _the list element write failed to abort Transaction and is forcing for a roll back now.
Error notification: Item that is causing the issue message
Record was not added to the transaction table. For e.g.: LVL_SEVERE_ERROR – list element failed to abort database transaction and is forcing rolling back now.
List name: Payment Method.
Item name: E-Check. Error Message: Record cannot be added to a transaction table. Error code: -6032.’’
QuickBooks for a Mac file
Begin the process by moving ahead to the list menu.
Thereafter, go to the right List of components in order to find out the particular item that is recognized above.
In this step you are then required to find out the list of the components in the QBWIN.LOG and fix it or remove it.
And to remove an item, pick it and then select Edit, followed by pressing the Delete option.
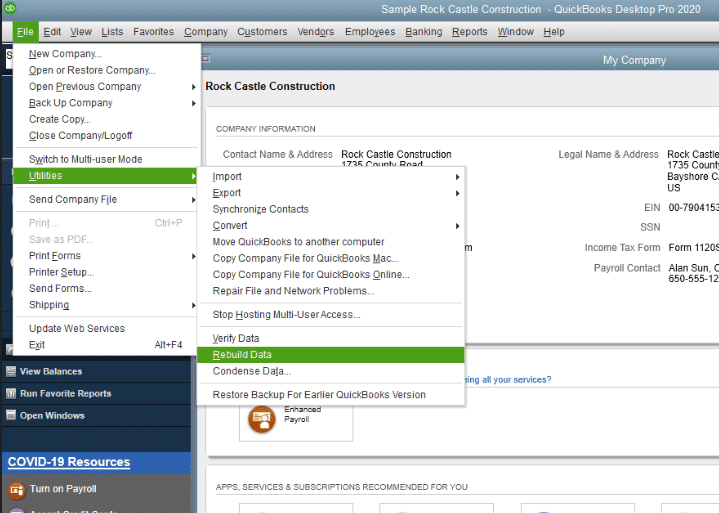
In the next step conversion of the file to QuickBooks Desktop is required and then post that create a backup of this file.
Be sure that you don’t exceed the limit of the list items in the QuickBooks. For the large database try to optimize it or update the QuickBooks plan.
Also, verify the duplicate items in your list of QuickBooks.
Ensure that you don’t use any special characters, symbols, or additional names of the items. Abide by the standard punctuation or alphanumeric characters.
Note: Don’t forget to create the backup of your data before doing any significant changes in order to avoid any potential loss.
Now that you know the steps to fix this error, hopefully, you will be able to get rid of QuickBooks unable to add item to the list error. However, if none of the above steps work, you can immediately reach out to our QuickBooks technical support professionals by dialing our toll-free number +1-888-510-9198. They are available 24*7 to provide you with specific assistance based on your issues.
Meeting across various errors while using company files in QuickBooks Desktop for Windows is a routine experience and can be frustrating also. Have you ever found yourself in trouble due to QuickBooks File in Use Error? In this case, you are not alone here. Well, no need for panic and let’ kick out this unexpected error through all the troubleshooting steps discussed in this article (in detail). Follow this article till the end and get your QuickBooks experience back on track. You can also reach out to our technical support team for any sort of technical guidance at +1-888-510-9198.
Let’s get to know about this QuickBooks Company file in use Error
Commonly, these errors are known as Locked file errors. Usually, you get this QuickBooks Company file in use error message when the QB company file is open in multi-user mode or is in use by some other running app.
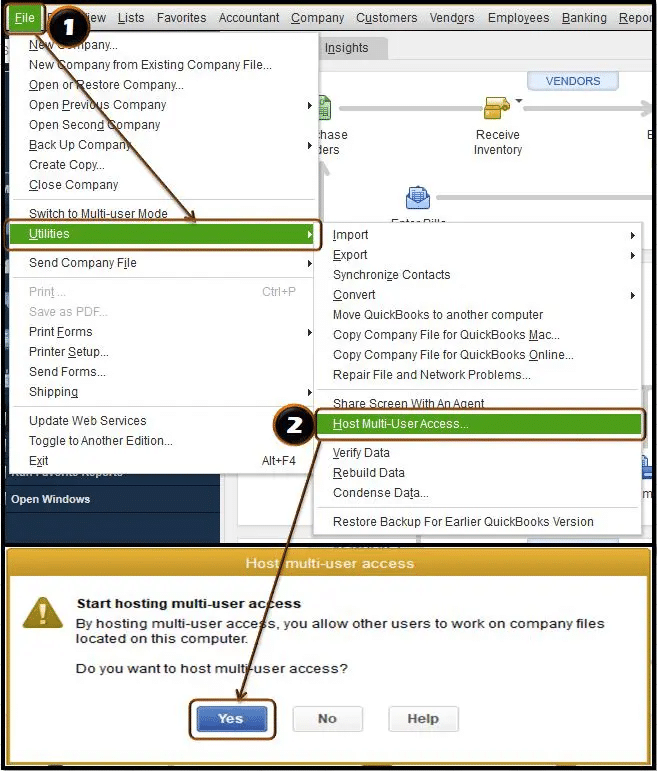
In the QuickBooks Desktop, many users can change the data file as setting the multi-user hosting of QuickBooks is quite easy. One of the most important reasons that is responsible for this error is incorrect hosting configuration. And if the file access rights are not assigned then QuickBooks won’t allow many users to access the data of the file. This is usually done for security purposes. So, in that case, QuickBooks shows different warning messages as per the causes and conditions.
When an error message QuickBooks not loading a Company file pops up on your screen since any other user is already doing some alterations in the QuickBooks Company file that you are trying to access.
Methods prescribed for the fixation of this QuickBooks file already in use error
There are certain circumstances that cause this locked file error to occur, so in accordance with them, various methods are available to fix this issue. Let’s get started by following the below-mentioned steps:
CASE 1: If another user is performing some action
As already stated above, this error usually comes in when any other user is doing any task in the same QuickBooks file that allows only one user to perform at once.
In such circumstances, you can start performing your task, once the other user finishes off.
CASE 2: If the Error consistently points out any particular user
In this case, this error repeatedly points out any specific user who is not using QuickBooks at present, follow the below steps for this:
At first, you need to refer the user mentioned in the error, close down, and then reopen the QuickBooks on their workstations.
After this, open QuickBooks on a different workstation.
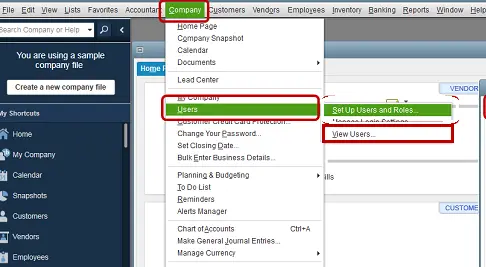
Then navigate to the Company menu and select Users, then you have to click on View Users.
Now request that the user mentioned in the error sign out QuickBooks on their workstation.
In the last one, go back to the list of users. If in case the particular user is no longer shown as being logged in. You are then required to complete the task without encountering any issues.
If the user still displays as logged in, then go with the solutions for both “Waiting for Company File” and “Error on multiple workstations” provided below.
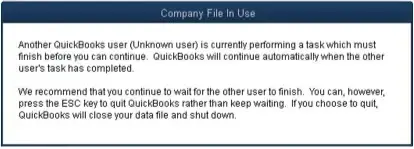
CASE 3: If the error states “Waiting for company file” or “Company File in Use. Please Wait”
Method 2: Stop and restart QuickBooks services on the server
To begin this, Go to your QuickBooks server and keep in mind that on all your workstations QuickBooks should have closed.
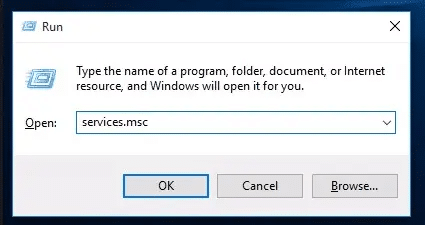
Now, go to the Start menu and later click on Run
After that in the Open field, type services.msc, then click on the OK button.
From the name column, click on QuickBooksDBXX.
The item you choose totally depends on the version of QuickBooks Desktop that you are using:
QuickBooksDB30 = QuickBooks 2020
QuickBooksDB29 = QuickBooks 2019
QuickBooksDB28 = QuickBooks 2018
Hit on the Stop link option.
Note: This step will terminate all users’ access from the company file.
Now click on the Start link.
This step will allow users to access the company file again while they are signing in.
Reopen the QuickBooks and then try to do the task that give rise to the error.
Method 3: Use the QuickBooks Tool Hub on the server
The QuickBooks Tool Hub has various that are quite helpful tools to fix common problems.
We suggest you check out the below steps to fix this error
At First, Download the tool and then install the tool hub on your computer.
Once done with installing, open the tool hub and go to the Program Problems tab.
And On the Program Problems tab, you have to run all the tools. When you are done with all the tools, now Re-open the QuickBooks, and then do the task that prompted the error.
Method 4: Reinstall QuickBooks on the server
Here you need to perform all the steps related to the clean installation of QuickBooks and also check if the issue gets fixed. You can make use of QuickBooks clean install tool to perform these steps and reinstall QuickBooks on the server.
How to deal when the QuickBooks Company File in Use Errors appears only on the Single Workstation?
In some instances sometimes this error occurs only on a user’s workstation, this is due to the fact that there is an issue with their QuickBooks or Windows permissions. Below are the steps to fix this issue. Follow them as it is:
Method 1: Create a new user in QuickBooks
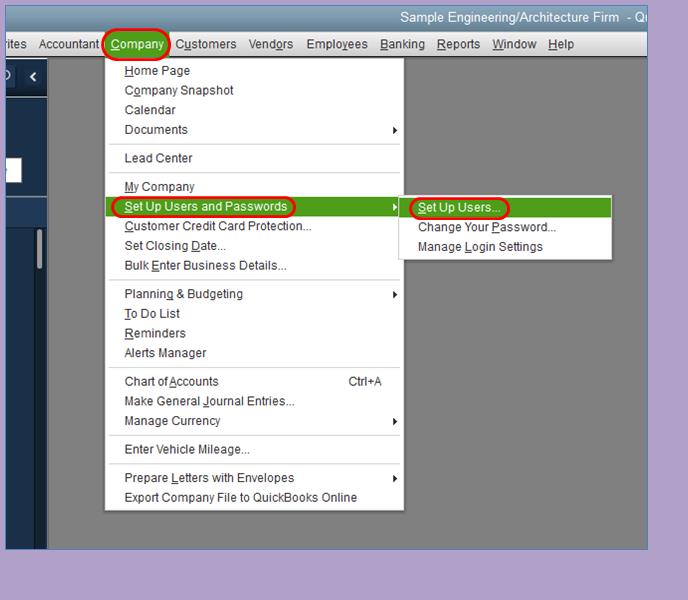
Begin the procedure by opening your QuickBooks, and go to the Company menu now click on the Users, and choose Set up Users and Roles.
Later, go to the Users and Roles window, and now click on New. Then move to the User Name field, add a name. If you need so, you can add and confirm a password.
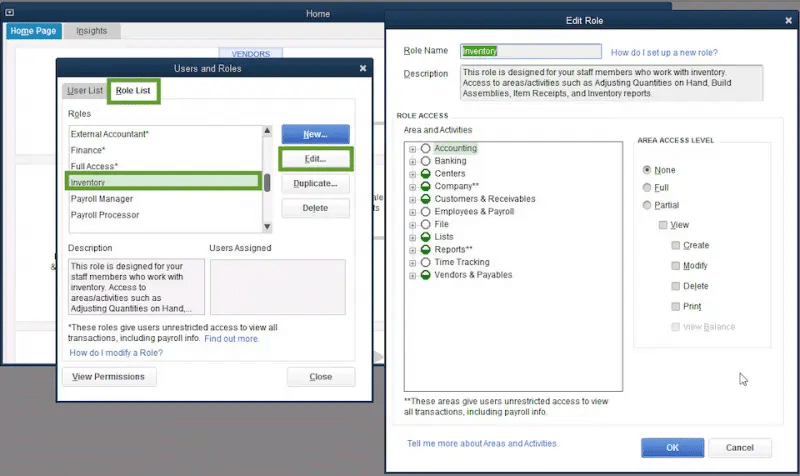
In this step, choose the Roles from the window menu, and click on a role, also click on Add, and hit on OK.
Suppose you want to make other necessary changes to the Role, and then click on the Role List tab, followed by clicking on Edit. After making changes to the permissions choose the OK option.
Now Click on Close in the Users and Roles window.
Now, on the current workstation sign out from QuickBooks.
After that, again login as the freshly created user.
Examine the user’s access once to make sure that all setup is good as you need. This will add user to QuickBooks.
Method 2: Create a new Windows user with admin credentials
In this method, at first, you need to create a new Windows user with the help of admin credentials. Follow the below steps for this:
Log in to Windows with the newly created user account on the workstation.
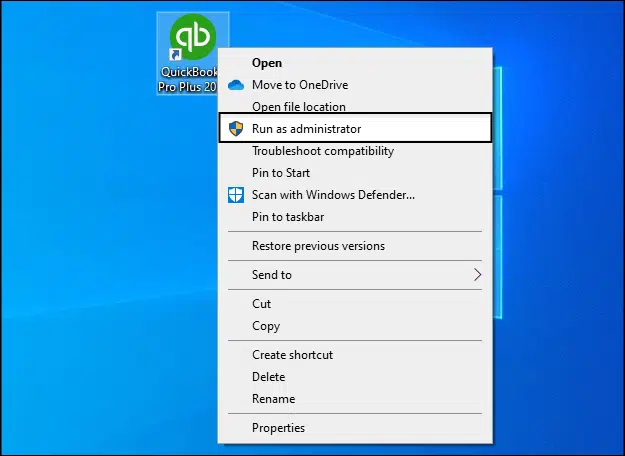
Right-click on the QuickBooks icon on your desktop and click on Run as administrator.
This will allow you to carry out the task on the workstation without perceiving any issues.
After performing all the suggested methods discussed above we assure you that you can easily resolve this locked file error in QuickBooks Desktop also known Company file in use error.
However, if you still encounter similar issues repeatedly or if you require our technical assistance at any point in time, then feel free to consult our QuickBooks Technical support professional by dialing this number +1-888-510-9198. We are here to serve you anytime soon and be more than happy to help you out.
Our team involves certified QuickBooks professionals who work round the clock to provide immediate support services. We are here to serve you anytime soon. We welcome you with your issue and be more than happy to help you out.
Are you experiencing an unexpected error when migrating QuickBooks? Well, need not panic, as this can be addressed easily. At times, when trying to move essential files across different systems, one might land into error “QuickBooks migration failed unexpectedly“. This particular error has the potential to drag you into an abrupt migration failure delaying the entire process. You can spot this error right after you run the Move_QuickBooks.bat file to complete the migration process.
As the data migration manual procedure is a bit time-consuming, making use of the tool is something that experts recommend. As a result of this issue, the tool stops working.
When this particular error occurs, it shows up on the screen stating: “QuickBooks migration failed unexpectedly”. As this error risks the data being transferred, it is essential to address it as soon as possible. Thus, to help you culminate such an error, here is a quick guide sharing the causes, as well as the fixes to the QuickBooks migration failed unexpectedly error. Thus, stay tuned to this segment or further you can get in touch with our technical support professionals at +1-888-510-9198, and let our technical support team help you in dealing with the error.
Before we head forward, it is essential to understand a term that was mentioned earlier i.e,, QuickBooks Migration Tool. Well, upgrading the system requires migrating the software as well, and when done manually this can take a lot of time and energy. Thus, to ease down the process, the QuickBooks Migration tool was introduced. This tool is designed in a way to automatically move all the data to the new system and activate QuickBooks on it. The manual process not only takes a lot of time but also poses a threat to the crucial data. However, the QuickBooks Migration tool takes care of all these factors.
What files can’t be migrated using the QuickBooks Migration Tool?
Even though the QuickBooks Migration tool saves a lot of time and eliminates the migration hassle, there are certain files and data that can’t be transferred using this tool. Some of the common file types that can’t be migrated using this tool are:
What triggers Error “QuickBooks Migration Failed Unexpectedly”?
The occurrence of every error is justified by some factors. Here is a quick view at the factors that trigger QuickBooks Migration Failed Unexpectedly Error. Let us have a look:
You should be prepared for such an error if you try to transfer any of the above-listed files that aren’t supported by the tool.
Another possible reason could be that the files related to the Migration tool got damaged somehow.
You can further come across the error if your system doesn’t meet the minimum system requirements to run the Migration tool.
Outdated QuickBooks or Windows versions also trigger this particular error in QuickBooks.
System Requirements to Avoid “QuickBooks Migration Failed Unexpectedly”
As we mentioned above, your system should meet the basic requirements to avoid compatibility issues with the Migration tool. Here is a gist of basic system requirements that you should ensure before using the QB Migration tool.
Operating System Requirement
Windows 11, 64-bit, natively installed
Windows 10, all 64-bit editions, natively installed
Windows Server 2022, Standard and Essentials
Windows Server 2019, Standard and Essentials
Windows Server 2016, Standard and Essentials
Windows Server 2012 R2, Standard and Essentials
Windows Server 2012, Standard and Essentials
Note that, as Microsoft has discontinued support for Windows 8.1 after the 10th of January, 2023, it is recommended to not install QuickBooks on Windows 8.1 or earlier to avoid any sort of issues.
Database Server Requirement
Windows Server 2022, Standard and Essentials
Windows Server 2019, Standard and Essentials
Windows Server 2016, Standard and Essentials
Windows Server 2012 R2, Standard and Essentials
Windows Server 2012, Standard and Essentials
In case you have planned to use QuickBooks in multi-user mode by hosting the company file or QuickBooks Hosting, these are the server systems that you can have.
Browser Requirement
QuickBooks Desktop 2023 doesn’t require any additional browser to let QuickBooks connect to the internet. The software now has its browser integrated with the application and an active internet connection is all that is required to sync license data online every 14 days.
System Hardware and Operating System
Processor
2.4 GHz minimum for running QuickBooks optimally
RAM (Workstation)
The display needs to be set to 1280 x 1024 or higher with up to 2 extended monitors. Also, the default DPI settings on the system are ideal.
RAM (Server)
8 GB minimum and 16 GB recommended
Disk Space
You need 2.5 GB of additional disk space for data files, in case you have any additional software: 60 MB for Microsoft .NET 4.8 runtime that you get with the installation files.
Windows
The North American version of Windows is required. Along with that, the regional settings are supported when set to English. Another point to note is to have admin rights on the server system when hosting multi-user access. Also, natively installed windows are required.
Optical Drive
A 4X DVD ROM drive is a must for physical CD installations
Screen Resolution
The display needs to be set to 1280 x 1024 or higher with up to 2 extended monitors. Also the default DPI settings on the system are ideal.
Effective Solutions to Fix QuickBooks Migration Failed Unexpectedly Error
Now that you have unleashed the required information about the error and the Migration tool. It is time to understand the steps involved in rectification of the error. Let us explore each of the methods one by one to learn further about fixing this error permanently:
Solution 1: Update the Operating System
As discussed above, an outdated operating system can trigger such an error in QuickBooks. Thus, it is a must to update the operating system and also ensure there are no compatibility issues with the Migration tool.
Begin by clicking on the Start tab on the taskbar.
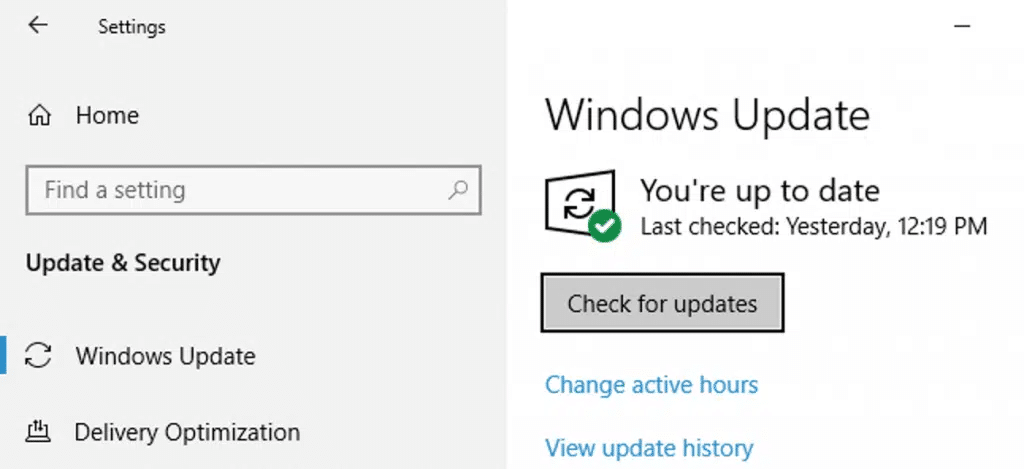
Further, enter Update and click on the Windows Update Icon.
You now have to Go for the Check for Updates tab.
And in case there are any updates available, make sure to download them.
Once done with that, Reboot the system and allow for automatic installation of the updates
After that try using the QuickBooks Migration tool after that and check if the error is rectified or not.
Solution 2: Running QuickBooks Migration tool in compatibility mode
You might come across the QuickBooks migration failed unexpectedly error due to compatibility issues. Thus, running the tool in compatibility mode is something we recommend.
Initially, right-click the exe file of the Migration tool and then click on the Properties tab.
You are then required to navigate to the Compatibility tab and mark the option to Run This Program in Compatibility Mode.
Towards the end, try to migrate your QuickBooks data to check if the error still persists.
Solution 3: Update QuickBooks to the latest release
Using outdated QuickBooks can also hurt the migration process the same way as using outdated Windows. Thus, we suggest you update QuickBooks to the latest release. The steps that can be performed here are:
Run QuickBooks Desktop
Click on the help tab and go for the option stating Update QuickBooks Desktop
You are then required to select the Update Now tab and further click on the Get Updates tab.
Fix technical issues when updating QuickBooks Update
When trying to update QuickBooks, if you are interrupted by any sort of technical glitch, then we suggest you to end all the background processes from the task manager and then reboot QuickBooks, and update the software again. This can be done using the below steps.
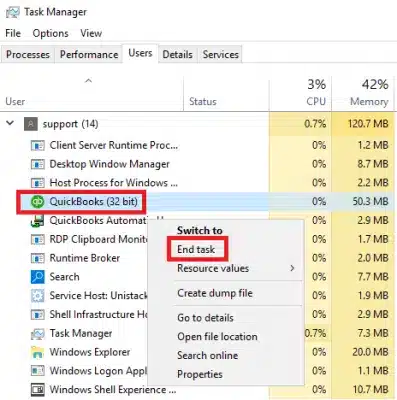
You need to first press Ctrl + Alt + Delete tabs together and select the option Open task manager
After that, search for the files related to QuickBooks such as QBW32.exe, QBCFMonitorService.exe, QBupdate.exe, etc. and further click on End Processes.
Immediately sealing errors related to the crucial data becomes essential to avoid any sort of data loss. We hope that this segment might have helped you in successfully eliminating the error from its root cause. However, if there are any queries or if you are stuck at some point in time, feel free to get in touch with our technical support professionals at +1-888-510-9198, and we will provide you with answers to all your queries.


![QuickBooks Migration Failed Unexpectedly [SOLVED]](https://www.hostdocket.com/wp-content/uploads/2024/01/QuickBooks-Migration-Failed-Unexpectedly-.png)