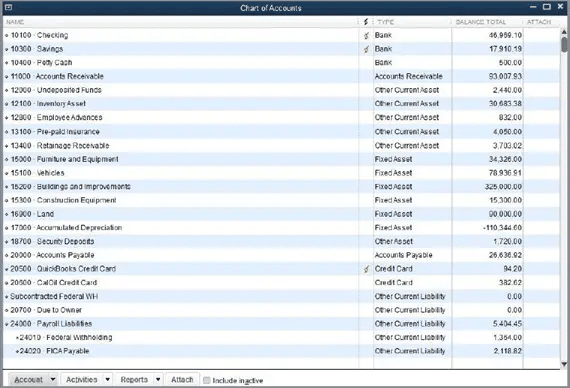
QuickBooks Chart of Accounts is basically a list of accounts that helps in categorizing assets, owner’s equity amount, liabilities, and income. To understand it better, you can say that it is a list of balances and chart of accounts in QuickBooks of the company, which further assists in understanding the amount of money a company has, how much it owns, and the amount it owes. It provides a full-proof financial report. This is an important feature for businesses, as it helps in analyzing the financial aspect of a business and reviewing its financial performance.
Setting up a chart of accounts in QuickBooks is quite easy, as it involves some basic set of steps, which we will be elaborating on later in this segment. So, if you are interested, then make sure to go through the segment carefully. For any kind of professional or technical assistance, you can simply connect with our tech professionals at +1-844-499-6700. Our certified QuickBooks professionals have years of experience and expertise in dealing with issues related to QuickBooks.
What is Chart of Accounts (COA)?
Before you dig in deep to learn the steps to setup chart of accounts in QuickBooks, it is sensible enough to understand a little more about the chart of accounts in QuickBooks. Well, as mentioned earlier, chart of accounts is basically a list of account numbers and names that are relevant to the company. It is majorly categorized into these four standard accounts namely:
Asset accounts
Liability accounts
Income accounts
Expense accounts
Within each of the categories, the line items will distinguish the specific accounts. Moreover, each line item represents an account within each category. It should be noted that a few charts of accounts also display equity accounts. This represents anything that remains after accounting for all operating expenses and revenue accounts.
There are basically four types of charts of accounts. Let us understand each one of them in detail:
1. Asset Accounts
The very first category is asset accounts. These accounts basically contain everything having a value like buildings, vehicles, land, inventory, valuables, etc. This type of Chart of Accounts helps in tracking the amount a user paid for a property and also other factors like depreciation. Items that are in liquid forms, like cheques and other bank accounts, also fall in this category.
2. Liability Accounts
Second comes the liability accounts. It consists of things like mortgages, payroll taxes, promissory notes, credit card balances, bank loans, personal loans, and income tax payables. When users add a loan to this account, it is recommended to ensure that users have also added the sum of the loan.
Here, the users will have to log just the principal amount and forgo the interest owed. When one reaches each monthly payment and enters the payment in the accounting system, the user would have to split the payment into an amount subtracted from what is owed and an amount of interest paid, which will go into an expense account.
3. Income Accounts
Another type if the income Accounts. This encompasses expenses, revenues, additional incomes or expenses, and cost of sales. Some of the accounts are the same for all businesses, while some accounts are definite to a particular business type.
It is recommended to create a separate line item in the chart of accounts for different types of income. Make sure to consider what various profitable activities may be and sort them by income type instead of limping all the income into one account. After the user is able to identify the locations or events bringing the most cash flow, then it is possible to manage things more properly.
The last type of account is the expense account. It keeps users informed about the amount of money that they have spent. It further allows them to track the cash that is not with them.
Effective points to organize and set up chart of accounts in QuickBooks
Before you perform the steps discussed ahead, make sure to go through the below pointers:
It is recommended to keep the line items simple in the first go. Also, make sure that the line items have titles that are understandable to the accountant and also to them.
Majority of accounting systems are preset with a chart of accounts. The lines of preset accounts have numbered headers like 1430.2 and 530.8. And these numbers can be effective for large scale businesses but are usually a waste for entrepreneurs and small firms.
We recommend avoiding creation of a new line item for each transaction. This is to ensure that it doesn’t litter entire chart of accounts.
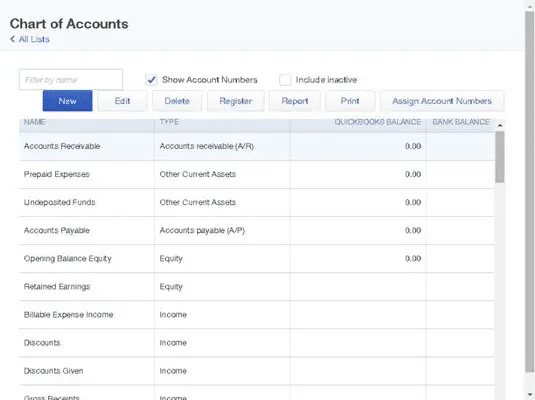
How to access the QuickBooks chart of accounts?
The steps to access the QuickBooks chart of accounts in QuickBooks desktop and online differ. So, make sure to perform the steps accordingly. The steps involved in the process are as follows:
On QuickBooks Desktop:
The user is supposed to pick up the Chart of accounts from any of the QuickBooks menus.
And then head to the company and click on lists or accounts.
Go to the Company and then click on Lists or Accountant.
On QuickBooks Online:
Under this software, you need to click on the settings icon and select chart of accounts directly.
You can perform the below set of steps to setup chart of accounts in QuickBooks. Let us explore the steps in detail:
Step 1: Go for the lists – Chart of Accounts Command
The QuickBooks software will display the Charts of Accounts window on the computer screen.
Step 2: Now, click on the Account Button
Furthermore, on the screen, QuickBooks will display the Account Menu. The user is required to click on the tab stating ‘Account menu option New’. And this will open up a window on the screen.
Step 3: Add New Account by opting for Account and then new tab
Note that the QuickBooks software will showcase the Add New Account window on the screen.
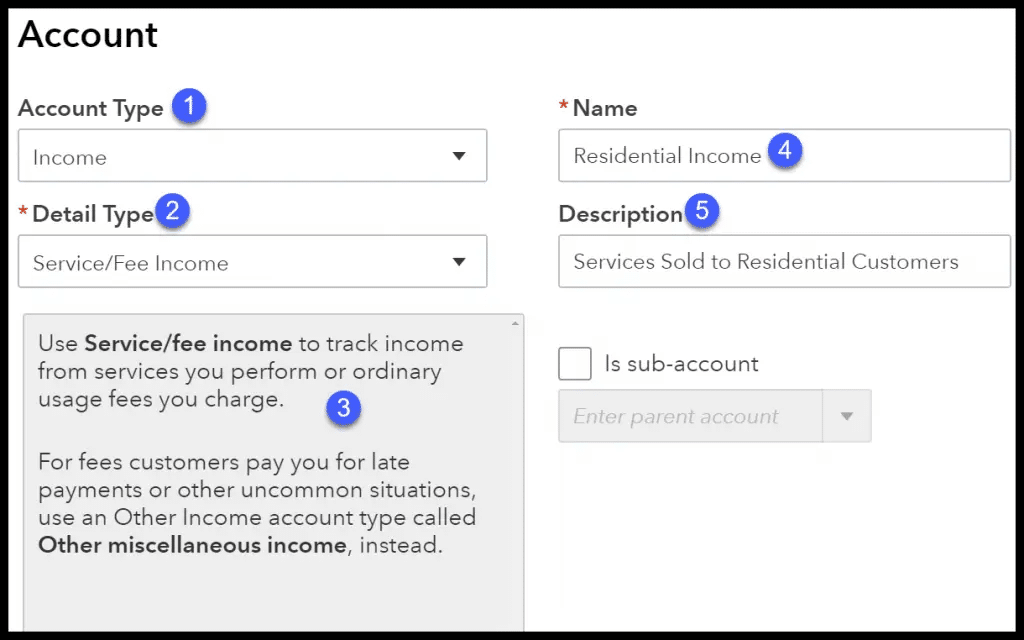
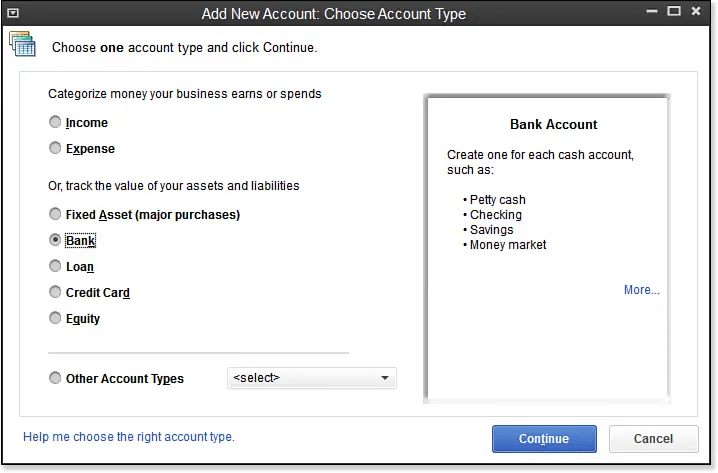
Step 4: Make use of the Account Type buttons
The QuickBooks accounting software offers different accounts types which include income, loan, fixed asset, Expenses, Credit Card, equity, Accounts Payable, Other Income, Costs of Good Sold, Accounts Receivable, Other Assets, Long Term Liability, Other Expenses, and more. Via the accounts, one can find the location where their data is getting reported.
Step 5: The next step is to click on continue
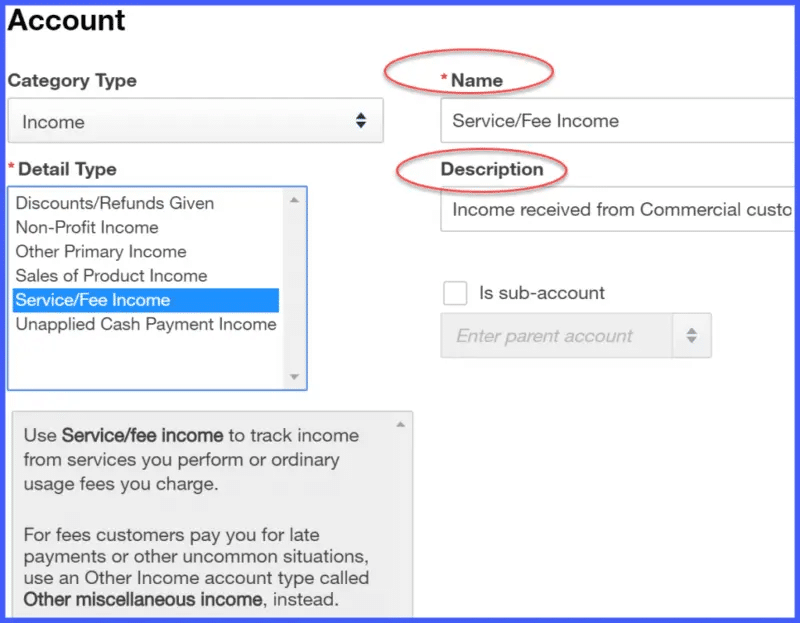
After the user clicks on the continue tab, the QuickBooks software will show the second Add Account window on the computer screen. It should be noted that the name of the account will appear in the financial statements. Thus, you would have to use the Account Name Box to give a distinctive name to the new account in order to setup chart of accounts in QuickBooks.
After you have opted for the sub-account checkbox, it is suggested to assign a name to the parent account.
Step 7: Head to the Bank Account
In case the QuickBooks software is compatible with working in different currencies, then it will prompt the users to look for all those customers, bank accounts, vendors, etc., who use different currencies.
Step 8: The next step involves the description of the new account
There is no need to describe the new account. QuickBooks software makes use of the account name in the financial statements and so no description is required as such.
Step 9: Get Account Info
Now, the user is supposed to get the info about the credit card account type version of the Add New Account window. This will help in storing all the card details.
Step 10: Recognize the Tax Line
On the corporation’s Tax return, the cash account balances will get recorded. In case the user wants to add a bank account, then using the Tax-Line Mapping drop-down list can help.
Lastly, the user is supposed to click on the next tab to save the account information and move to the add new account window. After both the accounts have been setup, the new accounts will appear on the chart of accounts list.
How to Modify an Account from the Chart of Accounts List?
One can try to modify an account from the chart of accounts list by performing the steps below:
Choose an account to setup chart of accounts in QuickBooks
At first, you need to choose the account that you wish to modify. Furthermore, you can modify the accounts regardless of the time. Now, from the chart of accounts, scroll down to the account that is to be modified. Click on the drop-down arrow next to run report.
Choose the edit option.
Make modifications to the account
This will now lead you to the window, where you can make changes to the account name and the account description fields. Note that the users should not change the category type in case they have already entered transactions using the account.
This can lay a serious impact on the financial statements.
Save and close
It is recommended to save the changes before exiting the account.
Conclusion!
Now that you know the steps that can be performed to set up a chart of accounts in QuickBooks, it is time to perform those steps. Whereas, if you get stuck at any point in time, or if you require any sort of technical assistance in performing those steps, then, in that case, consulting our tech support professionals is something that we suggest. We are a team of certified QuickBooks professionals who provide you with instant QuickBooks support services. Our experts have years of experience in helping QuickBooks users with issues related to the software. For more details, get in touch with us at +1-844-499-6700 and we will provide you with the best guidance possible.
What exactly is a Chart of Accounts in QuickBooks, and why is it important for my business?
Setting up a Chart of Accounts in QuickBooks involves several steps. First of all, you’ll need to access the Chart of Accounts feature and add or edit accounts as per your requirements. QuickBooks allows you to customize your Chart of Accounts to match your business structure, industry, and reporting needs. You can add new accounts, edit existing ones, and even organize them hierarchically for better organization.
What are the steps for setting up a Chart of Accounts in QuickBooks, and can I customize it to suit my business needs?
Setting up a Chart of Accounts in QuickBooks involves several steps. First, you’ll need to access the Chart of Accounts feature and add or edit accounts as per your requirements. QuickBooks allows you to customize your Chart of Accounts to match your business structure, industry, and reporting needs. You can add new accounts, edit existing ones, and even organize them hierarchically for better organization.
Can I import a Chart of Accounts into QuickBooks?
Yes, QuickBooks provides the option to import a Chart of Accounts from an external source like a spreadsheet or another accounting system. To do this, you’ll need to format your data according to QuickBooks’ import requirements, which typically involve preparing a CSV or Excel file. Then, you can use the import feature within QuickBooks to bring in your Chart of Accounts, saving you time and reducing the risk of errors during manual entry.
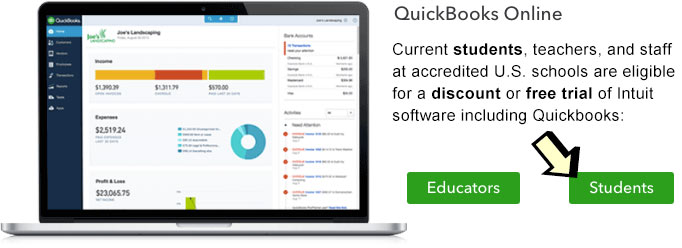
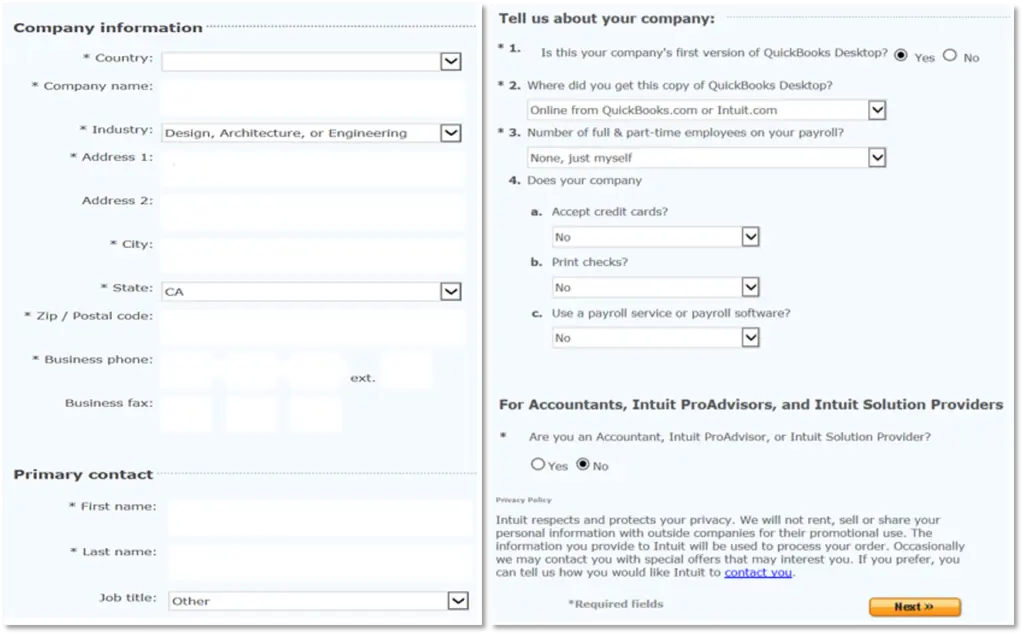
QuickBooks accounting software is often used by businesses for carrying out different accounting and bookkeeping activities. However, many students pursuing different courses based on accounting or various other finance subjects make use of this versatile software. To make it affordable for the students, Intuit offers certain student discount and offers. Thus, if you are a student and planning to purchase this software, then you should know a lot of things about QuickBooks Student Discount.
This article is going to brief you with the entire details about student discount in QuickBooks. For more information, make sure to read this post till the end or connect with our certified team professional team of QuickBooks Experts and they will guide you regarding student discount. For more information, dial +1-844-499-6700.
More About QuickBooks Student Discount & Educational Free Version
As a student, the income is zero and the expenses are high including lodging, study loans, etc. And an addition to these expenses can be a bit challenging. The QuickBooks student discount can be extremely valuable for those who might find buying QuickBooks a bit out of budget, due to high cost. Before you buy the software, it is essential to be sure which version you want for your studies. The reason behind this is that no two courses are same, this means that with the course the requirements might also vary. In case you are not sure, it is recommended to take assistance from professionals.
The students can either buy QuickBooks via online platforms or offline platforms. Buying QuickBooks desktop software from online portals might save time as well as money. Moreover, it is quite easy to use any online third-party service providers, as it would offer certain key elements that would ease everything for you.
As a student pursuing financial education, there are a few things to remember to opt for QuickBooks student discount. The students can ask their teacher or instructor about the discount. Or can also directly contact the store and get the information regarding the offers. To choose the best deal, make sure to compare the offers in hand.
Software providers that offer QuickBooks educational/student discount
Certain software providers offer software discounts and educational discounts. Thus, it is suggested to check out these software providers.
Student Discounts
This particular site usually offers discounts to students, teachers, and schools on different software for about twenty-five years. The price that they offer for QuickBooks Desktop Pro 2019 version is $199.99 and the same is for QuickBooks Desktop Premier 2019 version. Note that, it might fluctuate according to time and new releases.
JourneyEd
Another option is to check out journeyEd, which is an online store that not only sells software, but also a variety of other things. This might include, music, videos, electronic accessories, tablets, mobile devices, etc. They further offer QuickBooks training materials, along with QuickBooks software. You can avail Student discount on QuickBooks Accountant 2019 academic version. This might cost you around $99.95. This is an ideal software for students, as it offers the features required by students.
What is Intuit Education Program?
Intuit, the developer of QuickBooks offers a QuickBooks edition for all students. Students are required to register for 5 months trial version for a discount, via the education program. Moreover, an eligible student will then be permitted to download the 5 months free trial version of QuickBooks from the official portal. This program is beneficial for both students and educators for advancing their tax, accounting, and other skills. Not just that, but the Intuit education program provides free one year subscription for the following software to students and educators-
Financial literacy course called Financial Literacy Foundations
Eligibility Criteria for QuickBooks student discount?
Only the students fulfilling the below mandatory terms are eligible for this discount.
One of the most important facts is that the student must be in an accredited primary or secondary school.
Moreover, should be in public or private university or college.
School district or board of education is also important.
The student should be of accredited public or private school offering full-time instruction for students in grades k-12.
Student should be of any public or private college or university including community college, junior college, or vocational school.
Variations in prices on QuickBooks student discount
There can be certain variations in pricing of the QuickBooks student discount, due to certain reasons listed below. Thus, make sure to keep these factors in mind.
Less features
One might get same application in different prices on the same platform, due to differences in the number of features. Thus, makes sure to check the features before you make an investment.
Old version
Old versions cost less in QuickBooks. You can choose the version which suits you.
Pirated software
Often people might fool students with pirated software and provide them certain discounts. To avoid this, the students are suggested to view the customer reviews along with the downloading certificates before making a decision.
Precautions for Students
QuickBooks is not only great for businesses, but also it offers a good educational environment for students. Note that, online portals offer numerous special offers and coupon codes to make buying QuickBooks easier and more approachable for students. Also, just focusing on low prices is never a good practice for buying QuickBooks from any platform. In order to help students, certain offers and coupon codes are offered. Different online third-party service providers offer attractive schemes to students. The offer policies might be different depending upon every individual third-party structure, and so the students might face a variation in process and offers.
Not only that, but the students also might face piracy issues on some third-party providers. They should further consult professionals in order to fix these issues. We further recommend examining all the key factors of purchasing the software from any third-party application source. Moreover, students might face certain variations in prices due to version upgrading. This simply indicates that different versions or the latest ones might have a different price.
Also, identifying the less pricing reasons. You need to understand whether it is really an offer or just a degradation of pricing with the features. This further depends upon the reliability of third-party service providers. Further you need to keep a check on the support and customer service skills of the third party service that they are using in order to purchase the QuickBooks software.
Prominent Platforms for buying QuickBooks software
Often choosing the right platform might be difficult for the students to buy the software and this might end up in wrong decision making. Thus, it is suggested to keep a check on below pointers:
Microsoft Products:
The Microsoft’s official portal with verified certificates and prices can be an ideal platform for the students to get QuickBooks software.
Intuit’s official portal
Intuit’s official portal is another of the trusted platforms, where one can directly and easily get QuickBooks accounting software.
Apple store
Students can easily get QuickBooks software on the Apple’s official portal.
Any of the above portals can be used to buy QuickBooks with student discount. However, keeping a check on features is recommended.
How to Register for QuickBooks Desktop Student Trial?
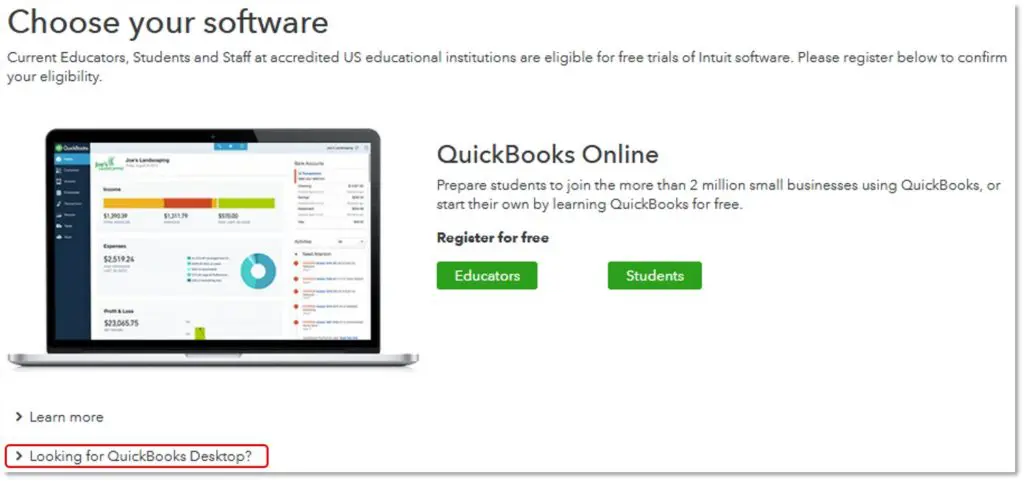
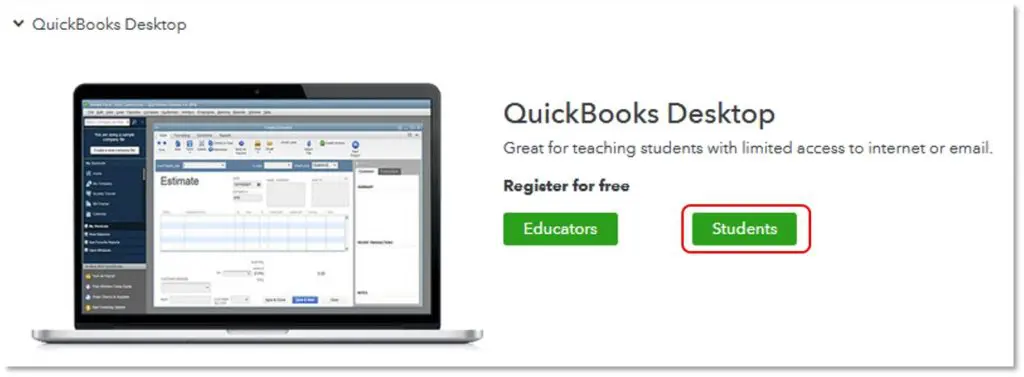
Now that you know the necessary information, let us understand how to register for QuickBooks student trial. Well, if you’re a current student at an accredited US educational institution, you can register for a student trial of QuickBooks Desktop. You can unlock the license using the steps below:
After that choose register option and then go for looking for QuickBooks desktop, under the Choose your software option.
Pick students and then fill out the registration form.
Choose verify and continue and then the welcome to Intuit Education page will display.
Note that, if the welcome page doesn’t display, then you need to continue to the verification section. Otherwise, skip to activate QuickBooks desktop student trial.
Installing steps for QuickBooks Desktop Student Trial
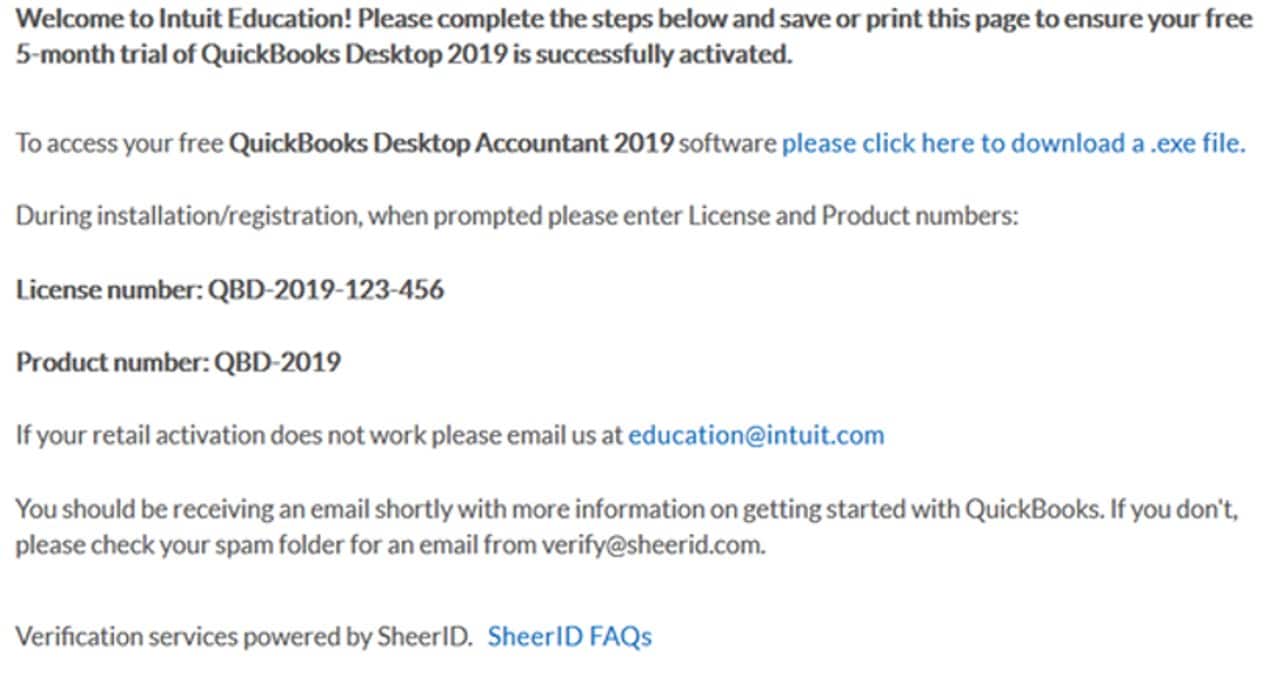
The very first step is to open the email you received from Intuit verification and then choose the please click here to download.exe file.
Also note that in case the email is not received, then you can contact a professional.
Also, select the download option and close any open program, along with that select the setup_QuickBooks.exe
Hit yes to permit QuickBooks to make changes to the system.
After the download is complete, hit next on the Install Shield Wizard window.
Choose next and then review the license agreement.
Go for I accept the terms of the license agreement checkbox and then hit next tab.
Enter the license and product number provided in the email and then hit next.
Opt for the express and hit next and now, choose install, and select Open QuickBooks.
The last step is to hit on OK button.
Steps to Activate QuickBooks Desktop Student Trial
When you open up a company file in QuickBooks for the very first time, then you might be asked to activate it. This should be done within 30 days of installation. The steps to be performed to activate it are as follows:
Start with clicking on Activate
Now, create a login or use an existing Intuit login.
In case you are having an existing Intuit Account, then you need to choose create account.
After that enter all the required information for the customer account (the required fields are shown with an asterisk *), and then hit the next tab.
You will see a confirmation window.
Where you will need to print the page or save it a PDF file for the records.
Conclusion!
Opting for QuickBooks student discount can make accessing QuickBooks software affordable for students. We believe, that the above set of steps might help the students understand student discounts and accessing the software with much ease. However, in case of any query or if the user requires our assistance at some point in time, then consulting our QuickBooks tech support team at +1-844-499-6700 is recommended. We are a team of certified QuickBooks professionals who work round the clock to provide immediate support and services.
Making an incorrect journal entry mistakenly is pretty common. In such a scenario, you might have to delete or reverse an entry by performing some basic steps. You can simply create journal entries in QuickBooks on your own, and if some issue arises, you can edit or correct a journal entry by reversing it if needed. Any entry made mistakenly can be removed permanently. A journal entry can be created and deleted in both QuickBooks desktop and QuickBooks online. However, the process might differ in both cases. To help you further, here we are with this segment sharing how to delete a journal entry in QuickBooks successfully.
In case you have any queries or if you need any sort of technical guidance at any point in time, then in that case, feel free to connect with our technical support professionals at +1-844-499-6700, and let them help you with your queries.
Before you directly jump on to the steps to reverse or delete journal entries, it is essential to understand the difference between the two.
Reverse a journal entry: This can be done when you need to allocate a transaction between two accounting periods or fix a debit/credit error. Note that, reversing simply reverses the debits and credits and doesn’t delete the original entry.
Delete a journal entry: In case you create it by mistake and need to get rid of the entry permanently.
How to delete a journal entry in QuickBooks Desktop?
The procedure to delete a journal entry in QuickBooks Desktop is different from QuickBooks Online. Let us understand the steps in detail:
Initially, you need to head to the company menu.
Now, choose make general journal entries.
Once done with that, find and choose the journal entry that you want to delete:
In QuickBooks for Windows, choose find and enter the name, date, entry no, or amount, and then choose find.
In QuickBooks for Mac, choose the journal entry you wish to reverse from the list on Make general journal entries window.
In order to delete the journal entry:
You need to double-click the journal entry in QuickBooks for Windows and then choose delete, or void and click on the ok tab.
In QuickBooks for Mac, you need to choose Delete General Journal from the edit menu.
Steps to reverse a journal entry in QuickBooks Desktop
In order to reverse a journal entry in QuickBooks desktop, you need to carry out the following steps:
At first, navigate to the company menu and choose Make general journal entries.
After that, find and choose a journal entry that you want to reverse.
In QuickBooks for Windows: You will have to choose find and enter the name, date, entry no, or amount and choose find.
Whereas in QuickBooks for Mac, you simply have to find and select the journal entry you wish to reverse on the left side of the Make general journal entries window.
Now, go for the reverse option.
And lastly, choose save and close.
How to Delete a journal entry in QuickBooks Online?
Note that, deleting a wrong journal entry can unbalance the accounts immediately. Thus, you must be absolutely sure to delete the journal entry. In case you invited your accountant to review your books, then instead of deleting the entry, it is possible to make an adjusting journal entry. Having said that, let us check out the steps to delete a journal entry in QuickBooks Online.
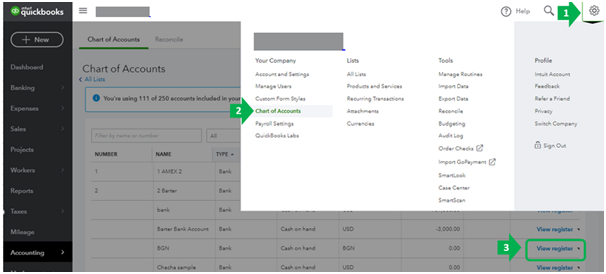
To begin with, you simply need to choose the settings tab and then go for the chart of accounts.
Once done with that, find the account you create the journal entry for.
Now, choose the account history tab.
And find the journal entry in the account register.
The word journal should be present in the Ref no. or type column.
The next step is to choose a journal entry to expand the view.
Then, simply click on delete and yes to confirm.
This would delete the entry successfully.
Steps to reverse a journal entry in QuickBooks Online
Reversing a journal entry usually reverses the debits and credits and doesn’t delete the original entry. The steps involved in reversing a journal entry in QuickBooks online are as follows:
Deleting or reversing a journal entry in QuickBooks desktop and online involves a handful of steps only. However, it is important to ensure that you actually need to delete or reverse the entry or not, as this might trigger balance issues. Hopefully, reading this segment might have helped you in successfully deleting or reversing journal entry in QuickBooks. However, if you have any queries at any point in time, then in that case, feel free to connect with our technical support team at +1-844-499-6700, and we will provide you with immediate support and assistance.
Do you know how and when to give a credit memo or delayed credit to customers? Well, we can help you with that. At times, instead of a refund, some customers prefer getting a credit that they can use to reduce the balance on their next invoice. It is possible to handle credit memos in QuickBooks using a bunch of ways. You have two different options, one is to create a credit memo to immediately reduce a customer’s current balance, and the other is to enter a delayed credit so that it can be used in the future. In this segment, we are going to discuss further about the differences and how they can be applied to the customer transactions.
It should be noted that if you are refunding money that a customer has paid already, then it is suggested to record a customer refund in QuickBooks by creating a refund receipt. Having said that, let us proceed with the segment and understand QuickBooks credit memos better. However, if you have any queries, or if you need any sort of professional guidance at any point in time, then we suggest you consult our technical team at +1-844-499-6700, and we will help you with your doubts immediately.
What is the difference between QuickBooks credit memos and delayed credits?
QuickBooks lets you give credit using a credit memo or delayed credit. However, there are a few key differences that we have jotted down. Let us evaluate:
Credit memoin QuickBooks
A credit memo can be used in case your customer wants to immediately reduce their current open balance.
It can also be used as payment for an invoice by the customer. Either they can use all of their credit memos or a portion of it.
A credit memo can be applied when recording payment for a customer’s invoice.
Note that, credit memos impact sales reports, even if you do not apply them to the invoices.
Delayed Credit in QuickBooks
In case you wish to track a customer’s credit for future use, and they do not want it to instantly affect their current open balance, then using a delayed credit might help.
The customer can use their delayed credit to reduce the balance of an invoice.
One can add delayed credits to future invoices as a line item.
Delayed credits do not impact sales reports until you apply them to invoices.
Steps to create and apply a QuickBooks credit memo
In order to create and apply a credit memo, you can try performing the steps enumerated below:
Step 1: Turn on or turn off automatically apply credits
Begin with heading to the Settings tab
Choose Account and settings
You now have to choose the advanced tab
Once done with that, choose the edit tab in the automation section
Also, turn on automatically apply credits, in case you wish to automatically apply credits to customer balances or open invoices.
After that, turn if off in case you wish to make a decision that open invoices you want to apply credit memos to.
The last step is to choose Save and click on Done.
Simply turn on auto-apply credits, to automatically apply credits to the oldest open invoices for the same customer. In case it is on, here is what happens:
In case you have older open invoices, QuickBooks will apply the credit to the oldest open invoice. If none, QuickBooks will apply the credit to the next invoice.
Just in case the credit matches the amount on the invoice, the credit memo and invoice will show Closed. In case the credit is less than the amount of the invoice, the credit memo will show as closed, and the invoice will depict partial.
Also, if the credit is more than the amount of the oldest open invoice, QuickBooks applies the remainder to the next oldest open invoice. In case there is no more open invoices, then the status of the credit memo will show unapplied
In case you create credit and the customer owes nothing, then they will have a negative balance.
Case 2: If the automatically apply credits setting is off
If you create a lot of invoices and credit memos for customers, then you need to turn off auto-apply credits. Just in case you apply specific credit memos to specific invoices, then here is what happens if it is off:
When you enter a credit, QuickBooks won’t apply it to any open invoices.
Moreover, when you receive a customer payment using receive payment, then it has a credits section. Choose when to apply credits and to which invoices.
In case you don’t link any credits, the customer balance detail report will show that both the invoice and the credit memo have open balances. They further show as open or customer and sales transaction pages.
Remove auto-applied credits from an invoice
Here you need to choose an invoice that has the credits applied
After that, choose the blue hyperlink of the credit applied, and then choose the date.
The payment transaction will open.
The next step is to choose more and then delete. Also, choose yes to confirm.
In case you want to transfer credit from one customer to another, create a journal entry, then apply the credit.
From the customer dropdown, you need to choose customer’s name
Also, enter the credit memo details, such as the date and the amount.
Note that, you can create a custom credit service item so that you can quickly add it to credit memos as a single line item.
After you are done, choose save and close.
Step 3: Apply the QuickBooks credit memos to an invoice
Just in case you turn on the auto-apply credits, QuickBooks will apply the credit for you. And in case you turn it off, you can manually apply a credit memo to an invoice.
Begin with, choose + New
After that, choose Receive payment
Select the customer from the customer dropdown.
You now have to choose the open invoice you wish to apply the credit memo to in the outstanding transactions section
In credits section, choose the credit memos you wish to apply
Also, note that, if you do not see the credits section, in case you haven’t created the credit memo.
Enter the credit you want to apply for the open invoice in the payment column.
Now, leave the payment method, reference no, deposit to, and the amount received fields blank.
Also, enter in the rest of the details including the payment date.
Ensure that the total is correct after applying the credit memo.
The last step is to choose save and close.
Steps to create and apply a delayed credit
For creating and applying a delayed credit, the steps enumerated below can be implemented.
Step 1: Create a delayed credit
To begin with, you need to choose + New
After that, choose delayed credit
Now, from the customer dropdown, choose the customer’s name
And then, enter the details, such as the date and the amount
Note that, you can create a custom credit service item, so you can quickly add it to the delayed credits as a single line item
Adding a delayed credit to an invoice from a prior accounting period will affect that period’s balances.
You need to choose + New
And then go for the invoice
After that, in the customer dropdown, choose the customer.
This opens a window with all open transactions for the customer and further includes invoices and delayed credits.
Also, note that, if you do not see this, choose the small arrow next to the invoice balance due.
Once done with that, find the delayed credit and choose add.
This adds the credit as a line item to the invoice
Now, fill in the rest of the details.
And choose save and close.
Credit memo customization
Any sort of customizations applied to the standard template will be applied by the credit memo. Thus, in order to customize a credit memo, you need to edit the standard template according to the requirements.
Towards the end of this segment, we believe that the information shared in above might be of some help in creating and applying credit memos or delayed credits in QuickBooks online. However, in case of any queries, you need to simply reach out to our technical support professionals at +1-844-499-6700, and they will help you with your doubts instantly.
Want to record and classify refunds easily in QuickBooks? If yes, then this segment is surely something you need to go through. Refunds usually happen when a client has to refund you for an overcharge, returns an item, or cancels a service. The QuickBooks accounting software helps in managing refunds in many ways. You need to record a refund depending on various scenarios. This ensures that your books are up-to-date. To help you out in recording customer refunds in QuickBooks, here we are with this segment sharing the complete set of steps that can be implemented. To learn more, stick around this segment carefully. Or you can also consult our technical support team for any sort of technical guidance and to find out how to record refund in QuickBooks. Dial +1-844-499-6700, for any sort of technical guidance.
Record and Categorize Refunds in QuickBooks Desktop
You can perform the below set of steps to record and categorize refunds in QuickBooks. Let us have a look:
Step 1: Launch QuickBooks
Initially, you need to launch QuickBooks software and then sign into the account.
Step 2: Make a new customer
Before you issue a refund, you must have a customer refund. If the customer is not present in your database, then you need to add them using the steps below:
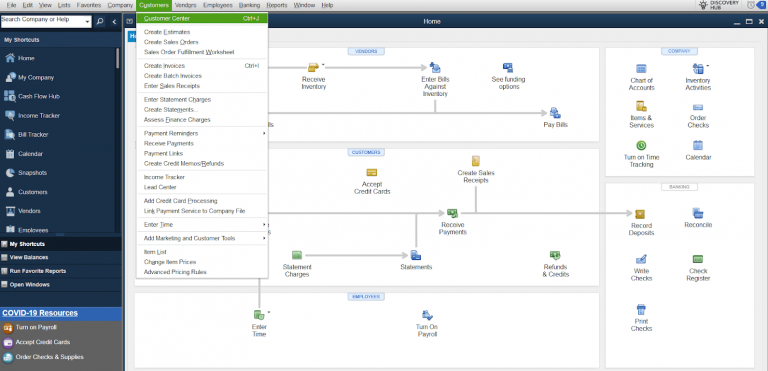
Head to the customer menu.
After that, choose Customer center
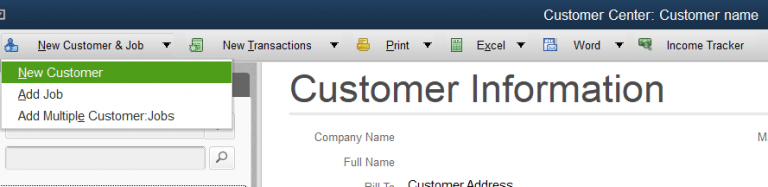
You need to then press new customer and job option.
Also, select a new customer.
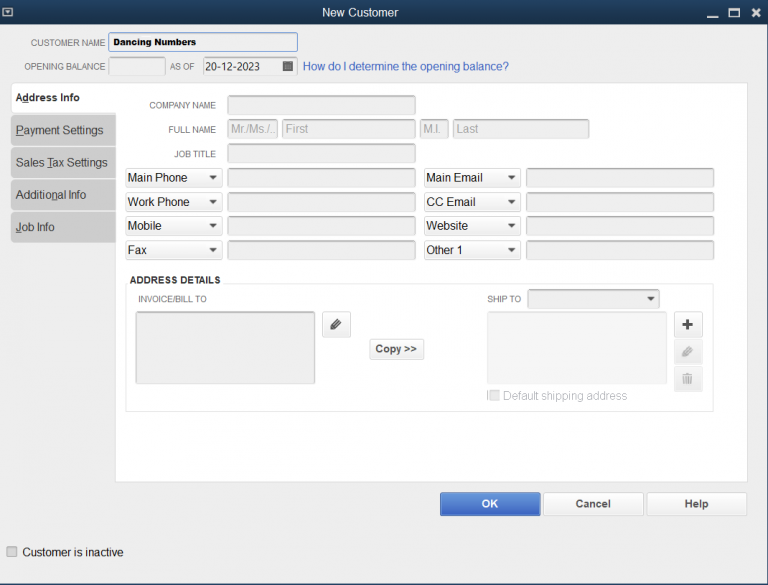
Complete all the customer details like the address, name, contact details, etc.
You need to now click on ok tab.
Step 3: Create a refund receipt
Here, you need to record the money that you are giving back to the customer. The steps involved in here are:
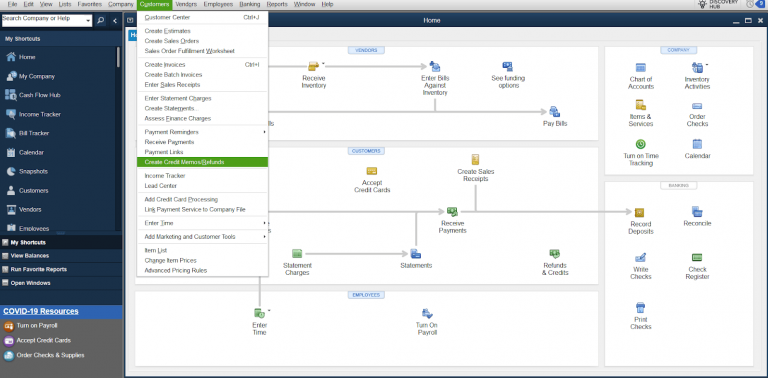
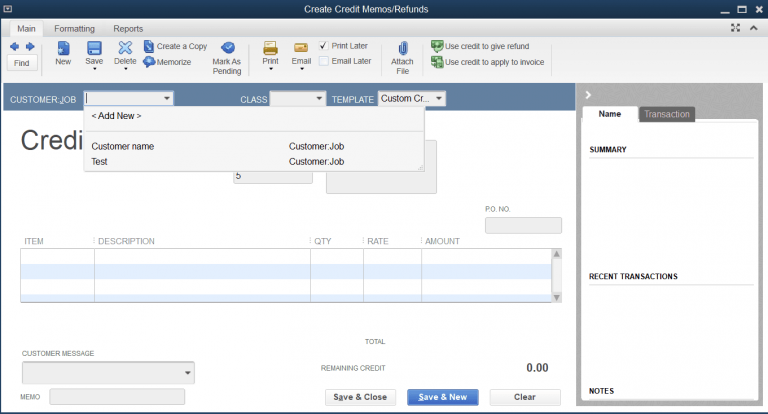
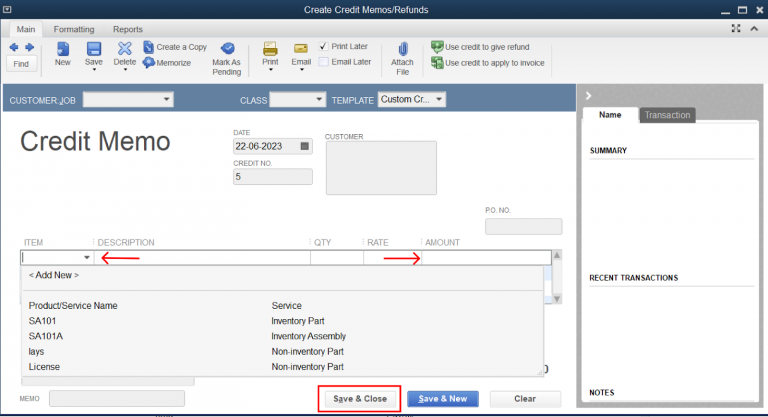
The very first step is to head to customers menu and select create credit memos/refunds.
You now need to select the customer you are refunding.
In the section for item, select the items that are refunded.
After that, type the amount of the refund in the particular account column.
Step 4: Issue a refund check or implement the refund to the customer’s balance
After preparing the credit memo, you can either apply it to the balance of the customer for future purchases or can refund the amount immediately with the help of the steps below:
After the credit memo is saved, a screen will ask you how you wish to handle the refund. Now, select apply to an invoice to use the refund for future purchases.
Now, select the option, and give a refund to refund the amount now.
Just in case you select the option give a refund, you will get notified to select the payment method for the particular refund along with the account the money will be taken from.
Now, click on ok tab.
Step 5: Review the Refund
The last step here is to review the refund to ensure that it has been categorized in the right way.
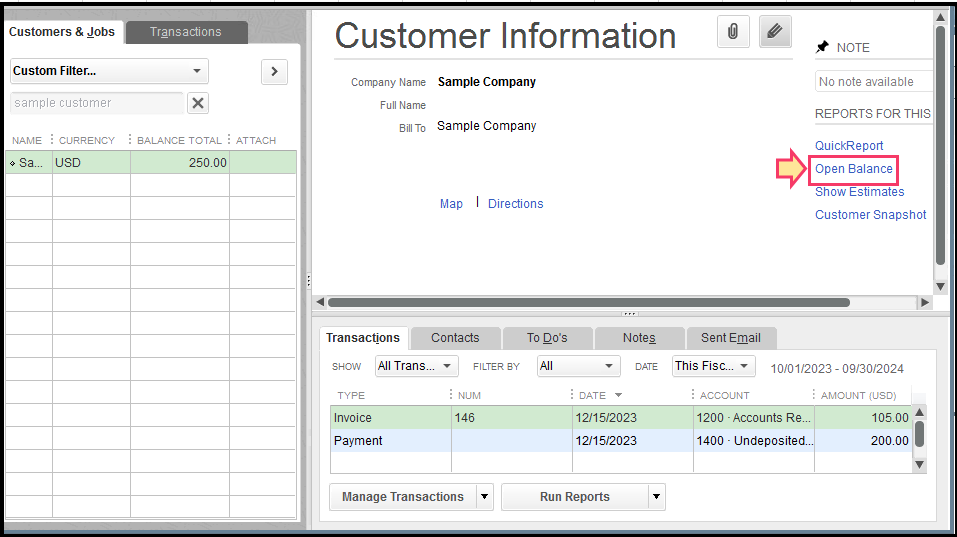
Head to the reports menu.
Select the customers and receivables and then opt for customer balance details.
You need to reimburse a client or vendor for an overpayment or returned items, which includes precise paperwork and prompt processing while issuing a refund in QuickBooks.
Partial Refunds
You can reimburse a partial of the initial payment using partial refunds in QuickBooks online. This gives you options when handling refund requests from customers or vendors. This includes determining the refund amount based on the percentages of the original payment being repaid. In order to ascertain transparency in financial transactions and properly represent the partial reimbursement, adjustment entries can be made in QuickBooks online.
Refunding to a Customer
When you receive a refund in QuickBooks, the overcharged amount must be returned or a return request must be processed. Proper documentation and on time compensation are guaranteed. The process involves customer filing a refund request which the authorized staff then examines and approves. Once you get the approval, the payment must be reconciled in QuickBooks to ensure that the amount reimbursed is the same as the initial transaction. After the reimbursement is processed on time, the consumer is informed in full via email. This maintains transparency and confidence. QuickBooks lets a smooth refund management process that lets businesses to maintain both financial accuracy and customer happiness.
Refunding a payment
When refunding a payment in QuickBooks, reversing the associated transaction, updating financial records, and guaranteeing an exact reconciliation of the refunded amount are essential. Initially, you need to find the original payment transactions in QuickBooks and select the suitable refund processing option. Accounting changes must be made when the refund is started, so that the financial records reflect the refund properly. You further need to check that the updated transaction information matches the financial statements. Businesses can guarantee accuracy in the financial records and transparency in their refunding processes by following the protocols.
In order to get the accuracy of the financial reporting and maintain clean financial records, one needs to accurately record and categorize refund in QuickBooks.
The above-discussed steps were related to recording a refund in QuickBooks Desktop. Let us now check out the steps that discuss how to refund a customer in quickbooks online.
Customer refund if invoice has been paid
Here is how to issue a refund in QuickBooks. Let us have a look:
Step 1: Enter a credit memo
Begin with by simply selecting +New tab and choose Credit memo
Once done with that, select the right customer in the customer field
You now have to enter the credit memo date, amount, tax, and product/service.
It should be noted that in case you choose an inventory item, then QuickBooks will put it back into inventory. In case the item is defective or if you do not wait it added back to inventory, then make an inventory adjustment.
The last step is to choose save and close tabs.
In case the customer has overpaid, then you d not need the credit memo as you will already have an unapplied credit that acts as your credit memo.
Step 2: Make a refund
Here you simply need to choose + New and then go for expense
After that, in the payee field, choose or enter the desired customer.
Furthermore, in the payment account field, choose the bank the money is being refunded from.
Also, in the category field, choose the debtors account.
And in the amount field, enter the amount of the refund.
The next step is to choose the appropriate tax in the tax field.
Choose save.
And also, head to + new and select receive payment.
After that add the customer and choose payment method and deposit to.
The balance should be 0 as they will cancel each other out.
You now need to choose save and close
In case you have online banking, head to transactions and then bank transactions.
Also, match the record you found.
Refund for goods or services that didn’t satisfy the customer
You can make use of refund receipts, in case a customer asks for a refund for an item or service. In case they used a credit card, then you can perform the steps related to refunding a credit card payment. It should be noted that, in order to avoid a double refund, ensure that you haven’t already entered a credit memo yet.
At first, choose new
And also, go for refund receipt or give refund.
The next step is to choose customer dropdown and then opt for customer you wish to refund.
Now, go for refund from drop-down and then choose the bank you deposited the payment for the invoice to.
After that, add all products or services the customer returned in the product/service column.
And then, ensure to fill the date, quantity, rate, amount, sales tax, and other fields.
Once done with that, choose save and close
Refund a customer’s overpayment or credit
One can record a refund to the customer using check or expense, in case:
They want to redeem their open credits
They made a prepayment for an older but canceled it before receiving the goods or services.
They wish to reimburse an accidental overpayment
Making use of a check or expense to record the refund reduces the bank’s balance and offsets the customer’s open credit, overpayment, or prepayment.
Step 1: Record the refund for your customer
You need to first choose +new
After that, opt for expense, add expense or check.
In case you are in a business view, follow the steps to switch to accountant view first.
Now, choose the customer you wish to refund from the payee dropdown
And then, from the payment account dropdown, select the bank account where you deposited the overpayment to.
On the first line of category column, select accounts receivable.
After which, you need to enter how much you want to refund in the amount field
The next step is to enter in other field as you see fit, and choose save and close.
Step 2: Link the refund to the customer’s credit or overpayment
The very first step is to choose +New tab
And then, select receive payment
Also, choose the same customer you used for the check or expense when recording the refund
Enter in the details
And in the outstanding transaction section, go for the checkbox for the expense or check you created when recording the refund.
It should be noted that in case you have automation to apply bill payments turned on, then this step is done for you.
Ensure that the payment is equal to the open balance, and choose save and close.
Recording a customer refund in QuickBooks isn’t a tough nut to crack. We hope that the information shared in above might be of some help in recording refund in QuickBooks successfully. However, in case of any queries, or if you are unable to record refund even after performing the steps above, then in that case, consult our technical support professionals right away by dialing our technical support number i.e., +1-844-499-6700. Our support professionals will provide you with instant guidance.