If you have been using QuickBooks accounting software for a while now, you understand very well how crucial the company file is. And there can be endless errors that can corrupt your company file and leave you in dilemma of losing your crucial data. And to save your crucial data and time, Intuit offers a quick solution i.e., backing the company file. Taking a backup of QuickBooks is even more essential, if you open QuickBooks on a regular basis and perform various accounting and bookkeeping tasks daily. But how to take this backup? Well, you don’t have to worry much, as we have curated this segment, sharing the detailed overview of the steps involved in creating a QuickBooks backup of the company file.
Thus, if you are keen to unleash the complete set of steps that can be performed to create a QuickBooks backup of the company file, then in that case, stick around to this piece of writing, and towards the end of this article, you will be able to successfully create a backup of the QuickBooks company file. On the contrary, if you find the process a bit tedious and want some professional guidance in creating a backup successfully, then our QuickBooks support team is available at your service. You just need to ring us up at +1-888-510-9198, and leave the rest on our team of professionals. Now that we have talked about professional guidance, let us continue with the procedure to create a backup company file in QuickBooks.
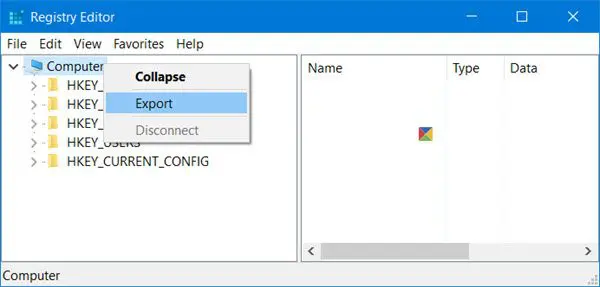
Steps to Create a Backup of your QuickBooks Company File
Note: Just in case you don’t need a complete QuickBooks backup and are just looking forward to moving certain accounting data only, then try performing the steps to create a portable company file. Not just that, if the backup copy is in a compressed file format, it is suggested to use the restore wizard to bring the data back into QuickBooks. And avoid using the copy command from windows. Let us explore the steps involved in creating a backup of the company file successfully:
Step 1: Set up Automatic QuickBooks Backup
The process to create a company file backup becomes much easier with the help of the option to set up automatic QuickBooks Back up. The steps you can carry out in this process are as follows:
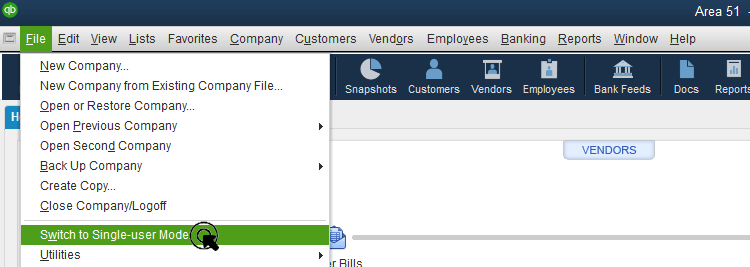
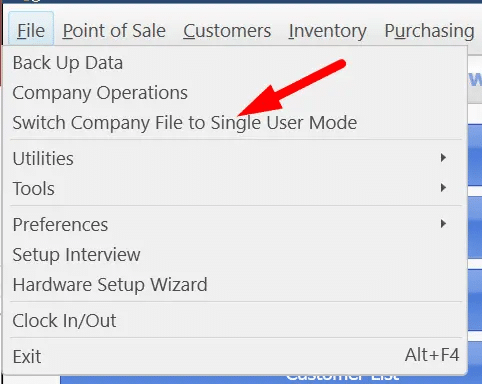
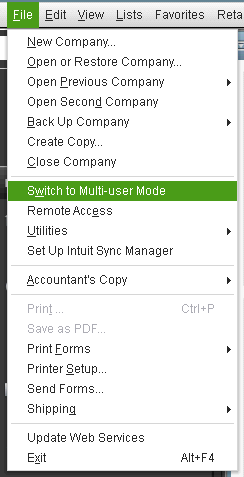
At first, open the file menu and switch to single user mode.
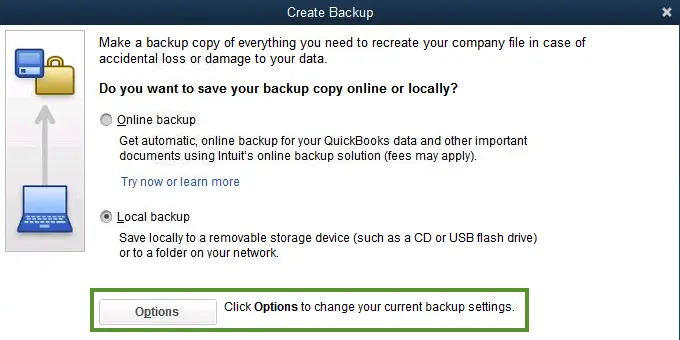
Go for the save copy or backup company and further create a local backup.
Once you have selected the backup copy, click on the next tab.
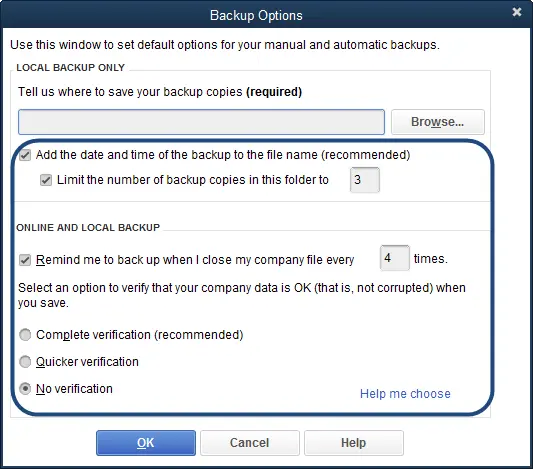
And further, choose options to set up the backup defaults and click on the next tab.
Look for and note the date and time of the file backups to determine the files.
Also use the checkbox to limit the number of backup copies and put a number to cap the number of backups created for every company.
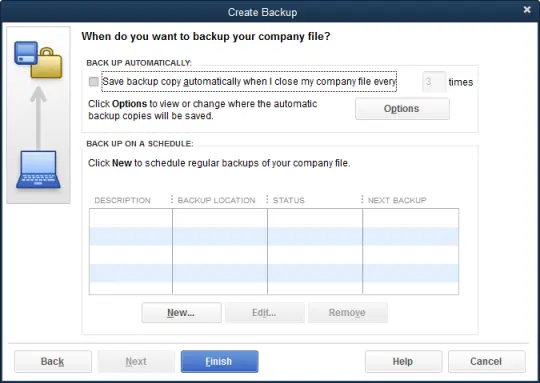
Once done with that, click on the checkbox to remind me to backup when I close my company file every time so as to receive reminders for creating backups and set a frequency.
Click on options for verifying the data before saving the changes.
Skip the steps to ensure that the process ends faster, but we recommend you to enable it to ensure that you get the alerts whenever damage is spotted.
After the backup options window appears on the screen, make sure to click on browse and go for the location to store the copy.
You are then supposed to choose the option to change location tab or use this location, and click on next tab.
Click on the option save it now and schedule backups for future and click on next.
Select the option stating save backup copy automatically when I close my company file every time.
Enter a number and click on finish in the field.
Step 2: Set up Scheduled QuickBooks Backup
Often setting up scheduled backups helps in timely backing up the company file and eliminates the risk of losing the crucial data. The steps involved in this particular process are as follows:
The process requires you to open the file and further click on save copy or backup.
You will then see a backup wizard on your screen.
Once done with that, go for the backup copy option and click on the next tab.
Now, head for the options tab so as to set backup defaults and click on the next tab.
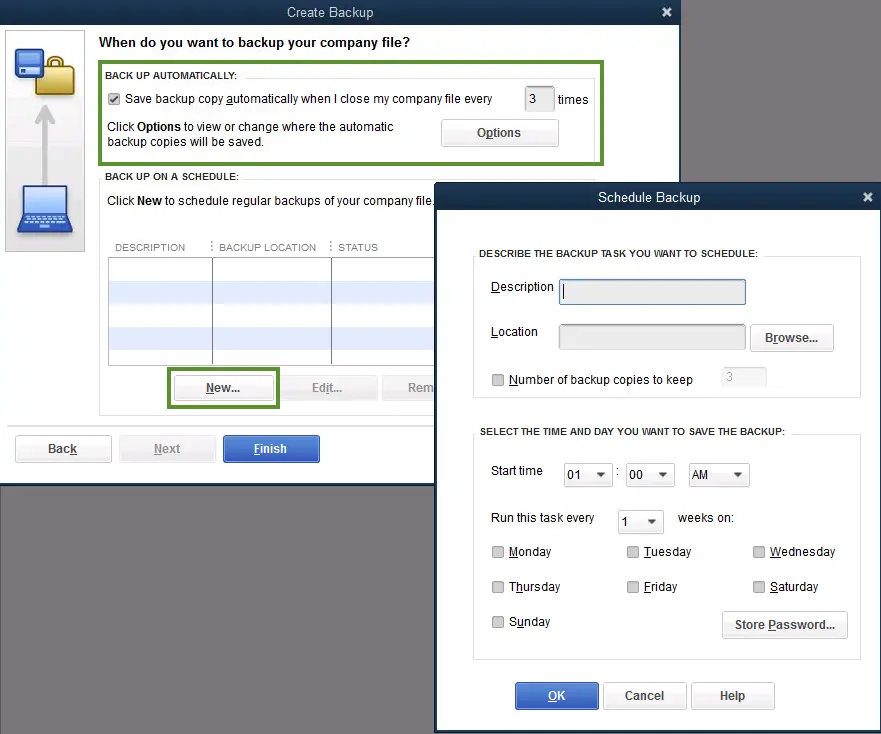
You are then supposed to click on the only schedule future backups and click on next tab.
The step ahead requires you to move to the backup on a schedule section and click on the same.
Moving forward, enter a description for the schedule backup that you are creating.
And further look for folders where you want to save your backup copies.
Click on the number of backup copies to keep the checkbox and also enter a number.
Now, click on store password and also go for the store windowspasswords.
Enter the required login details.
And further select the date, weekly frequency for the backup.
Often you might skip the part of backing up the data, due to the occupied schedule. However, setting up backup reminders can definitely help in saving you from such situations. Try performing the steps below, to set up QuickBooks backup reminders. Let us explore:
Begin the process by heading to the file menu.
Select save copy or backup.
Click on the next option.
And then, you need to click on the options tab.
Once done with that, you will see a pop up asking for the location to save the files, make sure to choose the right location and save the file successfully.
Select the remind me to backup option when closing data every time and further provide a number in the field as you might require.
Select add time and date of the backup to the file name box and click on ok tab.
Step 4: Backup the company file manually
If you are comfortable in backing up the company file manually, then try performing the steps enumerated below:
Initiate the process by heading to the file menu and further go for switch to single user mode.
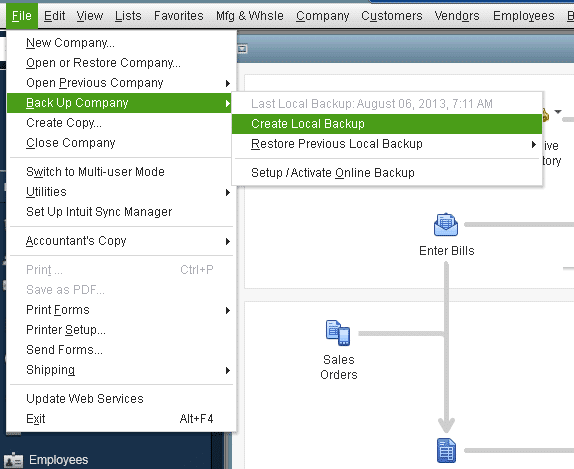
Navigate to the file menu again and further hover over the backup company.
Once done with that, select the create local backup option.
Also, go for the local backup option and click on the next tab.
In the local backup only section, choose the browse option and select the location for saving the backup.
Set the number of backups that you wish to keep.
Furthermore, make a note that this step is not a compulsion.
We recommend you to set backup reminders using the options in the online and local backup section.
Not just that, run a test to ensure that the backup file is in good shape.
Hit the ok tab.
And ensure that you click on the save it now option and also click on next.
To see when you last backed up the company file, make sure to navigate to the file menu and hover over the backup company. This will show up the time and date option, where you can see the details. To make any changes to the backup preferences, continue with the steps below:
Simply start off by selecting the file and head to the backup company.
You now have to click on the create local backup option.
Once done with that, choose the options tab.
Make necessary changes and click on ok tab.
Have a backup company file that you can use to restore the QuickBooks company file.
This file has a .qbb extension at the end of the file name.
If you keep the backup company files on an external device or hosting service like box, then you might need to remove them to the local hard drive first and then perform the steps to restore. It should be noted that in case QuickBooks finds the company file with the same name in folder, then QuickBooks will ask whether to replace the existing file or not. In such a scenario, it is recommended to avoid replacing it, as the existing file might get erased.
Step 6: Make use of express start method
You can try using the express start method with the help of the steps enumerated below:
Start off by creating a company file and further click on the express start.
You now have to enter the required information in QuickBooks setup.
Once done with that, select the option to help me choose to see a description for every business type.
Preset chart of accounts that will be created as per industry.
You now have to click on create company.
Furthermore, create a chart of accounts, customers, and services, once you create the company file.
This step can also be done later by selecting the start working option.
Restore the backup settings in QuickBooks
You can try restoring QuickBooks company file, after taking the backup of the company file. Note that the file will have a .qbb extension at the end of the name. In case you back up the company files on an external device or a hosting service like box, then you will be required to move them to the local hard drive first before restoring.
Your company file is one of the most essential elements, and of course you wouldn’t want it to be hampered in any manner. This is why timely backups are something we professionals recommend. Now that you know what steps you need to implement to create backups successfully, it is time to make use of these steps and roll in with the process. On the contrary, if you feel the need of professional assistance at any point in time or if you get stuck when performing the steps above, do not hesitate to call our tech geeks right away.
Our certified QuickBooks professionals are just a call away. Ring us up at +1-888-510-9198, and let the professionals guide you through the process.
FAQs Related to Creating Backup of QuickBooks Company File
How do I backup my company file in QuickBooks online?
For this: 1. Move to Settings ⚙. 2. Choose Back up company. You would have to sign in with Intuit account, then choose Authorize to proceed. 3. After that choose the User menu. 4. Pick where you want to save your back up. 5. Perform the steps to allow QuickBooks to create backups.
Where do I save my QuickBooks company file?
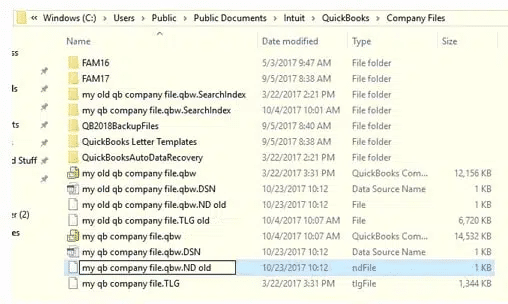
It should be noted that the default location for a QuickBooks Desktop company files is: C:\Users\Public\Public Documents\Intuit\QuickBooks\Company Files.
How do I manually backup QuickBooks?
In order to manually backup QuickBooks, you can perform the steps below: 1. Head to the File menu 2. Choose Back Up Data. 3. Specify the backup location: Go for Default Location to backup to the default folder on your local drive. 4. Further, choose Specify Alternate Location to backup to a network or removable drive. 5. Pick Backup then Finish.
Why can’t I backup QuickBooks?
QuickBooks at times can fail to back up the company file, if the backup path is unavailable. You can further check the backup location drive or directory before starting the backup task.
You can abruptly bump into QuickBooks error code 6210, 0, and it is potent enough to disrupt your smooth working experience. Be prepared for such an error when trying to either update your software or when cleaning the junk files. If you are devastated with the thought of getting such an error, we are here to help you. We have drafted this segment in a way to let you culminate this particular snag from its root cause by simply performing some basic set of procedures.
Dicey about implementing the procedures on your own? We have a solution for that as well. Just grab your phone and give us a call at +1-888-510-9198, and our certified QuickBooks ProAdvisors will cater you with tailor-made solutions. Having said that, let us together explore the QuickBooks error code 6210, 0 in detail!
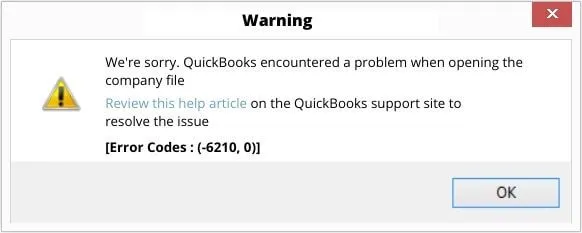
To eliminate the error permanently, it is crucial to understand what it is all about. Talking about, QuickBooks error code 6210, 0 is basically a 6000 series error, which related to the core element of QuickBooks i.e., the company file. You can see a warning message on your screen that states:
“We are sorry. QuickBooks encountered a problem when opening the company file. Review this helpful article on the QuickBooks support site to resolve the issue. Error codes: (-6210, 0)”
Upon checking out the article provided on the error notice, one can conclude that the error falls under a group that arises due to the same thing i.e. “A computer that is not the server is hosting the company file”
You may happen upon this particular glitch when performing tasks in multi user mode in QuickBooks. Moreover, this particular error can be expected when the download process of the QuickBooks software is corrupted. There are possible reasons that can drag you into this glitch in QuickBooks. To explore what reasons can be behind the occurrence of this issue, stay hooked to this segment carefully.
What operating systems can expect QuickBooks error code 6210, 0?
You can bump into such an error, if you are using any of the below operating systems:
Windows 7
MS Windows 8
Windows 10
MS Windows XP
Windows ME
Windows Vista
What can trigger QuickBooks error code 6210?
You can expect this particular error in QuickBooks due to a bunch of factors. One of the basic triggers can be corrupted download of QuickBooks accounting software. There are a couple of other errors as well, which include:
Be prepared to come across this issue when any alteration is done in QuickBooks.
Expect to experience such an error if the windows registry is corrupted.
You can also come across a similar issue if there is any sort of malware infection.
If you have mistakenly deleted any QuickBooks related file, then be prepared to bump into this error.
Signs and Symptoms of QuickBooks error code 6210 0
Identifying such an error in QuickBooks becomes easy, once you have a basic knowledge about the signs and symptoms of the same. Let us find it out:
If your system is freezing repeatedly for a couple of seconds, then this particular error might appear on your screen out of nowhere.
Not just that, if your system crashes again and again when running the same program, then it is a hint that you might land into this particular error.
The error code itself popping up on the screen is one of the clearest identifiers.
Be ready for this issue, if your system is running sluggishly when opening the same window.
Points to remember
Before you get onto the procedures to eliminate the error code 6210, 0 in QuickBooks, don’t forget to check out the QuickBooks error code 6210.
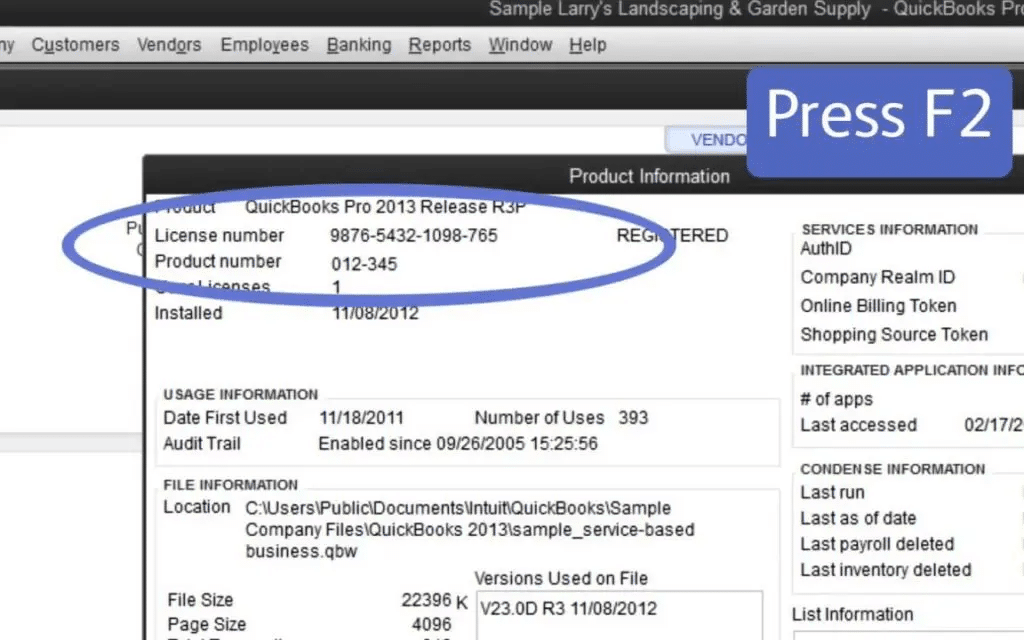
Check if the hosting is turned on. This can be done by pressing F2 and then searching for the local server information. Ascertain that the hosting is turned off before you jump onto the fixation procedures.
Try renaming the .ND and .TLG files and then proceed to run the QuickBooks database server manager from the QuickBooks tools hub.
Troubleshooting Procedures to Eliminate QuickBooks error 6210, 0
Getting rid of various errors is easy in QuickBooks, as you have some basic fixes for every error associated to QuickBooks and the same applies with QuickBooks error code 6210. Let us evaluate each of the procedures that you can try implementing, in order to culminate this company file error easily.
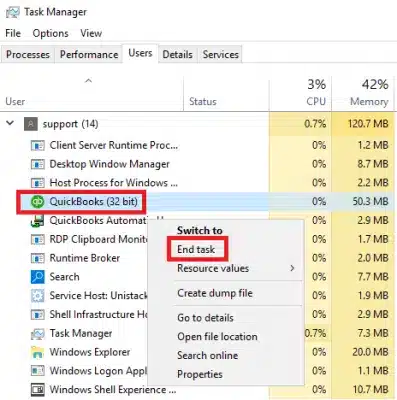
Technique 1: End conflicting programs
Often some background procedures can hinder the smooth running of the software and also trigger such errors. Thus, it is a quick solution to end those unwanted processes that turn out to be conflicting by following the below stated guidelines. Before heading forward, it is important to keep in mind that programs with mismatched APIs usually generate runtime errors.
Start off by pressing Ctrl + Alt + Del together and this would open up the task manager.
You will now see a list of programs that are running in the background.
There, you will have to proceed to the processes tab and terminate each of the programs one by one and click on the end process option.
And this would turn down the error to a certain extent. Check if the error gets eliminated or not, or else proceed to the procedure ahead.
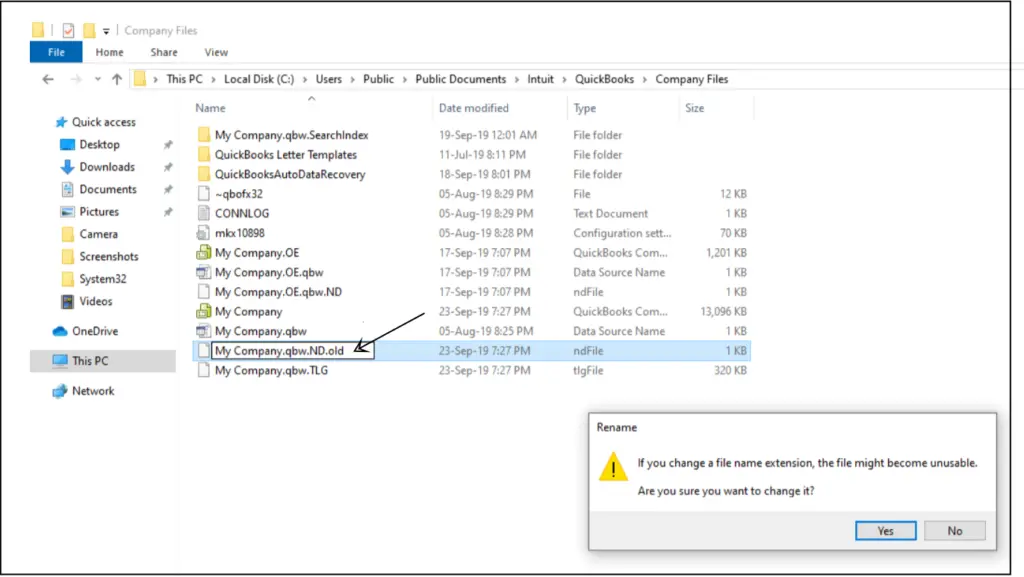
Technique 2: Configure .ND and .TLG files (Single user mode)
In some situations, renaming the .ND and .TLG files in single user mode can help in eliminating the error up to certain extent. The steps you need to implement in this process are as follows:
You need to first move to the folder having the QuickBooks installation directory and open it.
Followed by locating the corresponding network data and transaction log file.
Right click the .nd file and select the rename tab.
You now have to add .old at the end of the extensions.
Perform the same steps for the .tlg file and rename it.
Create a new folder on the desktop and then move QuickBooks file to the newly created location.
Towards the end, open the QuickBooks and company file from a newly created folder on the system’s desktop.
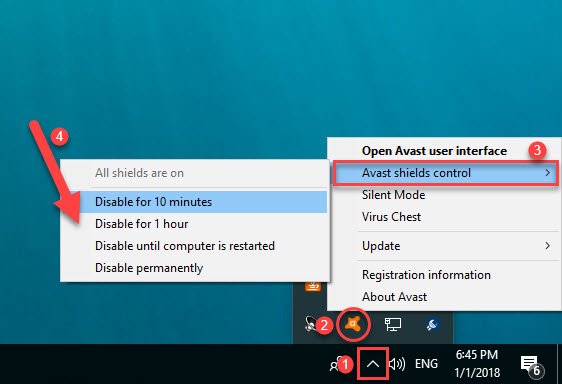
Technique 3: Disabling the antivirus and antimalware software
Have you ever experienced errors due to antivirus and antimalware software? Well, often this third-party software can trigger unexpected errors, which include the error code 6210, 0 as well. You can try to disable the antivirus and antimalware software by performing the essential steps. This software might pose a threat to the company files and might not let you access the financial data. It is suggested to check the virus vault to get a grip about the files that are quarantined and then terminate them.
Technique 4: Download and Launch QuickBooks database server manager
You can try performing the below set of steps to download and set up the database server manager, as it might help you culminate such an error in QuickBooks with much ease. The steps to be performed in this particular process are as follows:
Begin the process by simply downloading the QuickBooks tools hub from the website of Intuit, and further navigate to the downloads by pressing Ctrl + J.
You are then required to click on the QuickBooksToolshub.exe under the downloads list.
Once done with that, click on the yes tab and allow this app to make changes.
Moreover, click on next to install it and further click on yes to accept the license agreement.
You now have to tap on to the finish tab.
Followed by opening the tools hub program.
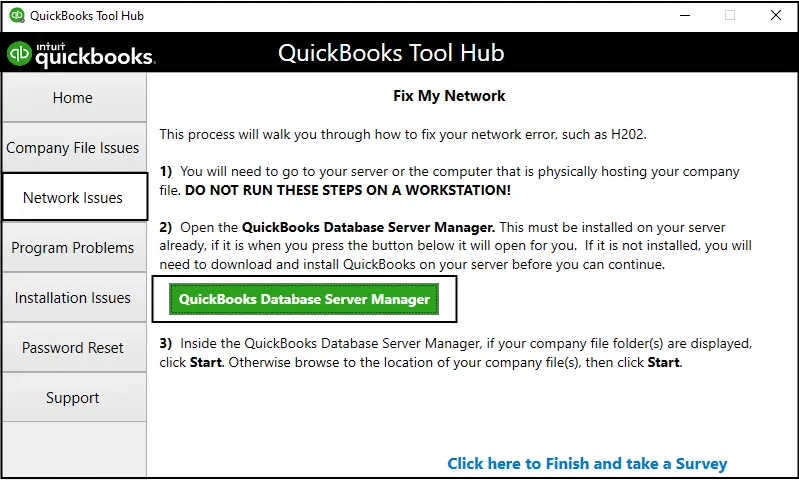
Heading forward, click on QuickBooks database server manager under the network issues.
Scan the company file location
Under this process, you need to move to the scan folders tab.
You now have to tap on browse and go for the folder that stores the company file.
To conclude, click on the ok tab and also click on the start scan option.
There can be situations when your company file location can be a reason behind the occurrence of some issue. In that scenario, you can try copying the company files to desktop by carrying out the set of steps enumerated below:
Right click the desktop screen and navigate to the new tab and folder option respectively.
Once done with that, click on the current company file location.
You are then required to right click the company file and go for the copy tab.
Open the new folder and right click and choose paste tab.
You now have to press ctrl key and ensure to now leave the ctrl key till the no company open window opens up.
Pick the open a company file option and click on the next tab.
You are then required to browse to the desktop file copied in a new folder.
The last step is to click on the open tab and check if the file is opening or not.
Technique 6: Update QuickBooks desktop
Using an outdated QuickBooks version can land you into some sort of technical glitch for sure. Thus, never miss any update of QuickBooks to avoid any such errors in QuickBooks. The steps to be continued for the process to update QuickBooks desktop are:
Open the QuickBooks desktop first.
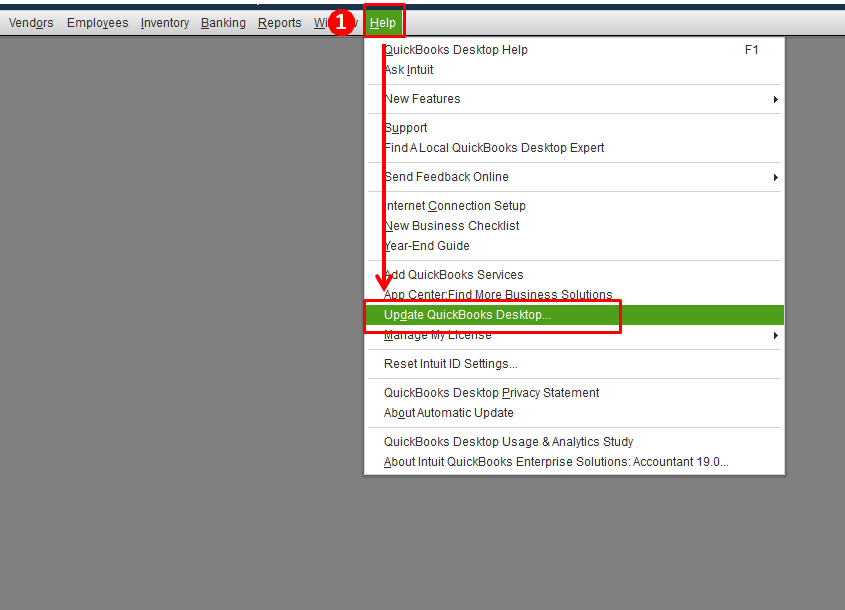
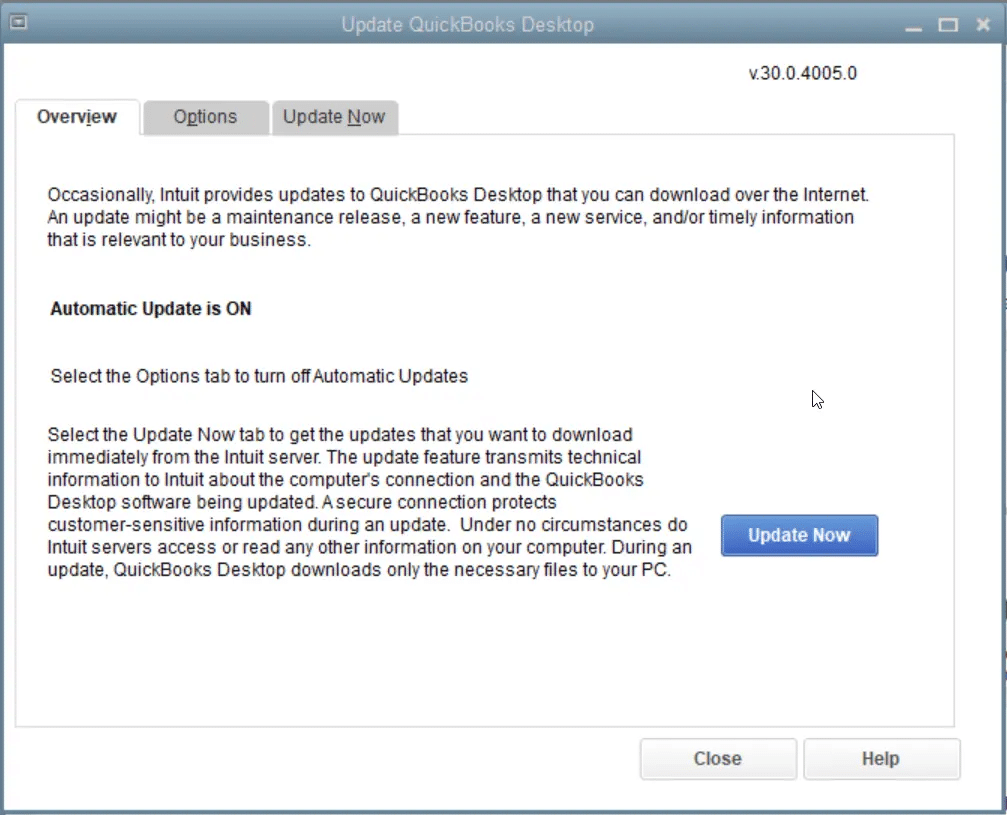
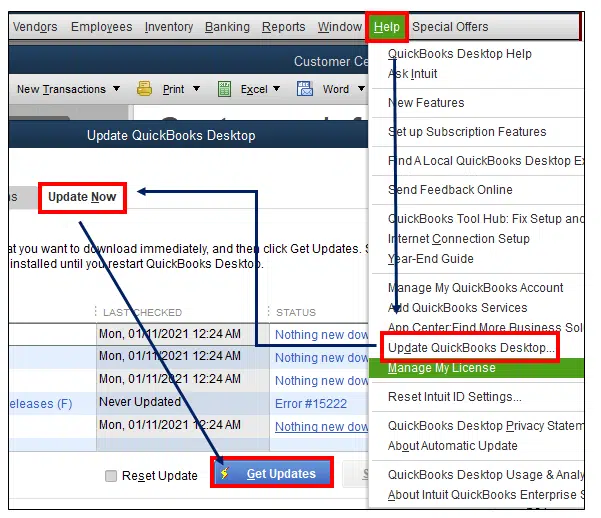
Followed by navigating to the help menu and selecting the update QuickBooks desktop option.
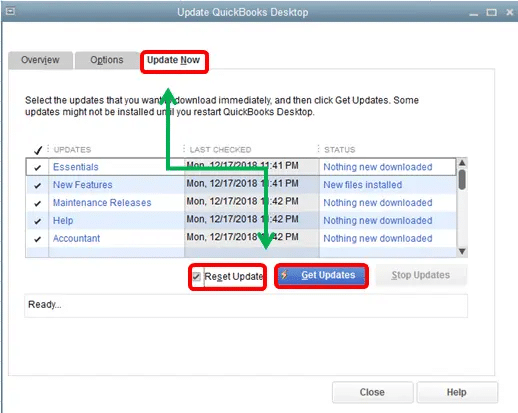
You now have to click on the update now tab present in the top right corner.
Heading forward, check on reset updates tab and click on get updates.
To conclude, try closing QuickBooks once the update is complete.
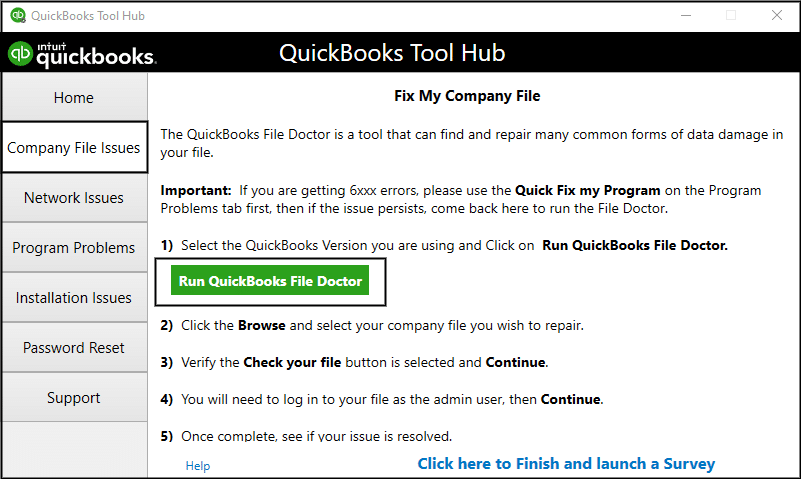
Many errors in QuickBooks are associated with the company files and other QuickBooks related files. Thus, to help in eliminating these errors, you are backed by the QuickBooks file doctor tool. This tool is designed in a way to culminate all the files related errors and get QuickBooks back on track. The steps involved in this procedure are as follows:
To begin with, you need to download QuickBooks tool hub first.
Later on, navigate to the downloads folder by pressing ctrl + J.
Once done with that, head to the downloads list and click on QuickBooksToolsHub.exe.
You now have to click on the yes tab to allow the app to make changes.
Followed by selecting the next tab and also installing it.
Click on yes for accepting the license agreement.
And furthermore, click on the finish tab after the installation is complete.
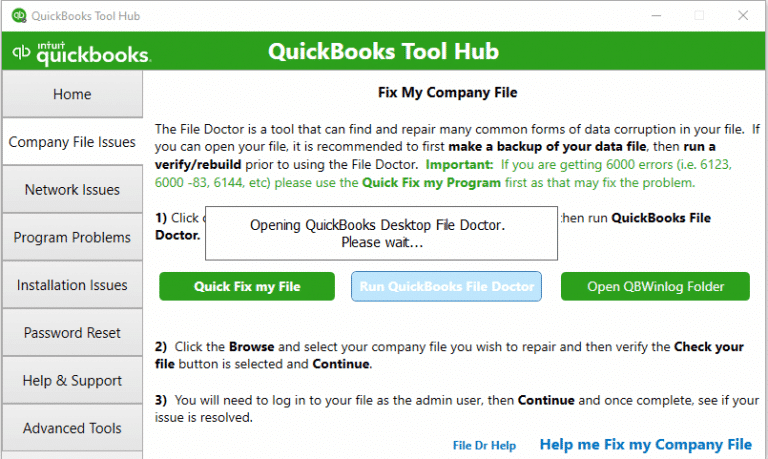
You now have to open the QuickBooks tool hub and head to the company file issues tab.
There you will find the QuickBooks file doctor, from where you can run it.
Let the tool diagnose the errors and perform the necessary set of procedures to uproot the error.
Technique 8: Restoring the backup files
Trying to restore the backup files is a proven method to culminate the error in QuickBooks. However, it is important to ensure that you restore the most recent backup. The steps you can perform in this procedure are as follows:
Begin the procedure by closing QuickBooks.
You now have to press ctrl key when waiting for the no company open window.
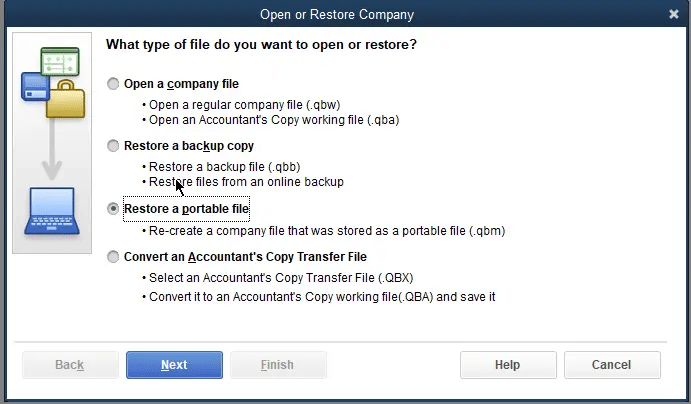
Another step is to click on the open or restore an existing company tab.
And furthermore, click on the next tab after picking the option to restore a backup copy.
Followed by restoring the most recent backup by performing the necessary steps appearing on the screen.
Try opening the software and accessing the file to check if the error has culminated or not.
Technique 9: Install and use QuickBooks clean install tool
Reinstallation of QuickBooks using the clean install tool eliminates all sorts of errors and bugs prevailing. The steps to be performed in this process are as follows:
Step 1: Uninstall the QuickBooks software
To uninstall the QuickBooks software, you can perform the set of steps enumerated below:
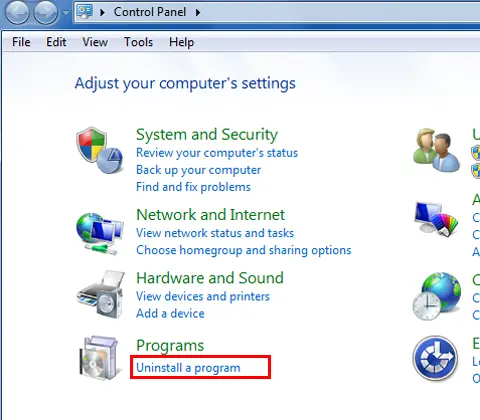
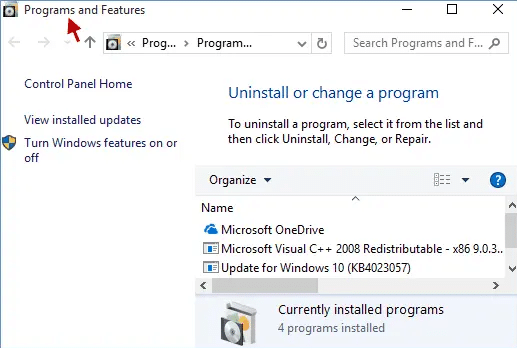
Click on the win + R keys to open the run command box, type control panel in search bar and also click on ok tab.
Go to the programs and features option and select uninstall a program option.
From the list of all the software, click on QuickBooks desktop and press uninstall, follow the prompts on the screen to complete this step.
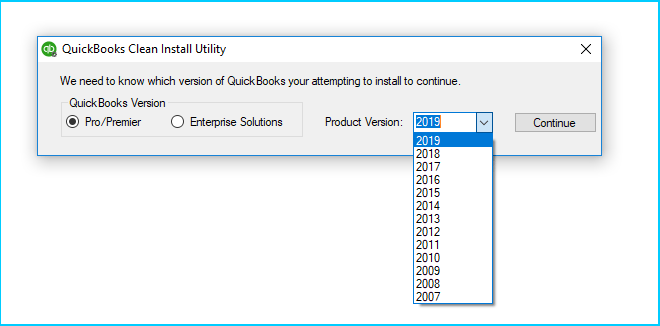
Step 2: Use QuickBooks clean install tool for windows
Download the QuickBooks tool hub from the official website of intuit.
Furthermore, head to the location of the file where the download is saved and perform the onscreen prompts.
Click “I accept” tab to complete the installation process and you are ready to open the QuickBooks tool hub from the desktop.
You now have to click on the clean install tool after selecting installation issues.
Select the QB desktop version which was installed previously on the system and further click on continue tab.
Wait to receive the message please install your copy of QuickBooks to the default location on the screen and press ok tab to complete this step.
Step 3: Re-install the QuickBooks software in the system
Insert the QuickBooks installation CD on the CD drive and perform the onscreen instructions.
Dumping off errors in QuickBooks is crucial to let it work smoothly and perform the accounting and bookkeeping activities without any interruption. On a conclusive note, we believe that the steps and procedures enumerated in this piece of writing will be of some help in culminating the error code 6210, 0 from its root cause. On the contrary, if you come across similar issue even after performing the same set of steps, then in that case, feel free to connect with our QuickBooks tech support team at +1-888-510-9198, and they will get back to you with the strongest and most effective solutions to make your software error-free.
QuickBooks Error code 6210, 0 belongs to the 6000 series error and is also known as multi-user mode error. You can experience this issue in case of Incomplete or corrupt installation, malware infection, data damage, corrupt Windows registry files, etc.
Does damaged file extension cause QuickBooks error 6210 0?
Files like .ND and .TLG files in QuickBooks if get damaged for some reason can trigger such an error in QuickBooks.
Why does QuickBooks error code 6210 0 happen?
You can experience this issue if the installation of QuickBooks gets corrupted, or if the network data file and transaction log file get damaged. Also, be ready to face the issue if there is any sort of malware infection in QuickBooks.
When I launch QuickBooks I get Error 6210 0. What to do?
This error is QuickBooks falls under the group of several others where “A computer that is not the server is hosting the company file”. You can try renaming the .Nd and .TLG files, or can use the database server manager. Or in case you are unable to rectify it, reach out to our QuickBooks Technical Support Team.
Random errors in QuickBooks can be extremely annoying but are commonly experienced. These errors often downsize the productivity of the software, which makes it unavoidable for the users to either implement the necessary steps to shun off these technical snags or join hands with some professionals who can help in tackling such issues. Of late, many QuickBooks users have reported the QuickBooks payroll error 2002. This error is basically experienced when you or any other user try to create a new data file, but unfortunately failed to do so during the payroll. You can also get redirected to such errors, when trying to create a company file during the use of QuickBooks payroll.
You might have noticed that you get a PIN when creating a company file in QuickBooks payroll, and at that time, if you enter a wrong password or PIN in the PIN section, then the probability of getting the same error is quite high. The factors triggering such technical glitches in QuickBooks can be identified easily and can be eliminated as well. We have drafted this piece of writing with the intention of providing you with the complete insight into the QuickBooks error code 2002, the basic triggers, and of course the quick fixes you can implement easily. On the contrary, if you feel the need of professional guidance at any point in time, then in that scenario, do not hesitate in contacting our technically sound QuickBooks ProAdvisors at +1-888-510-9198, and let them help you with all your clouds of confusion.
Possible Triggers to QuickBooks payroll error 2002
Getting errors in QuickBooks is common, but every error is instigated by some or the other factor. So, here are some possible triggers for the QuickBooks payroll error 2002. Let us evaluate:
One the most common factor that can drive such error in QuickBooks is if the security certificate itself is invalid.
Another possible trigger can be if you are trying to send the payroll data while in multi-user mode.
Be prepared to experience a similar issue if the network time out occurs hindering the connection with the server.
The probability of experiencing an issue is higher when the internet security and personal firewall software settings are not compatible to let the download happen.
If your system’s date and time is set incorrectly, then there are chances that you land into such typical errors.
Points to Remember
You are suggested to go through the below pointers before performing the tasks to eliminate the issue permanently.
Ensuring that the PIN is between 8 to 12 characters is crucial.
Further, the PIN should be a combination of at least one letter and one number.
Another essential point to be considered is that the PIN is case sensitive, make sure to check if the CAPS lock and the num lock is off when you enter the pin.
Not just that, make sure to request for payroll transaction.
You can try eliminating the QuickBooks payroll error by performing the steps enumerated below:
Measure 1: Clearing the Cache
Often the junk files and cache data can trigger some technical glitches, in that case, it is an ideal way to perform the basic steps to clear the cache and get rid of the errors easily. The steps that can be implemented for this process include:
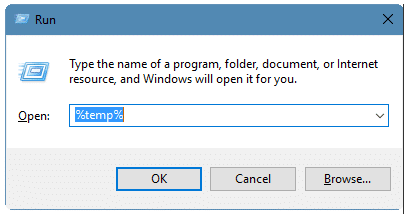
Initiate the process by closing the QuickBooks desktop software and all other programs running on the system.
Furthermore, you need to press the windows + R key and enter run in the search bar.
Later on, type %temp% in the run window and hit the enter tab respectively.
You will now witness a new window opening and showing the temporary files.
Here, you will need to select all the files and folders in this window and also click on the delete tab.
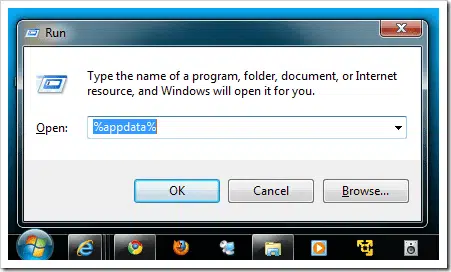
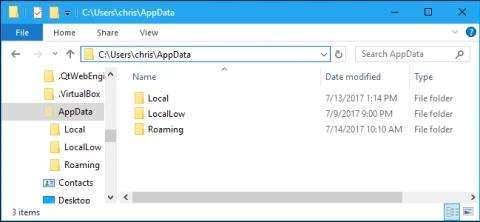
The next step in the process is to press the windows key and enter appdata and hit the enter tab.
Followed by heading to the AppData window, where you need to open the local folder and delete the intuit folder.
Reboot the system and open QuickBooks again to check if the error gets eliminated or not.
Measure 2: Reboot Database Manager Service on the sever system
Simply rebooting the database server manager service on the server system can shun off such errors in QuickBooks up to certain extent. You just need to perform the below steps to reboot the service and you are good to go.
Simply start off by press windows key + R key simultaneously
And this would open the run dialog box.
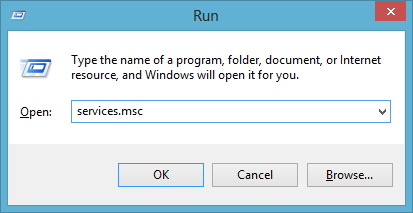
You now have to enter the services.msc in the box and hit the enter tab to open the services window.
Scroll down to find the QuickBooksDBXX service.
And further, right click the QuickBooksDBXX service and hit the restart tab from the context menu.
Wait for the service to reboot and further close the services window.
Now, open the QuickBooks software and try accessing the company file again to see if the error has been eliminated or not.
At times, your QuickBooks software itself gets damaged, due to which you might land into some glitches. A simple solution for this is to perform the steps to repair the QuickBooks software. Let us check out what steps can be performed to do so:
Begin the procedure by closing the QuickBooks software and all other programs running.
Furthermore, make sure to press the windows key and also enter the control panel in the search bar.
Click on the control panel from the search results.
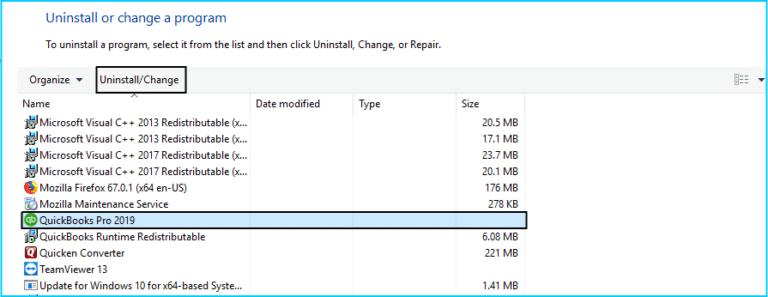
And then, in the control panel, choose programs and features or uninstall a program, depending upon the version of the windows.
You will now have to locate QuickBooks in the list of programs, right click on it and choose change or uninstall/change.
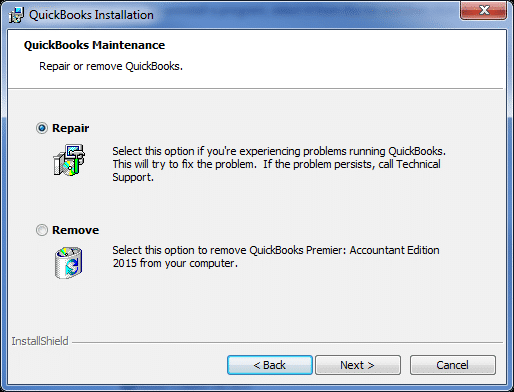
In the QuickBooks installation window, choose repair and click on the next tab.
You are then required to perform the onscreen instructions to complete the repair process.
Measure 4: Make use of the repair utility
Try using the repair utility by performing the below discussed steps and this might dump the QuickBooks error code 2002 up to certain extent. Let us have a look:
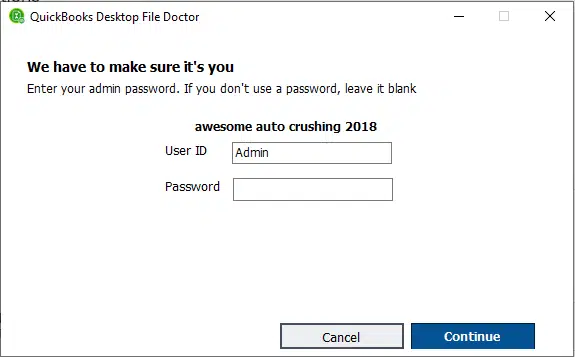
Launch QuickBooks as admin by simply using the admin ID and password.
You are then supposed to download payrollsubini.exe and run it in the system.
Followed by clicking on the repair utility tab to run the utility.
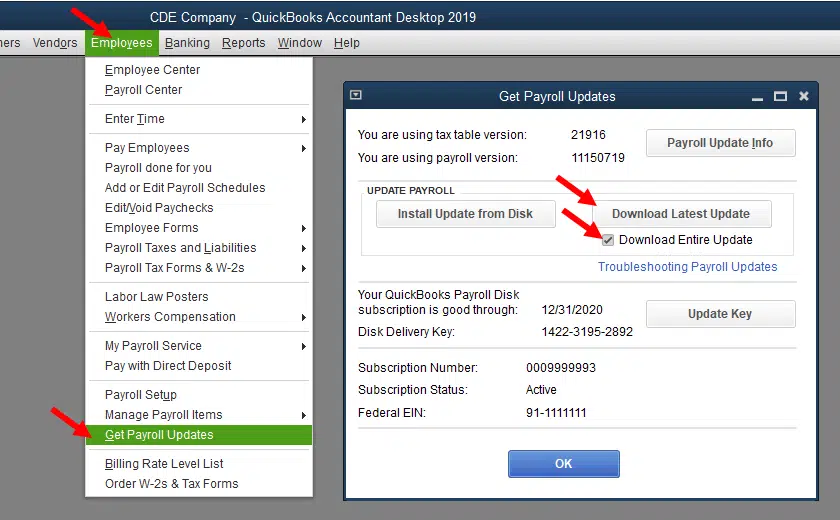
Check for the available payroll updates and perform the steps including:
Moving to the employees tab and clicking on the payroll updates tab.
Update the software
Click on the ok tab
Close and reopen the QuickBooks software to check if the repair utility works.
This is a basic solution that you can try implementing, in case you are entering an incorrect pin for using the QuickBooks payroll. Try re-entering the Pin and also can create a new Pin to fix the issue. When you enter your pin, make sure that the characters are within 8 to 12 characters.
Measure 6: Use QuickBooks file doctor tool
When none of the above steps help in getting rid of this issue in QuickBooks, try making use of the QuickBooks file doctor tool. This tool is designed in a way to get rid of all sorts of company file related errors that one might come across. The steps to be performed in this process are as follows:
Kickstart the process by downloading the QuickBooks tool hub in the latest version.
Followed by installing the same from the file saved after the first step.
Agreeing to the terms and conditions is another step in the process.
You will then have to look for a tab stating company file issue after you open the QuickBooks tool hub.
Once you have identified the error and know what measures can be taken to eliminate it, it becomes easy to get rid of such issues and bring your software back on track. However, there can be situation that you might not be able to tackle through the issue even after performing the solutions illustrated above, in that scenario, the only sensible solution is to get in touch with a professional who can help you with the fixation of the error and has sound knowledge related to the software. You can directly get on a call with our technically sound QuickBooks professionals at +1-888-510-9198, and they will help you with all sorts of QuickBooks associated problems. Feel free to contact us, as we are just a call away for your assistance.
Trying to update QuickBooks, but ended up in a random and vague error message. Does this sound relatable? QuickBooks Update errors are one of the most common sorts of errors experienced by QuickBooks users. One such error is QuickBooks error 12045. These errors often hinder the smooth working of the software and can freeze it for a couple of seconds. Delay in work is something that frustrates us the most, due to this it becomes crucial to tackle such errors as soon as possible. And to make the procedure of tackling update errors in QuickBooks like the error code 12045 easy, here we are with this section of our writing, sharing the crucial procedures that can help you in dealing with this update error successfully.
Just in case you are interested in learning the methods that can help you eliminate QuickBooks update error 12045 and bring your software back to normal working mode, then make sure you scroll through the entire segment. However, if you are in a hurry and do not want to perform the fixation procedures on your own, then in that case our certified QuickBooks ProAdvisors are here at your rescue. You can simply give us a call at +1-888-510-9198 and let our technically sound QuickBooks experts help you with all sorts of QuickBooks related queries. Having said that, let us delve in deep to understand the QuickBooks error code 12045 in detail!
Simply going through the causes and fixes won’t help until you have a little knowledge about what this error code is all about. So, here is a quick view about this error code 12045. This error can be experienced when you try to update the QuickBooks desktop or download the latest release for the same. In a couple of scenarios, the error messages aren’t noticeable, but at times you might experience a warning message such as in the case of 12045 error. It shows up on the screen stating: Error 12045: Failed to download the update. Other than this, there can be a few more errors that can be seen when updating the QuickBooks software, it includes QuickBooks error 12157, 12038, 12037, 15xxx errors, etc. There are a few factors that might trigger such errors in QuickBooks. Let us discuss further the causes.
Why does QuickBooks update error 12045 occur?
The moment you come across such an error in QuickBooks, you might have a query in your head that what is the reason behind the occurrence of this issue. Well, there are a couple of factors causing QuickBooks update error 12045. Let us find it out:
Inaccurate time and date settings on the system can be a factor triggering such errors.
In case the internet connection isn’t working properly
You have restrictive settings of firewall or third-party internet security software
Another possible cause can be if different QuickBooks versions are available on the same system.
Quick Solutions to eliminate Error code 12045 in QuickBooks
Getting rid of errors in QuickBooks is easy, as there are certain solutions for every error. Here are some common fixes that you can easily perform to get rid of the QuickBooks error code 12045.
Fix 1: Uninstall multiple versions of QuickBooks program
As we mentioned earlier, having multiple versions of QuickBooks installed on the system can trigger such issues in QuickBooks. Thus, it is suggested to uninstall them using the set of steps enumerated below:
You need to start off by opening the control panel
Followed by heading to the programs and features
Furthermore, search for any duplicate or multiple versions of QuickBooks program installed on the system
You are then supposed to click on any version identified and also click on uninstall and change tab
Once done with that, click on uninstall tab
When the version is removed, re-open QuickBooks and try updating the software to the latest release.
Fix 2: Resetting the previous update of QuickBooks
You can try resetting the previous update to fix the error using the steps listed below:
Start off by running the QuickBooks desktop
After that, click on the help tab
You are then required to click on the option to update QuickBooks desktop
Later on, click on the update now tab
Followed by, check marking the reset update option before clicking on the option to get updates
In case the updates proceed, QuickBooks payroll error 12045 should be fixed.
At times, when the internet connection settings aren’t configured properly, one might come across certain errors. To resolve errors like 12045, we recommend performing the below set of steps and configuring the internet connection settings.
Initiate the process by launching the web browser and navigate to any random URL to check if the internet is working fine.
Make an exit from the browser and run QuickBooks desktop, if it is working fine.
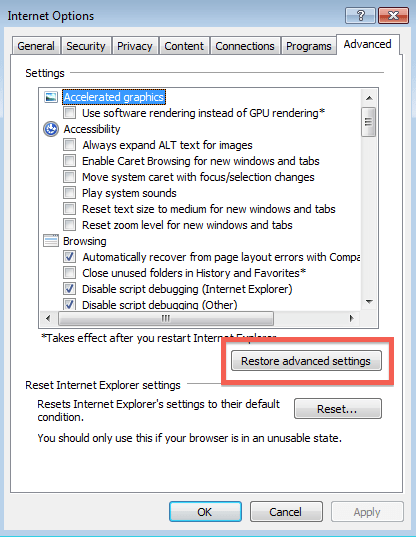
Now, click on the help tab and move to the internet connection setup.
You are then required to make a move to the advanced connection settings.
Click on the advanced tab
Select he option to restore the advanced settings
You are now supposed to click on apply
Followed by, clicking on ok tab.
Exit QuickBooks and reopen it
Try to update the software again
Fix 4: Configure firewall settings
Firewall can at times hinder the working of QuickBooks, if not configured properly. Thus, it is recommended to configure the firewall settings using the steps stated ahead:
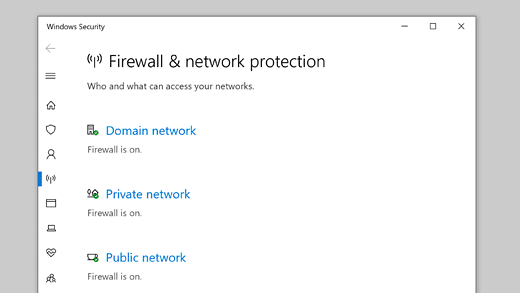
Open the control panel and head to the system and security tab
Move to the windows firewall tab
And pick the option to allow the program in windows firewall
You are then supposed to click on the option to change settings
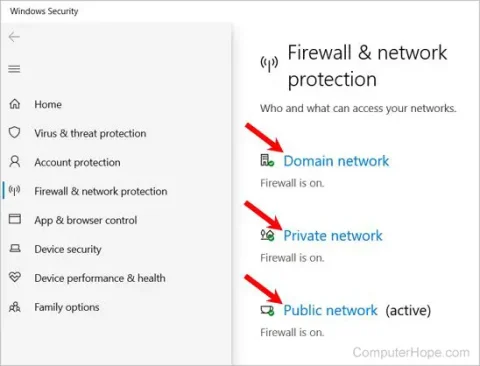
Followed by looking for QuickBooks and selecting private and public options other than QuickBooks.
In case the same isn’t listed, make sure to enter it manually.
This can be done by clicking on the add program tab
And then, select browse tab and also head to C Drive:/Program file/Intuit/QuickBooks/qbw32.exe
You are then required to click on open and also click on add tab
Now, click on ok tab.
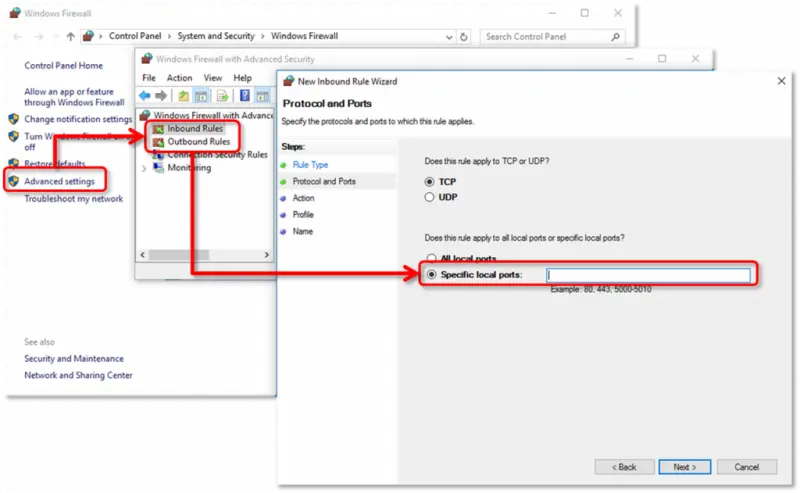
Incorporate port 80 and port 443 corresponding to QuickBooks in the firewall settings corresponding to the following files:
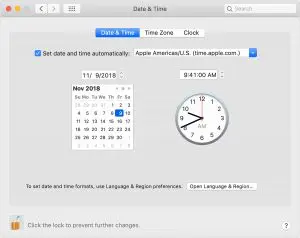
Incorrect date and time can be a major trigger behind the occurrence of such issues. One can verify the accuracy of the time set up on the system, and if there is any variation found, it is suggested to adjust it to fix any sort of issues occurring due to that.
For this, you need to right click the date and time on the taskbar
Select the option to adjust date/time
Click on the option to change date and time
Adjust the date and time to the correct one
Click on apply tab and also click on ok tab respectively
Head to the update process and check if the issue resolves
To Conclude!
Errors and bugs should be fixed before they create any sort of nuisance, and the same thing applies in the case of QuickBooks. Thus, if you come across QuickBooks error code 12045, then make sure that you implement any of the above discussed procedures and try eliminating the issue from its root cause. On the contrary, if you aren’t able to, or if you require any professional assistance, then do not hesitate in contacting our technically sound QuickBooks professionals at +1-888-510-9198, and they will provide you with immediate QuickBooks support and assistance.
QuickBooks error code 12045 is basically an update error that can often be experienced when the user tries to update the QuickBooks software to the latest version. The major factor triggering this issue can be if the date and time of the system is misconfigured.
What causes QuickBooks error code 12045?
A bunch of factors can cause such an error in QuickBooks, which include: 1. The internet connection isn’t working properly 2. Restrictive settings of firewall or third-party internet security software 3. If different QuickBooks versions are available on the same system.
How do I fix QuickBooks update error 12045?
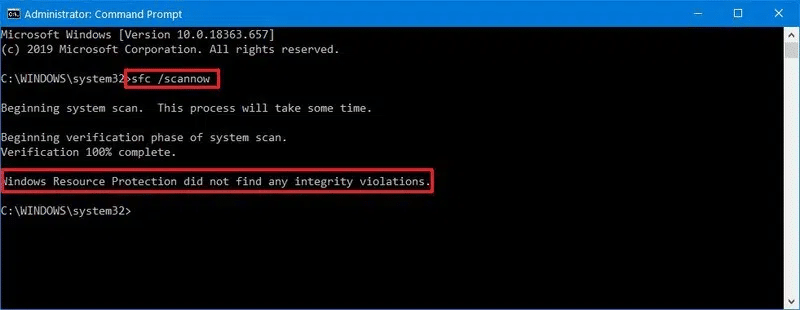
There are a couple of procedures that can be performed to fix this issue: 1. Configure the date and time of the system 2. Using SFC/Scannow command 3. Uninstall multiple versions of QuickBooks 4. Use QuickBooks install diagnostic tool
Finding it difficult to fix QuickBooks error code 832? Well, we can help you with that. QuickBooks error 6000 832 is more specific to multi-user environment in QuickBooks. You usually come across this issue when trying to open the company file or restore the company file. As this error is related to the company file in QuickBooks, it becomes essential to fix it as soon as possible. This compelled us to come up with this piece of writing, which is written with the intent to help you with the brief overview, causes, fixes, and much more related to the QuickBooks error code 6000 832.
Just scrolling through this writing segment will give you an insight into the error, and the ways that can be implemented to get rid of it immediately. But if in case you need to talk to a professional for any sort of QuickBooks-related queries, then our technically sound QuickBooks ProAdvisors are just a call away. Ring us at +1-888-510-9198, and all your queries with be resolved by experts right away. But before that, let us take an overview of QuickBooks error code 6000, 832 and jump onto the solutions.
What is QuickBooks error code 6000 832?
As you can see, the QuickBooks error code 6000 832 belongs to the 6000-error series, which contains an array of error codes triggered due to some or the other reasons. These errors are often related to the company file of QuickBooks, which is surely a crucial part. You can witness this error with a warning message that states:
Error
Description
Problem
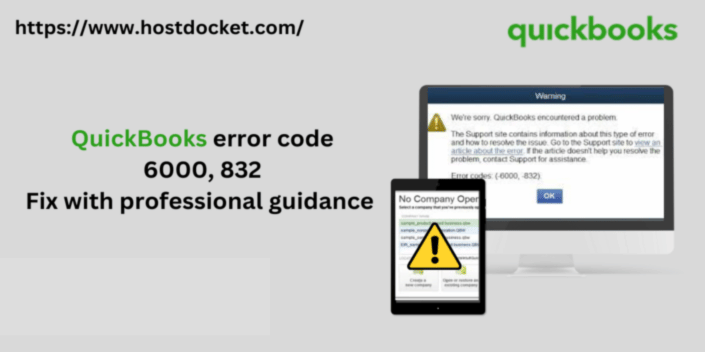
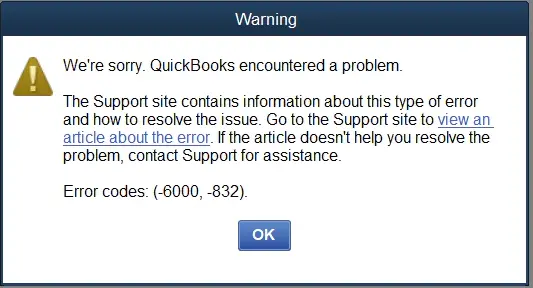
“QuickBooks is unable to open the company file”
Warning
We’re sorry. QuickBooks encountered a problem
Error codes: (6000, -832).
You can expect this glitch when your company file gets damaged, or a similar issue can also occur if the .nd file has a hosting issue. In simple words, when a QB end-user hosts a company file onto a completely different server or device, then such an error is identified. As the company file is a crucial part of QuickBooks, there are chances that you might end up losing your crucial data due to this QuickBooks error code 6000, 832. Thus, getting rid of this error becomes of utmost importance. Before you perform the steps to eliminate the error, let us explore what factors can land you in such a situation.
Possible Reasons behind QuickBooks error code 6000 832
When you land into some glitch, there is a reason behind its occurrence and once you are able to identify it, it becomes easy to get rid of the error. Thus, here are some common reasons why you might experience the QuickBooks error code 6000 832:
If you have opened the company file over a network or QuickBooks installation files are missing, then expect this error in QuickBooks.
The probability of experiencing this error becomes higher when the permissions for a network server aren’t proper.
Moreover, if more than one workstation is trying to host the company file, or if the file extension is .qbm or .qbw.adr.
Be prepared to tackle this issue if the Windows version used is a non-US or Canadian version.
Your antivirus blocking the software communication can be a common trigger.
As a user, you might be worried about the ways in which this article can be culminated. But need not to be, as there are some quick resolving steps for the error code 6000 832, implementing which would help you in getting rid of the error permanently and from its root cause. So, without further delay, let us delve into the fixes:
Method 1: Restore a backup of the company file
The backup company file restoration can be a smart move to fix this issue in QuickBooks. You can do this by:
Opening the company file and heading to the files and utilities tabs respectively
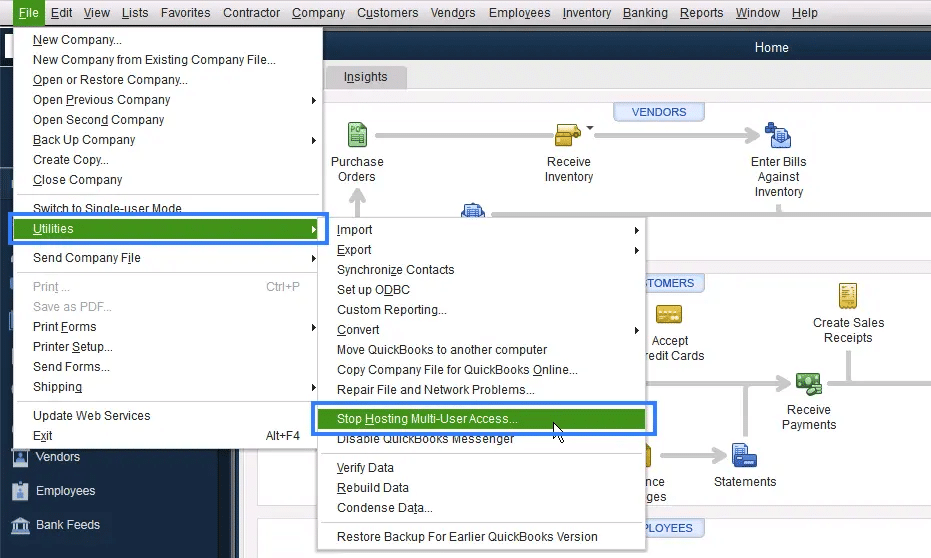
Furthermore, you can click on the stop hosting multi-user access to fix the issue
Now, click on yes if the message states Company file must be closed
Head to the company file.
And conclude the process by copying the path from the top and restoring the file.
Method 3: Verify if the hosting is switched off on all the system
At times, hosting being turned on can be a major trigger for QuickBooks errors like this. Thus, try performing the steps below and verify if the hosting is switched off on all system or not.
You need to first press F2 and then this will open a product information tab.
Search and click the local server information
You now have to ensure that the hosting is turned off.
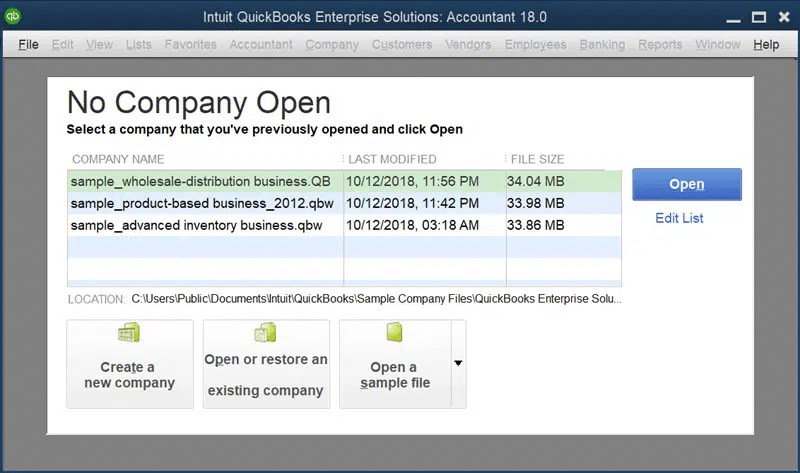
Method 4: Open the sample company file
Open the sample company files installed on the system and if you are able to open them, then it indicates that there is some issue with your company file itself. The steps to be performed are:
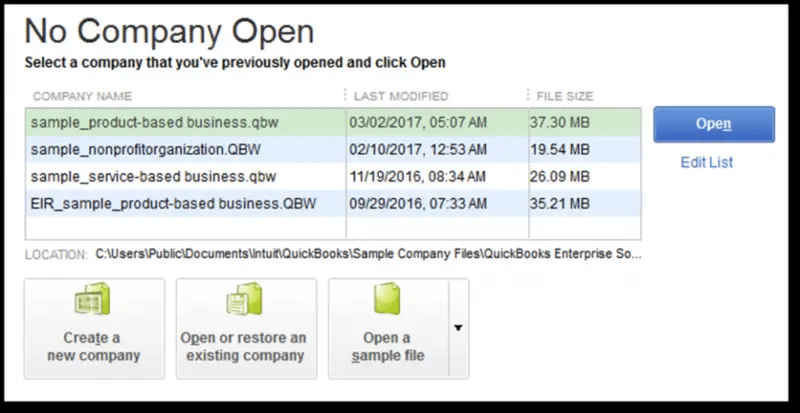
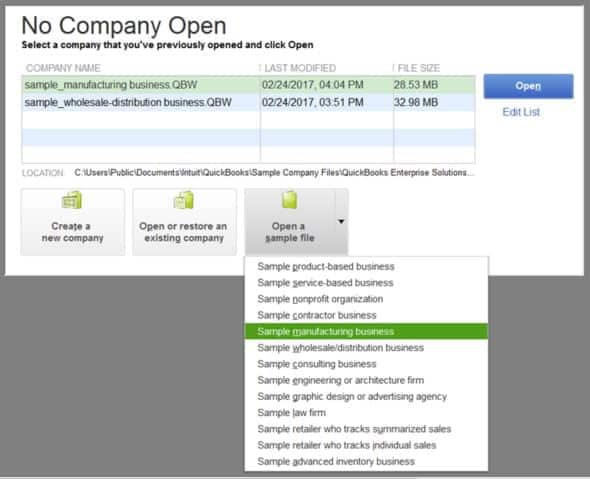
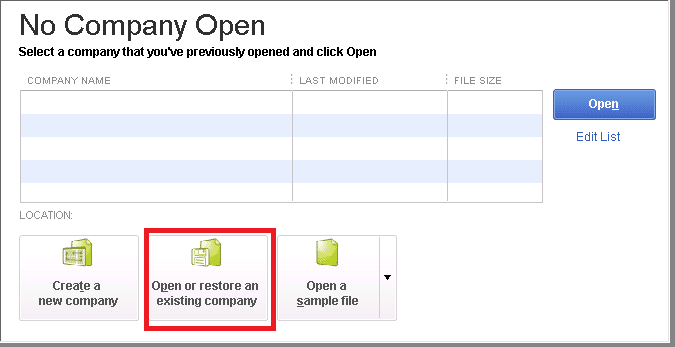
Begin the process by moving to the no company open window
Further, you need to select open a sample file.
Now, this will show up a sample company file and make sure to select the sample file.
If the sample file opens up, then head to the other solutions and try repairing the company file
Processes running in the background that are related to QuickBooks can trigger certain errors in QuickBooks. Thus, it becomes a must to get rid of these processes.
Firstly, sign in as the admin on the system
You will then have to click on ctrl + shift + esc
This will open up the task manager
Select show processes for all the users from the users
Go for the QuickBooks processes and click on the end task tab.
Lastly, switch to multi user mode to open the file.
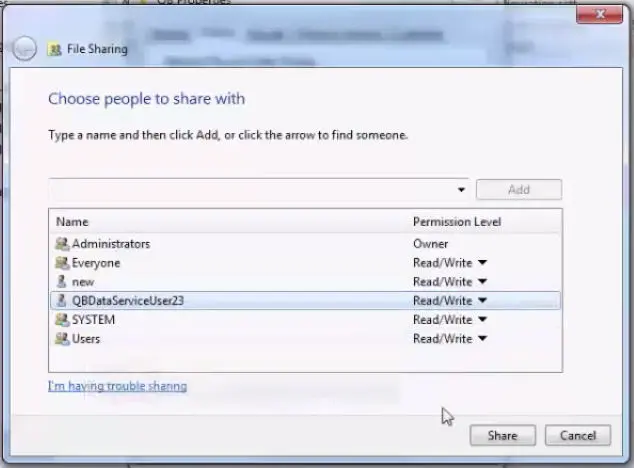
Method 6: Confirming folder permissions
Insufficient folder permissions can at times trigger errors in QuickBooks. Thus, you need to confirm the folder permissions by performing the steps ahead:
The process will first require you to right click the folder having the company file and then choose the properties tab.
Further, click on the advanced tab and also on the security option.
You now have to select QBQDataServiceUSerXX and click on the edit tab.
Ascertain that the settings listed below are granted permission:
Traverse folder/Execute file
Read attributes
List folder/Read data
Read extended attributes
Create files/write data
Create folder/Append data
Write attributes
Write extended attributes
Read permissions
In case permissions are set incorrectly, continue with the steps below:
Right click the folder and select properties
Now, head to the security tab
And pick the edit option
Select the QBdataServiceUserXX and click on the full control option
Also, click on the allow and click on apply and also tap the ok tab.
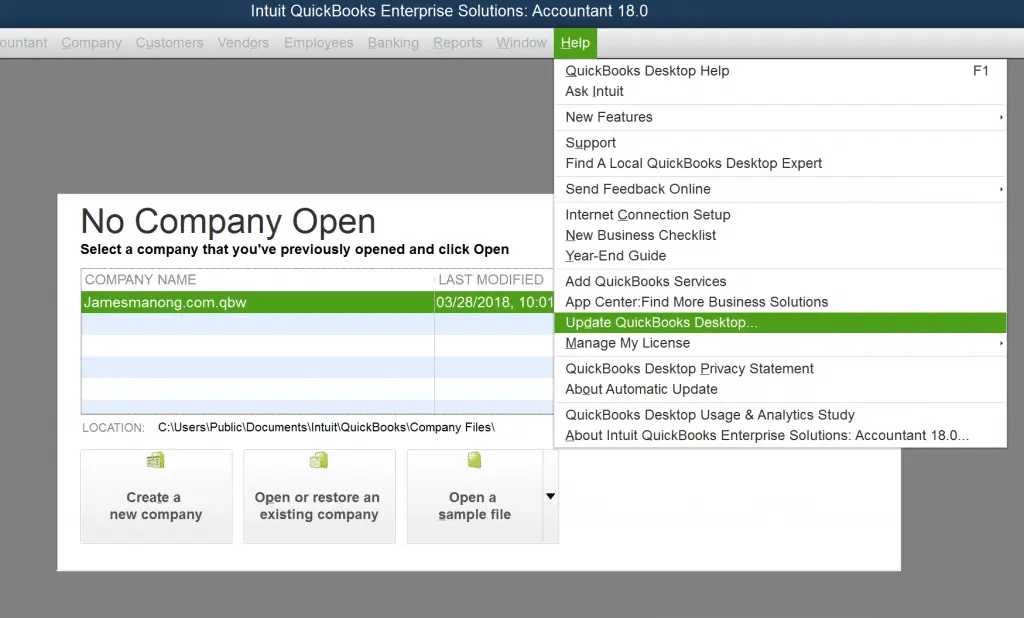
Keeping QuickBooks software updated is crucial to eliminate the errors that might occur due to outdated software versions. You can also try to download and run the QuickBooks file doctor tool to get rid of the company file-related errors. In order to update QuickBooks, you can try performing the steps enumerated below:
Start off the process by closing all the running tasks on the QuickBooks desktop.
Furthermore, open QuickBooks and head to the Help menu.
You now have to select Update QuickBooks option from here.
This process will bring any updates available.
Go for Update Now, and further pick the Get Updates tab.
After the updates process finishes, close and reopen QuickBooks.
You will now see a pop-up window appearing on the screen, where you will have to click on the Yes tab.
Method 8: Change/Rename the name of .ND and .TLG files
Did you know that the name of your .nd and .tlg files can hamper the working of the software? To eliminate this issue, you can try renaming the files.
Initiate the process by opening the folder having the company file.
You now have to look for the files with .nd and .tlg extensions.
Post that, you will have to rename each of the files and add .OLD at the end of the file names.
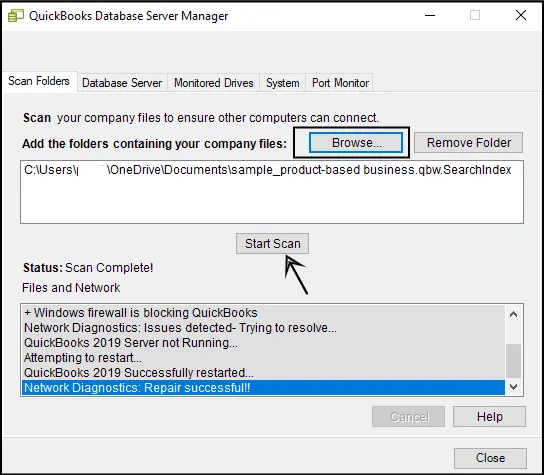
The QuickBooks database server manager is responsible for hosting the QuickBooks company files. When you are done with the process to rename the files, try restarting the Database Server Manager and rescan the files. This can be done by:
Opening up the start menu tab
Furthermore, head to the all programs tab.
Search for QuickBooks.
Open QuickBooks database server manager.
Pick the scan folders tab
Just in case no folders are seen, make sure to pick the add folder tab.
Confirm the QuickBooks company file in the box that states QuickBooks company files have been found.
Try opening the file again.
Towards the conclusion, open QuickBooks and sign in to the company file using the admin credentials.
The antivirus and firewall software often block access to specific QuickBooks files. You can simply configure the ports of the firewall and create an exception for the antivirus program. Once you make the changes to the firewall and the antivirus software, check whether the error is appearing or not.
Professional Guidance is a call away!
If you have reached this part of this article, then you might have understood what measures you can implement to get rid of such irritating errors like QuickBooks error code 6000, 832. However, being professionals, we understand that at times, it gets difficult for QuickBooks users to eliminate these errors on their own, so we make sure that none of you are hassle around these errors, we provide support services for all sorts of QuickBooks-related queries. You just need to pick up your phone and dial our customer support number which is toll-free i.e., +1-888-510-9198, and you can directly connect with our QuickBooks technical Support professionals, who might further answer all your queries and help you in getting your software to optimal use.