As the year 2024 is around the corner, it is time for a new QuickBooks upgrade. Each year, Intuit rolls in with a fresh upgrade loaded with features and functionalities. And QuickBooks desktop 2024 is here to assist your business in achieving its goals faster. Be prepared to experience better data security, more productivity, and a better view of inventory levels. You can experience quick and smooth daily accounting accomplishments with all new QuickBooks 2024. It is compatible with all sizes of businesses, whether you are small scaled or large scale, or a medium sized business. QB 2024 support services will enable you to streamline your financial records, automate your daily tasks, and further make the right decisions for your business. If you haven’t checked out what’s new in QuickBooks desktop 2024, here is a quick overview for you.
This article is curated in a way to let you explore what QuickBooks 2024 has to offer you. Let us dive in and unleash the features and functionalities you can avail of. On the contrary, you can speak to our technical support team at +1-888-510-9198, in case of any queries.
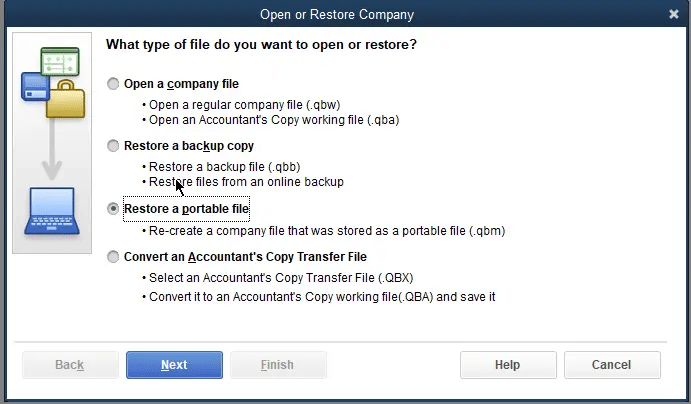
QuickBooks 2024 version will witness changes in all editions – Pro, Premier, Premier Plus, Accountant, and Enterprise Product Lines. Just like previous software, the latest upgrade is compatible with Google Chrome and is expected to work better with Windows 7 and higher versions. You can install the upgrade either using automatic install or manual. It completely depends upon your preferences. Furthermore, it is possible to perform any modifications by simply configuring the settings. The newest version brings tons of features to the table, like automated calculations, merging reports in one dashboard, inflows and outflows tracking on one dashboard and much more.
Download QuickBooks 2024 for better efficiency, more security, and of course some amazing features and functionalities. Not just that, with the latest QuickBooks version 2024, you can easily record transactions at a low cost without having to open a computer or connect it to a network.
QuickBooks Desktop 2024 Release Date
Well, not many users are versed with the sudden release of QuickBooks 2024. QuickBooks Desktop 2024 was released on 3rd October, 2023, which not many users are aware of. You can expect this new version of QuickBooks to boost your business growth. It further promotes advanced security along with an efficient work system and a user-friendly experience for all its users.
As always, QuickBooks Desktop 2024 has rolled in with some interesting features that not just make your daily activities easier, but also will assist you to grow your business.
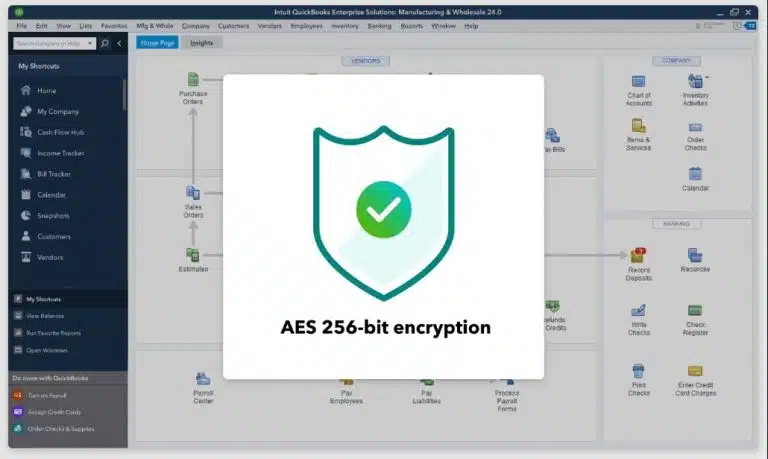
Security Enhancements – With the 2024 version of QuickBooks comes in the best-in-class security protocols that will protect your data. QuickBooks Desktop 2024 and Enterprise 24.0 now have 256-bit encryption to keep your data secure.
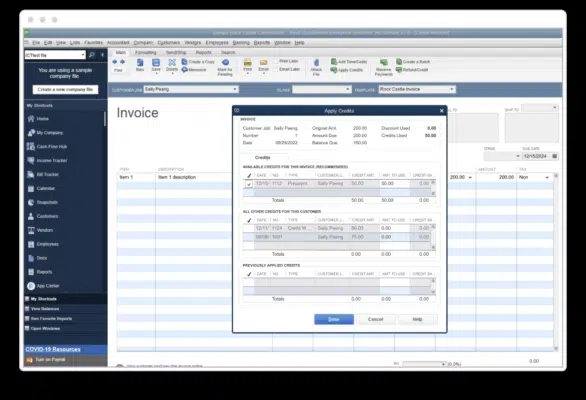
Customer Prepayments – This feature is available only in enterprise version. You can track customer prepayments i.e., customer deposits on sales orders. And further apply credit when the sales order becomes an invoice.
Item Category enhancements – This feature is again for enterprise version only. You can use enhanced category management to manage your items and inventory. Further, it would let you set pricing rules by categories for enhanced productivity.
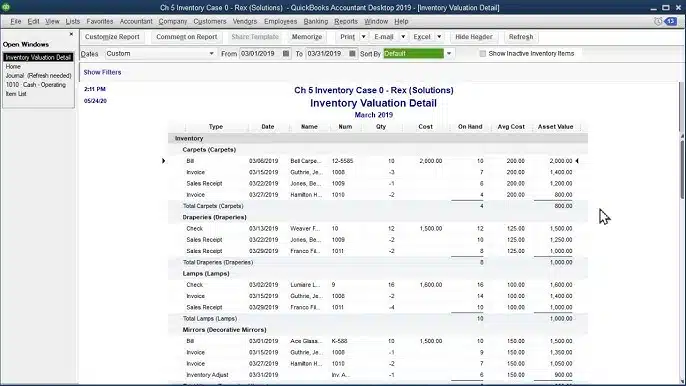
Inventory reports enhancements – The enterprise users can avail of this particular feature of inventory reports enhancements. They can get important sales and inventory reports for the business at the category level. And further can track inventory of products developed in batches/lots with a new report on inventory stock status by lot numbers.
Item list search enhancements – Now use enhanced search to perform advanced search and find your items faster.
QuickBooks Desktop 2024 Pricing
It should be noted that QuickBooks is a paid software and to access QuickBooks, you need to buy its license. Here is some pricing information related to QuickBooks Desktop 2024:
QuickBooks Desktop Pro Plus/ Mac Plus is now available at $649 yearly.
QuickBooks Desktop Premier Plus can be purchased for $949.
You can get QuickBooks Enterprise with the starting price of $1830 per year.
QuickBooks Desktop 2024 is ready to download and can easily be downloaded with a click of a button on the table below. However, in order to activate and start using the software you need to key in the QuickBooks Desktop 2024 license number and the product key. The license number and product key for the QuickBooks Desktop 2024 (Pro, Premier and Enterprise) can be obtained by making a purchase with the official Intuit website.
Once you are ready with the License and Product key for QuickBooks Desktop 2024 all you need to do is click the desired version of QuickBooks from the below list and the download will start as soon as you click the download button. Once the download is complete, open the downloaded file and proceed for the QuickBooks Installation. Enter the license information when prompted during the installation. As soon as you enter the license info and proceed further QuickBooks Desktop 2024 will be activated and you can start using it.
QuickBooks Desktop 2024 is here already, but is your system ready for it? Well, here is what your computer needs for the best experience in QuickBooks Desktop 2024. Check out the details below about the operating system, hardware, software, and other requirements to run QuickBooks Desktop 2024.
QuickBooks Pro or Premier 2024 and Enterprise 24.0
Well, before proceeding ahead, make sure to check your computer’s specs. And here is how you check your system info.
Operating Systems
Still using Windows Server 2012?
Note that Microsoft will no longer provide security updates or support for PCs running windows standard and essentials server 2012 and Server 2012 R2 after 10th of October, 2023. Thus, QuickBooks 2024 won’t support Windows Server 2012 and can’t be installed on it.
Windows 11, 64-bit, natively installed
Windows 10, all 64-bit editions, natively installed
Windows Server 2022, Standard and Essentials
Windows Server 2019, Standard and Essentials
Windows Server 2016, Standard and Essentials
A quick note: Linux and Windows 10 S mode isn’t supported. Also, you will have to use windows natively and not through an emulator or virtual environment to make use of QuickBooks.
Database Servers
Windows (natively installed)
Windows Server 2022, Standard and Essentials
Windows Server 2019, Standard and Essentials
Windows Server 2016, Standard and Essentials
Browser Requirements
QuickBooks Desktop 2024 needs internet access and Google Chrome to work without any glitches.
Hardware and Operating System Requirements
Talking about the hardware and operating system requirements, QuickBooks desktop 2024 needs a 64-bit operating system and won’t run on 32-bit. Here are the basic hardware and OS requirements for QuickBooks desktop 2024.
2.5 GB of disk space (addition needed for data files) Additional Software: Microsoft .NET 4.8 Runtime- 60 MB, provided with the installation files. Intuit Data Protect in QuickBooks Connected Services offerings: Needs at least 4 GB RAM Twice the size of the largest file set to back up and in addition to that 100MB or twice the size to restore. The space is only required from the work folder LocalApplicationData + Intuit\Intuit Data Protect. Also Note: You can store your QuickBooks data file on a solid-state drive for the best performances.
Windows
North American version of windows regional settings are supported when set to English Admin rights needed for the server system when hosting multi-user access. Natively installed and doesn’t need to run in a virtual environment or emulation software.
Optical Drive
A 4X DVD-ROM drive needed for physical CD installations
Screen Resolution
Display optimized for 1280 x 1024 resolution or higher with around 2 extended monitorsIdeally optimized for default DPI setting for a given computer.
Other Hardware Devices
In case you make use of the warehouse manager in QuickBooks desktop mobile, here is the supported devices you can use:
Zebra TC20/TC25/TC51 Mobile Computer is suggested (Android 6.0 & above)
Zebra MC40 Mobile Computer (Android 6.0 and above)
QuickBooks Desktop Enterprise 24.0 further supports:
Honeywell Voyager 1602g Pocket Barcode Scanner
Socket Mobile CHS 7CI
Symbol CS3070
Software Compatibility
QuickBooks integrates plenty of other apps. Here is a list of the common apps you can use. However, additional RA< can enhance the use of these features.
Microsoft Office:
Office 2021
Office 2019
Office 2016 (including Outlook 2016) both on 32 and 64-bit
Email estimates, invoices, and other forms with Microsoft Outlook 2016-2021, Microsoft Outlook with Microsoft 365, Gmail, Yahoo mail, Outlook.com, and other SMTP-supporting email clients.
Preparing letters needs Microsoft Word 2021, 2019, 2016, or Microsoft 365 (includes 64-bit)
Exporting reports requires Microsoft Excel 2021, 2019, 2016, or Microsoft 365 (includes 64-bit)
Contact synchronization with Microsoft Outlook needs Outlook 2021, 2019 (32 and 64-bit), or 2016.
Quicken 2023, 2022, 2021, 2020, 2019, 2018, 2017, and 2016
QuickBooks Desktop for Mac 2024, 2023, 2022, and 2021
Adobe Acrobat Reader: Business Planner, Payroll, and viewing forms need Adobe Acrobat Reader 9.0 or later.
Payroll and other online features and services need Internet access with at least a 56 Kbps connection speed (1 Mbps recommended).
Anti-malware and antivirus software compatibility
QuickBooks Desktop Pro 2024, Premier 2024, and Enterprise 24.0 are tested with the following antimalware and antivirus programs. However, you might require to adjust some settings in these programs to get the best performance.
Antivirus Software
McAfee
Avast
Bitdefender
Norton
Kaspersky
Trend Micro Security
Webroot
Cylance (Internet/Regression Only)
ESET
Panda Dome
Sophos
Avira
Symantec
F-Secure
Microsoft Windows Defender
Anti malware software
Bitdefender
AVG
Malwarebytes
Spybot
Emsisoft
McAfee
Avast
Webroot
ZoneAlarm
Kaspersky
F-Secure
It should be noted that QuickBooks will work with systems running Redundant Array of Inexpensive Disks (RAID), but it’s not suggested as it can cause QuickBooks to operate slowly.
QuickBooks Desktop 2024 needs internet security protocol TLS 1.2 for the connected services to work without any hassle.
If you are planning to get QuickBooks Mac Plus 2024, here are the basic system requirements for you:
Minimum Mac OS X v12.0 (Monterey).
iOS 12.0 or later for iPhone related features.
Supports either Intel or Apple CPU hardware.
Internet connection is a must.
Multi-user Server: Intel Core 2 Duo or higher processor to run a server.
2 GB RAM (4 GB RAM suggested).
250 MB of available storage.
Macintosh-compatible printer if you plan to print invoices, checks, deposit slips, lists, purchase orders, mailing labels, reports, or graphs.
Use Intuit Checks to print checks.
Quick list of integration/compatibility requirements
Export Report Data- Apple Numbers v12.0 or later, or Microsoft Excel 2016 or later, including Microsoft 365
E-mail as PDF – Apple Mail, Microsoft Outlook 2016 or later, including Microsoft 365.
File Conversion – QuickBooks Mac 2024 supports:
One-way conversion to QuickBooks online.
One-way conversion from QuickBooks desktop for windows 2021 and 2023.
Conversion to and from QuickBooks for windows 2024.
What do I do if my system doesn’t meet the minimum requirements?
In case your system doesn’t meet the above discussed system requirements, then simply upgrade your system to meet all the requirements. In case upgrading your system isn’t the option, then you can switch to QuickBooks online.
Not many QuickBooks users know about this secretive launch of QuickBooks Desktop 2024. Now that you know what’s new in QuickBooks desktop 2024, it is the right time to upgrade. Download QuickBooks desktop 2024 right away with the help of the links listed above in this segment. However, in case of any queries, you can simply reach out to our technical support team at +1-888-510-9198, and our certified QuickBooks ProAdvisors will help you with immediate support and assistance.
FAQs Related to QB 2024
Will QuickBooks desktop be available in 2024?
QuickBooks Desktop is planning to stop selling several products to U.S. new subscribers after July 31, 2024.
How do I upgrade QuickBooks desktop to 2024?
QuickBooks Desktop 2024 edition can be installed using the steps below: 1. When you are ready, choose upgrade now. 2. After that, choose keep the old version on my computer if you want to keep your current QuickBooks. 3. Choose let’s go. 4. QuickBooks downloads, installs, and activates the new version for you. 5. Choose open QuickBooks.
Will QuickBooks desktop be discontinued?
After May 31, 2024, your QuickBooks Desktop 2021 software will be discontinued. This includes all 2021 versions of QuickBooks Desktop Pro, QuickBooks Desktop Premier, QuickBooks Desktop for Mac, and QuickBooks Enterprise Solutions v21.19
Does QuickBooks desktop have to be renewed every year?
To view your data after 1 year, you’ll have to renew your subscription. Note: As a QuickBooks Desktop user, you still own your data, regardless of subscription status. You can open and edit company files at any time with a compatible license or active subscription.
QuickBooks error 12038, belongs to the 12xxx series error and typically occurs when you download the latest update to the software. You can come across a warning message on your desktop screen stating “QuickBooks error 12038: Failed to download the update”. As this error occurs in the middle of the downloading the software, it can abruptly freeze the software or might end up in software malfunctioning. To help you fix the error, before the situation worsens, we are here with this piece of writing, sharing the nitty-gritties of QuickBooks error code 12038.
You scroll through this piece of writing, to unveil the entire information related to the QuickBooks error code 12038, or you can also seek assistance from our technically sound QuickBooks personnel, who can guide you through such errors easily. Give us a call at +1-888-510-9198 and get answers to all your queries.
There are bunch of factors driving such errors in QuickBooks, which we have tried to list below. Let us together have a look:
When your system has incorrect date or time, then you might come across such issues in QuickBooks.
Another prominent reason behind the occurrence of such issue can be if your internet browser settings are not configured properly or if there is any sort of internet issue prevailing.
You can also land into a similar issue if the security or firewall software is blocking the QuickBooks services.
Important Pointers to Consider Before Troubleshooting
There are a bunch of factors that you must keep in mind, before you start fixing the error.
A few devices make use of the download accelerator to speed up the download process. However, these third-party accelerators can corrupt the entire download process. Thus, make sure to disable it before download the updates.
Ensuring that the internet connection is proper and speed is not less than 28.8 KB/s is important factor.
Furthermore, you need to check if the parent controls are enabled in the browser for safety concerns. If yes, then make sure to disable them before you update the software.
Another important task is to create a company file backup before performing any solution steps.
Troubleshooting Methods to fix QuickBooks error 12038 (When Installing the Updates)
Now that you have learnt major information about the error code 12038, it is time to unleash the methods that can help you with the fixation of the error permanently. Let us explore each method one by one:
Procedure 1: Uninstall any duplicate/Multiple versions of QuickBooks
As we mentioned earlier, setting up multiple versions of QuickBooks in one system can hindering the update process. Thus, to fix this, you can perform the below steps:
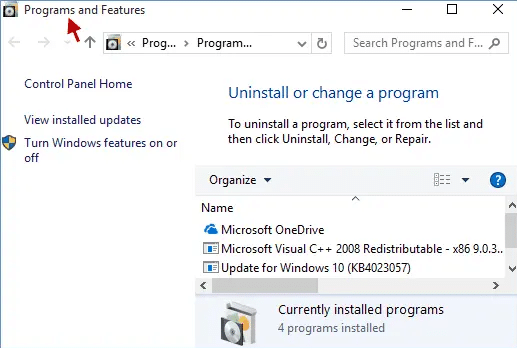
You need to first open the control panel from the start menu
Furthermore, head to the programs and features section
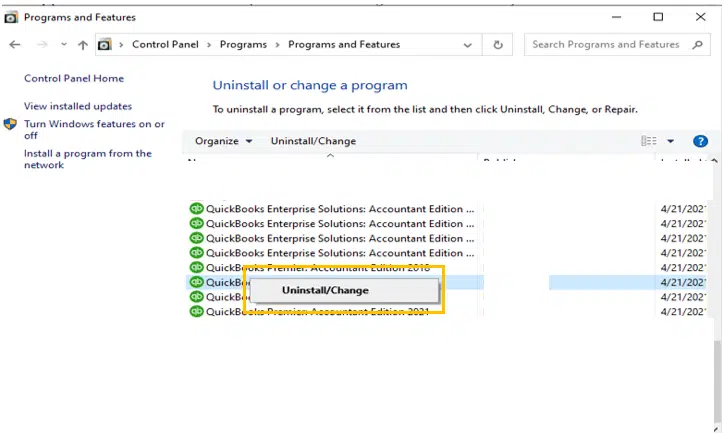
You can also check for any duplicate versions of QuickBooks programs from the list
In case you spot any duplicate copy, then make sure to uninstall them by selecting the icon and also clicking on the uninstall/change option.
Now, click on the uninstall tab and get the copy of QuickBooks removed from the system
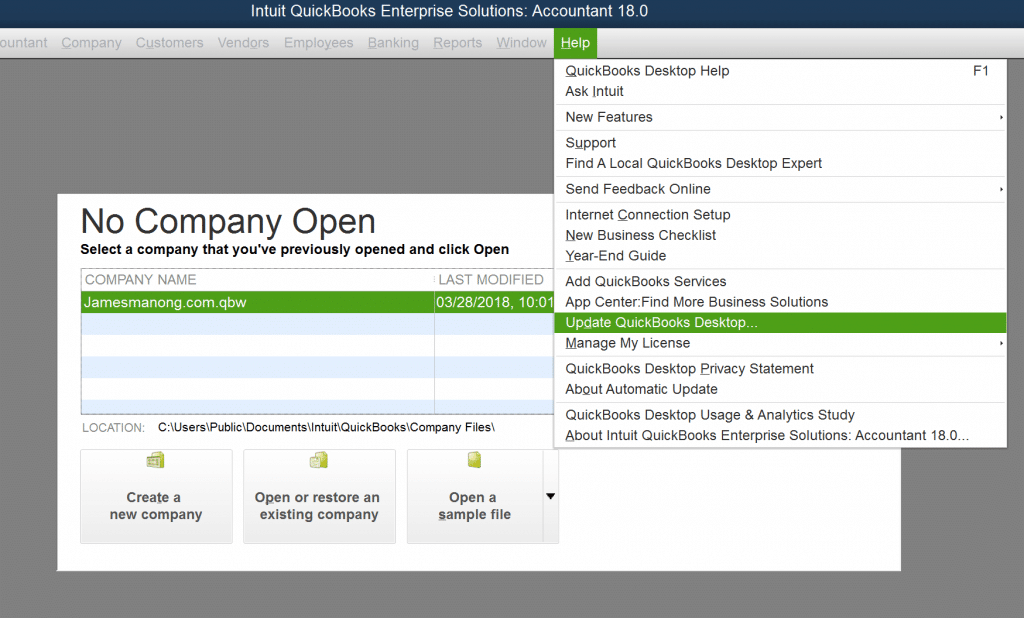
Open QuickBooks and move to the help menu
Click on the option to update QuickBooks desktop and check if the issue is eliminated or not.
Procedure 2: Creating a new rule for QuickBooks.exe files
When firewall hinders the process of updating, it is suggested to create a new rule for the QuickBooks. exe file. This involves the following steps:
Start off the process by searching for firewall and pressing the windows key
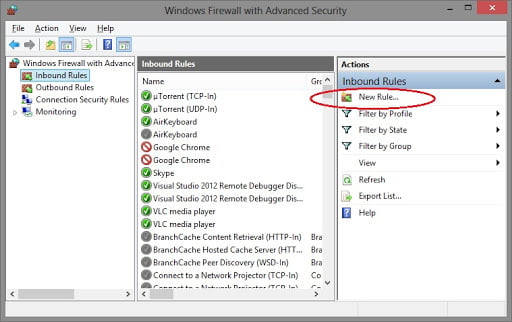
You are then required to open windows firewall and head to the advanced settings
Later on, move to the inbound rules option
And rightclick the inbound rules
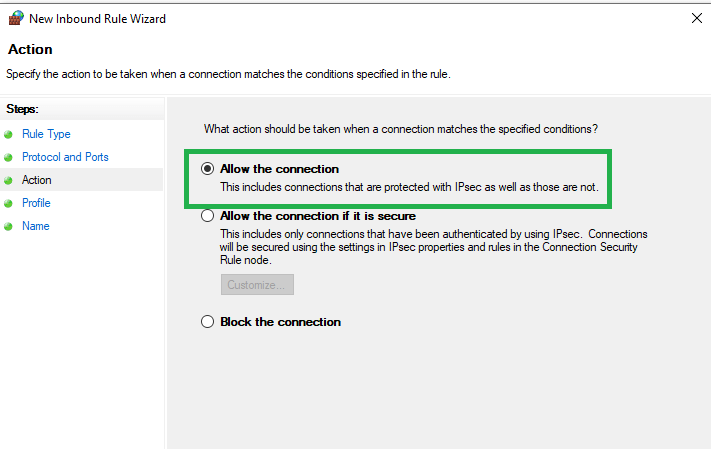
You will see an option that states create a new rule, click on the same
Choose the program and click on next
Hit the browse tab and go for the files associated with the QuickBooks software.
AutoBackupExe.exe, Dbmlsync.exe, DBManagerExe.exe, FileManagement.exe, IntuitSyncManager.exe, QBCFMonitorService.exe, QBDBMgr.exe, QBLaunch.exe, including all other .exe files corresponding to QuickBooks.
Also, click on the allow the connection option
Followed by clicking on next tab
You are then supposed to head to creating a new rule by providing a name to the same
Perform the steps to create outbound rules as well.
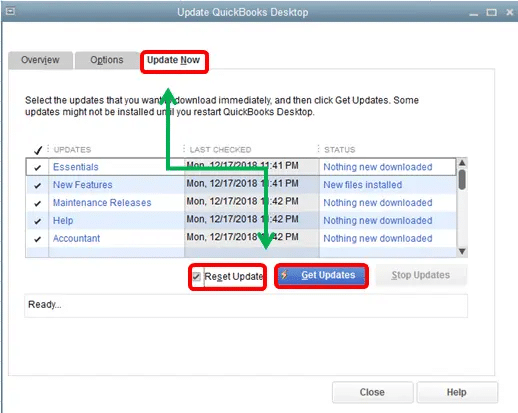
You are later required to click on the update now tab
Followed by ensuring that the reset update tab is selected
You are then supposed to click on the get updates tab
Now, check if the error is fixed or not, if not, proceed to the next procedure.
Procedure 4: Configuring System Date/ Time
As we discussed above, if your system date and time is set incorrect, then there are chances that you land into this sort of issue. An incorrectly set date or time can directly end up in such an error. The steps involved in this procedure are as follows:
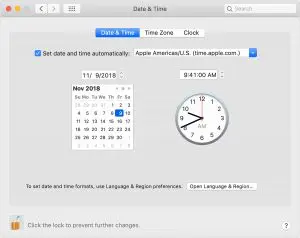
Just in case the user experiences that the date and time is not set properly, then right clicking on the date option is suggested.
Followed by, clicking on the adjust date/time tab.
You are further required to set the correct time zone and also make any corrections required.
In case an error appears, try changing the internet settings.
Procedure 5: Close all QuickBooks processes and services
Sometimes, the background processes related to QuickBooks can trigger this sort of issues in QuickBooks. The steps involved in this process are as follows:
Start by opening the task manager
You can also use a shortcut for the same i.e., Ctrl + Alt + Delete
Furthermore, click on the processes tab and end all the QuickBooks related processes
Once done with that, click on the services tab
And after all the QuickBooks services and processes are terminated, try to update the QuickBooks again.
Procedure 6: Configuring internet connection settings
Simply launch the QuickBooks software and click on the help section
Once done with that, click on the internet connection setup option
Followed by selecting the option to allow QuickBooks to get access to the internet connection
You are then supposed to head to the advanced connection settings
And then click on the advanced tab
Now, you need to click on the option to restore advanced settings
And towards the end of the process, click on apply tab and try to update QuickBooks again
Bugs and technical snags like Error code 12038 in QuickBooks can be a little bit exasperating. Nevertheless, if you perform the set of procedures elaborated above, you can try getting rid of these errors easily. Just in case you are stuck at some point in time, or if you feel the need of professional guidance, then in that scenario, do not hesitate in connecting with our technical team of certified QuickBooks professionals, who have the right knowledge and experience to deal with any sort of QuickBooks related errors. You just need to ring us at +1-888-510-9198, and we will make sure that all your queries are well-answered.
FAQs – QuickBooks error 12038
What is QuickBooks error code 12038?
QuickBooks error code 12038 is basically an update error that can be experienced when you try to update your QuickBooks software. You can experience this sort of issue when the date and time isn’t set properly on your system. There can be a bunch of other factors as well triggering such an error in QuickBooks.
Are there any specific network settings to fix Error 12038 in QuickBooks?
Yes, it is important to keep a check on certain network settings to eliminate this issue in QuickBooks. This includes:
1. Ensuring that the network proxy settings aren’t configured properly 2. Verifying that no network restrictions block the connection of the software 3. You also need to confirm that the ISP hasn’t put any limitations.
What causes QuickBooks error code 12038?
The following factors can trigger such an error in QuickBooks:
1. Incorrect date and time 2. Internet settings misconfigured 3. Antivirus or firewall blocking the software 4. User having multiple versions of QuickBooks set up
QuickBooks software is one of the most common names in the accounting sector of every small or big firm because of its simple and flawless work proficiency. QuickBooks, however, comes with all the advanced features but there are times when you face some technical glitch with QuickBooks which you need to fix on their own or you will need the help of professionals. One such error that users usually encountered while trying to access QB Company file and have been talking about mostly is QuickBooks missing name list problem. In numerous occasions like while opening the QuickBooks desktop company file you have seen that some of the name, items, accounts, entries and other important data are missing or not available in the specific name list.
This usually happens as a result of the above-named error QuickBooks missing name list. Forget about it! In this comprehensive blog, we have mentioned every possible detail (about this error, its causes) along with this you will also get every possible solution to fix this error. Feel free to dial our toll-free number +1-888-510-9198 in case you need professional help fixing this issue. So, let’s move ahead!
What do you understand by QuickBooks Missing Name List Problem
QuickBooks Missing Name List is a kind of QB error that usually occurs as a technical glitch in your internal database while opening QuickBooks company data file. This missing error does not allow you to access your company data file. It usually happens in the QuickBooks desktop thereby causing QB company file name to be missing from the name list.
Some of the lists where you may have spotted this error frequently are like vendor lists, customer lists and other kind of names lists. And you may have noticed a blank space in many areas of the company file like business transactions, center predefined reports and company reports.
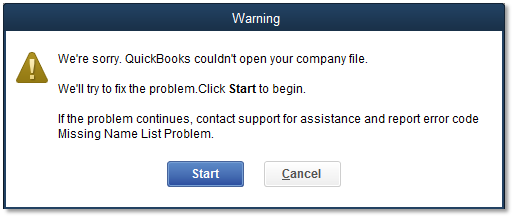
The error message that appears before your screen for this error is:
We’re sorry; QuickBooks couldn’t open your company file. We’ll try to fix the problem, click start to begin.
If the problem continues, contact Consultant for assistance and report error code “MISSING NAME LIST Problem.” Please help what to do.”
What are the factors that give rise to QuickBooks Missing Name List Problem
Some of the prominent factors that give rise to this QuickBooks Missing Name List Problem are given below:
Incorrect or Incomplete installation of QuickBooks Software/application can be the reason that you may not find names in the list.
Another factor that triggers this missing name list error is sudden or improper shutdown of your system/PC before completion of your work.
Damaged system files appearing in Windows registry or corrupted Microsoft Components can also be responsible for missing names in QuickBooks list.
Meticulous infection from any third-party software or any other malware and virus affecting your system can also give rise to this issue of QB missing name list.
By chance deletion of any specific and important QuickBooks Files is another common factor that may bring this QuickBooks name list error.
How to affix this QuickBooks Missing Name List Problem
Some of the possible remedies in some easy steps that can help you to fix this annoying QuickBooks Missing Name List Problem are available now. You can carry out these steps mentioned below on your own:
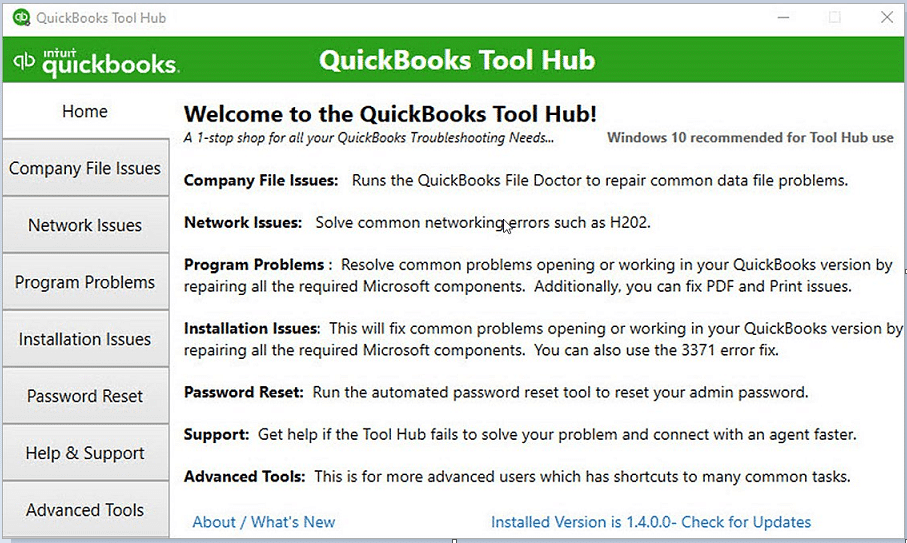
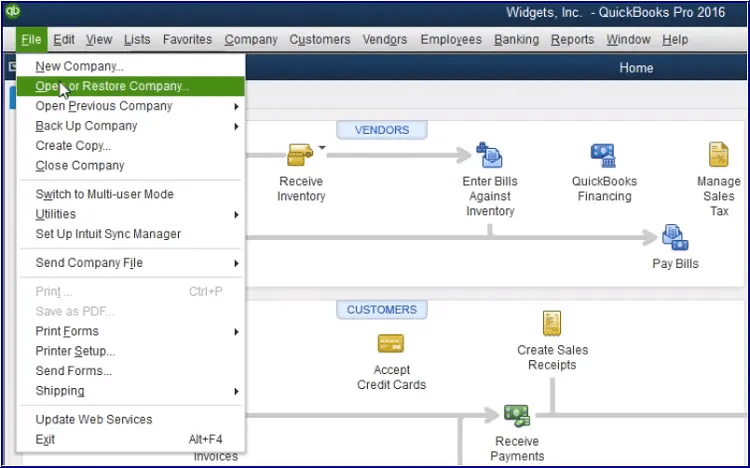
METHOD I: Utilization Of QuickBooks Tool Hub
QuickBooks Tool Hub is a one-stop solution that helps you to solve all kinds of common QuickBooks Bugs. Here are the steps that you need to perform and fix the issue:
Start the procedure with the opening of QuickBooks application and the company file.
Now, for opening the Product Information Screen press the F2 key.
After this, go and find the Rebuilt option (RB Tag) in the File Section, this RB Tag displays the date and time of the rebuilt file.
After determining the Rebuilt date and time, you need to restore the backup file that is created before rebuilding your file.
If in case you don’t have any clue about the location of the backup file, then look for the Display Hidden Files folder and locate the backup files using the Windows for Help in Searching .QBB files option that is present on your system.
If you can’t find the Rebuild option in the File versions, then it means your file has not been rebuilt. In such circumstance, you need to carry out the following steps:
Wait for a while, as File Doctor Tool can take up to one minute to open
Select your company file available in the list, and then click on the Continue button
Now go for the Diagnose File tab and click on it.
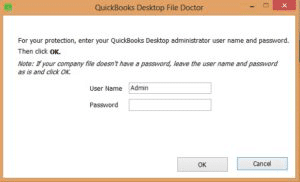
Then fill your QuickBooks administrator log in details with password and then choose the Next option
Perform all the on-screen instructions displayed by the tool.
Apply all the changes by rebooting your system in the end.
METHOD II: Rebuilding the name list from Scratch
In this method you need to make an attempt to rebuild your QuickBooks name list from the scratch. This will help you to fix the QuickBooks missing name list error. Follow the below-written steps to rebuild your QuickBooks name list:
At First, construct a backup company data file, and if you have constructed it already, then restore this file to a location where you can access it easily.
Once it is done, forward the Damaged Company Data File to the Data Recovery team.
This step will take you to the completion of the data repairing process, and this tool will help you to fix the issue that you are facing.
Note: Check the information that you have restored and check the necessary details of the customers, , employees, vendors etc. Also, try to amend or revise the data damage on your QuickBooks company file.
METHOD III: Utilization of QuickBooks Auto Data Recovery Service
In order to recover your recent transactions, you can make use of this ADR (Auto Data Recovery Service). This ADR Service helps you to restore all your lost data (.QBW and .QBW.tlg files) and gives you error-free files at the times of any data loss or failure. However, this Auto Data Recovery service is accessible only in editions like QuickBooks Premier, Pro, and Enterprise. So, if you are working with any of these versions, there will be an additional folder as QuickBooks Auto Data Recovery with .QBW.ADR & .QBW.TLD.ADR files.
Before moving ahead, it is important for you to keep certain things in mind and these are:
Information recovery can’t be utilized within the controller editions.
Now, Use ADR services by following the steps to recover the transactions.
At first create a current folder with the name QB Test and save it on your Desktop.
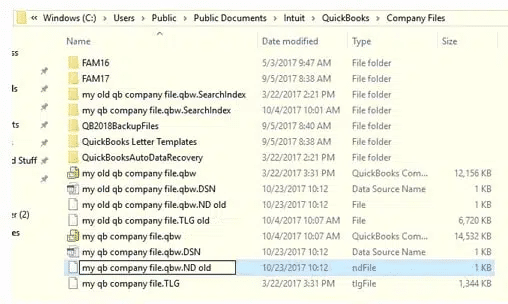
Now, open the folder where you have stored the QuickBooks company file.
Then look for the .tlg file. After it is found, save this in your company file folder.
You can now use the Auto Data Recovery Tool to restore the transactions.
If you can’t find the .tlg file, that indicates the file extensions. Then, you need to:
Firstly, open File Person by pressing the Windows + E keys simultaneously and then select the Organize option.
Now, Select the Folder option and look for choices. If you are a Windows 10, 8.1 & 8 user, you are required to choose the read option and then select the file name extension.
Click on the Hide Extensions option for other well-known file varieties. Now choose the Apply option and then click the OK button.
In this step, open the QuickBooks Auto Data Recovery folder and then copy the .QBW .adr file.
Paste this file into the QBTest folder, which you have already saved on your Desktop.
Utilize your QuickBooks account register to verify all the transaction area units in the file.
Choose the File option, by clicking the Utilities and check information to check the knowledge integrity of your recovered QuickBooks data file.
In the last step check if the company file’s copy is prepared or not. If yes, transfer the corrupted company data file to a new place and move the file copy from the QBTest folder that you have made to the original location.
METHOD IV: Use Clean Install to fix QuickBooks Missing Name List Problem
As we have already mentioned above, the damaged and corrupted QuickBooks files are one of the significant reasons for the issues in the QuickBooks name list. Therefore, a clean installation of the QuickBooks software can help you to evade this error. Now perform the following steps:
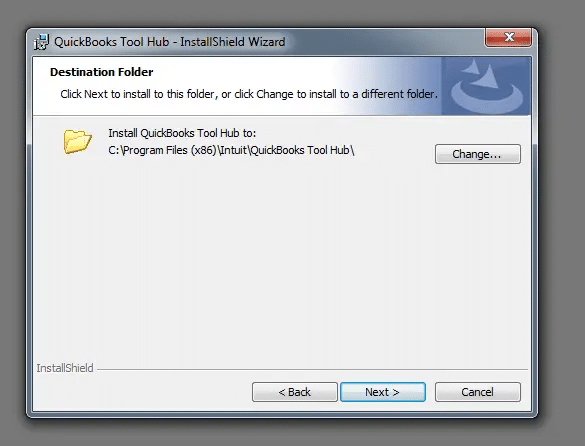
At First, you have to download and install the QuickBooks Tool Hub. And if it is present already, open it, and then go to the tab of Installation Issues.
In the second step, under the Fix My Installation Issues, there is a Clean Install Tool button; click it and then click on the continue button.
Now you can initiate the clean installation of your QuickBooks software.
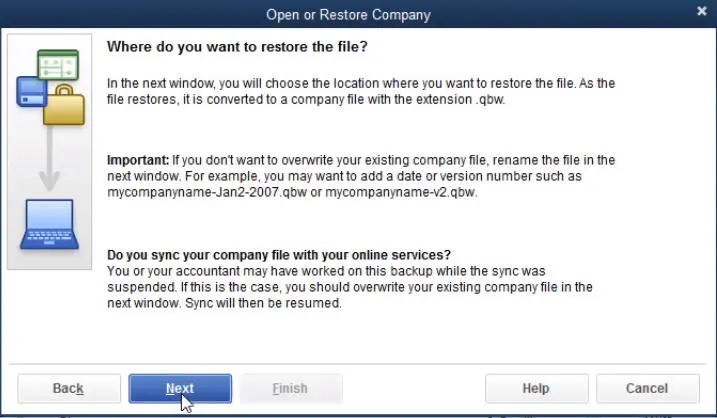
METHOD V: Restore a previous backup Company File
This is one of the easiest methods where you just need to restore a previous backup file and again enter the transactions to this file in order to make it updated and usable.
Although, this method is not an optimal solution because backup can be a few days older and data volume of the transactions be too much that can make this method a little hectic.
This troubleshooting method is the manual update solution. So, let’s get started by logging in to the computer and then fill in the administrative credentials.
Follow the below-mentioned step by step procedure without any miss. They are:
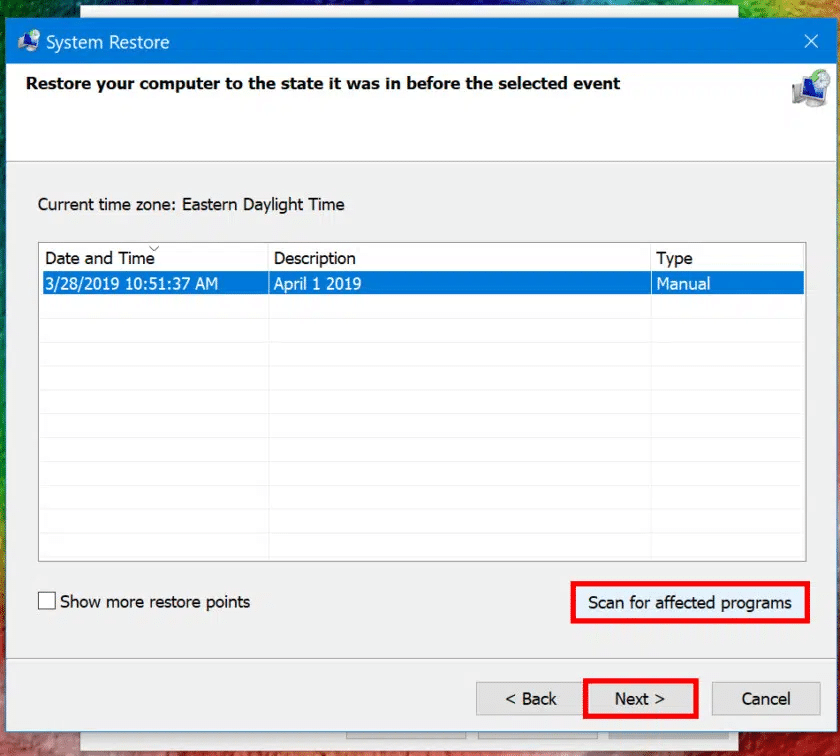
Go for the Start button of Windows and choose Programs. After that, select the Accessories option and then System Tools. Now you need to opt for the System Restore.
Here a new window pops up before you. On that window, opt for
“Restore my computer to an earlier time” and after that click on Next button.
Then From the given option “On this list, click a Restore Point” choose the most recent time you want to restore to.
Go and click the Next option.
Once again click Next option on the confirmation window that will pop up
Now when the restoration process will start, you just need to be patient and wait.
Finally restart the computer to apply the change.
This method will most probably work for you and you will not need to proceed further. Sometimes, it might not work for you. Then it will be better to move on to the second solution. All you need is some patience and a pain-staking attitude so that you can follow and perform each step with no loophole.
METHOD VII: Novice Computer User Solution
Begin the process by downloading the QuickBooks Error Missing Name List Problem repair utility. Then Save this somewhere on the system, most likely on the desktop
After this locate the file then, double-click to open and run the application.
Now opt for the Scan process.
After the Completion of the scanning process, click on the Fix Errors button
All the files that were damaged will be repaired automatically.
Once the process is done, the vital part begins.
Finally, reboot the system to verify whether the changes have taken place and whether the problem is resolved or not.
We hope that all these above-mentioned troubleshooting methods will help you effectively to resolve the QuickBooks missing name list problem. However, at some point if you are still struggling with this problem and are not able to see the names in the QuickBooks name list, you can reach out to our QuickBooks experts for instant assistance. Our QuickBooks teams of experts are available 24×7 to assist you professionally and will resolve the issue within minimum turnaround time.
QuickBooks file doctor is by far one of the most sought-after tools offered by Intuit, the developer of QuickBooks. As the name suggests, this tool is designed in a way to culminate all sorts of company files and QuickBooks-related file issues. If you have been a QuickBooks user for a while now, you might have at least once heard about the QuickBooks file doctor tool. This particular tool was introduced in the year 2012 by Intuit, and since then it has been helping businesses to eliminate different errors that are experienced when working on QuickBooks.
QuickBooks file doctor tool automatically detects the company file and QuickBooks related file errors and performs the necessary steps to fix them on its own. A bunch of steps can be performed to download, install, set up, and use QuickBooks file doctor tool, which we have tried to elaborate on later in this piece of writing. You can access the file doctor tool using QuickBooks tool hub. You can stick around this article to understand the QuickBooks File Doctor Tool in detail. However, in case you need any professional help, then need not worry, as you are backed by certified professionals of the Host Docket team, and they will guide you through the right solution.
Ring us up at +1-888-510-9198, and get all your queries and doubts not just regarding QuickBooks file doctor, but any issue related to QuickBooks answered by certified professionals. Now, let us dive in deep and explore further about QuickBooks file doctor tool.
What’s the first thing that comes to your mind, when we say QuickBooks file doctor tool? Well, it might surely relate to files associated with QuickBooks. In simple words, QuickBooks file doctor tool is basically a file-repairing tool that can be used to fix errors that are often encountered when working on QuickBooks accounting software, especially the errors that are associated with the files. This particular tool is built-in only in QuickBooks 2016 and the later versions. It is further available to download from the official Intuit website.
Note: This tool works only for the UK and US versions of QuickBooks and is compatible with all QuickBooks desktop versions for Windows. If you are a Mac user, you won’t be able to access this tool and avail of its benefits. Here is what else you should know about QuickBooks file doctor tool!
Errors You Can Fix Using QuickBooks File Doctor Tool
Just in case you are having any issue when opening the company file, then QuickBooks file doctor tool can help you with that. However, other than that, you can try rectifying this error using the steps enumerated below:
Did you know that there are two types of file doctor tool? Well, many of you might not know that, but QuickBooks file doctor tool can be categorized into two different types, namely:
QBFD Stand Alone Versions- This is used from the server where only the QuickBooks database server manager component is installed to host the file.
Before you proceed with the steps to download and install QuickBooks file doctor tool, here are some quick important things overview that you should keep in mind.
Uninstall the existing QBFD before downloading the latest version, to avoid any sort of errors.
Note that all QuickBooks versions post 2015 come with an inbuilt file doctor tool, but it is suggested to use the external file doctor tool only, as it carries various features that the inbuilt one didn’t possess.
If you are a QuickBooks for Mac user, then file doctor tool isn’t for you. Mac users won’t be able to access the file doctor tool.
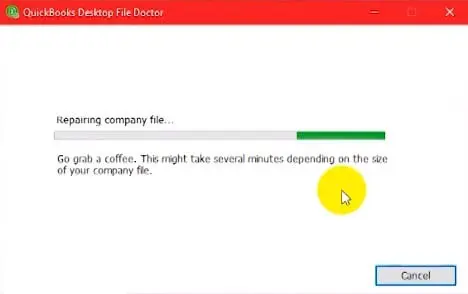
The file doctor tool might show up on its own, in case of any error. All you would have to do is to click on the start tab and let the tool perform its fixation steps.
Steps to Download QuickBooks File Doctor Tool
You can try performing the below steps to download the file doctor tool successfully.
Download QuickBooks tool hub and move to downloads section by pressing ctrl + J.
Now that you have downloaded the tool hub, it is time to run this tool. Before exploring the steps to run the tool, it is essential to go through the below-discussed pointers to avoid any errors later on.
Before you try to access the file doctor tool, make sure you have the admin credentials.
A proper internet connection is something you can’t skip.
Another essential point is to keep a check on the file size. The file size limit is 1.5 GB.
Make sure that you have installed a single version of QuickBooks, to avoid any error in between the process.
Update QuickBooks to the latest release before accessing the QBFD.
Steps to Run QuickBooks file doctor
Once you are thorough with the points to remember, it is time to run the QuickBooks file doctor tool. Perform the below steps for this:
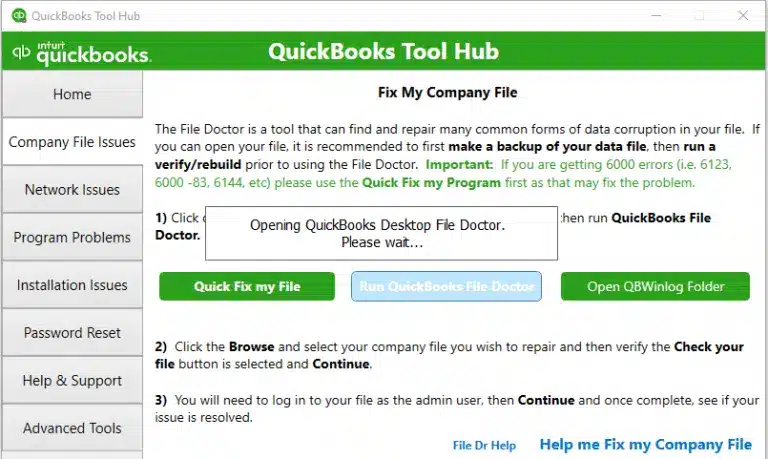
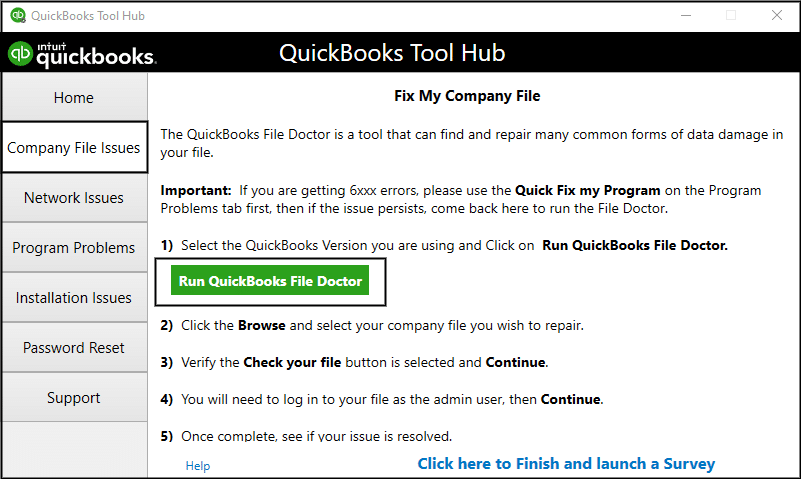
To run QuickBooks file doctor tool, go for the company file issues tab in the tool hub.
You will see the center option stating QBFD. Running the tool might take some time.
Be patient till the tool runs.
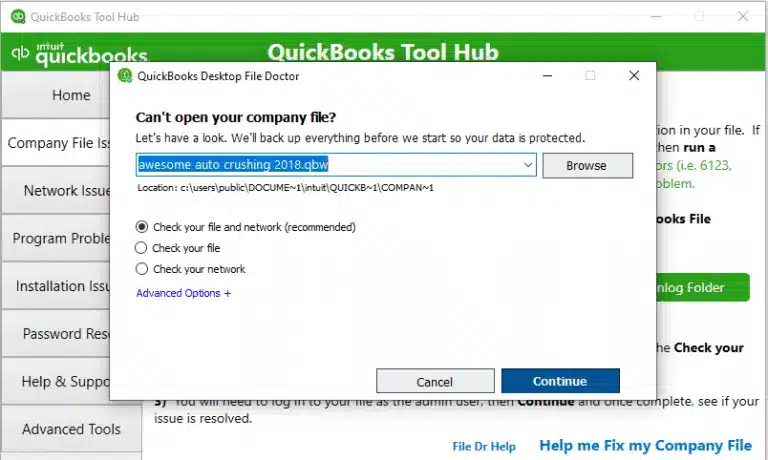
Now, choose the company file from the drop-down menu. In case you are unable to find the file, browse and look for the file.
Select check the file option and hit continue.
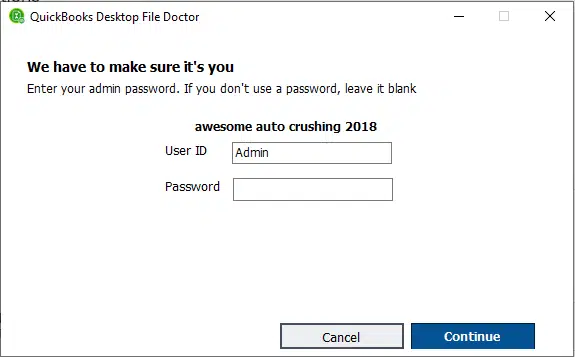
Toward the end, enter the QuickBooks admin password and click on next.
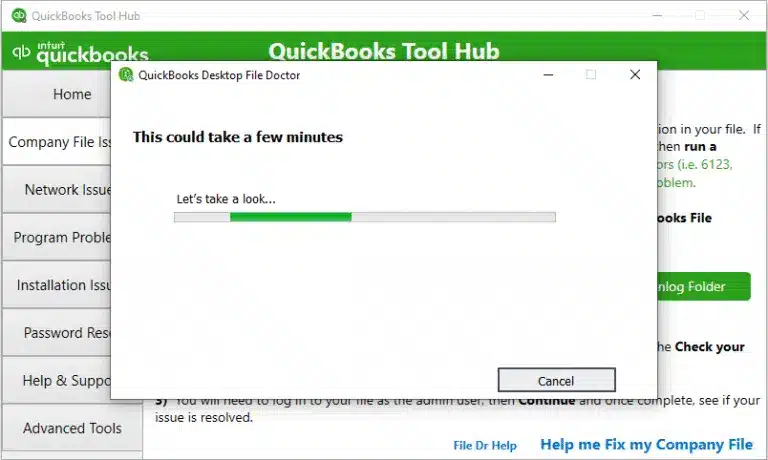
Note that, the scan time completely depends upon the file size and might take around 10-15 minutes in general. After the scan is complete, make sure to open the company file and check if the error ends successfully.
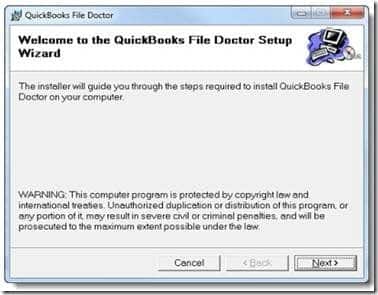
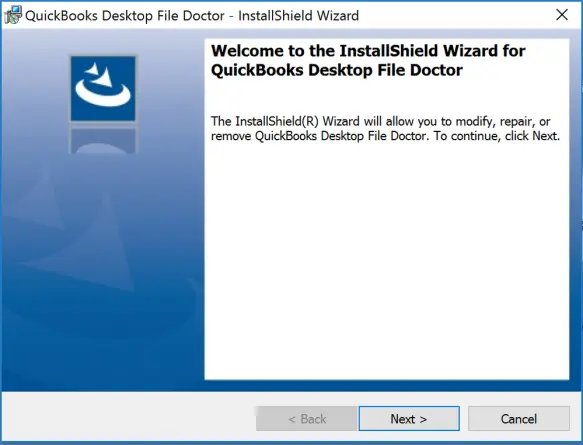
Double-click the file doctor tool icon and perform the onscreen steps to complete the installation process.
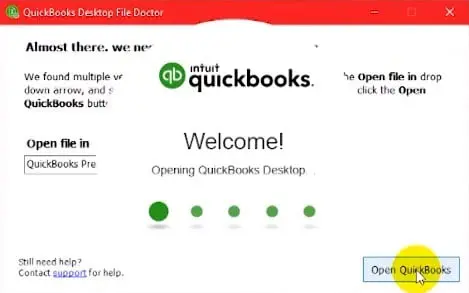
Once the tool is available and it doesn’t show up on the screen, open it from the taskbar.
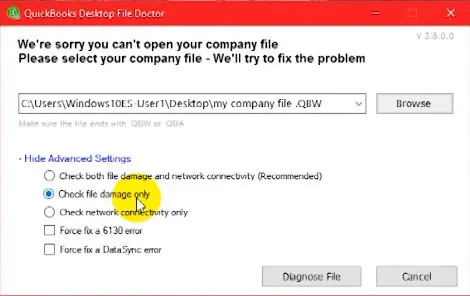
Click on browse and find the damaged company file.
Start the file diagnosis.
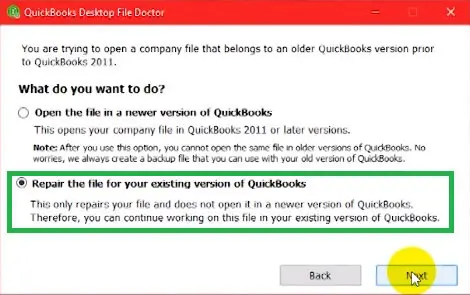
You will be provided with two options in the file doctor tool window.
There, you need to choose the one that is suitable according to your issue.
The options are self-explanatory and help you in deciding.
Just in case you have received 6000 series errors or the company file gets damage, go for the first option.
Or else, in case of network issues, choose the second option.
Enter the company file admin password and click on next.
Go for any of the two options mentioned below, to continue diagnosing and fixing the issue.
Workstation option: Select this, if you are operating diagnosis and troubleshooting a client’s system. This indicates that the company file isn’t stored or hosted on the system.
Server Option: In case you are diagnosing and fixing issues on QuickBooks client system i.e., QuickBooks company file isn’t stored or hosted on the system.
Click on the yes tab and in case you are working on QuickBooks server/host.
Or choose not, if you are on the QuickBooks workstation.
QuickBooks file doctor tool will repair the company files on its own.
Wait for the process to end, and do not disrupt the process in between.
When the process ends, close the file doctor tool.
Open the company file at the end of the process.
Use the Built-In QuickBooks doctor tool using the steps below
The built-in file doctor tool only supports Windows 10, 8, 7, and MS Server 2003-2012. Note that, you can repair the network and company file issues using this tool and it only supports the US, UK, and Canada QuickBooks versions. The tool helps repair files and data and need not be download separately. In case the .NET Framework 2.0 is not present on the desktop, then the file doctor tool will install it via the diagnostic tool. You can carry out the below steps to use the built-in file doctor tool successfully.
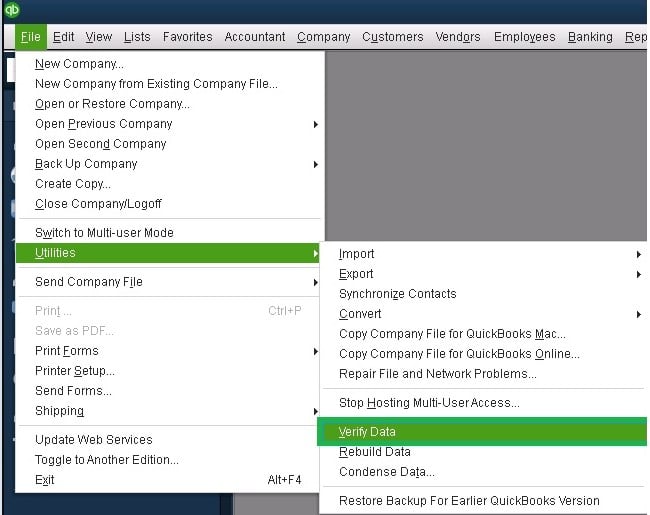
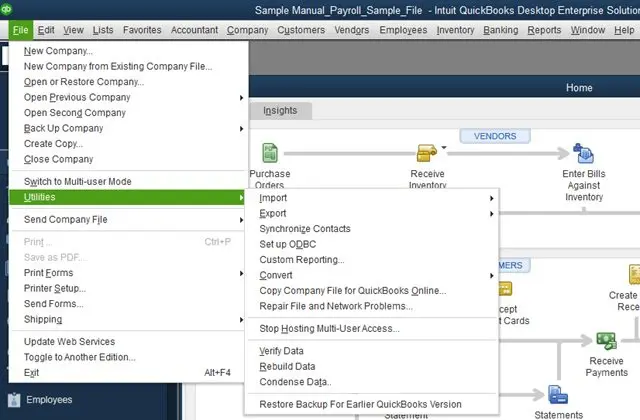
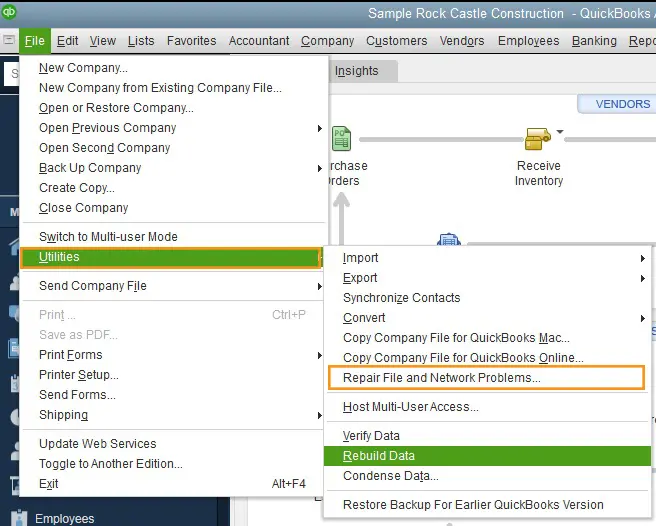
Start with launching QuickBooks and ensure that the company file remains unopened.
Move to the file menu and choose the utilities tab.
Go for repair file and run the QuickBooks file doctor tool.
Click on the browse option select the company file that requires repair and further click on open tab.
Choose the type of fix from the show advanced settings window and click on the next tab.
Enter the admin ID and password and hit next.
Towards the end, try to launch the company file again.
What Are the Common Outcomes of QuickBooks File Doctor Tool?
After you run the QuickBooks file doctor tool, you can see the following outcomes on the screen:
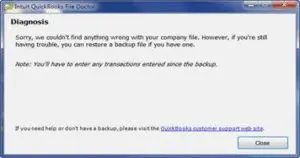
QBFD didn’t detect any problem
This outcome states that the tool didn’t find any bug and it might require you to re-login the company file. You can also set up the auto data recovery and enter the transactions since the last backup.
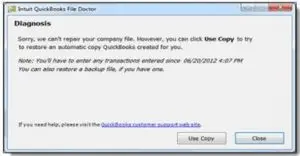
QBFD diagnoses and fixes the issue
Another outcome can be that the tool identifies and fixes the error for you. Later on, you will need to open a new company when the process ends. This is the most favorable outcome so far.
Error detected but can’t be resolved
In this case, it can happen that when you run the file doctor tool, it spots the issue but is unable to rectify it. In such a scenario, you must use the auto data recovery tool and also enter the transactions manually.
What to do after repairing the QuickBooks company file?
After the tool has identified the issue and fixed it, you will have to back up the company file in a removable hard drive. Note that you should backup the data right at the end of every month.
If the file doctor is not working:
In some situations, you might not be able to use the QB file doctor tool and an error might come up on your screen stating “file doctor is not working”. This is possible due to the following factors:
When you are trying to update the company file
In case you forgot to install any company files during installation.
If you are unable to restore the files
Or if there is any damage or corruption in the files
Use auto data recovery to fix the QuickBooks file doctor not working issue.
Further configure the third-party antivirus software and also turn off the hosting mode.
Are there any limitations to QuickBooks Doctor Tool?
Well, not everything can be perfect. There are certain limitations to the file doctor tool including:
The company file size should be less than 2GB.
You will need a proper internet connection to upload the company file.
To access the tool and perform the steps, admin access is a must.
In case you have multiple versions of QuickBooks installed, then you might find it difficult to access the network connectivity diagnosis and repair option.
Also, if the database server manager is present, you might find it difficult to access these features.
There is a lot to learn and understand about the QuickBooks Desktop file doctor tool. It is one of the most promising QuickBooks tools to dump errors that are associated with the company file. We have tried to list as much information as possible in this particular segment. Now that you have reached this section of the article, we believe you might have understood the steps to make the optimum use of this software. On the contrary, if you find this tool a bit difficult to operate, or if there is any query disturbing you, do not hesitate in contacting our tech support team at +1-888-510-9198, and they will ensure that all your doubts and queries are answered in the best possible way. So, do not hesitate to reach out to us immediately to get rid of all sorts of errors in QuickBooks.
Frequent Asked Questions
How to Download QuickBooks File Doctor?
Download QuickBooks File Doctor using the QuickBooks Tool Hub utility. You can find the QuickBooks File Doctor tool within the QuickBooks Tools Hub under the Company File Issues Tab.
What is QuickBooks File Doctor Tool?
QuickBooks File Doctor tool is a tool that authorizes the user to rectify the errors and resolve the issues in the best possible manner. This tool is available in two versions, one which is built-in and the other named a stand-alone version. Both versions help to check and fix the errors that occur in the company file. In a nutshell, the QuickBooks File Doctor tool is a tool to get rid of errors and issues that the user encounters while using the QuickBooks Software.
Which errors can be resolved with the help of file doctor tool?
QuickBooks File Doctor Tool generally helps to rectify errors such as Error -6150, Error -6000 -82, Error -6000 -305, Error -6000 -301, Error -6147, and Error -6130. Also, the file doctor tool can be used in case the users have missed or blank lists for the customers and employees. Not only this but the file doctor tool can also be used in case the file is strongly damaged and doesn’t open.
What is the difference between the built-in file doctor tool and the stand-alone version?
QB File Doctor tool has two versions, one is the built-in file doctor tool, and another is the stand-alone version. File Doctor stand-alone version is generally used from the server and is not built-in. Whereas, the built-in version of the file doctor tool is the version that is available in the QuickBooks version 2016 and later. As per the experts, out of the two versions, the QuickBooks file doctor tool stand-alone version is preferable.
How long does QuickBooks desktop file doctor take?
The scan time depends on your file size and can take up to 10–15 minutes. The scan may say it was unsuccessful even if it fixes your issue. Once the scan finishes, open QuickBooks, and your company file.
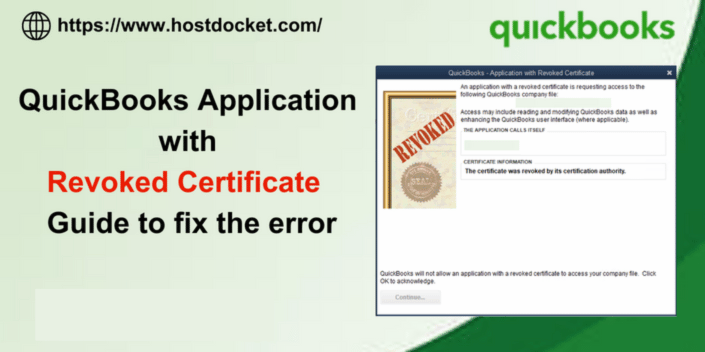
While you try to sync QuickBooks with Intuit apps such as field service management or statement writer or with any third-party app using web connector, a digital certificate indicates that the connection is secure. However, at times, these certificates might expire and eventually drag you in QuickBooks Application with Revoked certificate error. As this error sounds a bit technical and different from usual errors occurring in QuickBooks, you might find it devastating to deal with. As a result of this error, you might not be able to create invoices successfully.
To help you deal with the QuickBooks – Application with Revoked Certificate error, here we are with this piece of writing sharing the in-depth analysis of the error, along with its triggers, and of course the fixes. Thus, scroll through this segment to unleash further information about this particular error. In case you aren’t a QuickBooks professional or seeking for professional guidance to help you deal with application with revoked certificate error, do not hesitate in contacting our QuickBooks technical support at +1-888-510-9198, and they will answer all your queries.
Quick Update about the Application with revoked certificate error
This particular error can also be experienced due to Symantec root certificate, which is used in the development of the applications being revoked. It can further result in many certificates to be considered invalid. In order to maintain the highest security, QuickBooks is designed to only let applications with valid certificates access the company file data. This might appear to be QuickBooks bug, but Intuit is going through a process to detect invalid certificates and is further blocking access to the company file data. This error can be completely fixed once the developer using expired/invalid certificates updates the apps accordingly with a new valid certificate.
Intuit released patches for supported versions of QuickBooks. These patches deliver the newly updated web connector. These patches only update the web connector app, thus, if a customer is using a third-party app that doesn’t use web connector to sync data with QuickBooks, this update won’t fix the issue. Note that Microsoft agreed to re-enable the certificates on a temporary basis, so one can simply sync the data or open the file. This might take some time to change and take effect on your computer.
Causes of Revoked Certificate Error in QuickBooks
Every error in QuickBooks is triggered by some set of factors and the same applies to the revoked certificate error. It can be seen due to the below enumerated triggers:
Syncing QuickBooks with a third-party application without using Web Connector
Using Web Connector to sync QuickBooks with a third-party application.
An outdated digital signature certificate for QuickBooks can drag you into this error.
You can come across a similar issue if the QuickBooks web connector is not updated in a timely manner.
Expect such an error if the QuickBooks software itself is not updated to the latest release.
A quick fix to QuickBooks Application with revoked certificate error
Before performing the below stated measures, you can try this basic fix to get rid of the revoke certificate error. These steps are a temporary workaround for exchanging data QB POS v18 data with older versions of Desktop Pro.
You need to first backup both files.
Now, change the system date of the computer to the day before the POS data was last successfully exchanged.
Open both programs and then run End of Day/ Exchange Data with QB.
Your POS data will be transferred to QB desktop with the correct dates.
You will now have to change the computer date back to teh correct day and enable auto sync and the exchange function will still be working.
Effective Steps to Fix QuickBooks Application Revoked Certificate Error
You can try performing the below steps to successfully end the revoked certificate error and create invoice without any issue.
Solution 1: Set up Digital Signature Certificate for QuickBooks and Third-party application
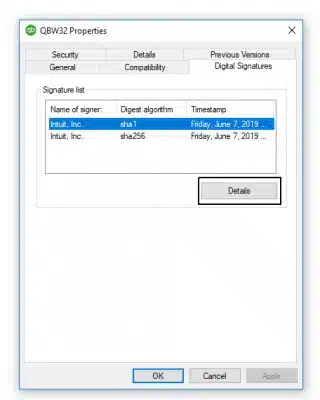
An outdated digital signature certificate can trigger this error. Thus, perform the below steps to set up the latest digital signature certificate for QuickBooks.
Move to QuickBooks folder
If you are unable to find the folder, right click the desktop icon of QuickBooks and head to the properties tab.
Go for open file location option.
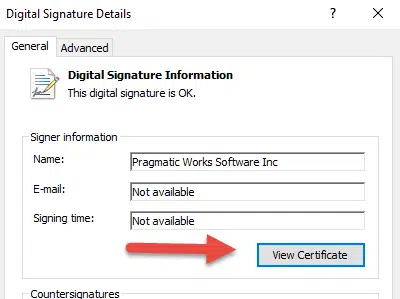
Right click the QuickBooks.exe file and click on properties tab.
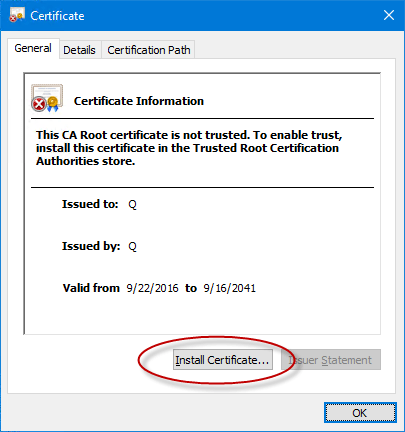
Here, you need to click on digital signature option.
Select the details tab.
Click on view certificate option.
Move to general tab.
Click on the option to install the certificate.
Click on finish and ok tabs respectively.
Set up digital signature certificate for third party application
The steps shared above were related to setting up digital signature certificate for QuickBooks. Now comes the steps to set up certificate for third party application to which you are trying to sync QuickBooks with.
Move to installation directory of the application.
Right click the .exe icon.
Select properties tab.
Click on digital signature tab.
Click on name of thesigner.
Hit details tab.
Go for view certificate option.
End the process, by clicking on ok tab.
Solution 2: Intuit Field Service Management
Note that IFSM doesn’t use web connector for connecting to QuickBooks desktop. In case you see an issue with the setting up IFSM, the steps below can be performed:
Replace the downloaded file in C:\Program Files (x86)\Intuit Field Svc. Integration or C:\Program Files (x86)\Corrigo Integration folder
And lastly, open QuickBooks and start using the Intuit field service management normally.
Solution 3: Update QuickBooks to latest release if error occurs with QSW
It is possible witness the QuickBooks – Application with revoked certificate error with QSW, in case your QuickBooks is not updated to the latest release. You can update QuickBooks desktop to the latest release using the steps below:
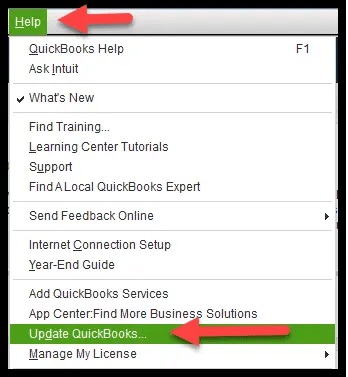
Open QuickBooks
Click on Help tab
Click on Update QuickBooks Desktop
Go for Update now tab
Select Get updates
ExitQuickBooks after the updates are downloaded
Reboot QuickBooks
Click on yes on the automatic prompt for installing the downloaded updates
Try to sync QuickBooks with the third-party application again
Solution 4: Close all version of QuickBooks
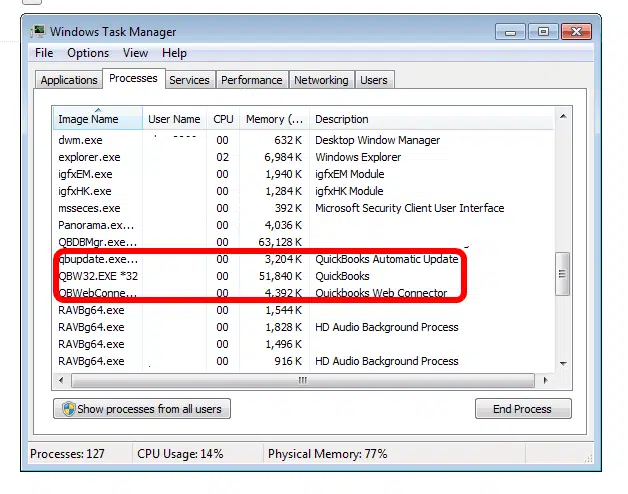
By heading to the task manager, you can try closing all the versions of QuickBooks and processes opened in background.
This can be done by pressing Ctrl + Alt + Delete simultaneously
Choose Task Manager
Head to the processes tab
Ascertain QBW.exe, QBW32.exe, and QBWebconnector.exe aren’t running
End all of them one by one.
Run QuickBooks to check if the issue is fixed.
Solution 5: Rename the QBWebConnector.exe
In some situations, QBWebConnector can trigger such an error. Thus, you can try to rename this using the steps below:
You can press Windows + R
For 64 bit Windows – Enter C:\Program Files (x86)\Common Files\Intuit\QuickBooks\QBWebConnector\.
32 bit Windows – C:\Program Files\Common Files\Intuit\QuickBooks\QBWebConnector\QBWebConnector.exe.
This will open the folder having the exe file of QuickBooks web connector.
Right click the file and press rename tab
Change the current name to OLD_QBQWebConnector.exe.
Head to the file menu and click on open new window
Download QBWebConnector.exe freshly from the Intuit website.
Relocate the downloaded QBWebConnector.exe to the following path: “C:\Program Files (x86)\Common Files\Intuit\QuickBooks\QBWebConnector\”
Lastly, open QuickBooks and check if the issue is fixed.
In case you come across an error when you try to sync QuickBooks with a third-party app without using web connector, then try updating the third party app and sync with QuickBooks. You can perform the below steps:
The QuickBooks – Application with Revoked Certificate error might sound a bit different from the rest of the errors in QuickBooks. However, we believe that carrying out the set of steps discussed in this piece of writing might be of some assistance in eliminating the issue in QuickBooks. On the contrary, if you continue to experience the same error or if you get stuck at any point in time, in that case you are backed by our QuickBooks support professionals. You can ring us up at +1-888-510-9198, and discuss your queries with our tech geeks and get round the clock assistance from certified ProAdvisors.
FAQs related to Application with Revoked Certificate
QuickBooks Application with revoked certificate preventing from doing invoicing. What to do?
In case of Application with revoked certificate, you can perform the steps below: 1. Update QuickBooks to latest release 2. Update Web connector to latest release 3. Also, update third party application and then try to sync QuickBooks
I tried re-loading the application (inside web connector) and it shows a non-expired certificate, but then gets that revoked error?
To fix this issue, try performing the steps below: 1. First, close QuickBooks. 2. Copy the address: http://qbinstall.corrigo.com/6.13/6.13.132/QbEventsShim.exe into your browser to download a new QbEventsShim.exe file. 3. Replace the downloaded file in C:\Program Files (x86)\Intuit Field Svc. Integration or C:\Program Files (x86)\Corrigo Integration folder 4. Open QuickBooks and start using the Intuit field service management normally.
QuickBooks Desktop Statement Writer Stopped launching and began throwing an error message. What to do?
To fix this issue with the QuickBooks statement writer, try updating QuickBooks to the latest releasing using the steps below: 1. Open QuickBooks and help tab 2. Click on Update QuickBooks Desktop 3. Go for Update now tab 4. Select Get updates 5. Exit QuickBooks after the update 6. Reboot QuickBooks 7. Try to sync QuickBooks with the third-party application again