Want to close your books in QuickBooks desktop? Well, this is now possible, as we have curated this segment sharing the complete steps that you can implement to close your books in QuickBooks successfully. You can close your accounting periods to ascertain that old invoices from invoice don’t accidentally update the old accounting periods in QuickBooks. It is possible to close your books at the end of every fiscal year. Also, QuickBooks creates automatic adjustments in preparing for the coming year. To find out the entire procedure to close books in QuickBooks successfully, make sure to read this segment. Or you can further get in touch with our technical support team at +1-888-510-9198.
Year-end adjustments QuickBooks desktop makes automatically
QuickBooks Desktop carries out year-end adjustments based on the fiscal year start month. Let us understand that:
QuickBooks adjusts the income and expense accounts at the end of the year to nullify them and let the user start the new fiscal year with zero net income
QuickBooks further makes an adjustment entry to net income. Like, if the profit for the year was $12000, the equity section of the balance sheet shows a line for a net income of $12000 on the last day of the fiscal year
On the first day of the fiscal year, the QuickBooks increases the retained earning equity account by the previous year’s net income and decreases the net income by the same amount. This will start new fiscal year with a net income of zero.
Important Points to close books in QuickBooks Desktop
Before you close the books, keep a check on the following points:
Advantages to closing the books
Restricted access: The user can create a closing date password in order to restrict access to data from the prior accounting period, that includes the details of every transaction. The user needs to find out the closing date password and have the right permissions to modify or delete transaction in a closed period.
Reporting: Note that the changes made after the closing date to the transactions dated on or before the closing date show in the closing date exception report.
To run the report and move to the report’s menu
Furthermore, select the accountant and taxes and further select the closing data exception report
The closing date history shows the current and past closing dates and the user who set the closing date.
Note that the closing entries are made after recording all the adjusting entries. And when the books are closed, the user isn’t supposed to enter any entry for the fiscal year.
There are certain programs that restrict the user from making any entry even if that entry corrects or makes the books accurate
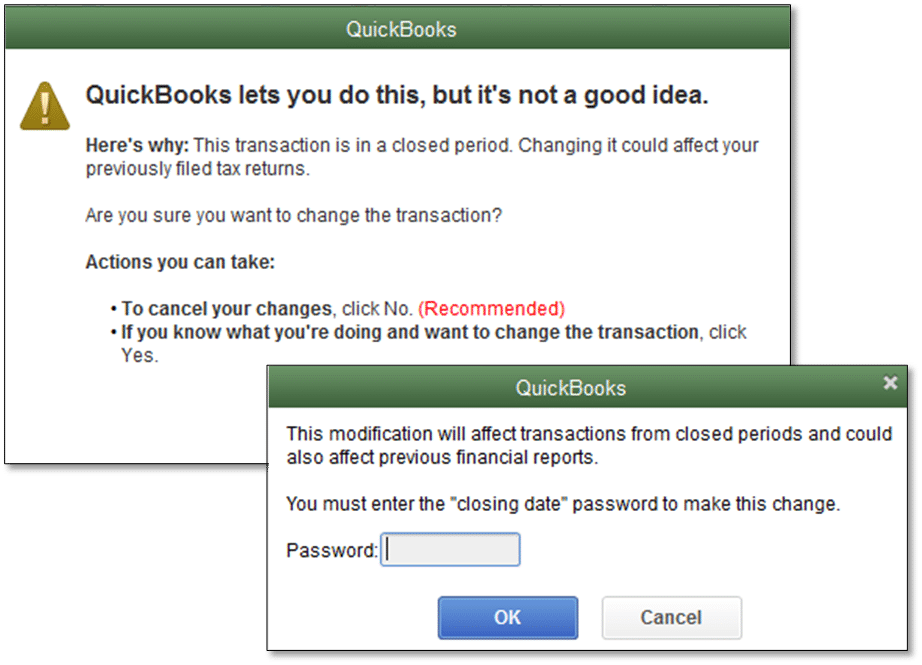
QuickBooks lets the user to enter transaction that affect the balance of the closed fiscal year. But it either tells the user that it isn’t something we recommend or it will ask for the closing date password if you set up one.
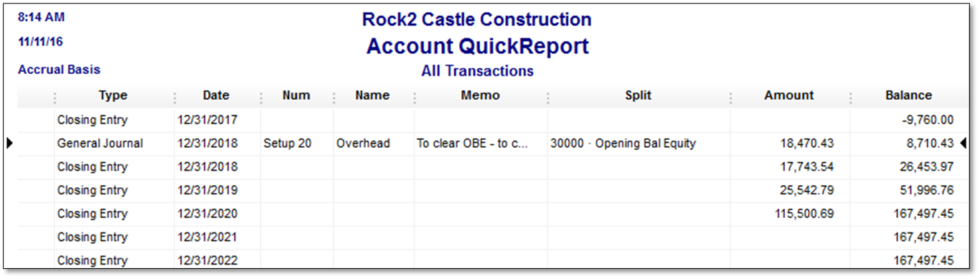
QuickBooks doesn’t have an actual transaction for closing entries that it creates. After you run a report, the program computes the adjustments. However, the user can’t QuickZoom on these transactions. The adjustments are termed as closing entry.
Note that closing entries are the entries made at the end of the fiscal year to transfer the balance from the income and expense account to retained earnings. The user aims at zero out the income and expense accounts, and then add the fiscal year’s net income to retained earnings.
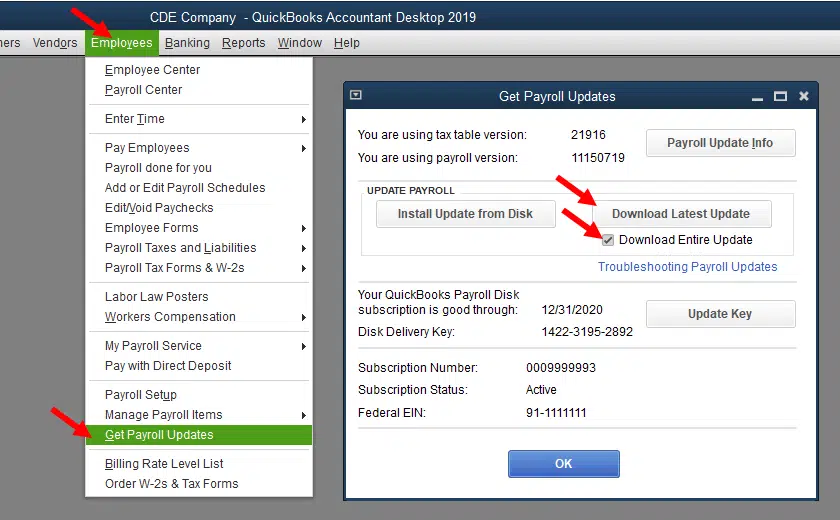
Steps to close the books in QuickBooks Desktop
You can try performing the below steps to close books in QuickBooks easily:
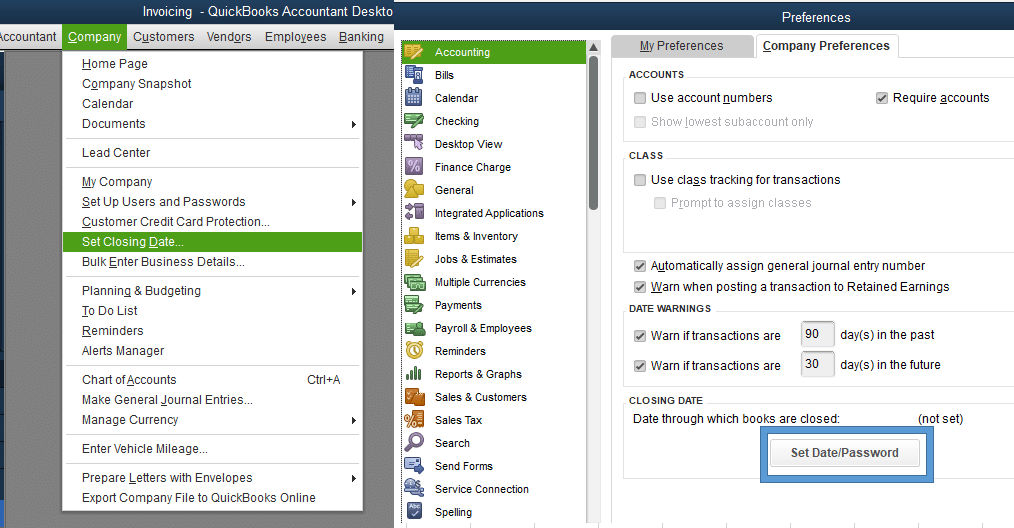
Initiate the process by heading to QuickBooks and further click on edit and preferences tab
Choose accounting tab and select the company preferences tab
The user will then have to click on the set date/password tab.
You need to enter the date you wish the books to be closed and set the password and click on ok tab
After that, the closing date will be set
No invoices edited prior to the particular date will sync into QuickBooks
If an invoice from the closing date or earlier syncs, you will get a notice to let you know that the period is closed
Lastly, the sync process is successful, though the invoice did not get updated in QuickBooks
Now that you know what is the process to close books in QuickBooks desktop, it is time to implement the steps right away. However, if you fail to do so for some reason, then contacting our QuickBooks support professionals might help. You can dial our tech-support number i.e., +1-888-510-9198, and our certified QuickBooks ProAdvisors will help you with your queries.
Did you find incorrect COGS in QuickBooks Desktop when trying to make certain adjustments to profit and loss reports? Well, this error is not a common error, but lately has been reported by a few QuickBooks users. This error basically indicates a particular change in the cost of sold goods. Incorrect COGS can be a bit confusing error for QuickBooks users. Thus, to help you out, we have come up with this segment right here, sharing the complete procedure that can be performed to correct COGS in QuickBooks Desktop and also the reason behind incorrect COGS.
Thus, to learn more about this issue in QuickBooks, make sure to read this segment carefully, or you can also consult our technical support team at +1-888-510-9198, for any sort of further technical guidance.
Initially, move to the sales history section in QuickBooks POS
Followed by, clicking on the I wish option
The next step is to go for the financial details to display option
Then, in case the financial information is sent to QuickBooks successfully, the status will show up, but if there is no option to access the file in QuickBooks, then the entry has likely been erased.
You now have to resend the document available under the next financial exchange option if QuickBooks doesn’t contain the receipt.
Once done with that, deselect the sent checkbox if any receipts show a not sent status and if the option to mark this document as successfully sent is opted.
The last step is to click on ok and end the process.
Method 2: Delete any changes causing the incorrect cogs in QuickBooks error
You need to observe if there are any faulty changes. If there are any, you can try performing the below steps to delete any changes made.
The very first step is to right-click any column header and select Customize columns
Once done with that, you need to select inventory and go for quantity adjustment history
The next step is to enter the incorrect amount in the diff cost column and also make necessary quantity adjustments after adding the diff cost to the choose column list.
After that, you need to click on the save tab
Also, double-click the edited entry and go for I want to, along with clicking on check it.
You now have to follow the same steps to check the cost adjustments by opting to view the financial history.
Open it in QuickBooks and then go for the inventory and finally click on the cost adjustment history.
Any wrong alteration can be undone by the user, by simply clicking on I wish to and also opting for a reverse memo from Qty adjustment or cost adjustment history.
In order to avoid the COGS error in QuickBooks, it is essential to correctly set up the cost of items and preferences sold in QuickBooks. If the account is set incorrectly, then one might have to choose the item list. And also select the correct COGS account corresponding to each item.
Method 4: Fix the cost input of items to correct cogs in QuickBooks
You need to perform the below steps to double-check the input cost of items. The major cause of the error can be the incorrect entry of the cost items. This can be fixed by checking and configuring the input cost of the items.
To begin with, you need to go for the column heading for the ext cost column. Also, match it to the item name.
Also, note that the names of the items with a value of 0.00 or an inaccurate quantity, before moving on to the next stage.
The next step is to click on the inventory and further click on the item list
After that, select each item and click on edit.
You now have to take the number of items sold from the history report and multiply it by the item’s cost.
Coming to the end of this segment, we believe that the reader might be able to understand the reasons why the correct COGS in QuickBooks error shows up. Along with that, the measures can be taken to successfully culminate the issue. Just in case you come across the same issue again and again, then connecting with our QuickBooks technical support team at +1-888-510-9198 is suggested. Our certified ProAdvisors will ensure to answer all your queries immediately and make sure that you do not face the same error again.
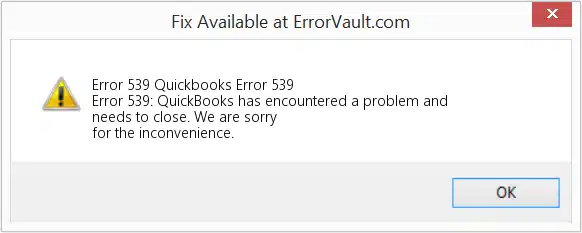
Trying to work on QuickBooks and suddenly bumped into QuickBooks error code 539? QuickBooks error code 539 is a common error that shows up on the screen stating: Error 539 – QuickBooks encountered a problem and needs to close. This is basically a runtime error that occurs in case you experience QuickBooks crashing. Other than that, QuickBooks error 539 can also be witnessed when printing tax forms and so it is termed as QuickBooks tax form printing error 539. This error not only interrupts the smooth workflow but also requires immediate fixes to ensure smooth workflow continuity.
To help you tackle QuickBooks error 539, here we are with this segment sharing the complete set of steps to get rid of this issue in QuickBooks, along with the causes and signs of the error. Thus, make sure to stick around this segment carefully, or you can also consult our technical support team at +1-888-510-9198, and we will provide you with instant support and guidance.
Also Read:
Signs and symptoms of QuickBooks error 539
Identifying the error code 539 becomes easy with the help of below signs and symptoms:
The system becomes slow and gives delayed responses to user inputs
An error message shows up on the screen
QuickBooks and PC crash at the same time indicating the error
What can trigger QuickBooks error 539?
However, every error in QuickBooks is triggered due to some or other reason. But when it comes to QuickBooks runtime errors the reason isn’t definite. Usually, runtime errors in QuickBooks occur due to conflicting programs operating at the same time. It can further be experienced due to memory problems, a bad graphics driver, or a virus infection. Regardless of the reason, it is essential to fix the QuickBooks error 539 and other runtime errors immediately.
Solutions to fix QuickBooks Error 539
Now that you know what can lead you to QuickBooks error 539, it is time to perform the necessary fix to this issue. Here are the solutions that can be performed to get rid of the error permanently.
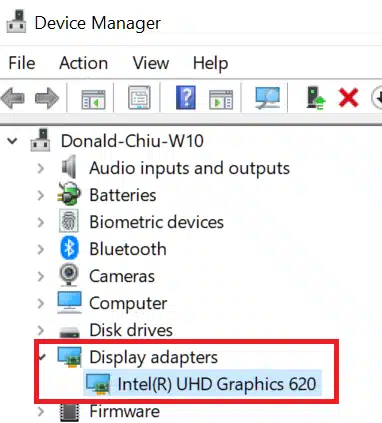
Solution 1: Graphics driver should be reinstalled
In case the graphics driver is not set up properly, then you might end up in QuickBooks error 539. In such a scenario, it is suggested to uninstall the graphics driver and get the correct version installed on the system to simply fix the error.
Start by simply pressing the start tab
Then, head to the device manager
Now, search for the graphics driver option
Click on Uninstall it
Solution 2: Uninstall any suspicious conflict app
In certain cases, any suspicious app running in the background can also trigger such an error in QuickBooks. Thus, uninstalling the conflicting apps might work in such cases. The steps involved here are:
You need to first click on the start menu and then open the control panel
After that, head to the programs and features tab within the control panel and then click on uninstall the program
The next step is to find any conflicting programs and uninstall it
The last step is to restart your system and check if the issue exists.
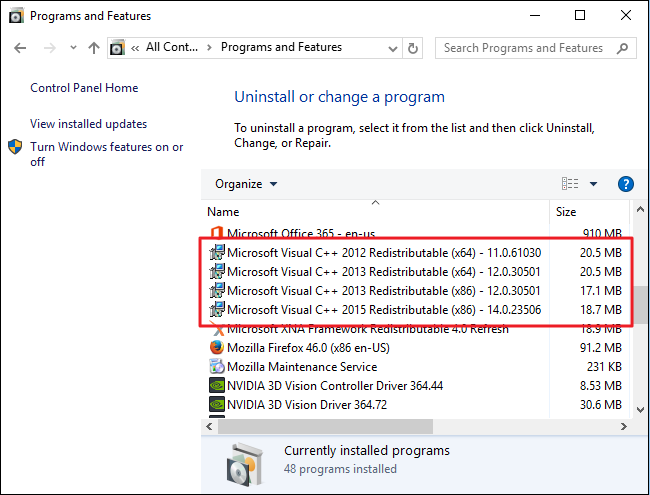
It is recommended to get the Microsoft Visual C++ package reinstalled on the system. The steps involved in that case are listed below:
You need to first open the control panel via the Windows start menu
After that, choose the Programs and Features tab
The next step is to look for the Microsoft Visual C++ redistributable package and then click on it.
Once done with that, click on the uninstall tab
And after the uninstallation process ends, restart your system.
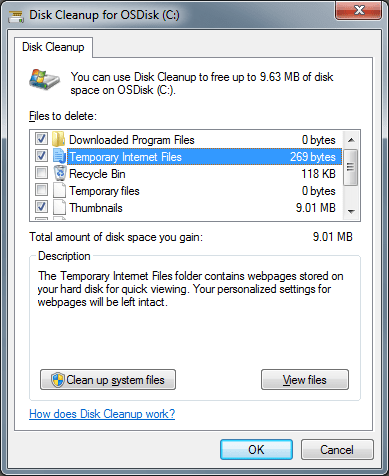
Solution 5: Running the Disk Cleanup
After the system gets over occupied cache and junk files, then such an error is probable to occur. In such a scenario, the solution to this issue is a disk cleanup tool, to simply free up space on the hard drive. The steps to be performed here are:
Cleaning system junk with Disk Cleanup – Screenshot
The very first step is to head to the Windows start menu and then enter disk cleanup in the search bar
Now, double-click the disk cleanup icon
Within the cleanup window, go for C: disk and this will begin the scan and the cleanup process.
Toward the end of this segment, we believe that the reader might be able to successfully get rid of the QuickBooks error 539. Just in case the user is unable to fix the issue, or if there is any query remaining unanswered, then contacting our technical support team at +1-888-510-9198 might work. Give us a call and our technical sound certified ProAdvisors will address your queries immediately.
Do you know how and when to give a credit memo or delayed credit to customers? Well, we can help you with that. At times, instead of a refund, some customers prefer getting a credit that they can use to reduce the balance on their next invoice. It is possible to handle credit memos in QuickBooks using a bunch of ways. You have two different options, one is to create a credit memo to immediately reduce a customer’s current balance, and the other is to enter a delayed credit so that it can be used in the future. In this segment, we are going to discuss further about the differences and how they can be applied to the customer transactions.
It should be noted that if you are refunding money that a customer has paid already, then it is suggested to record a customer refund in QuickBooks by creating a refund receipt. Having said that, let us proceed with the segment and understand QuickBooks credit memos better. However, if you have any queries, or if you need any sort of professional guidance at any point in time, then we suggest you consult our technical team at +1-888-510-9198, and we will help you with your doubts immediately.
What is the difference between QuickBooks credit memos and delayed credits?
QuickBooks lets you give credit using a credit memo or delayed credit. However, there are a few key differences that we have jotted down. Let us evaluate:
Credit memoin QuickBooks
A credit memo can be used in case your customer wants to immediately reduce their current open balance.
It can also be used as payment for an invoice by the customer. Either they can use all of their credit memos or a portion of it.
A credit memo can be applied when recording payment for a customer’s invoice.
Note that, credit memos impact sales reports, even if you do not apply them to the invoices.
Delayed Credit in QuickBooks
In case you wish to track a customer’s credit for future use, and they do not want it to instantly affect their current open balance, then using a delayed credit might help.
The customer can use their delayed credit to reduce the balance of an invoice.
One can add delayed credits to future invoices as a line item.
Delayed credits do not impact sales reports until you apply them to invoices.
Steps to create and apply a QuickBooks credit memo
In order to create and apply a credit memo, you can try performing the steps enumerated below:
Step 1: Turn on or turn off automatically apply credits
Begin with heading to the Settings tab
Choose Account and settings
You now have to choose the advanced tab
Once done with that, choose the edit tab in the automation section
Also, turn on automatically apply credits, in case you wish to automatically apply credits to customer balances or open invoices.
After that, turn if off in case you wish to make a decision that open invoices you want to apply credit memos to.
The last step is to choose Save and click on Done.
Simply turn on auto-apply credits, to automatically apply credits to the oldest open invoices for the same customer. In case it is on, here is what happens:
In case you have older open invoices, QuickBooks will apply the credit to the oldest open invoice. If none, QuickBooks will apply the credit to the next invoice.
Just in case the credit matches the amount on the invoice, the credit memo and invoice will show Closed. In case the credit is less than the amount of the invoice, the credit memo will show as closed, and the invoice will depict partial.
Also, if the credit is more than the amount of the oldest open invoice, QuickBooks applies the remainder to the next oldest open invoice. In case there is no more open invoices, then the status of the credit memo will show unapplied
In case you create credit and the customer owes nothing, then they will have a negative balance.
Case 2: If the automatically apply credits setting is off
If you create a lot of invoices and credit memos for customers, then you need to turn off auto-apply credits. Just in case you apply specific credit memos to specific invoices, then here is what happens if it is off:
When you enter a credit, QuickBooks won’t apply it to any open invoices.
Moreover, when you receive a customer payment using receive payment, then it has a credits section. Choose when to apply credits and to which invoices.
In case you don’t link any credits, the customer balance detail report will show that both the invoice and the credit memo have open balances. They further show as open or customer and sales transaction pages.
Remove auto-applied credits from an invoice
Here you need to choose an invoice that has the credits applied
After that, choose the blue hyperlink of the credit applied, and then choose the date.
The payment transaction will open.
The next step is to choose more and then delete. Also, choose yes to confirm.
In case you want to transfer credit from one customer to another, create a journal entry, then apply the credit.
From the customer dropdown, you need to choose customer’s name
Also, enter the credit memo details, such as the date and the amount.
Note that, you can create a custom credit service item so that you can quickly add it to credit memos as a single line item.
After you are done, choose save and close.
Step 3: Apply the QuickBooks credit memos to an invoice
Just in case you turn on the auto-apply credits, QuickBooks will apply the credit for you. And in case you turn it off, you can manually apply a credit memo to an invoice.
Begin with, choose + New
After that, choose Receive payment
Select the customer from the customer dropdown.
You now have to choose the open invoice you wish to apply the credit memo to in the outstanding transactions section
In credits section, choose the credit memos you wish to apply
Also, note that, if you do not see the credits section, in case you haven’t created the credit memo.
Enter the credit you want to apply for the open invoice in the payment column.
Now, leave the payment method, reference no, deposit to, and the amount received fields blank.
Also, enter in the rest of the details including the payment date.
Ensure that the total is correct after applying the credit memo.
The last step is to choose save and close.
Steps to create and apply a delayed credit
For creating and applying a delayed credit, the steps enumerated below can be implemented.
Step 1: Create a delayed credit
To begin with, you need to choose + New
After that, choose delayed credit
Now, from the customer dropdown, choose the customer’s name
And then, enter the details, such as the date and the amount
Note that, you can create a custom credit service item, so you can quickly add it to the delayed credits as a single line item
Adding a delayed credit to an invoice from a prior accounting period will affect that period’s balances.
You need to choose + New
And then go for the invoice
After that, in the customer dropdown, choose the customer.
This opens a window with all open transactions for the customer and further includes invoices and delayed credits.
Also, note that, if you do not see this, choose the small arrow next to the invoice balance due.
Once done with that, find the delayed credit and choose add.
This adds the credit as a line item to the invoice
Now, fill in the rest of the details.
And choose save and close.
Credit memo customization
Any sort of customizations applied to the standard template will be applied by the credit memo. Thus, in order to customize a credit memo, you need to edit the standard template according to the requirements.
Towards the end of this segment, we believe that the information shared in above might be of some help in creating and applying credit memos or delayed credits in QuickBooks online. However, in case of any queries, you need to simply reach out to our technical support professionals at +1-888-510-9198, and they will help you with your doubts instantly.
Want to record and classify refunds easily in QuickBooks? If yes, then this segment is surely something you need to go through. Refunds usually happen when a client has to refund you for an overcharge, returns an item, or cancels a service. The QuickBooks accounting software helps in managing refunds in many ways. You need to record a refund depending on various scenarios. This ensures that your books are up-to-date. To help you out in recording customer refunds in QuickBooks, here we are with this segment sharing the complete set of steps that can be implemented. To learn more, stick around this segment carefully. Or you can also consult our technical support team for any sort of technical guidance and to find out how to record refund in QuickBooks. Dial +1-888-510-9198, for any sort of technical guidance.
Record and Categorize Refunds in QuickBooks Desktop
You can perform the below set of steps to record and categorize refunds in QuickBooks. Let us have a look:
Step 1: Launch QuickBooks
Initially, you need to launch QuickBooks software and then sign into the account.
Step 2: Make a new customer
Before you issue a refund, you must have a customer refund. If the customer is not present in your database, then you need to add them using the steps below:
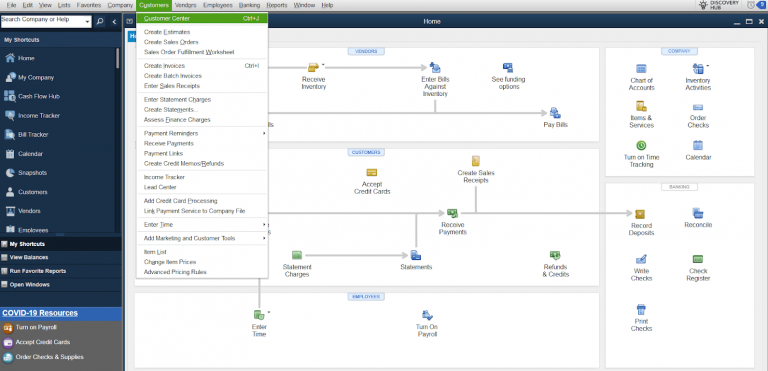
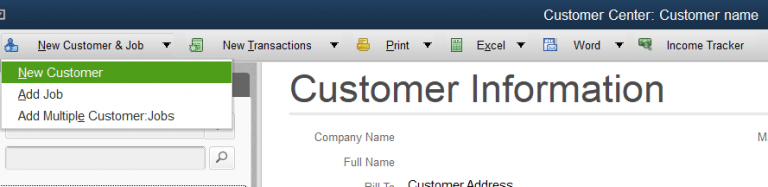
Head to the customer menu.
After that, choose Customer center
You need to then press new customer and job option.
Also, select a new customer.
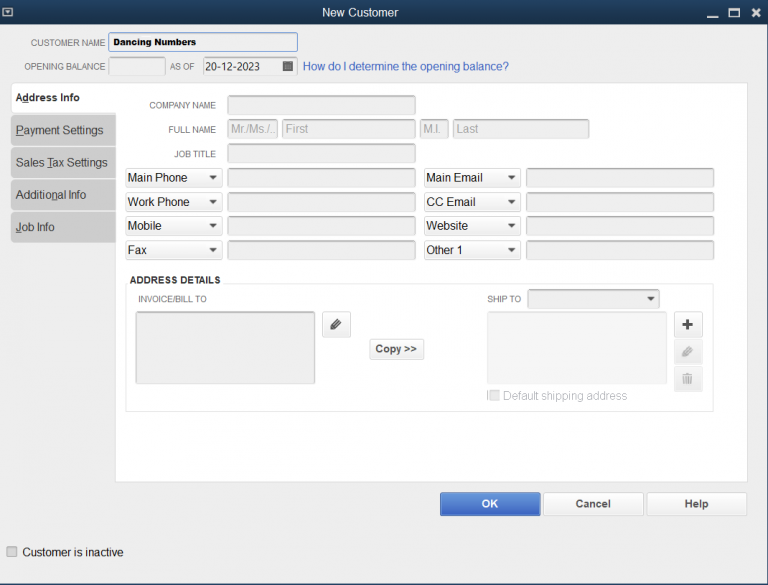
Complete all the customer details like the address, name, contact details, etc.
You need to now click on ok tab.
Step 3: Create a refund receipt
Here, you need to record the money that you are giving back to the customer. The steps involved in here are:
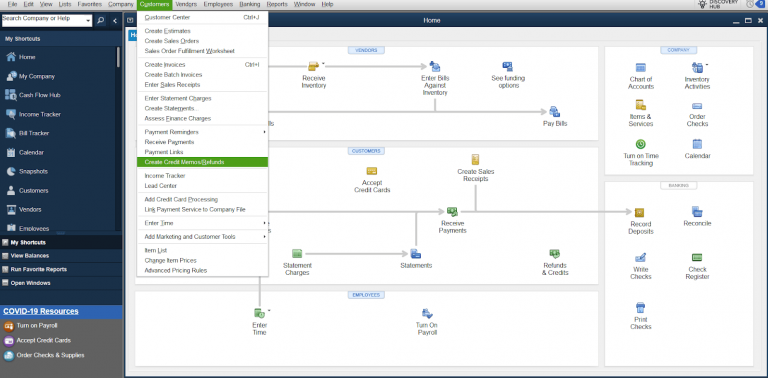
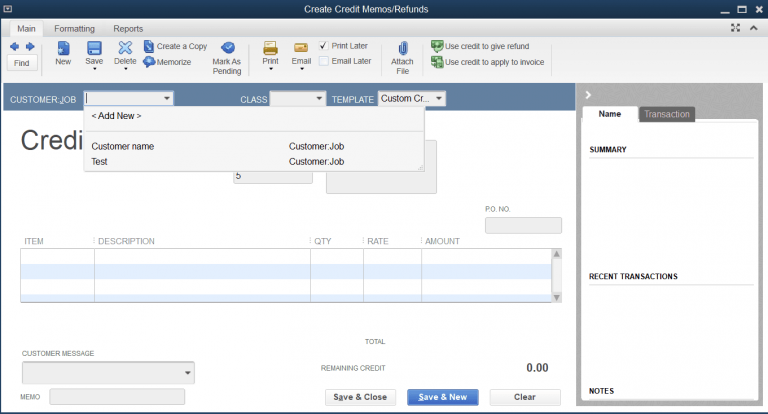
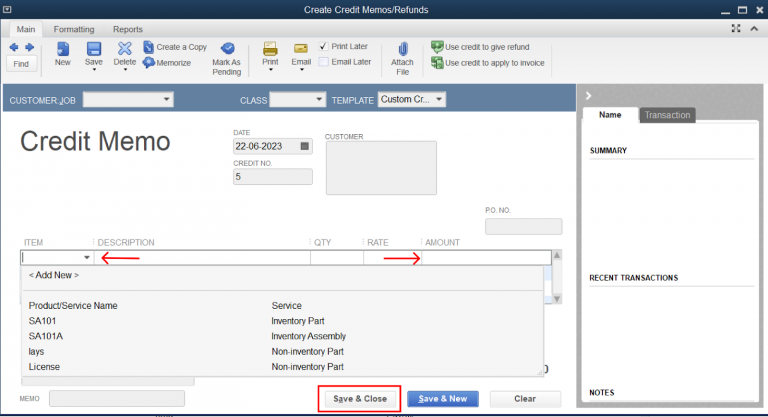
The very first step is to head to customers menu and select create credit memos/refunds.
You now need to select the customer you are refunding.
In the section for item, select the items that are refunded.
After that, type the amount of the refund in the particular account column.
Step 4: Issue a refund check or implement the refund to the customer’s balance
After preparing the credit memo, you can either apply it to the balance of the customer for future purchases or can refund the amount immediately with the help of the steps below:
After the credit memo is saved, a screen will ask you how you wish to handle the refund. Now, select apply to an invoice to use the refund for future purchases.
Now, select the option, and give a refund to refund the amount now.
Just in case you select the option give a refund, you will get notified to select the payment method for the particular refund along with the account the money will be taken from.
Now, click on ok tab.
Step 5: Review the Refund
The last step here is to review the refund to ensure that it has been categorized in the right way.
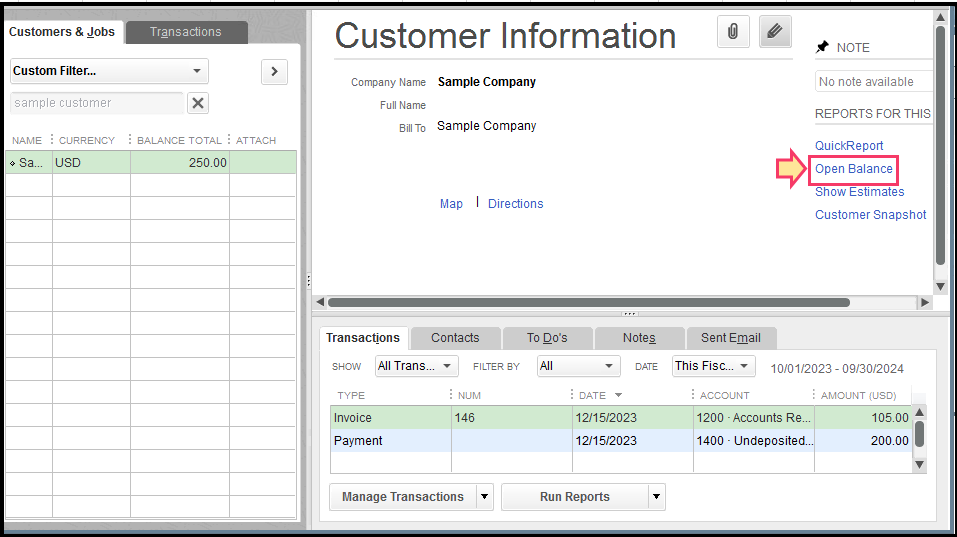
Head to the reports menu.
Select the customers and receivables and then opt for customer balance details.
You need to reimburse a client or vendor for an overpayment or returned items, which includes precise paperwork and prompt processing while issuing a refund in QuickBooks.
Partial Refunds
You can reimburse a partial of the initial payment using partial refunds in QuickBooks online. This gives you options when handling refund requests from customers or vendors. This includes determining the refund amount based on the percentages of the original payment being repaid. In order to ascertain transparency in financial transactions and properly represent the partial reimbursement, adjustment entries can be made in QuickBooks online.
Refunding to a Customer
When you receive a refund in QuickBooks, the overcharged amount must be returned or a return request must be processed. Proper documentation and on time compensation are guaranteed. The process involves customer filing a refund request which the authorized staff then examines and approves. Once you get the approval, the payment must be reconciled in QuickBooks to ensure that the amount reimbursed is the same as the initial transaction. After the reimbursement is processed on time, the consumer is informed in full via email. This maintains transparency and confidence. QuickBooks lets a smooth refund management process that lets businesses to maintain both financial accuracy and customer happiness.
Refunding a payment
When refunding a payment in QuickBooks, reversing the associated transaction, updating financial records, and guaranteeing an exact reconciliation of the refunded amount are essential. Initially, you need to find the original payment transactions in QuickBooks and select the suitable refund processing option. Accounting changes must be made when the refund is started, so that the financial records reflect the refund properly. You further need to check that the updated transaction information matches the financial statements. Businesses can guarantee accuracy in the financial records and transparency in their refunding processes by following the protocols.
In order to get the accuracy of the financial reporting and maintain clean financial records, one needs to accurately record and categorize refund in QuickBooks.
The above-discussed steps were related to recording a refund in QuickBooks Desktop. Let us now check out the steps that discuss how to refund a customer in quickbooks online.
Customer refund if invoice has been paid
Here is how to issue a refund in QuickBooks. Let us have a look:
Step 1: Enter a credit memo
Begin with by simply selecting +New tab and choose Credit memo
Once done with that, select the right customer in the customer field
You now have to enter the credit memo date, amount, tax, and product/service.
It should be noted that in case you choose an inventory item, then QuickBooks will put it back into inventory. In case the item is defective or if you do not wait it added back to inventory, then make an inventory adjustment.
The last step is to choose save and close tabs.
In case the customer has overpaid, then you d not need the credit memo as you will already have an unapplied credit that acts as your credit memo.
Step 2: Make a refund
Here you simply need to choose + New and then go for expense
After that, in the payee field, choose or enter the desired customer.
Furthermore, in the payment account field, choose the bank the money is being refunded from.
Also, in the category field, choose the debtors account.
And in the amount field, enter the amount of the refund.
The next step is to choose the appropriate tax in the tax field.
Choose save.
And also, head to + new and select receive payment.
After that add the customer and choose payment method and deposit to.
The balance should be 0 as they will cancel each other out.
You now need to choose save and close
In case you have online banking, head to transactions and then bank transactions.
Also, match the record you found.
Refund for goods or services that didn’t satisfy the customer
You can make use of refund receipts, in case a customer asks for a refund for an item or service. In case they used a credit card, then you can perform the steps related to refunding a credit card payment. It should be noted that, in order to avoid a double refund, ensure that you haven’t already entered a credit memo yet.
At first, choose new
And also, go for refund receipt or give refund.
The next step is to choose customer dropdown and then opt for customer you wish to refund.
Now, go for refund from drop-down and then choose the bank you deposited the payment for the invoice to.
After that, add all products or services the customer returned in the product/service column.
And then, ensure to fill the date, quantity, rate, amount, sales tax, and other fields.
Once done with that, choose save and close
Refund a customer’s overpayment or credit
One can record a refund to the customer using check or expense, in case:
They want to redeem their open credits
They made a prepayment for an older but canceled it before receiving the goods or services.
They wish to reimburse an accidental overpayment
Making use of a check or expense to record the refund reduces the bank’s balance and offsets the customer’s open credit, overpayment, or prepayment.
Step 1: Record the refund for your customer
You need to first choose +new
After that, opt for expense, add expense or check.
In case you are in a business view, follow the steps to switch to accountant view first.
Now, choose the customer you wish to refund from the payee dropdown
And then, from the payment account dropdown, select the bank account where you deposited the overpayment to.
On the first line of category column, select accounts receivable.
After which, you need to enter how much you want to refund in the amount field
The next step is to enter in other field as you see fit, and choose save and close.
Step 2: Link the refund to the customer’s credit or overpayment
The very first step is to choose +New tab
And then, select receive payment
Also, choose the same customer you used for the check or expense when recording the refund
Enter in the details
And in the outstanding transaction section, go for the checkbox for the expense or check you created when recording the refund.
It should be noted that in case you have automation to apply bill payments turned on, then this step is done for you.
Ensure that the payment is equal to the open balance, and choose save and close.
Recording a customer refund in QuickBooks isn’t a tough nut to crack. We hope that the information shared in above might be of some help in recording refund in QuickBooks successfully. However, in case of any queries, or if you are unable to record refund even after performing the steps above, then in that case, consult our technical support professionals right away by dialing our technical support number i.e., +1-888-510-9198. Our support professionals will provide you with instant guidance.