Did you see a 1330 error when working on QuickBooks? Well, QuickBooks error 1330 is a point of sale error that can be associated with invalid data signature. You can further experience this issue when you try to reinstall QuickBooks POS version 7 on Windows XP. It is crucial to address this issue as soon as possible, as it might further trigger unrecoverable data loss. You will see this error along with a warning indicating stating “Error 1330 Invalid Digital Signature”. Getting rid of this error doesn’t involve any rocket science, it is easy and quick. All you need is to perform a bunch of measures. Let us understand, what actually causes this issue and what measures can help you fix this.
Toward the end of this segment, we believe that you will be able to get rid of QuickBooks error 1330 successfully. Just in case you fail to do so, you can simply connect with our technical support team at +1-888-510-9198, and your queries will be addressed immediately. We are surrounded by a team of certified professionals who work round the clock to provide the best possible support services.
Do you know the process to set up and track inventory in QuickBooks Online plus and advanced? Well, we can help you with that. QuickBooks Online has everything that you need in order to manage your inventory. You can track what’s on hand, and further get alerts when it is time to restock and check insights on what you buy and sell. Not just that, but you can also enter non-inventory products and services so that you can add them to the sales forms quickly. Well, this segment is curated to help you in successfully setting up and tracking inventory in QBO. Thus, make sure to stick around this segment or connect with our technical team at +1-888-510-9198, and our certified ProAdvisors will help you with your queries.
Note: The inventory features are available only for QuickBooks Online Plus and Advanced. Thus, if you have not upgraded to plus or advanced, then upgrade QuickBooks plan to start tracking your inventory.
Steps to set up and track your inventory in QuickBooks Online
Step 1: Turn on Inventory tracking in QuickBooks
In case you haven’t yet, simply turn the settings so that you can add your inventory using the steps below:
The very first step is to head to the settings tab and choose account and settings
After that, choose sales tab
Now, select edit in the products and services section
The next step is to turn on show product/service column on sales forms
You can also turn on price rules in case you wish to set up flexible pricing for the things you sell
After that, turn on both track quantity and price/rate and further track inventory quantity on hand
The user will then have to select save and done
How QuickBooks handles inventory account?
QuickBooks considers the first items you purchase as the first items you sell. Accountants consider this method as first in, first out i.e., FIFO. In case you are not moving from average costing or a product that uses it, then let the IRS know you are switching to FIFO.
Step 2: Add your inventory products
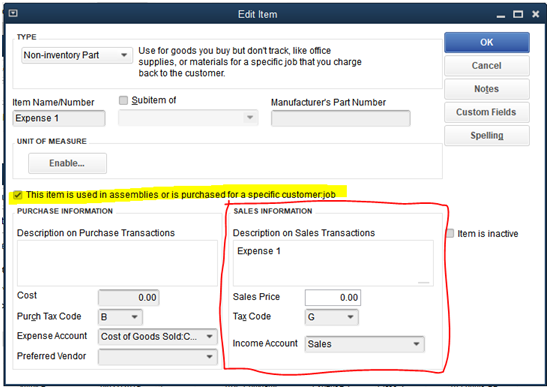
You can simply add your inventory items along with other products and services you sell into QuickBooks. This further lets you quickly add them as line items to sales forms. The steps to add inventory, service items, and non-inventory are different.
Now, add a sales receipt if your customer paid on the spot
Learn how to apply for QuickBooks payments
QuickBooks further decreases what’s on hand by the amount on the invoice or sales receipt.
Check what’s on hand and what’s on order as you work
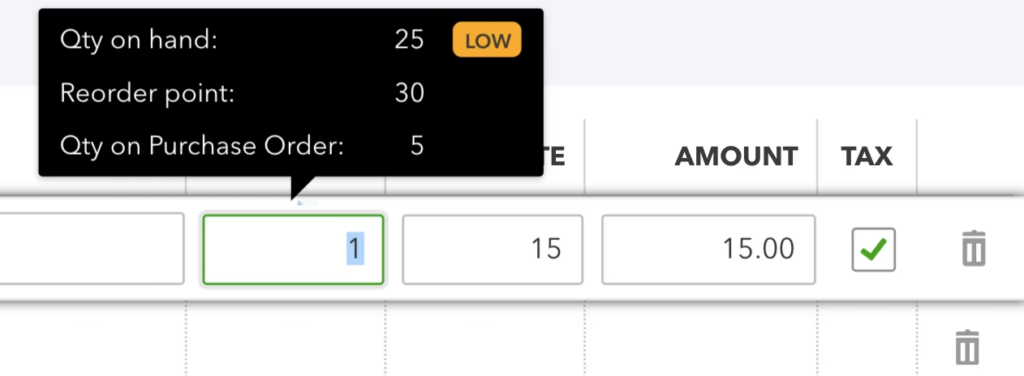
You need to check what’s on hand and what’s still on order, as you work on an invoice, sales receipt, or another type of transaction. You simply need to hover your pointer over the quantity you entered for an item to check for more info.
In case you set reorder points, QuickBooks will also let you know when something’s running low. Also, in case you set a low stock alert, the software will let you know when something’s running low.
Step 4: Restock your inventory
QuickBooks will tell you when it is the time to restock. You can order inventory right in QuickBooks. And further track what you get from vendors and what’s still on order. After you are done, the quantity on hand automatically increases by the number of items you get.
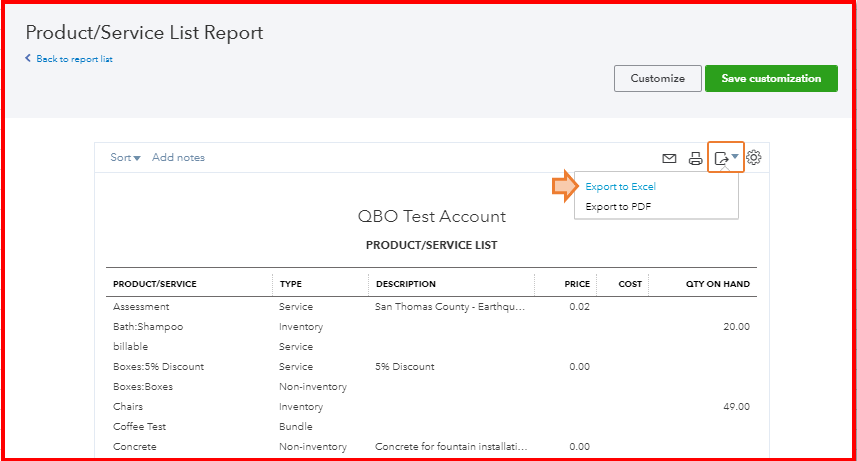
Step 5: Use Reports to Check Status of the Inventory
You need to access the reports to instantly see the best sellers.
Towards the end of this segment, we believe that the information discussed above might be of great help in setting up and inventory tracking in QuickBooks Online. However, if you have any queries, then connecting with our technical support team is suggested. We are a team of certified QB ProAdvisors who work round the clock to provide the best assistance. For more queries dial +1-888-510-9198.
Want to close your books in QuickBooks desktop? Well, this is now possible, as we have curated this segment sharing the complete steps that you can implement to close your books in QuickBooks successfully. You can close your accounting periods to ascertain that old invoices from invoice don’t accidentally update the old accounting periods in QuickBooks. It is possible to close your books at the end of every fiscal year. Also, QuickBooks creates automatic adjustments in preparing for the coming year. To find out the entire procedure to close books in QuickBooks successfully, make sure to read this segment. Or you can further get in touch with our technical support team at +1-888-510-9198.
Year-end adjustments QuickBooks desktop makes automatically
QuickBooks Desktop carries out year-end adjustments based on the fiscal year start month. Let us understand that:
QuickBooks adjusts the income and expense accounts at the end of the year to nullify them and let the user start the new fiscal year with zero net income
QuickBooks further makes an adjustment entry to net income. Like, if the profit for the year was $12000, the equity section of the balance sheet shows a line for a net income of $12000 on the last day of the fiscal year
On the first day of the fiscal year, the QuickBooks increases the retained earning equity account by the previous year’s net income and decreases the net income by the same amount. This will start new fiscal year with a net income of zero.
Important Points to close books in QuickBooks Desktop
Before you close the books, keep a check on the following points:
Advantages to closing the books
Restricted access: The user can create a closing date password in order to restrict access to data from the prior accounting period, that includes the details of every transaction. The user needs to find out the closing date password and have the right permissions to modify or delete transaction in a closed period.
Reporting: Note that the changes made after the closing date to the transactions dated on or before the closing date show in the closing date exception report.
To run the report and move to the report’s menu
Furthermore, select the accountant and taxes and further select the closing data exception report
The closing date history shows the current and past closing dates and the user who set the closing date.
Note that the closing entries are made after recording all the adjusting entries. And when the books are closed, the user isn’t supposed to enter any entry for the fiscal year.
There are certain programs that restrict the user from making any entry even if that entry corrects or makes the books accurate
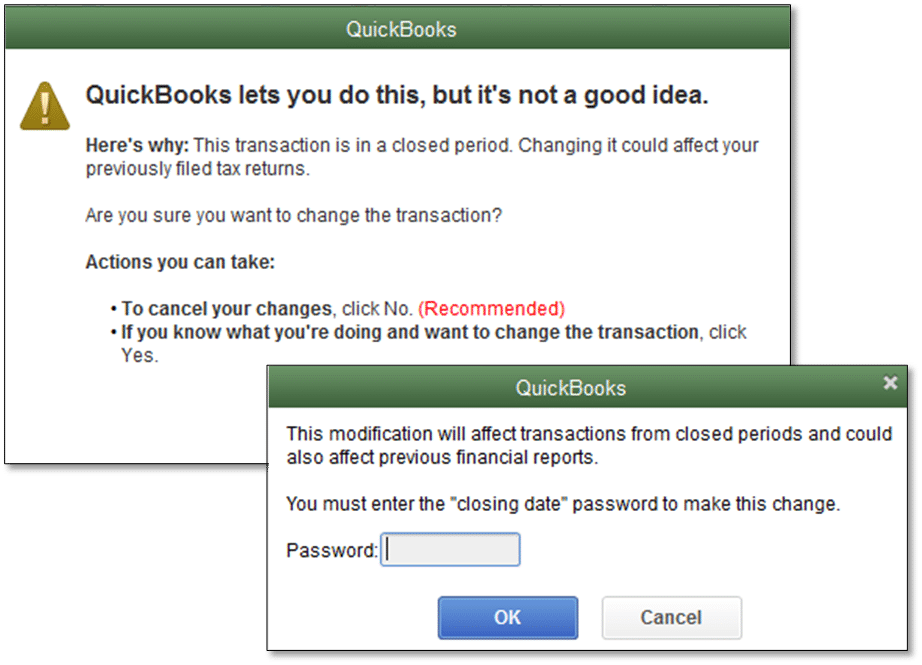
QuickBooks lets the user to enter transaction that affect the balance of the closed fiscal year. But it either tells the user that it isn’t something we recommend or it will ask for the closing date password if you set up one.
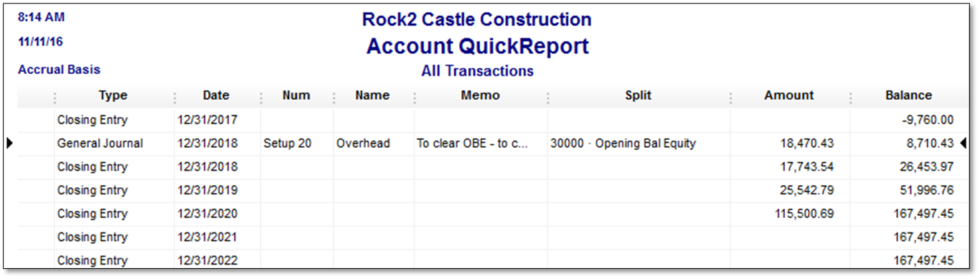
QuickBooks doesn’t have an actual transaction for closing entries that it creates. After you run a report, the program computes the adjustments. However, the user can’t QuickZoom on these transactions. The adjustments are termed as closing entry.
Note that closing entries are the entries made at the end of the fiscal year to transfer the balance from the income and expense account to retained earnings. The user aims at zero out the income and expense accounts, and then add the fiscal year’s net income to retained earnings.
Steps to close the books in QuickBooks Desktop
You can try performing the below steps to close books in QuickBooks easily:
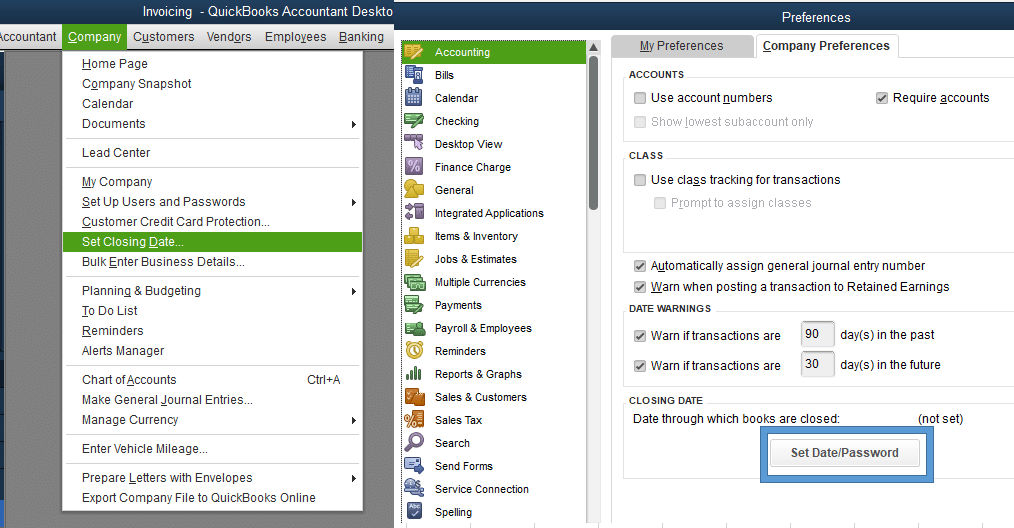
Initiate the process by heading to QuickBooks and further click on edit and preferences tab
Choose accounting tab and select the company preferences tab
The user will then have to click on the set date/password tab.
You need to enter the date you wish the books to be closed and set the password and click on ok tab
After that, the closing date will be set
No invoices edited prior to the particular date will sync into QuickBooks
If an invoice from the closing date or earlier syncs, you will get a notice to let you know that the period is closed
Lastly, the sync process is successful, though the invoice did not get updated in QuickBooks
Now that you know what is the process to close books in QuickBooks desktop, it is time to implement the steps right away. However, if you fail to do so for some reason, then contacting our QuickBooks support professionals might help. You can dial our tech-support number i.e., +1-888-510-9198, and our certified QuickBooks ProAdvisors will help you with your queries.
Want to Sign in to QuickBooks Online Account? We can help you with that. You can use Identity First to sign in to QuickBooks Online. It is designed to make accessing QuickBooks account easily. It combines the sign in and account recovery process. If you are using a new device to sign in, such as a new laptop or even a different browser, and you can’t remember your user ID and password. Till the time you have the email address or phone number, you can use IDF to get the access to the account. To learn further about signing in to QuickBooks Online Account, stick to this segment. Or you can also connect with our technical support team at +1-888-510-9198.
When you sign in QuickBooks Online using a different user ID
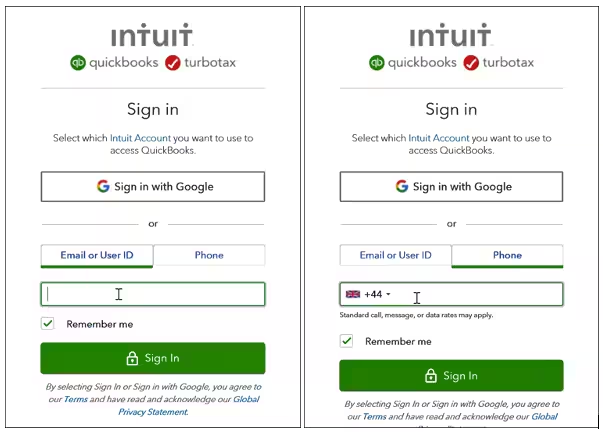
Sign in to QuickBooks Online
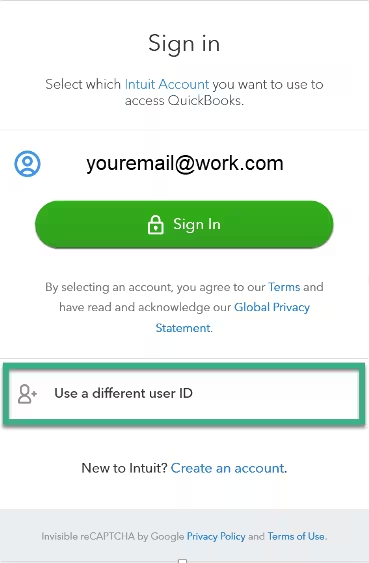
You need to choose use a different user ID
In case you have recently used other Intuit accounts to sign in, they will be present here
After that, enter the email address, user ID, and password or phone number
The next step is to save the sign in information, and choose remember me
Now, select sign in
You will get an email or text message from us containing a 6-digit verification code
Enter the code and choose continue to sign in
In case your phone number isn’t up to date – QuickBooks online sign in
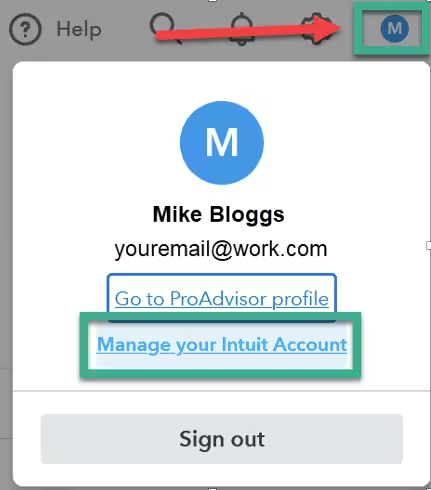
After you are logged in to QuickBooks Online, you can update the phone number, select the blue circle in the top right corner and then manage your Intuit Account.
In case you are unable to recover the account with the options available, you can connect with experts.
Now that you know the steps to sign in to QuickBooks online, make sure to implement these steps. However, if there are any queries or if you need any sort of technical guidance, then connect with our technical support team at +1-888-510-9198. Our technically sound QuickBooks ProAdvisors will provide you with immediate support and assistance.
Did you find incorrect COGS in QuickBooks Desktop when trying to make certain adjustments to profit and loss reports? Well, this error is not a common error, but lately has been reported by a few QuickBooks users. This error basically indicates a particular change in the cost of sold goods. Incorrect COGS can be a bit confusing error for QuickBooks users. Thus, to help you out, we have come up with this segment right here, sharing the complete procedure that can be performed to correct COGS in QuickBooks Desktop and also the reason behind incorrect COGS.
Thus, to learn more about this issue in QuickBooks, make sure to read this segment carefully, or you can also consult our technical support team at +1-888-510-9198, for any sort of further technical guidance.
Initially, move to the sales history section in QuickBooks POS
Followed by, clicking on the I wish option
The next step is to go for the financial details to display option
Then, in case the financial information is sent to QuickBooks successfully, the status will show up, but if there is no option to access the file in QuickBooks, then the entry has likely been erased.
You now have to resend the document available under the next financial exchange option if QuickBooks doesn’t contain the receipt.
Once done with that, deselect the sent checkbox if any receipts show a not sent status and if the option to mark this document as successfully sent is opted.
The last step is to click on ok and end the process.
Method 2: Delete any changes causing the incorrect cogs in QuickBooks error
You need to observe if there are any faulty changes. If there are any, you can try performing the below steps to delete any changes made.
The very first step is to right-click any column header and select Customize columns
Once done with that, you need to select inventory and go for quantity adjustment history
The next step is to enter the incorrect amount in the diff cost column and also make necessary quantity adjustments after adding the diff cost to the choose column list.
After that, you need to click on the save tab
Also, double-click the edited entry and go for I want to, along with clicking on check it.
You now have to follow the same steps to check the cost adjustments by opting to view the financial history.
Open it in QuickBooks and then go for the inventory and finally click on the cost adjustment history.
Any wrong alteration can be undone by the user, by simply clicking on I wish to and also opting for a reverse memo from Qty adjustment or cost adjustment history.
In order to avoid the COGS error in QuickBooks, it is essential to correctly set up the cost of items and preferences sold in QuickBooks. If the account is set incorrectly, then one might have to choose the item list. And also select the correct COGS account corresponding to each item.
Method 4: Fix the cost input of items to correct cogs in QuickBooks
You need to perform the below steps to double-check the input cost of items. The major cause of the error can be the incorrect entry of the cost items. This can be fixed by checking and configuring the input cost of the items.
To begin with, you need to go for the column heading for the ext cost column. Also, match it to the item name.
Also, note that the names of the items with a value of 0.00 or an inaccurate quantity, before moving on to the next stage.
The next step is to click on the inventory and further click on the item list
After that, select each item and click on edit.
You now have to take the number of items sold from the history report and multiply it by the item’s cost.
Coming to the end of this segment, we believe that the reader might be able to understand the reasons why the correct COGS in QuickBooks error shows up. Along with that, the measures can be taken to successfully culminate the issue. Just in case you come across the same issue again and again, then connecting with our QuickBooks technical support team at +1-888-510-9198 is suggested. Our certified ProAdvisors will ensure to answer all your queries immediately and make sure that you do not face the same error again.