Trying to merge customers in QuickBooks and don’t know what the right procedure to do it is? Well, this segment solves all your queries and confusions. Note that if you enter the same item twice with different names, you can merge them and keep the lists accurate. QuickBooks lets users successfully combine customers in QuickBooks by performing some basic set of steps. To learn further about how to merge customers in QuickBooks, stick around this piece of writing. However, if you do not want to perform these steps on your own and need any sort of technical guidance, then in that case, give us a call at +1-888-510-9198, and our QuickBooks support team will ensure to answer all your queries immediately.
Also Read: How to Merge Vendors in QuickBooks?
Essential points to consider
A bunch of points should be kept in mind before you perform the steps to merge customers in QuickBooks. Let us have a look:
- Back up the company file in QuickBooks Desktop for Windows or Mac.
- Another point is to switch to single-user mode, in case you are using Multi-user mode in QuickBooks.
- You further need to clear any pending accountant changes.
- Make sure that multicurrency is not turned on in QuickBooks for Windows.
- Further, ensure that the suppliers to merge don’t include:
- Tax authorities
- Tax-exempt
- Paid through online banking
- Direct deposit suppliers
You might find this helpful: Intuit Customer File Exchange – Upload and download files
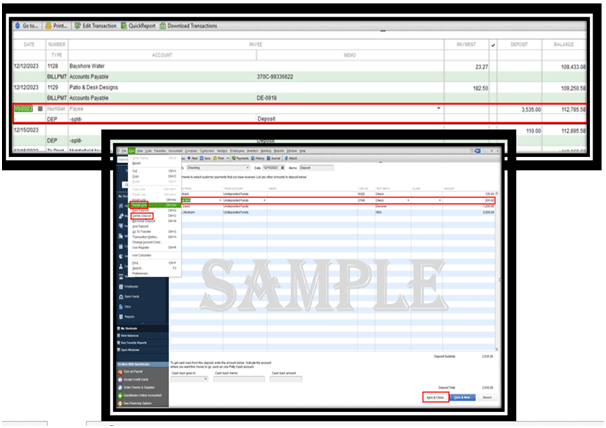
Steps for deleting payment or deposit against customer before merging
- You need to initially open QuickBooks and further click on the list at the top menu bar and click on Chart of Accounts in QuickBooks.
- You are then required to double-click the account and double-click the deposit to delete the specific payment.

- The next step is to click on edit and further click on delete line.
Once done with that you need to delete the deposit and payments against the customer, you can carry out the below steps to merge the customers.
Steps to merge two customers in QuickBooks
- Begin with opening QuickBooks and enter the credentials. You now have to right-click on the name of the customer that you want to merge with the other customer.
- Before merging, you need to make the job a parent customer. This can be done by placing the cursor on the top of the small diamond symbol left to the name of the job and then dragging it to the left side.
- You now have to right-click on the name of the customer and click on edit customer.
- Replace the name of the customer with the new name. And then click on ok tab.
- Click on the ok tab and click on yes once a prompt appears for proceeding for merging.
After you are done with merging two customers, you will have to re-process the payment that you deleted earlier.
- Click on the customer menu and click on receive payment.
- The next step is to choose the customer by clicking on received from the drop-down menu.
- Put a checkmark next to the invoice you want to apply the payment to.
- And the last step is to select a payment method and click on the save and close tab.
Also Read: How to Delete a Company in QuickBooks?
Conclusion!
Merging list entries in QuickBooks isn’t a tough nut to crack, especially when you unleash the right steps. Hopefully, reading this segment might help you in some way to successfully merge lists in QuickBooks. Just in case, you have any queries left unanswered, then in that case connecting with our QuickBooks technical support team at +1-888-510-9198 is recommended. We are a team of certified QuickBooks professionals who work around the clock to provide immediate support and guidance.
Other Related Articles:
How to Download and Install Trial Version of QuickBooks Desktop (30-days trial)
QuickBooks Tool Hub Download, Fix QuickBooks Error
QBWC1039: Fix QuickBooks Web Connector Error
How To Fix QuickBooks Online Login Problems On Google Chrome?


